Apollo数据同步源码分析
本文基于
shenyu-2.6.1版本进行源码分析,官网的介绍请参考 数据同步原理 。
Admin管理端
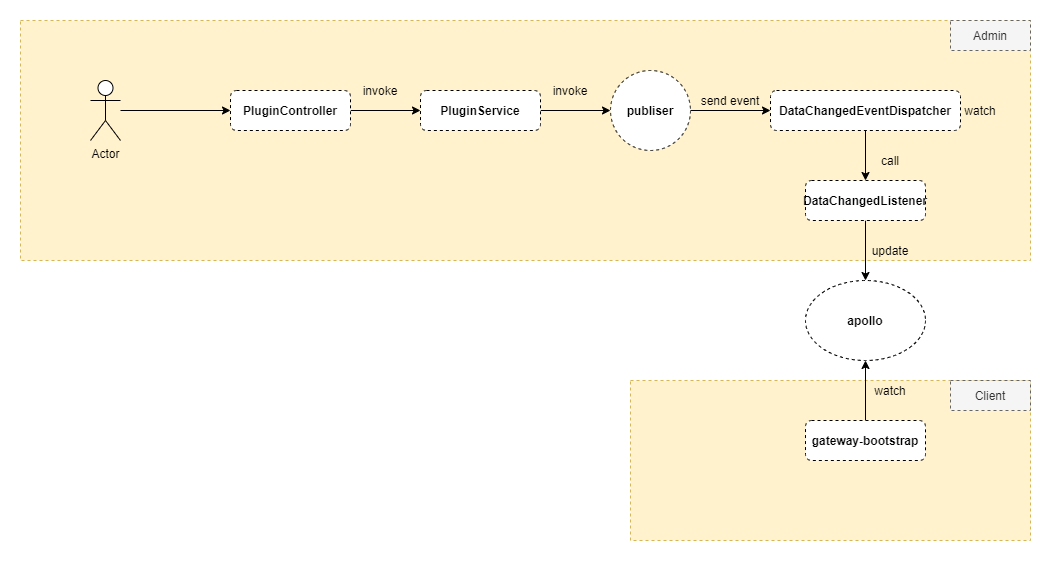
以新增插件的流程来理解下整体的流程
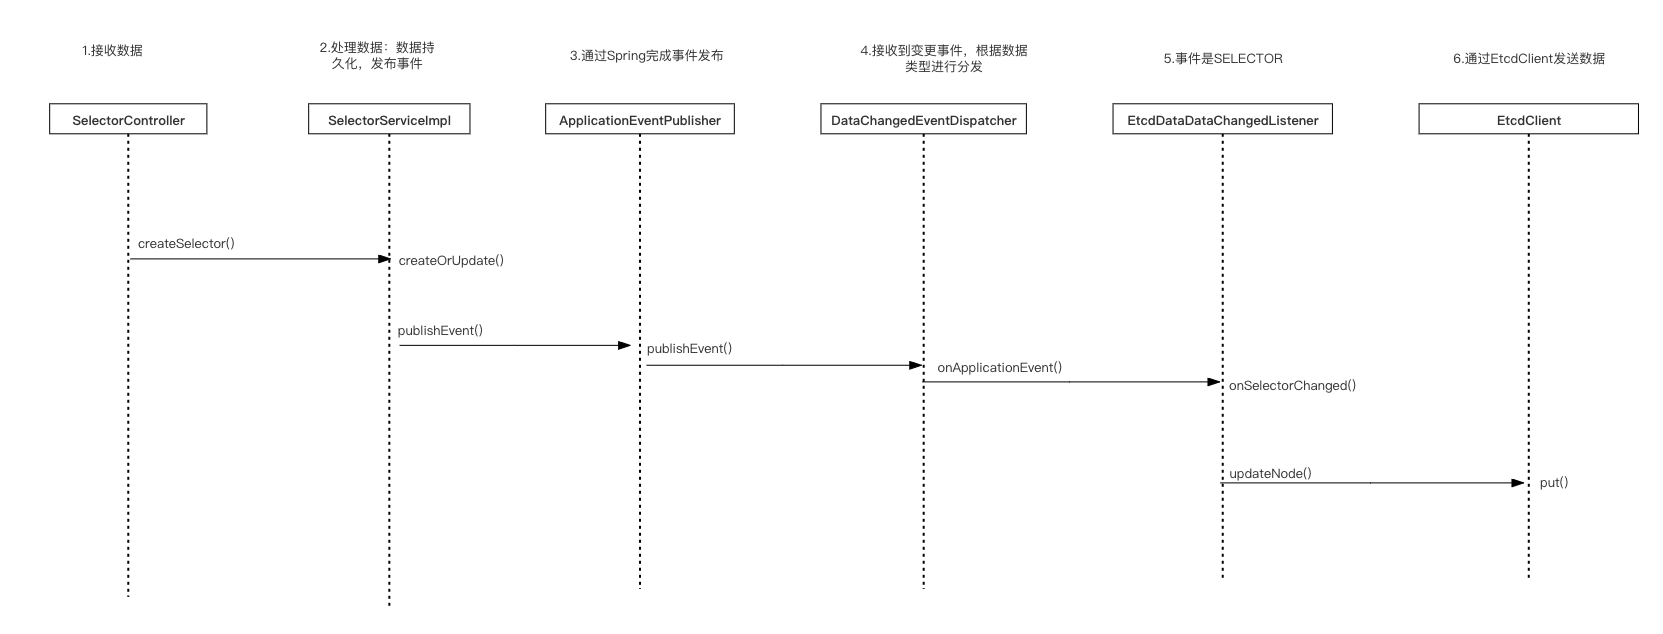
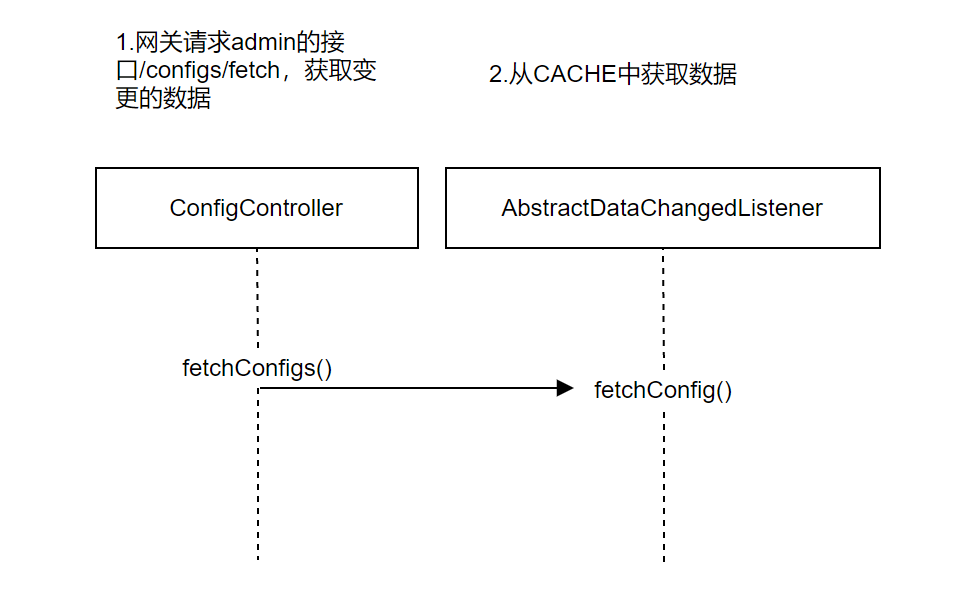
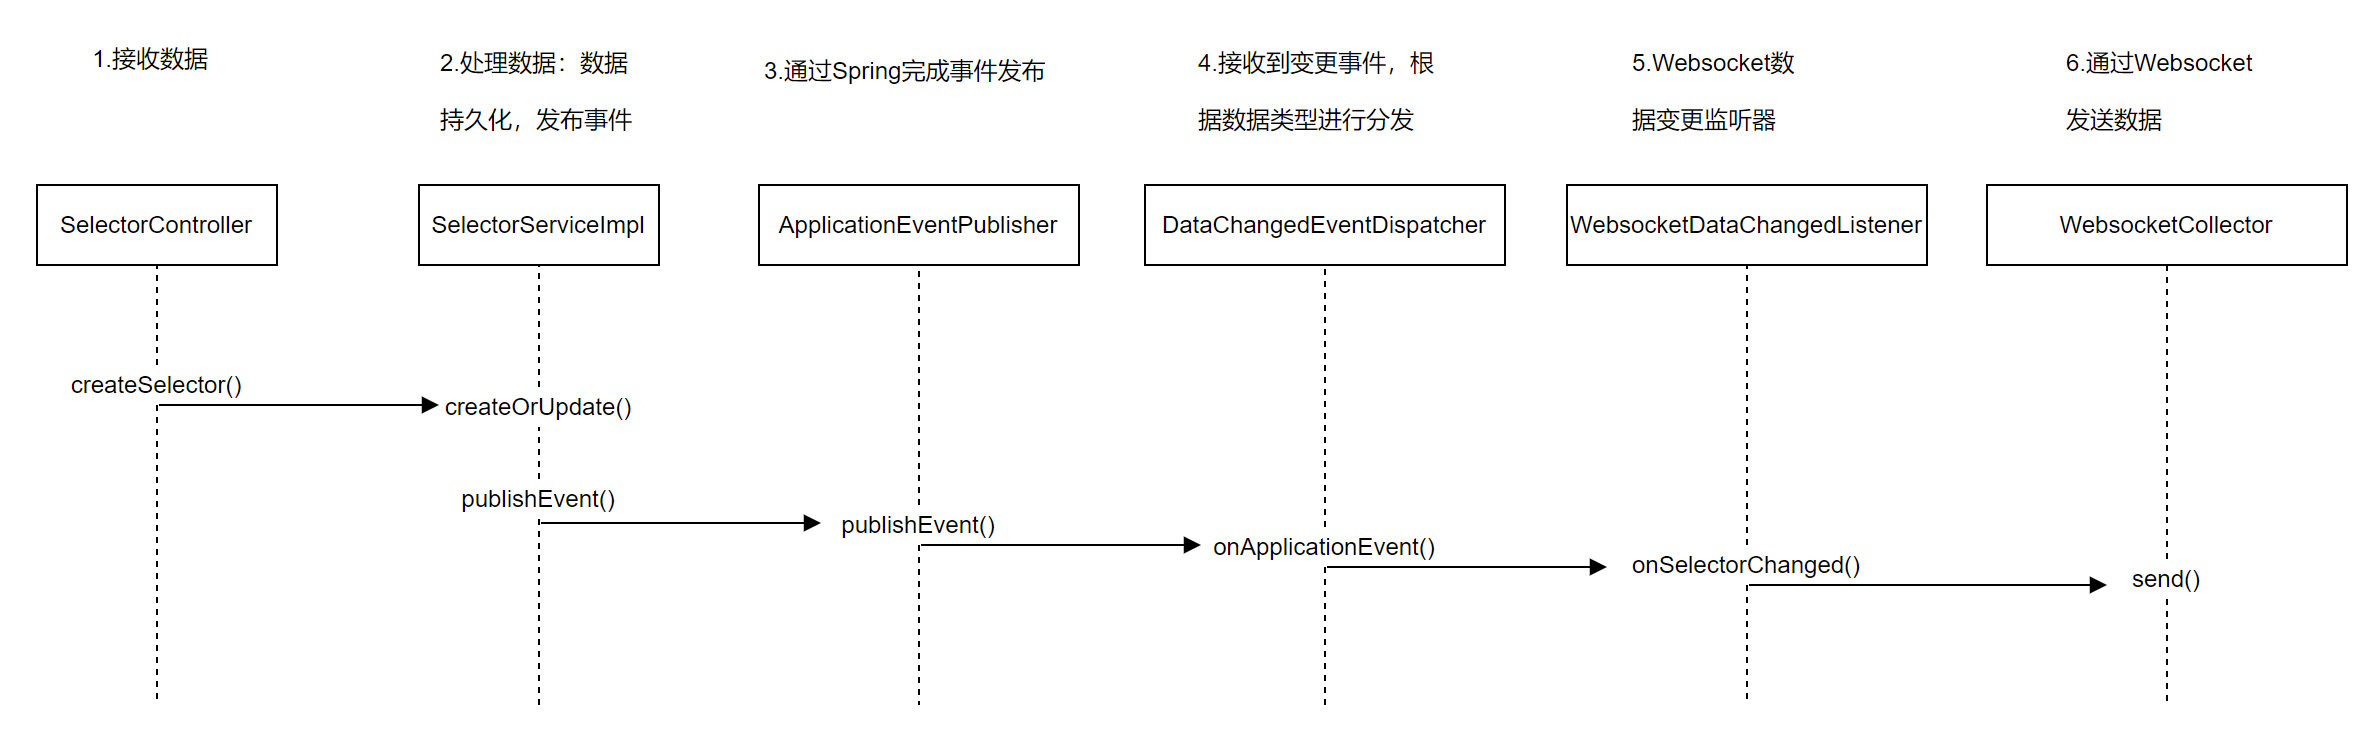
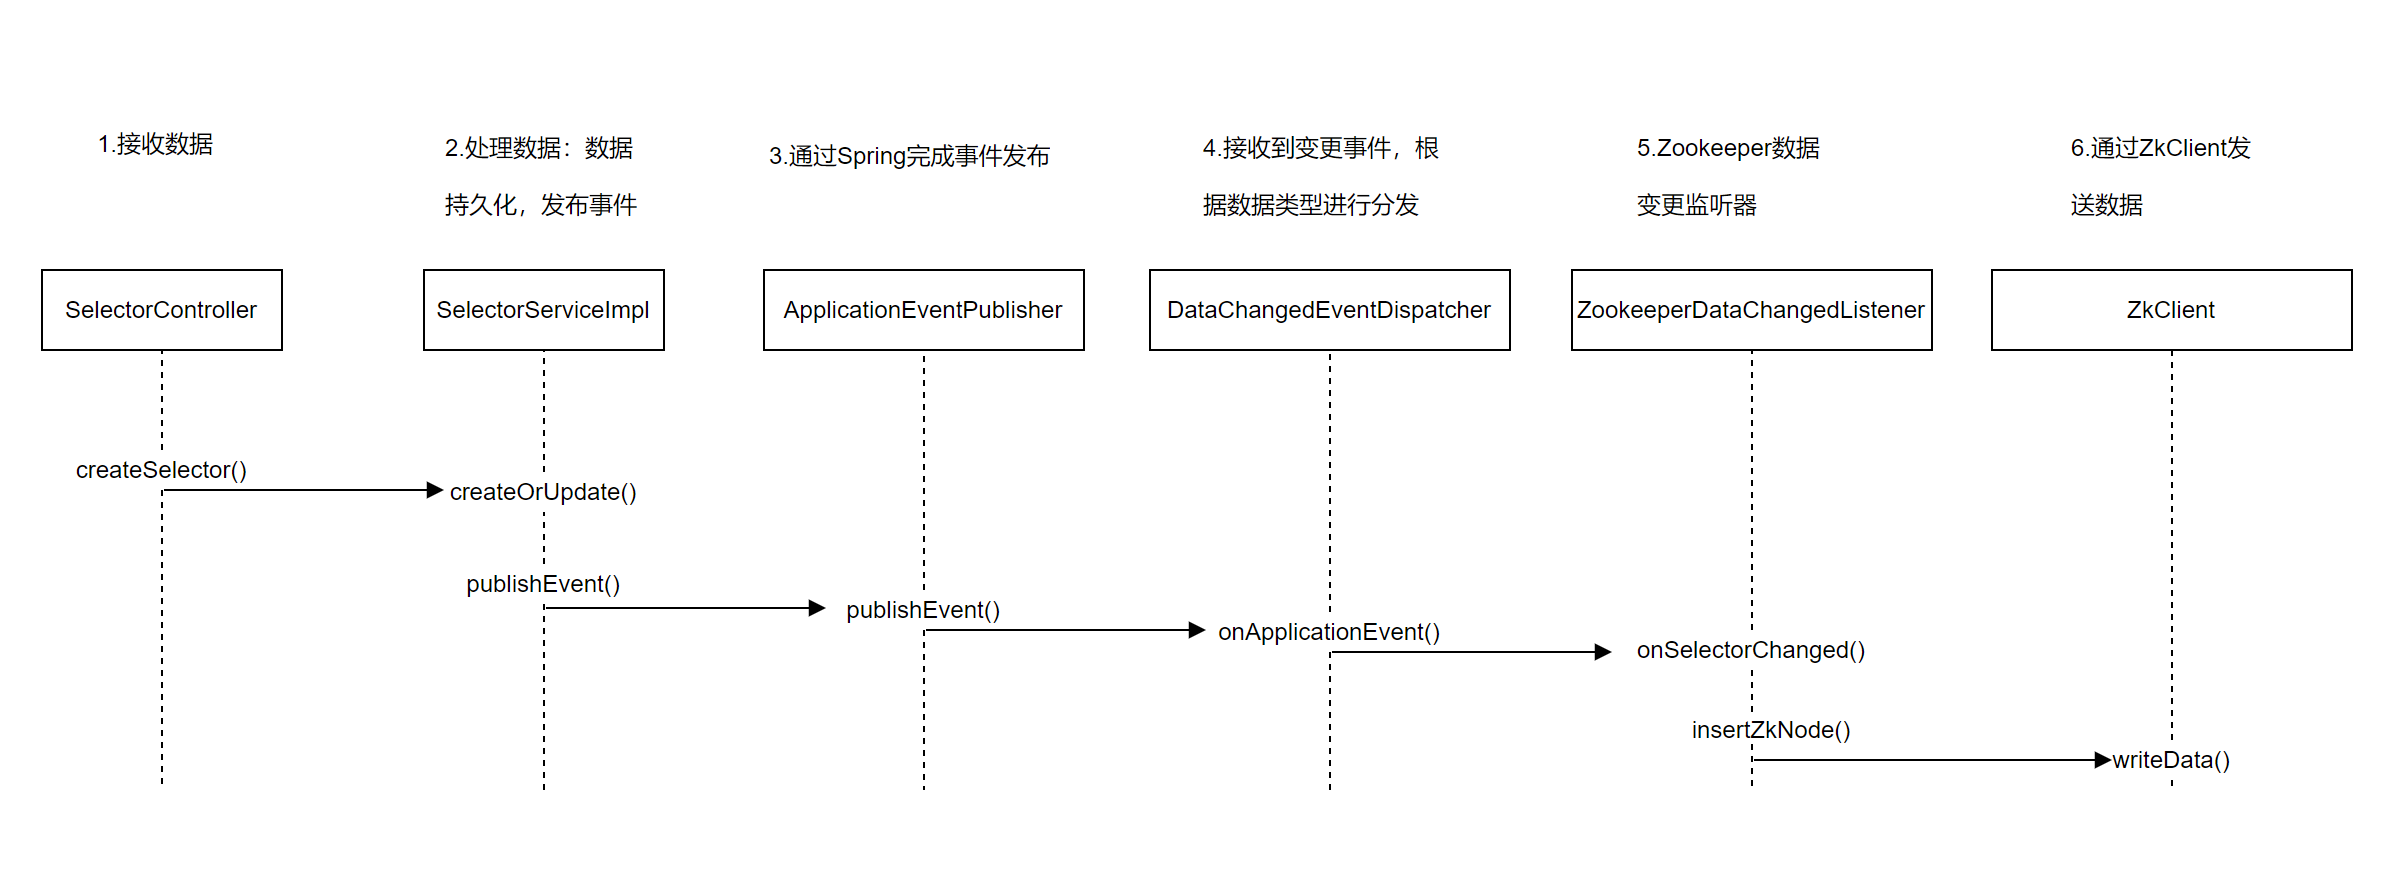
接收数据
- PluginController.createPlugin()
进入PluginController类中的createPlugin()方法,它负责数据的校验,添加或更新数据,返回结果信息。
@Validated
@RequiredArgsConstructor
@RestController
@RequestMapping("/plugin")
public class PluginController {

  @PostMapping("")
  @RequiresPermissions("system:plugin:add")
  public ShenyuAdminResult createPlugin(@Valid @ModelAttribute final PluginDTO pluginDTO) {
      // 调用pluginService.createOrUpdate 进行处理逻辑
      return ShenyuAdminResult.success(pluginService.createOrUpdate(pluginDTO));
  }

    // ......
}
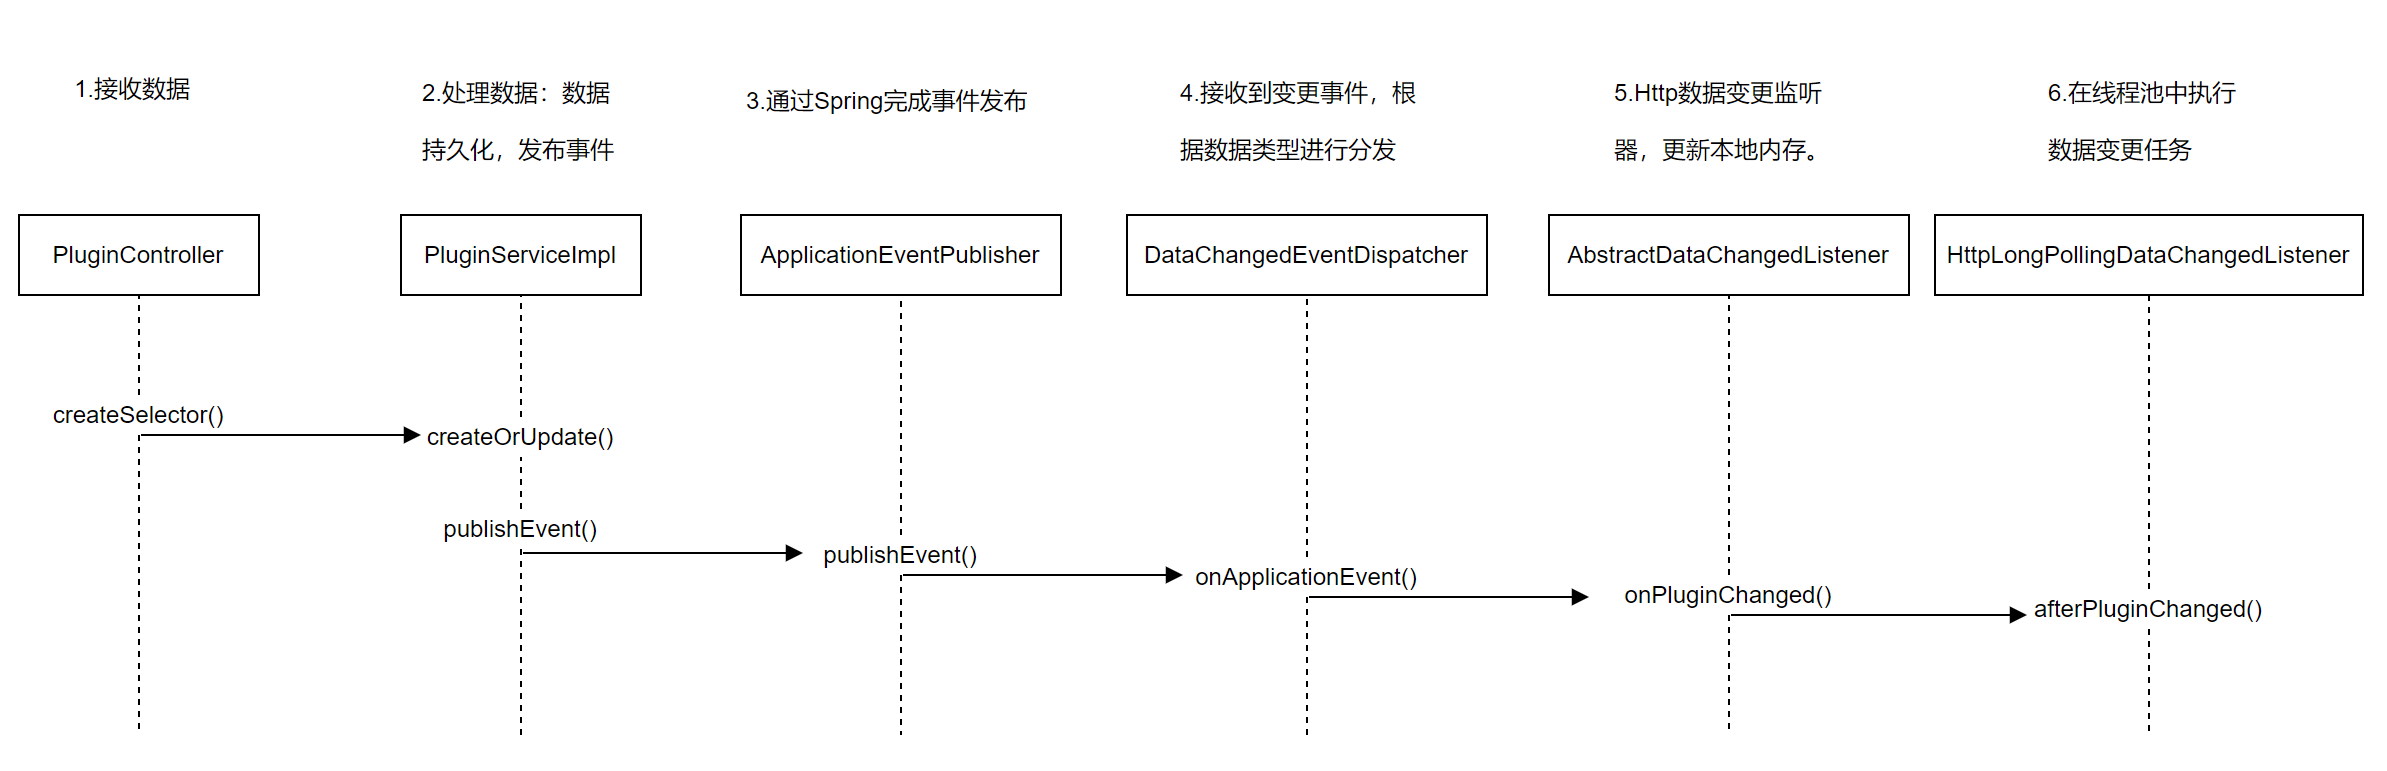
处理数据
- PluginServiceImpl.createOrUpdate() -> PluginServiceImpl.create()
在PluginServiceImpl类中通过create()方法完成数据的转换,保存到数据库,发布事件。
@RequiredArgsConstructor
@Service
public class PluginServiceImpl implements SelectorService {
    // 事件发布对象 pluginEventPublisher
    private final PluginEventPublisher pluginEventPublisher;

   private String create(final PluginDTO pluginDTO) {
      // 判断有没有对应的插件
      Assert.isNull(pluginMapper.nameExisted(pluginDTO.getName()), AdminConstants.PLUGIN_NAME_IS_EXIST);
      // 自定义的插件jar
      if (!Objects.isNull(pluginDTO.getFile())) {
        Assert.isTrue(checkFile(Base64.decode(pluginDTO.getFile())), AdminConstants.THE_PLUGIN_JAR_FILE_IS_NOT_CORRECT_OR_EXCEEDS_16_MB);
      }
      // 创建plugin对象
      PluginDO pluginDO = PluginDO.buildPluginDO(pluginDTO);
      // 插入对象到数据库
      if (pluginMapper.insertSelective(pluginDO) > 0) {
        // 插件新增成功,则发布创建事件
        // publish create event. init plugin data
        pluginEventPublisher.onCreated(pluginDO);
      }
      return ShenyuResultMessage.CREATE_SUCCESS;
  }


    // ......

}
在PluginServiceImpl类完成数据的持久化操作,即保存数据到数据库,并通过 pluginEventPublisher 进行发布事件。
pluginEventPublisher.onCreateed方法的逻辑是:发布变更的事件。
    @Override
public void onCreated(final PluginDO plugin) {
        // 发布DataChangeEvent事件:事件分组(插件、选择器、规则)、事件类型(创建、删除、更新)、变更的数据
        publisher.publishEvent(new DataChangedEvent(ConfigGroupEnum.PLUGIN, DataEventTypeEnum.CREATE,
        Collections.singletonList(PluginTransfer.INSTANCE.mapToData(plugin))));
        // 发布PluginCreatedEvent
        publish(new PluginCreatedEvent(plugin, SessionUtil.visitorName()));
}
发布变更数据通过publisher.publishEvent()完成,这个publisher对象是一个ApplicationEventPublisher类,这个类的全限定名是org.springframework.context.ApplicationEventPublisher。看到这儿,我们知道了发布数据是通过Spring相关的功能来完成的。
关于
ApplicationEventPublisher:当有状态发生变化时,发布者调用
ApplicationEventPublisher的publishEvent方法发布一个事件,Spring容器广播事件给所有观察者,调用观察者的onApplicationEvent方法把事件对象传递给观察者。调用publishEvent方法有两种途径,一种是实现接口由容器注入ApplicationEventPublisher对象然后调用其方法,另一种是直接调用容器的方法,两种方法发布事件没有太大区别。
ApplicationEventPublisher:发布事件;ApplicationEvent:Spring事件,记录事件源、时间和数据;ApplicationListener:事件监听者,观察者;
在Spring的事件发布机制中,有三个对象,
一个是发布事件的ApplicationEventPublisher,在ShenYu中通过构造器注入了一个eventPublisher。
另一个对象是ApplicationEvent,在ShenYu中通过DataChangedEvent继承了它,表示事件对象。
public class DataChangedEvent extends ApplicationEvent {
//......
}
最后一个是 ApplicationListener,在ShenYu中通过DataChangedEventDispatcher类实现了该接口,作为事件的监听者,负责处理事件对象。
@Component
public class DataChangedEventDispatcher implements ApplicationListener<DataChangedEvent>, InitializingBean {

    //......

}
分发数据
- DataChangedEventDispatcher.onApplicationEvent()
当事件发布完成后,会自动进入到DataChangedEventDispatcher类中的onApplicationEvent()方法,进行事件处理。
@Component
public class DataChangedEventDispatcher implements ApplicationListener<DataChangedEvent>, InitializingBean {
/**
* 有数据变更时,调用此方法
* @param event
*/
@Override
@SuppressWarnings("unchecked")
public void onApplicationEvent(final DataChangedEvent event) {
// 遍历数据变更监听器(这里只会注册ApolloDataChangedListener)
for (DataChangedListener listener : listeners) {
// 依据不同的分组类型进行转发
switch (event.getGroupKey()) {
case APP_AUTH: // 认证信息
listener.onAppAuthChanged((List<AppAuthData>) event.getSource(), event.getEventType());
break;
case PLUGIN: // 插件事件
// 调用注册的listener对象
listener.onPluginChanged((List<PluginData>) event.getSource(), event.getEventType());
break;
case RULE: // 规则事件
listener.onRuleChanged((List<RuleData>) event.getSource(), event.getEventType());
break;
case SELECTOR: // 选择器事件
listener.onSelectorChanged((List<SelectorData>) event.getSource(), event.getEventType());
break;
case META_DATA: // 元数据事件
listener.onMetaDataChanged((List<MetaData>) event.getSource(), event.getEventType());
break;
case PROXY_SELECTOR: // 代理选择器事件
listener.onProxySelectorChanged((List<ProxySelectorData>) event.getSource(), event.getEventType());
break;
case DISCOVER_UPSTREAM: // 注��册发现下游列表事件
listener.onDiscoveryUpstreamChanged((List<DiscoverySyncData>) event.getSource(), event.getEventType());
applicationContext.getBean(LoadServiceDocEntry.class).loadDocOnUpstreamChanged((List<DiscoverySyncData>) event.getSource(), event.getEventType());
break;
default:
throw new IllegalStateException("Unexpected value: " + event.getGroupKey());
}
}
}
}
当有数据变更时,调用onApplicationEvent方法,然后遍历所有数据变更监听器,判断是哪种数据类型,交给相应的数据监听器进行处理。
ShenYu将所有数据进行了分组,一共会有以下种:认证信息、插件信息、规则信息、选择器信息、元数据、代理选择器、发现下游事件。
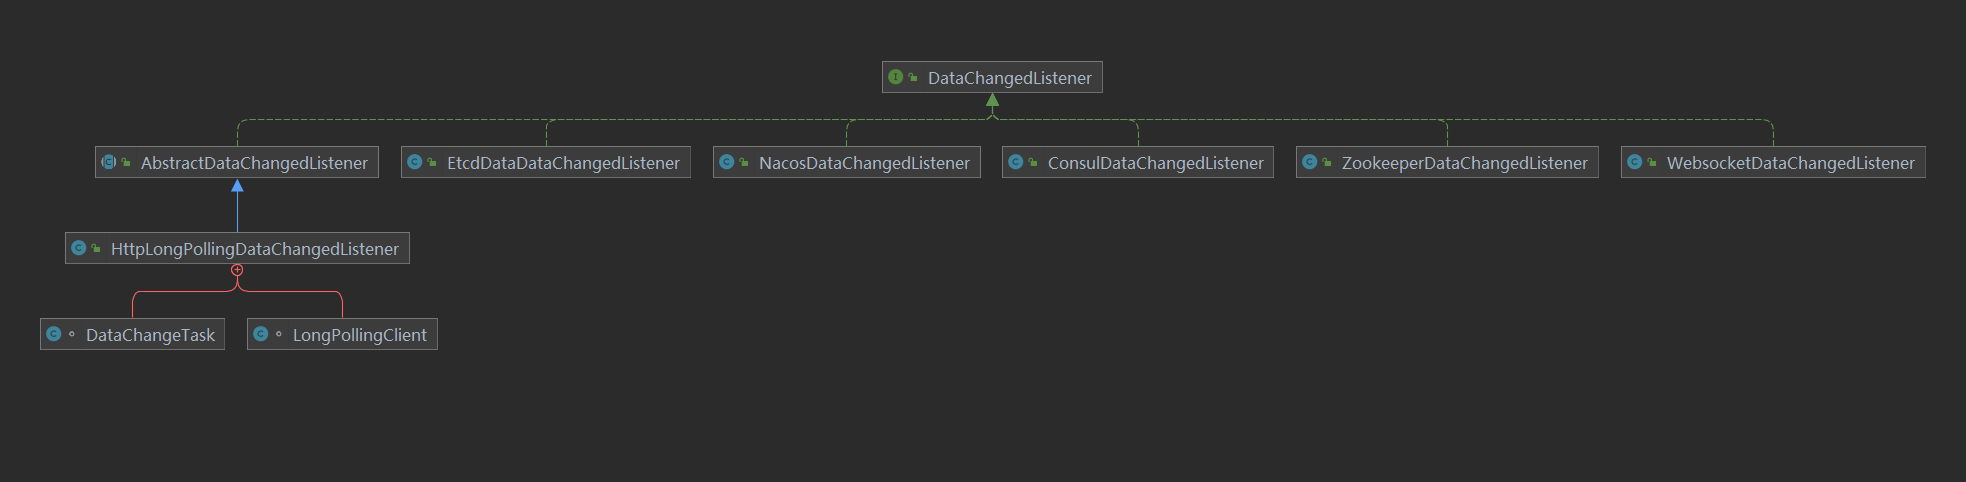
这里的数据变更监听器(DataChangedListener),就是数据同步策略的抽象,由特定的实现来处理,而不同的监听由不同的实现来处理,当前分析的是Apollo来
监听,所以这里只关注 ApolloDataChangedListener。
// 继承AbstractNodeDataChangedListener
public class ApolloDataChangedListener extends AbstractNodeDataChangedListener {

}
ApolloDataChangedListener 继承了 AbstractNodeDataChangedListener 类,该类主要是以key作为存储方式的基类,如apollo、nacos等,其他的如zookeeper、
consul、etcd 等是以path的方式进行分层级来查找的。
// 以key作为查找存储方式的基类
public abstract class AbstractNodeDataChangedListener implements DataChangedListener {

    protected AbstractNodeDataChangedListener(final ChangeData changeData) {
      this.changeData = changeData;
    }
}
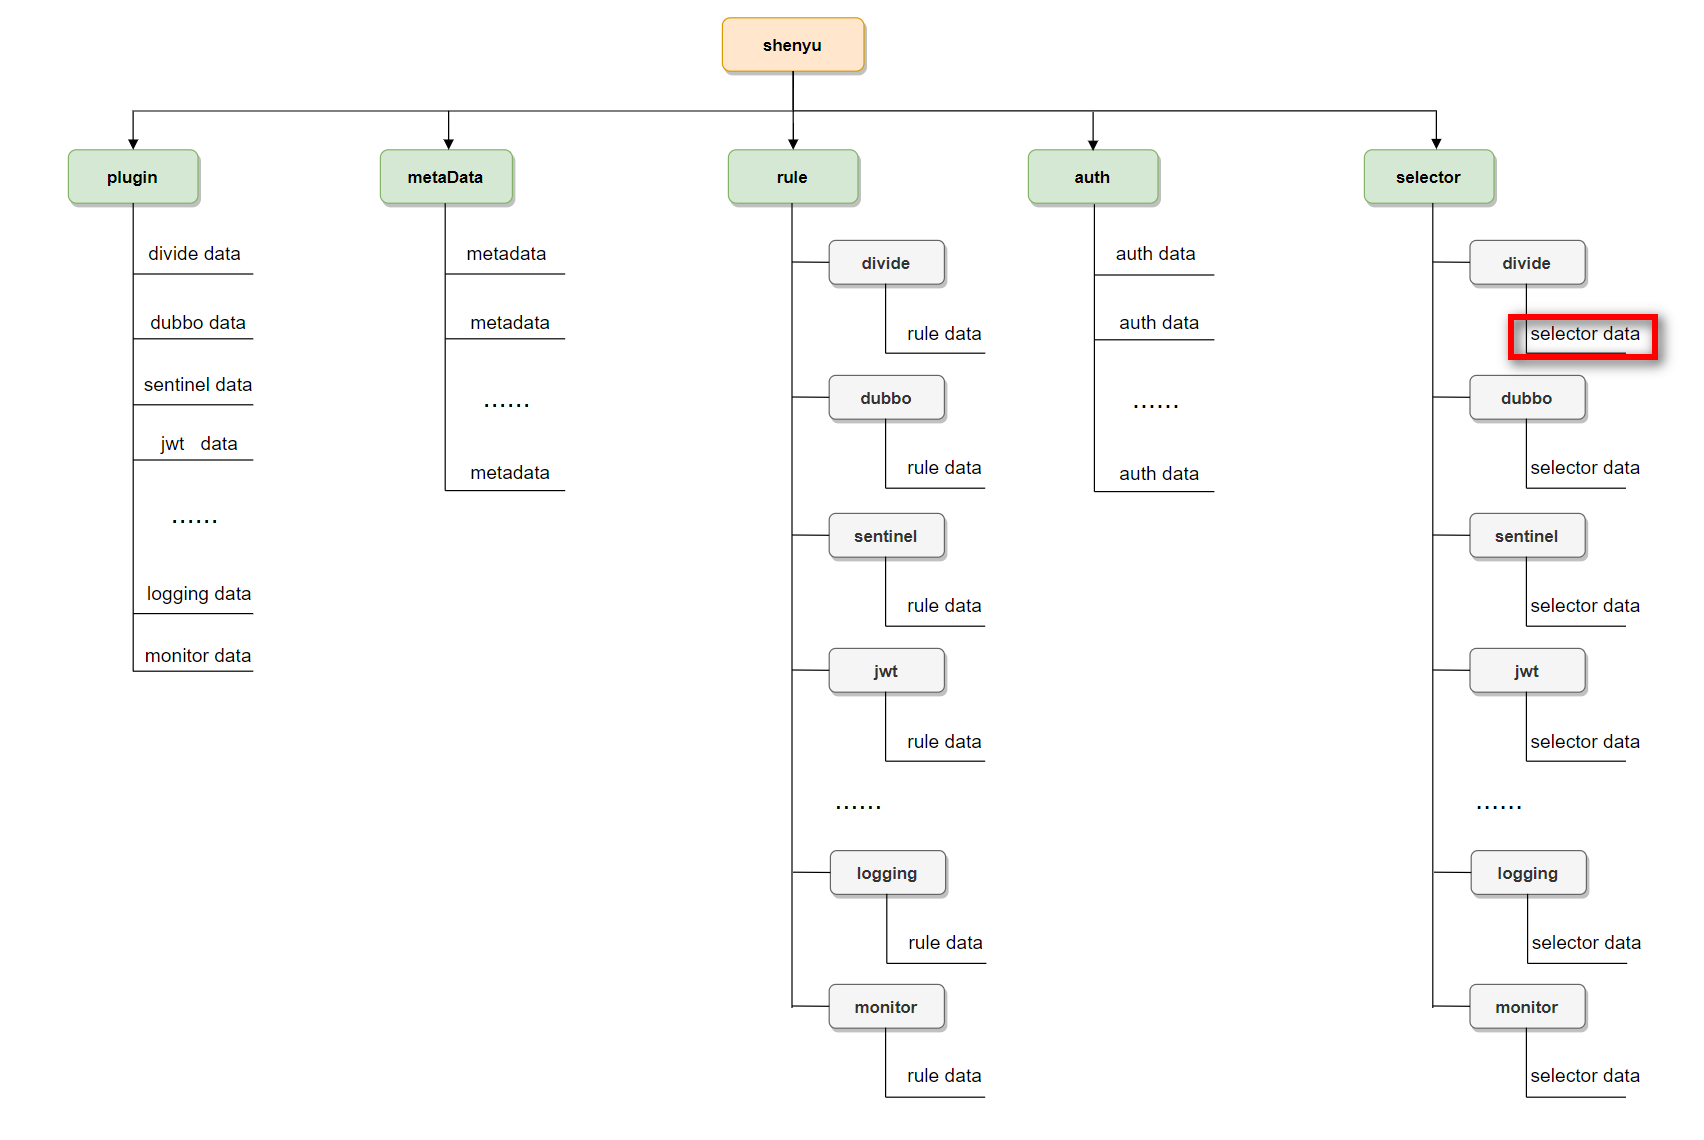
AbstractNodeDataChangedListener 接收 ChangeData作为参数,该对象定义了存储于Apollo中的各个数据的key命名,存储于Apollo中的数据包括以下数据:
- 插件(plugin)
- 选择器(selector)
- 规则(rule)
- 授权(auth)
- 元数据(meta)
- 代理选择器(proxy.selector)
- 下游列表(discovery)
这些信息由ApolloDataChangedListener构造器指定:
public class ApolloDataChangedListener extends AbstractNodeDataChangedListener {
  public ApolloDataChangedListener(final ApolloClient apolloClient) {
    // 配置几类分组数据的前缀
    super(new ChangeData(ApolloPathConstants.PLUGIN_DATA_ID,
            ApolloPathConstants.SELECTOR_DATA_ID,
            ApolloPathConstants.RULE_DATA_ID,
            ApolloPathConstants.AUTH_DATA_ID,
            ApolloPathConstants.META_DATA_ID,
            ApolloPathConstants.PROXY_SELECTOR_DATA_ID,
            ApolloPathConstants.DISCOVERY_DATA_ID));
    // 操作apollo的对象
    this.apolloClient = apolloClient;
  }
}
DataChangedListener 定义了以下几个方法:
// 数据变更监听器
public interface DataChangedListener {

    // 授权信息变更时调用
    default void onAppAuthChanged(List<AppAuthData> changed, DataEventTypeEnum eventType) {
    }

    // 插件信息变更时调用
    default void onPluginChanged(List<PluginData> changed, DataEventTypeEnum eventType) {
    }

    // 选择器信息变更时调用
    default void onSelectorChanged(List<SelectorData> changed, DataEventTypeEnum eventType) {
    }

     // 元数据信息变更时调用
    default void onMetaDataChanged(List<MetaData> changed, DataEventTypeEnum eventType) {

    }

    // 规则信息变更时调用
    default void onRuleChanged(List<RuleData> changed, DataEventTypeEnum eventType) {
    }

    // 代理选择器变更时调用
    default void onProxySelectorChanged(List<ProxySelectorData> changed, DataEventTypeEnum eventType) {
    }
    // 发现下游信息变更时调用
    default void onDiscoveryUpstreamChanged(List<DiscoverySyncData> changed, DataEventTypeEnum eventType) {
    }

}
由 DataChangedEventDispatcher处理插件时,调用方法 listener.onPluginChanged, 接下来分析下对象的逻辑,实现由AbstractNodeDataChangedListener处理:
public abstract class AbstractNodeDataChangedListener implements DataChangedListener {
  @Override
  public void onPluginChanged(final List<PluginData> changed, final DataEventTypeEnum eventType) {
    // 配置前缀为plugin.
    final String configKeyPrefix = changeData.getPluginDataId() + DefaultNodeConstants.JOIN_POINT;
    this.onCommonChanged(configKeyPrefix, changed, eventType, PluginData::getName, PluginData.class);
    LOG.debug("[DataChangedListener] PluginChanged {}", configKeyPrefix);
  }
}
首先构建配置数据的key前缀为:plugin., 再调用onCommonChanged统一处理:
private <T> void onCommonChanged(final String configKeyPrefix, final List<T> changedList,
                                     final DataEventTypeEnum eventType, final Function<? super T, ? extends String> mapperToKey,
                                     final Class<T> tClass) {
        // Avoiding concurrent operations on list nodes
        final ReentrantLock reentrantLock = listSaveLockMap.computeIfAbsent(configKeyPrefix, key -> new ReentrantLock());
        try {
            reentrantLock.lock();
            // 当前传入的插件列表
            final List<String> changeNames = changedList.stream().map(mapperToKey).collect(Collectors.toList());
            switch (eventType) {
                // 删除操作
                case DELETE:
                    // 按 plugin.${pluginName} 进行删除
                    changedList.stream().map(mapperToKey).forEach(removeKey -> {
                        delConfig(configKeyPrefix + removeKey);
                    });
                    // 从plugin.list中移除对应的插件名称
                    // plugin.list 记录下了目前启用的列表
                    delChangedData(configKeyPrefix, changeNames);
                    break;
                case REFRESH:
                case MYSELF:
                    // 重载逻辑
                    // 获取plugin.list中的所有插件列表
                    final List<String> configDataNames = this.getConfigDataNames(configKeyPrefix);
                    // 依次更新当前调整的每个插件
                    changedList.forEach(changedData -> {
                        // 发布配置
                        publishConfig(configKeyPrefix + mapperToKey.apply(changedData), changedData);
                    });
                    // 目前存储的列表中,如果数据比当前传入的多,则删除多余的数据
                    if (configDataNames != null && configDataNames.size() > changedList.size()) {
                        // 踢除当前加载的数据
                        configDataNames.removeAll(changeNames);
                        // 逐个删除已经取消的数据
                        configDataNames.forEach(this::delConfig);
                    }
                    // 重新更新列表数据
                    publishConfig(configKeyPrefix + DefaultNodeConstants.LIST_STR, changeNames);
                    break;
                default:
                    // 新增或是更新
                    changedList.forEach(changedData -> {
                        publishConfig(configKeyPrefix + mapperToKey.apply(changedData), changedData);
                    });
                    // 将新加的插件更新
                    putChangeData(configKeyPrefix, changeNames);
                    break;
            }
        } catch (Exception e) {
            LOG.error("AbstractNodeDataChangedListener onCommonMultiChanged error ", e);
        } finally {
            reentrantLock.unlock();
        }
    }
在以上逻辑,其实包含全量重载(REFRESH、MYSELF)与增量(DELETE、UPDATE、CREATE)的处理
在插件中主要包含两个节点:
plugin.list当前生效的插件列表plugin.${plugin.name}具体插件的详细信息 最后,将这两个节点对应的数据写入Apollo。
数据初始化
当admin启动后,会将当前的数据信息全量同步到apollo中,由ApolloDataChangedInit实现:
// 继承AbstractDataChangedInit
public class ApolloDataChangedInit extends AbstractDataChangedInit {
    // apollo操作对象
    private final ApolloClient apolloClient;

    public ApolloDataChangedInit(final ApolloClient apolloClient) {
        this.apolloClient = apolloClient;
    }

    @Override
    protected boolean notExist() {
        // 判断 plugin、auth、meta、proxy.selector等节点是否存在
        // 只要有一个不存在,则进入重新加载(这些节点不会创建,为什么要判断一次呢?)
        return Stream.of(ApolloPathConstants.PLUGIN_DATA_ID, ApolloPathConstants.AUTH_DATA_ID, ApolloPathConstants.META_DATA_ID, ApolloPathConstants.PROXY_SELECTOR_DATA_ID).allMatch(
                this::dataIdNotExist);
    }

    /**
     * Data id not exist boolean.
     *
     * @param pluginDataId the plugin data id
     * @return the boolean
     */
    private boolean dataIdNotExist(final String pluginDataId) {
        return Objects.isNull(apolloClient.getItemValue(pluginDataId));
    }
}
判断apollo中是否存在数据,如果不存在,则进行同步。
这里有一个bug, 因为这里判断的key,在同步时,并不会创建,则会导致每次重启时都重新加载数据,已提PR#5435
ApolloDataChangedInit实现了CommandLineRunner接口。它是springboot提供的接口,会在所有 Spring Beans初��始化之后执行run()方法,常用于项目中初始化的操作。
- SyncDataService.syncAll()
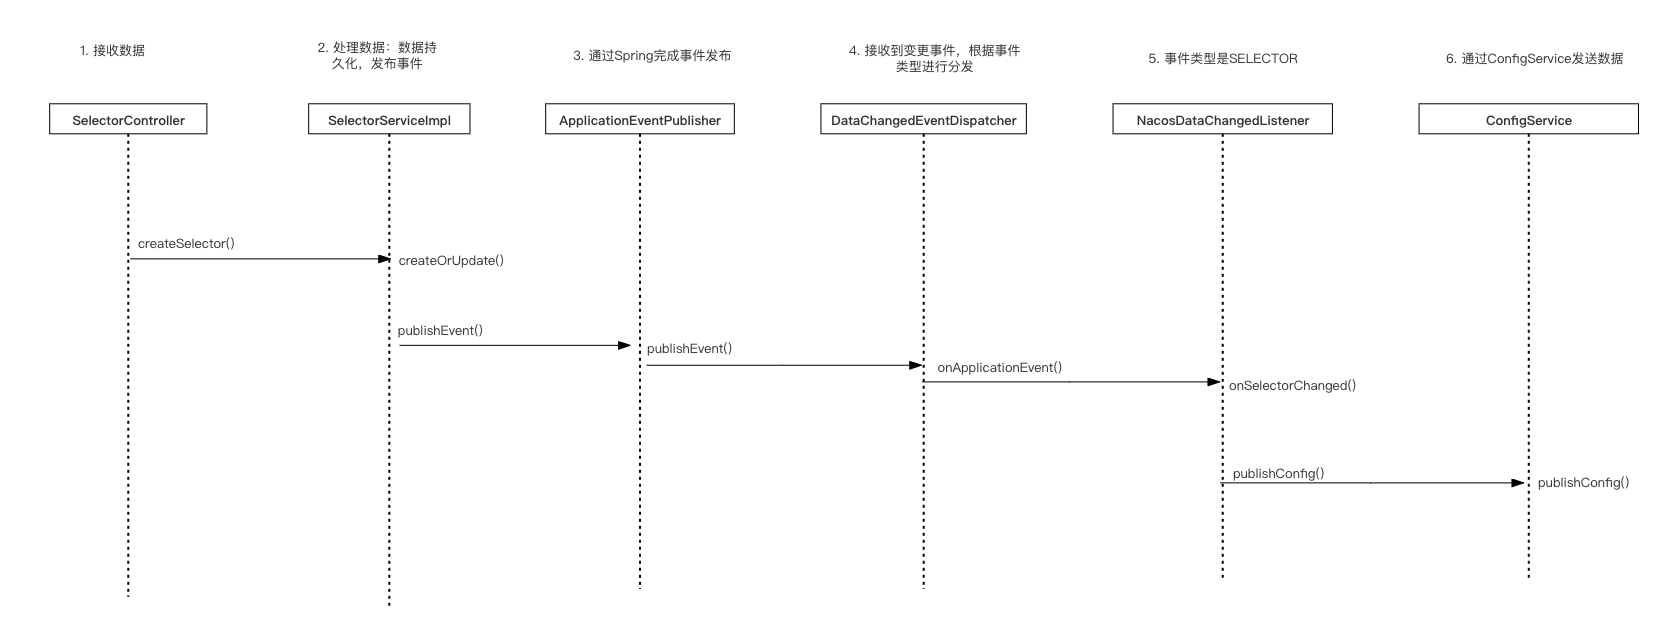
从数据库查询数据,然后进行全量数据同步,所有的认证信息、插件信息、规则信息、选择器信息、元数据、代理选择器、发现下游事件。主要是通过eventPublisher发布同步事件,eventPublisher通过publishEvent()发布完事件后,有ApplicationListener执行事件变更操作,在ShenYu中就是前面提到的DataChangedEventDispatcher。
@Service
public class SyncDataServiceImpl implements SyncDataService {
    // 事件发布
    private final ApplicationEventPublisher eventPublisher;

     /***
     * 全量数据同步
     * @param type the type
     * @return
     */
     @Override
     public boolean syncAll(final DataEventTypeEnum type) {
         // 同步auth数据
         appAuthService.syncData();
         // 同步插件数据
         List<PluginData> pluginDataList = pluginService.listAll();
         // 通过spring发布/订阅机制进行通知订阅者(发布DataChangedEvent)
         // 统一由DataChangedEventDispatcher进行监听
         // DataChangedEvent带上了配置分组类型、当前操作类型、数据
         eventPublisher.publishEvent(new DataChangedEvent(ConfigGroupEnum.PLUGIN, type, pluginDataList));
         // 同步选择器
         List<SelectorData> selectorDataList = selectorService.listAll();
         eventPublisher.publishEvent(new DataChangedEvent(ConfigGroupEnum.SELECTOR, type, selectorDataList));
         // 同步规则
         List<RuleData> ruleDataList = ruleService.listAll();
         eventPublisher.publishEvent(new DataChangedEvent(ConfigGroupEnum.RULE, type, ruleDataList));
         //元数据
         metaDataService.syncData();
         // 下游列表
         discoveryService.syncData();
         return true;
     }

}
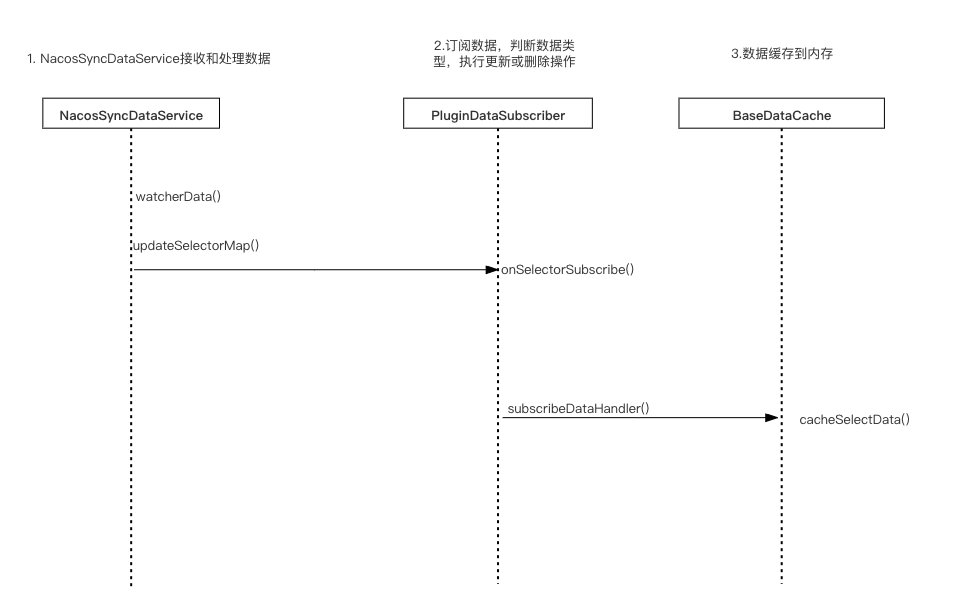
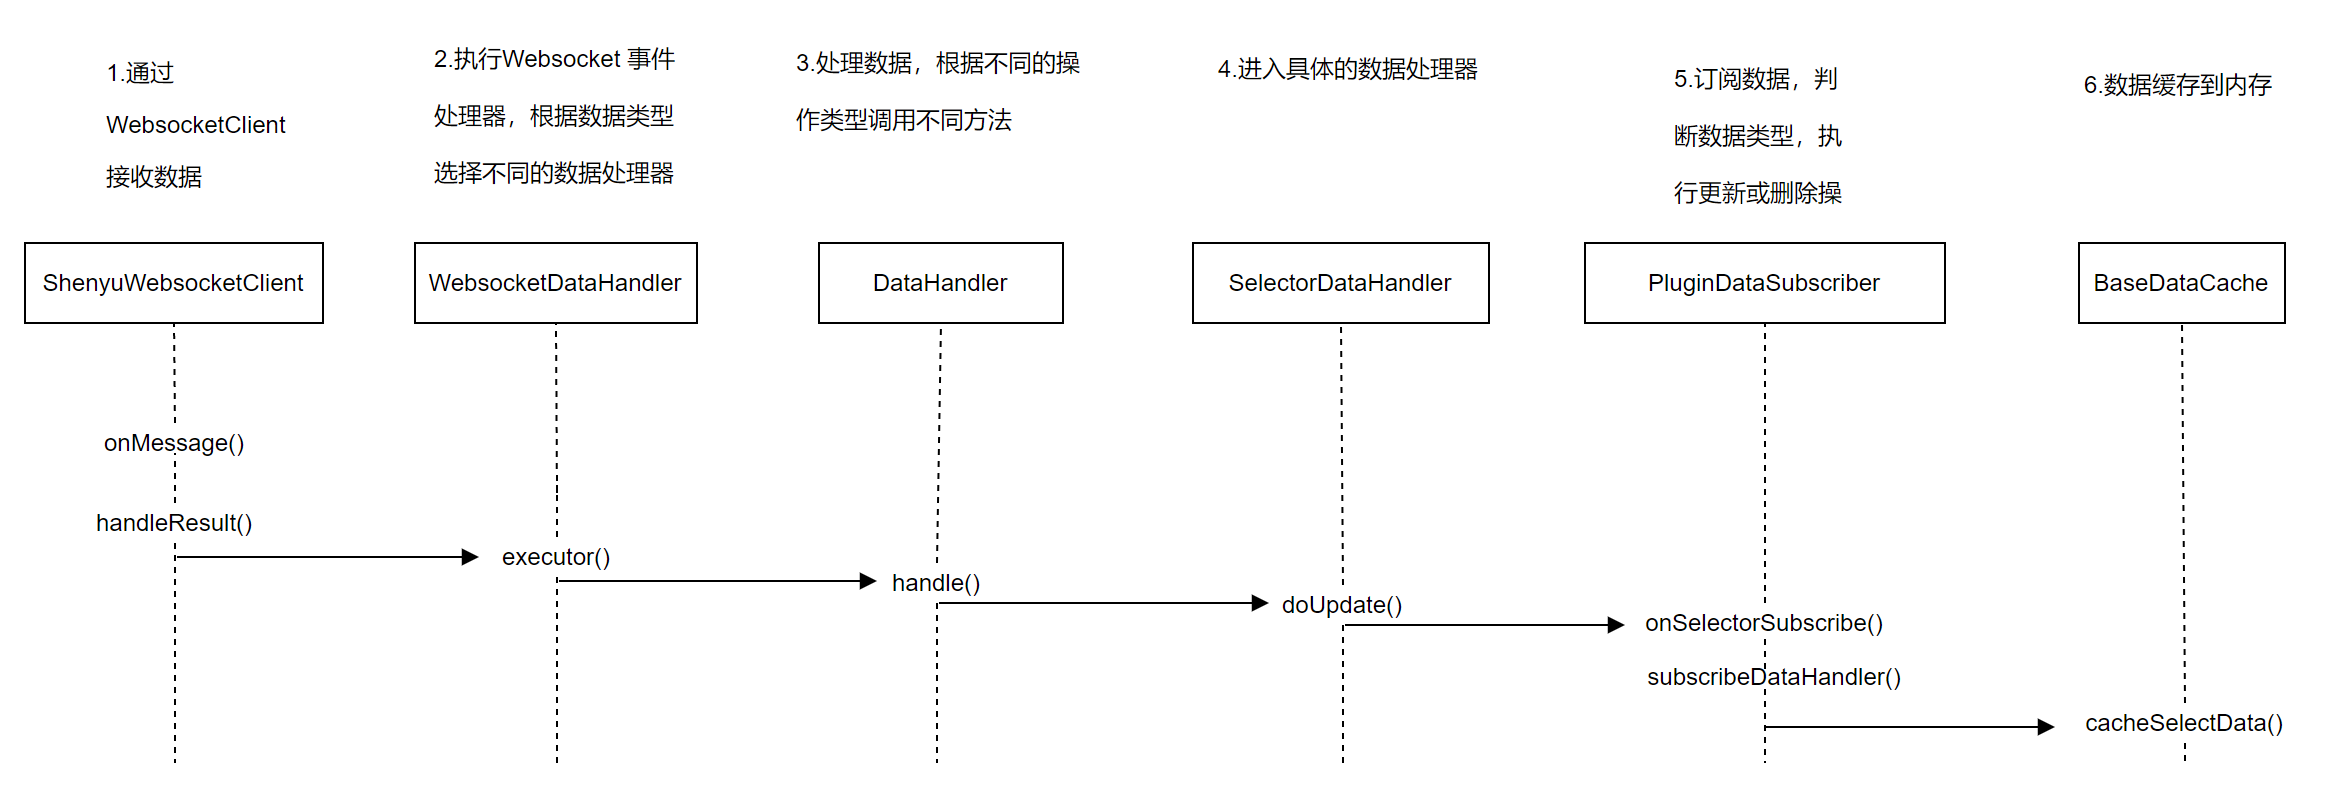
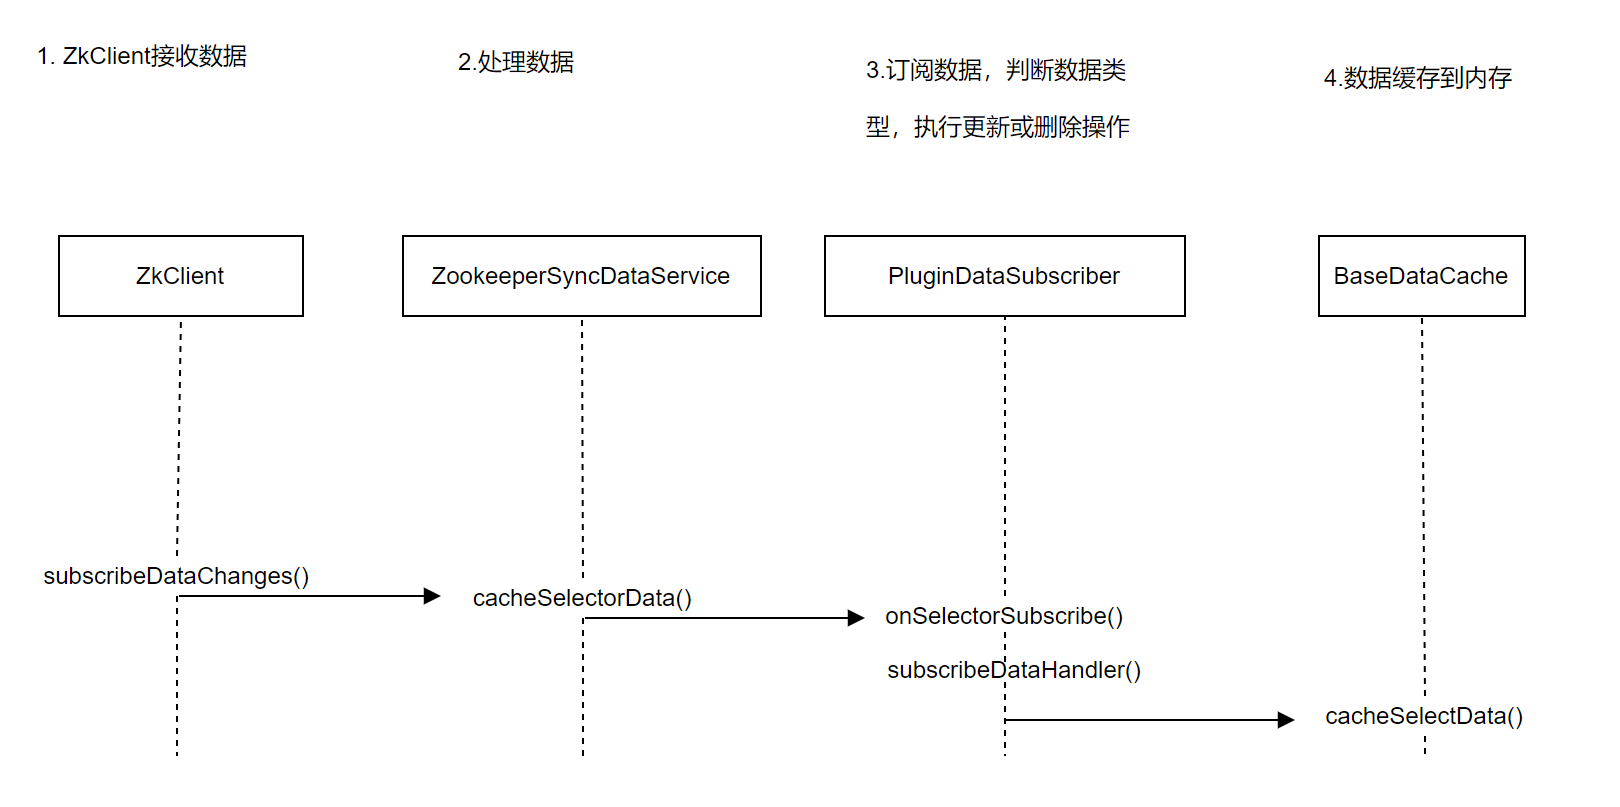
bootstrap同步操作初始化
网关这边的数据同步初始化操作主要是订阅apollo中的节点,当有数据变更时,收到变更数据。这依赖于apollo的listener机制。在ShenYu中,负责apollo数据同步的是ApolloDataService。
ApolloDataService的功能逻辑是在实例化的过程中完成的:对apollo中的shenyu数据同步节点完成订阅。通过configService.addChangeListener()方法实现;
public class ApolloDataService extends AbstractNodeDataSyncService implements SyncDataService {
    public ApolloDataService(final Config configService, final PluginDataSubscriber pluginDataSubscriber,
                             final List<MetaDataSubscriber> metaDataSubscribers,
                             final List<AuthDataSubscriber> authDataSubscribers,
                             final List<ProxySelectorDataSubscriber> proxySelectorDataSubscribers,
                             final List<DiscoveryUpstreamDataSubscriber> discoveryUpstreamDataSubscribers) {
        // 配置监听的前缀
        super(new ChangeData(ApolloPathConstants.PLUGIN_DATA_ID,
                        ApolloPathConstants.SELECTOR_DATA_ID,
                        ApolloPathConstants.RULE_DATA_ID,
                        ApolloPathConstants.AUTH_DATA_ID,
                        ApolloPathConstants.META_DATA_ID,
                        ApolloPathConstants.PROXY_SELECTOR_DATA_ID,
                        ApolloPathConstants.DISCOVERY_DATA_ID),
                pluginDataSubscriber, metaDataSubscribers, authDataSubscribers, proxySelectorDataSubscribers, discoveryUpstreamDataSubscribers);
        this.configService = configService;
        // 开始监听
        // 注:Apollo该方法,只负责获取apollo的数据获取,并添加到本地缓存中,不处理监听
        startWatch();
        // 配置监听
        apolloWatchPrefixes();
    }
}
首先配置需要处理的key信息,同admin同步的key。接着调用startWatch() 方法进行处理数据获取与监听。但对于Apollo的实现中,该方法只负责处理数据的获取并设置到本地缓存中。
监听由apolloWatchPrefixes方法来处理
private void apolloWatchPrefixes() {
// 定义监听器
final ConfigChangeListener listener = changeEvent -> {
changeEvent.changedKeys().forEach(changeKey -> {
try {
final ConfigChange configChange = changeEvent.getChange(changeKey);
// 未变更则跳过
if (configChange == null) {
LOG.error("apollo watchPrefixes error configChange is null {}", changeKey);
return;
}
final String newValue = configChange.getNewValue();
// skip last is "list"
// 如果是list结尾的Key,如plugin.list则跳过,因为这里只是记录生效的一个列表,不会在本地缓存中
final int lastListStrIndex = changeKey.length() - DefaultNodeConstants.LIST_STR.length();
if (changeKey.lastIndexOf(DefaultNodeConstants.LIST_STR) == lastListStrIndex) {
return;
}
// 如果是plugin.开头 => 处理插件数据
if (changeKey.indexOf(ApolloPathConstants.PLUGIN_DATA_ID) == 0) {
// 删除
if (PropertyChangeType.DELETED.equals(configChange.getChangeType())) {
// 清除缓存
unCachePluginData(changeKey);
} else {
// 更新缓存
cachePluginData(newValue);
}
// 如果是selector.开头 => 处理选择器数据
} else if (changeKey.indexOf(ApolloPathConstants.SELECTOR_DATA_ID) == 0) {
if (PropertyChangeType.DELETED.equals(configChange.getChangeType())) {
unCacheSelectorData(changeKey);
} else {
cacheSelectorData(newValue);
}
// 如果是rule.开头 => 处理规则数据
} else if (changeKey.indexOf(ApolloPathConstants.RULE_DATA_ID) == 0) {
if (PropertyChangeType.DELETED.equals(configChange.getChangeType())) {
unCacheRuleData(changeKey);
} else {
cacheRuleData(newValue);
}
// 如果是auth.开头 => 处理授权数据
} else if (changeKey.indexOf(ApolloPathConstants.AUTH_DATA_ID) == 0) {
if (PropertyChangeType.DELETED.equals(configChange.getChangeType())) {
unCacheAuthData(changeKey);
} else {
cacheAuthData(newValue);
}
// 如果是meta.开头 => 处理元数据
} else if (changeKey.indexOf(ApolloPathConstants.META_DATA_ID) == 0) {
if (PropertyChangeType.DELETED.equals(configChange.getChangeType())) {
unCacheMetaData(changeKey);
} else {
cacheMetaData(newValue);
}
// 如果是proxy.selector.开头 => 处理代理选择器数据
} else if (changeKey.indexOf(ApolloPathConstants.PROXY_SELECTOR_DATA_ID) == 0) {
if (PropertyChangeType.DELETED.equals(configChange.getChangeType())) {
unCacheProxySelectorData(changeKey);
} else {
cacheProxySelectorData(newValue);
}
// 如果是discovery.开�头 => 处理下游列表数据
} else if (changeKey.indexOf(ApolloPathConstants.DISCOVERY_DATA_ID) == 0) {
if (PropertyChangeType.DELETED.equals(configChange.getChangeType())) {
unCacheDiscoveryUpstreamData(changeKey);
} else {
cacheDiscoveryUpstreamData(newValue);
}
}
} catch (Exception e) {
LOG.error("apollo sync listener change key handler error", e);
}
});
};
watchConfigChangeListener = listener;
// 添加监听
configService.addChangeListener(listener, Collections.emptySet(), ApolloPathConstants.pathKeySet());
}
由前面admin加载数据的逻辑,插件只会增加两个Key:plugin.list 与 plugin.${plugin.name},而 plugin.list 是所有启用的插件列表,该key的数据在
本地缓存中没有数据,只会关注plugin.${plugin.name} key对应的数据,这是对应的插件的详细信息。
至此,bootstrap在apollo中的同步逻辑就分析完成。