
One post tagged with "spi"

View All Tags

LoadBalancer SPI 代码分析

· One min read
Apache ShenYu Contributor

​ 网关应用需要支持多种负载均衡的方案,包括随机选择、Hash、轮询等方式。Apache Shenyu网关中不仅实现了传统网关的这些均衡策略,还通过流量预热(warmup)等细节处理,对服务器节点的加入,做了更平滑的流量处理,获得了更好的整体稳定性。让我们来看看Shenyu是是如何设计和实现这部分功能的。

本文基于shenyu-2.5.0版本进行源码分析.

[TOC]

LoadBalancer SPI#

LoadBalancer SPI 定义在shenyu-loadbalancer模组中,以下是这个核心接口的代码,这个接口很好的诠释了这样一个理念:负载均衡是在一系列服务器节点中选出最合适的节点,也就是选择策略。做流量转发、路由和负载均衡是LoadBalance SPI的基本功能

@SPIpublic interface LoadBalancer {
    /**     * this is select one for upstream list.     *     * @param upstreamList upstream list     * @param ip ip     * @return upstream     */    Upstream select(List<Upstream> upstreamList, String ip);}

接口中,upstreamList是可选路由的一组服务器节点,Upstream 是服务器节点的数据结构,它包括的重要元素有:协议、url 、权重、时间戳,warmup,健康状态等。

public class Upstream {    /**     * protocol.     */    private final String protocol;
    /**     * url.     */    private String url;
    /**     * weight.     */    private final int weight;
    /**     * false close, true open.     */    private boolean status;
    /**     * startup time.     */    private final long timestamp;
    /**     * warmup.     */    private final int warmup;
    /**     * healthy.     */    private boolean healthy;
    /**     * lastHealthTimestamp.     */    private long lastHealthTimestamp;
    /**     * lastUnhealthyTimestamp.     */    private long lastUnhealthyTimestamp;
    /**     * group.     */    private String group;
    /**     * version.     */    private String version;}

Design of LoadBalance module`#

图1是LoadBalancer模组的类图:

loadbalancer-class-diagram

从类图上可以看出LoadBalance的设计概要:

  1. 抽象类AbstractLoadBalancer继承自LoadBalancer SPI接口,并提供选择的模板方法,及权重计算。

  2. 三个实做类继承AbstractLoadBalancer, 实现各自的逻辑处理。

    • RandomLoadBalancer -加权随机选择 Weight Random
    • HashLoadBalancer - 一致性Hash
    • RoundRobinLoadBalancer -加权轮询(Weight Round Robin per-packet)
  3. 由工厂类LoadBalancerFactory 实现对外的静态调用方法。

    另外根据Apache Sheny SPI规范,在SHENYU_DIERECTORY中的添加profile,配置LoadBalance的实现类,配置key=class形式,左边的operator要和LoadBalanceEnum中的定义一致。

random=org.apache.shenyu.loadbalancer.spi.RandomLoadBalancerroundRobin=org.apache.shenyu.loadbalancer.spi.RoundRobinLoadBalancerhash=org.apache.shenyu.loadbalancer.spi.HashLoadBalancer

LoadBalanceEnum的定义如下:

public enum LoadBalanceEnum {    /**     * Hash load balance enum.     */    HASH(1, "hash", true),
    /**     * Random load balance enum.     */    RANDOM(2, "random", true),
    /**     * Round robin load balance enum.     */    ROUND_ROBIN(3, "roundRobin", true);
    private final int code;    private final String name;    private final boolean support;}

AbstractLoadBalancer#

这个抽象类实做了LoadBalancer接口, 定义了抽象方法doSelect()留给实作类处理,在模板方法select() 中先进行校验,之后调用由实作类实现的doSelect()方法。

public abstract class AbstractLoadBalancer implements LoadBalancer {    /**     * Do select divide upstream.     *     * @param upstreamList the upstream list     * @param ip           the ip     * @return the divide upstream     */    protected abstract Upstream doSelect(List<Upstream> upstreamList, String ip);
    @Override    public Upstream select(final List<Upstream> upstreamList, final String ip) {        if (CollectionUtils.isEmpty(upstreamList)) {            return null;        }        if (upstreamList.size() == 1) {            return upstreamList.get(0);        }        return doSelect(upstreamList, ip);    }}

权重的处理方法getWeight()的逻辑是:当有时间戳,并且当前时间与时间戳间隔在流量预热warmup时间内,权重计算的公式为: $$ {1-1} ww = min(1,uptime/(warmup/weight)) $$ 从公式可以看出,最终的权值,与设置的weight成正比,时间间隔越接近warmup时间,权重就越大。也就是说等待的时间越长,被分派的权重越高。没有时间戳时等其他情况下,返回Upstream设置的weight值。

考虑流量预热(warmup)的核心思想是避免在添加新服务器和启动新JVM时网关性能不佳。

下面我们看一下三个实做类的实现。

RandomLoadBalancer#

这里随机LoadBalancer 可以处理两种情况:

  1. 没有权重:所有服务器都没有设定权重,或者权重都一样, 会随机选择一个。
  2. 有权重:服务器设定有不同的权重,会根据权重,进行随机选择。

下面是有权重时的随机选择代码random(): 遍历全部服务器列表,当随机值小于某个服务器权重时,这个服务器被选中(这里提前计算了前一半服务器的权重和,如果随机值大于halfLengthTotalWeight,则遍历从(weights.length + 1) / 2开始,提高了小效率)。 若遍历后没有满足条件,就在全部服务器列表中随机选择一个返回。这里getWeight(final Upstream upstream) 方法是在AbstractLoadBalancer 中定义的,按公式计算权重。

@Overridepublic Upstream doSelect(final List<Upstream> upstreamList, final String ip) {    int length = upstreamList.size();    // every upstream has the same weight?    boolean sameWeight = true;    // the weight of every upstream    int[] weights = new int[length];    int firstUpstreamWeight = getWeight(upstreamList.get(0));    weights[0] = firstUpstreamWeight;    // init the totalWeight    int totalWeight = firstUpstreamWeight;    int halfLengthTotalWeight = 0;    for (int i = 1; i < length; i++) {        int currentUpstreamWeight = getWeight(upstreamList.get(i));        if (i <= (length + 1) / 2) {            halfLengthTotalWeight = totalWeight;        }        weights[i] = currentUpstreamWeight;        totalWeight += currentUpstreamWeight;        if (sameWeight && currentUpstreamWeight != firstUpstreamWeight) {            // Calculate whether the weight of ownership is the same.            sameWeight = false;        }    }    if (totalWeight > 0 && !sameWeight) {        return random(totalWeight, halfLengthTotalWeight, weights, upstreamList);    }    return random(upstreamList);}
private Upstream random(final int totalWeight, final int halfLengthTotalWeight, final int[] weights, final List<Upstream> upstreamList) {    // If the weights are not the same and the weights are greater than 0, then random by the total number of weights.    int offset = RANDOM.nextInt(totalWeight);    int index = 0;    int end = weights.length;    if (offset >= halfLengthTotalWeight) {        index = (weights.length + 1) / 2;        offset -= halfLengthTotalWeight;    } else {        end = (weights.length + 1) / 2;    }    // Determine which segment the random value falls on    for (; index < end; index++) {        offset -= weights[index];        if (offset < 0) {            return upstreamList.get(index);        }    }    return random(upstreamList);}

因此,当采用RandomLoadBalancer时,是按权重随机分派服务器的。

HashLoadBalancer#

Apache ShenyuHashLoadBalancer 中采用了一致性hash算法,使用有序hash环,将key与服务器节点的hash映射缓存起来。对于请求的ip地址,计算出其hash值, 在hash环上顺时针查找距离这个key的hash值最近的节点,将其作为要路由的节点。一致性hash解决了传统取余hash算法的可伸缩性差的问题。

HashLoadBalancer中的采用的是加密的单向MD5散列函数,这个hash函数会hash后产生不可预期但确定性的()的结果,输出为32-bit的长整数。hash代码如下:

private static long hash(final String key) {    // md5 byte    MessageDigest md5;    try {        md5 = MessageDigest.getInstance("MD5");    } catch (NoSuchAlgorithmException e) {        throw new ShenyuException("MD5 not supported", e);    }    md5.reset();    byte[] keyBytes;    keyBytes = key.getBytes(StandardCharsets.UTF_8);    md5.update(keyBytes);    byte[] digest = md5.digest();    // hash code, Truncate to 32-bits    long hashCode = (long) (digest[3] & 0xFF) << 24            | ((long) (digest[2] & 0xFF) << 16)            | ((long) (digest[1] & 0xFF) << 8)            | (digest[0] & 0xFF);    return hashCode & 0xffffffffL;}

再看一下HashLoadBalancer的选择函数doSelect()的实现:

    private static final int VIRTUAL_NODE_NUM = 5;
    @Override    public Upstream doSelect(final List<Upstream> upstreamList, final String ip) {        final ConcurrentSkipListMap<Long, Upstream> treeMap = new ConcurrentSkipListMap<>();        upstreamList.forEach(upstream -> IntStream.range(0, VIRTUAL_NODE_NUM).forEach(i -> {            long addressHash = hash("SHENYU-" + upstream.getUrl() + "-HASH-" + i);            treeMap.put(addressHash, upstream);        }));        long hash = hash(ip);        SortedMap<Long, Upstream> lastRing = treeMap.tailMap(hash);        if (!lastRing.isEmpty()) {            return lastRing.get(lastRing.firstKey());        }        return treeMap.firstEntry().getValue();    }

这个方法中,生成带虚拟服务器节点的hash环, 一个实际节点会生成5个虚拟节点,因此整个hash环的均匀性大大增加,降低数据倾斜的发生。

为了实现hash环的有序性及顺时针查找功能,代码中使用Java 的ConcurrentSkipListMap 来存储带虚拟节点的服务器节点及其hash值, 它既能保证线程安全,又能保证数据的有序性,支持高并发。 另外,ConcurrentSkipListMap提供了一个tailMap(K fromKey)方法,可从map中查找比fromKey大的值的集合,但并不需要遍历整个数据结构。

上述代码中,生成hash环之后,就是调用ConcurrentSkipListMaptailMap()方法,找到大于等于请求的ip的hash值的子集,这个子集的第一个就是要路由的服务器节点。采用了合适的数据结构,这里的代码看上去是不是特别的简洁流畅?

RoundRobinLoadBalancer#

Round-robin轮询方法的原始定义是顺序循环将请求依次循环地连接到每个服务器。当某个服务器发生故障(例如:一分钟连接不上的服务器),从候选队列中取出,不参与下一次的轮询,直到其恢复正常。在 RoundRobinLoadBalancer中实现的是组内加权轮询(Weight Round Robin per-packet)方法:

为了计算和存储每个服务器节点的轮询次数,在这个类中定义了一个静态内部类WeigthRoundRobin,我们先看一下它的主要代码(去掉了注释):

protected static class WeightedRoundRobin {
    private int weight;        private final AtomicLong current = new AtomicLong(0);
    private long lastUpdate;
    void setWeight(final int weight) {        this.weight = weight;        current.set(0);    }    long increaseCurrent() {        return current.addAndGet(weight);    }
    void sel(final int total) {        current.addAndGet(-1 * total);    }    void setLastUpdate(final long lastUpdate) {        this.lastUpdate = lastUpdate;    }}

请重点关注这几个方法:

  • setWeight(final int weight) ,为对象设定权重,并将current重置为0.

  • increaseCurrent() : 对AtomicLong类型的对象current,累加其权重值。

  • sel(final int total): current减去传入的 total值。

下面我们看一下带权重的轮询过程是如何实现的。 首先定义了一个ConcurrentMap类型对象methodWeightMap 两层对象来存储服务器列表与其各个明细节点的轮询资料。

private final ConcurrentMap<String, ConcurrentMap<String, WeightedRoundRobin>> methodWeightMap = new ConcurrentHashMap<>(16);

这个map对象第一层的key为当前服务器列表的第一个节点的upstreamUrl, 第二个对象ConcurrentMap<String, WeightedRoundRobin>存储了组内各个服务器节点的轮询情况,内层Map的key为组内每个服务器的upstreamUrlMap对象使用JUCConcurrentHashMap,不仅存取高效,而且线程安全,支持高并发。

内层map的每个节点对应的WeighedRoundRobin作为静态内部类能确保线程安全,并实现组内的加权轮询选择功能。下面是这个类的doSelect()方法的代码。

@Overridepublic Upstream doSelect(final List<Upstream> upstreamList, final String ip) {    String key = upstreamList.get(0).getUrl();    ConcurrentMap<String, WeightedRoundRobin> map = methodWeightMap.get(key);    if (Objects.isNull(map)) {        methodWeightMap.putIfAbsent(key, new ConcurrentHashMap<>(16));        map = methodWeightMap.get(key);    }    int totalWeight = 0;    long maxCurrent = Long.MIN_VALUE;    long now = System.currentTimeMillis();    Upstream selectedInvoker = null;    WeightedRoundRobin selectedWeightedRoundRobin = null;    for (Upstream upstream : upstreamList) {        String rKey = upstream.getUrl();        WeightedRoundRobin weightedRoundRobin = map.get(rKey);        int weight = getWeight(upstream);        if (Objects.isNull(weightedRoundRobin)) {            weightedRoundRobin = new WeightedRoundRobin();            weightedRoundRobin.setWeight(weight);            map.putIfAbsent(rKey, weightedRoundRobin);        }        if (weight != weightedRoundRobin.getWeight()) {            // weight changed.            weightedRoundRobin.setWeight(weight);        }        long cur = weightedRoundRobin.increaseCurrent();        weightedRoundRobin.setLastUpdate(now);        if (cur > maxCurrent) {            maxCurrent = cur;            selectedInvoker = upstream;            selectedWeightedRoundRobin = weightedRoundRobin;        }        totalWeight += weight;    }    ......  //erase the section which handles the time-out upstreams.     if (selectedInvoker != null) {        selectedWeightedRoundRobin.sel(totalWeight);        return selectedInvoker;    }    // should not happen here    return upstreamList.get(0);}

举例,若服务器组upstreamUrl 分别为: LIST = [upstream-20, upstream-50, upstream-30]时,经过一轮执行后,建立的methodWeightMap 资料如下:

methodWeightMap

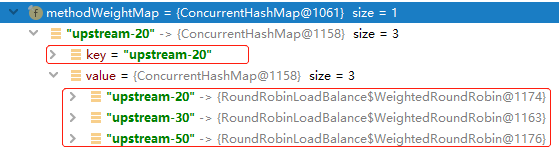
假设上述的LIST中,各个服务器节点的权重数组为: [20,50,30], 下图是内部类current 值变化和轮询选择过程:

weighted-roundrobin-demo

每一轮,选择值current最大的服务器节点:

  • Round1:
    • 对当前服务器LIST做遍历,当服务器节点的weightedRoundRobin 为null时,current被置为各自的权重; 不为null时,累加各自的权重。
    • 即:遍历后current 分别为 [20, 50,30] , 会选择Stream-50, Stream-50对应的WeightRoundRobin静态类做 sel(-total)处理,current 更新为[20,-50, 30].
  • Round 2 遍历后的current是[40,0,60], 会选择Stream-30, current分别更新为[40,0,-40].
  • Round 3 遍历后的current是[60,50,-10], 会选择Stream-20,current分别更新为[-40,50,-10].

中间进行了容错处理, 当服务器的个数与map个数不一样,就对methodWeightMap 加锁做处理。 用先copy 后modify的方式, 把超时的服务器remove掉,即移除掉发生故障的服务器,并更新Map资料。如下是异常时的处理代码:

    if (!updateLock.get() && upstreamList.size() != map.size() && updateLock.compareAndSet(false, true)) {        try {            // copy -> modify -> update reference.            ConcurrentMap<String, WeightedRoundRobin> newMap = new ConcurrentHashMap<>(map);            newMap.entrySet().removeIf(item -> now - item.getValue().getLastUpdate() > recyclePeriod);            methodWeightMap.put(key, newMap);        } finally {            updateLock.set(false);        }    }    if (Objects.nonNull(selectedInvoker)) {        selectedWeightedRoundRobin.sel(totalWeight);        return selectedInvoker;    }    // should not happen here.    return upstreamList.get(0);

LoadBalancerFactory#

在这个工厂类中,提供了调用LoadBalancer的静态方法, 其中ExtensionLoaderApache ShenyuSPI执行入口。也就是说,LoadBalancer模组是可配置、可扩展的。这个静态方法中的algorithm变量是LoadBalanceEnum中定义name枚举类型。

/** * Selector upstream. * * @param upstreamList the upstream list * @param algorithm    the loadBalance algorithm * @param ip           the ip * @return the upstream */public static Upstream selector(final List<Upstream> upstreamList, final String algorithm, final String ip) {    LoadBalancer loadBalance = ExtensionLoader.getExtensionLoader(LoadBalancer.class).getJoin(algorithm);    return loadBalance.select(upstreamList, ip);}

Using of LoadBalancer module#

上面说明了LoadBalancer SPI接口及三个实作类。下面看一下LoadBalancerApache Shenyu中是如何被调用的。DividePlugin是路由选择插件,所有的Http请求都由该插件进行负载均衡处理。当请求头rpcType = http, 且开启该插件时,它将根据请求参数匹配规则,最终交由下游插件进行响应式代理调用。

DividePlugindoExecute方法中,先对要转发的请求的Header大小、content长度等做校验,

@Overrideprotected Mono<Void> doExecute(final ServerWebExchange exchange, final ShenyuPluginChain chain, final SelectorData selector, final RuleData rule) {   ......}

接口方法的第二个参数是ShenyuPluginChain 类型,代表plugin的调用链,具体可参见Apache Sheyuplugin的调用机制。第三个SelectorData类型的参数是选择器, 第四个是RuldData类型,代表规则。分别请查看对应的代码。

下面给出了doExecute()方法中,有关LoadBalancer调用的代码片段:

   //取到要路由的服务器节点列表。   List<Upstream> upstreamList = UpstreamCacheManager.getInstance().findUpstreamListBySelectorId(selector.getId());    ...     //取到请求的ip    String ip = Objects.requireNonNull(exchange.getRequest().getRemoteAddress()).getAddress().getHostAddress();
    //调用Util方法,执行LoadBalancer处理    Upstream upstream = LoadBalancerFactory.selector(upstreamList, ruleHandle.getLoadBalance(), ip);

这里UpstreamCacheManager 是缓存的要路由的服务器节点 , ruleHandle.getLoadBalance()取到的是LoadBalanceEnum定义的枚举name, 如random, hash, roundRobin等.

经过封装,调用负载均衡功能非常的方便。 未来增加新的LoadBalancer类,这些调用的Plugin代码完全不需要变更。

Summary#

经过上面的代码解读,从设计角度总结LoadBalancer 模组具有如下的特点:

  1. 可扩展性:面向接口的设计,及基于Apache Shenyu SPI的实现,使得系统具有良好的可扩展性。可以方便的扩展为其他的动态的负载均衡算法,如最少连接方式(least connection)、最快模式( fastest)。并支持集群处理,具有良好的可扩展性。

  2. 可伸缩性:采用的一致性hash、权重随机和权重轮询算法,都可以无缝支持集群扩容或缩容。

  3. 流量预热等更细致的设计,能带来整体上更为平滑的负载均衡。

MatchStrategy--基于SPI的代码分析

· One min read
Apache ShenYu Contributor

Apache Shenyu 网关的各个Plugin(包括Dubbo, gRPC,Spring-cloud等) 中,routing参数均设计为可以接受多个条件的组合。 为了实现这样的目的,遵循其SPI的机制进行将参数及行为抽象为如下三部分,这些SPIshenyu-plugin-base模组中实现

  • ParameterData-参数资料
  • PredictJudge-断言
  • MatchStrategy-匹配策略

相对而言,匹配策略是需要扩展点最少的部分。想象一下,对多个条件的组合判断,最常见的几种规则是:全部都满足、至少满足一个条件、至少满足第一个,或者大部分满足等等。 并且要做到对各种plugin的不同类型的参数,如IP, header, uri等。针对这些需求,如何将MatchStrategy设计得简单易用且容易扩展?

MatchStrategy#

MatchStrategy的实现代码在shenyu-plugin-base模组中,基于Apache ShenyuSPI创建机制, 设计上结合了工厂模式和策略模式,整体MatchStrategy的设计类图如下下:

MatchStrategy-class-diagram

以接口MatchStrategy为基础,设计实现类,并由抽象类AbstractMatchStrategy实现公共方法,由工厂类MatchStrategyFactory提供创建和外部调用功能。

MatchStrategy Interface#

首先来看MatchStrategy SPI接口的定义:

@SPIpublic interface MatchStrategy {
    Boolean match(List<ConditionData> conditionDataList, ServerWebExchange exchange);}

@SPI annotation代表这是一个SPI接口。ServerWebExchangeorg.springframework.web.server.ServerWebExchange ,代表HTTPrequest-response 的交互内容。ConditionData的代码如下,更多说明可以参考PredicateJudge代码分析中的说明,

public class ConditionData {
    private String paramType;    private String operator;
    private String paramName;    private String paramValue;}

AbstractMatchStrategy#

在抽象类AbstractMatchStrategy中,定义MatchStrategy的公共方法, 用buildRealData方法中,用ParameterData工厂类ParameterDataFactory,将多种参数如 Ip, Cookie, Header,uri等资料都以统一的接口方法来呈现。这些参数格式及规则的修改,不会影响到对参数规则匹配MatchStrategy的调用。

public abstract class AbstractMatchStrategy {
    public String buildRealData(final ConditionData condition, final ServerWebExchange exchange) {        return ParameterDataFactory.builderData(condition.getParamType(), condition.getParamName(), exchange);    }}

实现类及Profile#

基于上述接口定义, shenyu-plugin-base 模组提供了两个MatchStrategy实现类

  • AndMatchStrategy-多个条件 AND

  • OrMatchStrategy- 多个条件 OR

    并在SHENYU_DIRECTORY目录下的配置文件中,对实作类做了配置。在系统启动时会由顶层SPIkey-value形式加载并cache起来。

and=org.apache.shenyu.plugin.base.condition.strategy.AndMatchStrategyor=org.apache.shenyu.plugin.base.condition.strategy.OrMatchStrategy

两个实现类AndMatchStrategy 继承AbstractMatchStrategy 并实做了MatchStrategy

AndMatchStrategy- “与”的关系#

由于PredicateJudge封装了条件判断的多样性,ConditionDataParameData封装了多种参数。那么对于多个条件的匹配来说,采用Stream流处理及lamda表达式,非常简洁高效达成了:全部条件都满足,即"AND"的逻辑。

@Joinpublic class AndMatchStrategy extends AbstractMatchStrategy implements MatchStrategy {
    @Override    public Boolean match(final List<ConditionData> conditionDataList, final ServerWebExchange exchange) {        return conditionDataList                .stream()                .allMatch(condition -> PredicateJudgeFactory.judge(condition, buildRealData(condition, exchange)));    }}

OrMatchStrategy是同样的实现方式,实现: 至少满足一个条件"OR"的规则,在此不做赘述。

MatchStrategyFactory#

这是MatchStrategy的工厂类,实现了两个方法,一个是newInstance()方法根据策略代码和名称,返回由SPI ExtensionLoader按key来加载对应的MatchStrategy实现类。

    public static MatchStrategy newInstance(final Integer strategy) {        String matchMode = MatchModeEnum.getMatchModeByCode(strategy);        return ExtensionLoader.getExtensionLoader(MatchStrategy.class).getJoin(matchMode);    }

MatchModeEnum 中定义了match策略的code和name。 调用时由策略名称,如"and","or",根据启动时SPI加载的key-value资料,找到对应的实现类:

AND(0, "and"),  OR(1, "or");

另一个是match()方法,调用实作类的match方法。

    public static boolean match(final Integer strategy, final List<ConditionData> conditionDataList, final ServerWebExchange exchange) {        return newInstance(strategy).match(conditionDataList, exchange);    }

调用方式#

shenyu-plugin模组的各个plugin的基类AbstractShenyuPlugin 中,定义了两个选择的方法:filterSelectorfilterRule 它们都调用了MatchStrategyFactory 方法,下面是AbstractShenyuPluginfilterSelector方法的代码:

    private Boolean filterSelector(final SelectorData selector, final ServerWebExchange exchange) {        if (selector.getType() == SelectorTypeEnum.CUSTOM_FLOW.getCode()) {            if (CollectionUtils.isEmpty(selector.getConditionList())) {                return false;            }            return MatchStrategyFactory.match(selector.getMatchMode(), selector.getConditionList(), exchange);        }        return true;    }

这段代码中,先检测参数匹配条件SelectorData是否为空,之后调用MatchStrategyFactorymatch方法,工厂方法将调用对应的实作类的match方法。同理,如下是AbstractShenyuPluginfilterRule 方法

    private Boolean filterRule(final RuleData ruleData, final ServerWebExchange exchange) {        return ruleData.getEnabled() && MatchStrategyFactory.match(ruleData.getMatchMode(), ruleData.getConditionDataList(), exchange);    }

也同样是调用MatchStrategyFactorymatch方法,看上去是不是特别的简洁甚至是简单? 在PredicteJudge代码分析文中,对shenyu-plugin如何做参数调用方面做了更进一步的描述。

Summary#

由于应用了Apache shenyuSPI框架,使得整体上具有松耦合、易于扩展的特点。在多个参数规则策略方面,MatchStrategy提供了良好的设计,虽然目前只提供了两个AND 和OR的实现类,但未来可以很轻松地扩展为更多MatchStrategy规则,例如 firstOf:即必须满足第一个条件,或mostOf-满足大部分条件等更多复杂策略,而其他调用部分的代码完全不受影响。

有兴趣的读者可以去阅读Shenyu plugin的源码了解更多内容。

PredicateJudge-- 基于SPI的设计实现分析

· One min read
Apache ShenYu Contributor

灵活的插件和规则定义,是Shenyu网关的一大特色。它以插件形式支持多种网络协议和多种流行的微服务框架,如Dubbo, gRPC和 Spring-Cloud 等。 为了实现对各种协议及插件的配置规则的解析,网关在规则策略解析方面,采用了优雅的SPI(Service Provider Interface)实现,当添加新的插件时,规则解析部分可以沿用现有实现或采用SPI机制快速实现,具有良好的可扩展性。

SPI 的顶层设计#

Shenyu的SPI采用接口+ 工厂模式+配置文件的方式,来实现模组的动态加载。在其shen-SPI-模组,做了SPI的顶层设计。定义了@ Join ,@SPI 两个annotation。 其中@Join 代表此类会加入扩展机制,相当于是做申请注册。 @SPI 标明当前类为SPI功能扩展类。

Fig 1 classes in the shenyu-spi

toplevel-SPI

配置文件方面,定义SPI加载的目录为 META-INF/shenyu/

SHENYU_DIRECTORY = "META-INF/shenyu/";

系统启动时,会扫描 SHENYU_DIRECTORY 下的配置文件,并由 ExtensionLoader 类来加载所配置的SPI扩展类,并cache到内存中。 配置文件内容为 key=class的形式。 在系统执行期间, 由ExtensionFactory的实现类,返回key所对应的SPI实现类。

shenyu-plugin的SPI 实现#

shenyu-plugin模组中,按照插件机制,实现了各种请求转发功能,包括支持request, redirect, response, rewrite等http协议功能,及 gRPC, dubbo, hystrix等微服务框架, 并且插件功能还在不断增加中。如果在各自的功能插件实做类中,还要做对routing 参数的解析等处理,不仅会造成程序的冗余,而且当要支持各自匹配规则,如通配符、正则表达式、SpEL解析等,会造成频繁对插件核心代码的修改。因此,在shenyu-plugin模组中,将routing参数解析做了更高一层的抽象,并按照SPI机制做了规则解析的实现。解析由三个部分组成:

  • ParameterData-参数资料,

  • PredictJudge-断言

  • MatchStrategy-匹配策略三个SPI实现。

    这些扩展类定义在 shenyu-plugin-base module中,经过这样抽象后,每个插件实现中,routing 参数解析的功能全部由AbstractShenyuPlugin 来调用上述三个SPI工厂类来定义和实现。做到了功能的专一,并易于扩展,符合SOLID原则。

本节就其中的PredictJudge-断言做详细解析。可以看到这个module中的pom文件中,添加了对shenyu-SPI的依赖

<dependency>    <groupId>org.apache.shenyu</groupId>    <artifactId>shenyu-spi</artifactId>    <version>${project.version}</version></dependency>

PredicateJudge SPI 设计#

PredicateJudge SPI 实现用来解析判断各类规则,当网关中配置的。这个类命名和功能都类似于java 的Predicate ,但对接受行为做了更进一步的抽象。这个SPI通过一个工厂和策略模式实现,首先来看PredicateJudge SPI接口的定义:

@SPI@FunctionalInterfacepublic interface PredicateJudge {
    /**     * judge conditionData and realData is match.     *     * @param conditionData {@linkplain ConditionData}     * @param realData       realData     * @return true is pass  false is not pass.     */    Boolean judge(ConditionData conditionData, String realData);}

这部分的类图如下:

Fig 2-Predicate class diagram

predicate-class-diagram

PredicateJudgeFactory的重要方法如下:

    public static PredicateJudge newInstance(final String operator) {        return ExtensionLoader.getExtensionLoader(PredicateJudge.class).getJoin(processSpecialOperator(operator));    }
    public static Boolean judge(final ConditionData conditionData, final String realData) {        if (Objects.isNull(conditionData) || StringUtils.isBlank(realData)) {            return false;        }        return newInstance(conditionData.getOperator()).judge(conditionData, realData);    }

这里ConditionData定义如下包含属性四个String类型的属性: paramType, operator,paramName,paramValue

ParamTypeEnum#

参数 paramType必须为系统中枚举类型 ParamTypeEnum,默认支持的paramType有:

post, uri,query, host, ip,header, cookie,req_method

OperatorEnum#

operator 必须为枚举类型 OperatorEnum ,目前支持的操作符有:(注意,严格区分大小写)

   match, =,regex, >,<, contains, SpEL,  Groovy, TimeBefore,TimeAfter

基于以上的规则, plugin 模组实现了如下8个 PredicateJudge 实现类,分别实现上述operator的逻辑匹配规则.

Implementation classRule denotes 规则说明corespondece operator
ContainsPredicateJudge包含关系 "contains", 实际结果,需要包含所定规则的值contains
EqualsPredicateJudge相等"=",=
MatchPredicateJudge用于URI 路径匹配的处理match
TimerAfterPredicateJudge当前local时间是否晚于设定的时间TimeAfter
TimerBeforePredicateJudge当前local时间是否早于设定的时间TimeBefore
GroovyPredicateJudgeGroovy,设定ParamName的值,与设定ParamValue相同Groovy
RegexPredicateJudge正则表达式匹配资料regex

调用方法#

当要做一组参数的解析时,只需要调用PredicateJudgeFactory的judge方法即可:

PredicateJudgeFactory.judge(final ConditionData conditionData, final String realData);

SPI配置文件#

这些PredicateJudge实现类在 SHENYU_DIRECTORY 中的config文件中做了配置,在启动时会加加载并cache到内存中。

PredicateJudge文件的内容如下,为key=class形式,左边的operator要和ParamEnum中的定义一致。

equals=org.apache.shenyu.plugin.base.condition.judge.EqualsPredicateJudge
contains=org.apache.shenyu.plugin.base.condition.judge.ContainsPredicateJudgeGroovy=org.apache.shenyu.plugin.base.condition.judge.GroovyPredicateJudgematch=org.apache.shenyu.plugin.base.condition.judge.MatchPredicateJudgeregex=org.apache.shenyu.plugin.base.condition.judge.RegexPredicateJudgeSpEL=org.apache.shenyu.plugin.base.condition.judge.SpELPredicateJudgeTimeAfter=org.apache.shenyu.plugin.base.condition.judge.TimerAfterPredicateJudgeTimeBefore=org.apache.shenyu.plugin.base.condition.judge.TimerBeforePredicateJudge

PredicateJudge SPI在网关Plugin中的使用#

网关系统中,大部分的Plugin 都继承自AbstractShenyuPlugin,这个抽象类中,在做选择和规则解析时,调用了上述SPI中的MatchStrategy,继而在策略判断时调用PredicateJudge 的各个断言类来处理。

Plugin与SPI 的类图如下:

Fig 3- class diagram of plugins with PredicateJudge and MatchStrategy SPI

plugin-SPI-class-diagram

从客户端发来的请求,在系统中调用规则部分的SPI的流程如下:

Fig 4- flow chart for Shenyu gateway filter with parameter processing

SPI-flow-diagram

  • 系统启动时,会加载目录下配置的SPI资料到内存中
  • 当client有新的请求发到Apache shenyu 网关系统时,在网关内部,会调用对应的plugin
  • 对实际请求资料做规则匹配时,会根据所包含的operator,调用的对应的PredicateJudge实现类

其他#

PredicateJudge 判断结果举例#

ContainsPredicateJudge- " contains“ rule#

举例:给定一组参数(ConditionData ), paramType="uri", paramValue 是 "/http/**"

当应用 ContainsPredicateJudge包含关系时,判断结果如下表:

ConditionData (operator="contains")real datajudge result
paramType="uri", "/http/**""/http/**/test"true
"/test/http/**/other"true
"/http1/**"false

其他的几个PredicateJudge的具体功能可参考其代码和测试类.

RateLimiter SPI 代码分析

· One min read
Apache ShenYu Contributor

限流是网关必备的功能,用来应对高并发请求的场景。当系统受到异常攻击,短期内聚集了大量的流量;当有大量低级别的请求,处理这些请求会影响关键业务的处理,需要限制这些请求的访问速度; 或者系统内部出现一些异常,不能满负荷的服务整个应用请求等等。这些情况下,都需要启用限流来保护系统。可以拒绝服务、等待或降级处理,将流量限制到系统可接受的量,或者只允许某些域名(或某些业务)的请求优先处理。

针对以上的场景需求,在设计一个API网关的限流功能时,就需要考虑如下的扩展点:

  1. 可以支持多种限流的算法,并易于扩展。

  2. 要可以支持多种限流的方式,能区分用户群、高低优先级的请求。

  3. 要支持高并发,能快速的做出限制或通过的决策。

  4. 要有容错处理,如果限流程序出错,网关系统能继续执行。

    本文会先介绍shenyu网关限流部分的总体技术架构,之后重点分析RateLimiter SPI扩展实现的代码。

This article based on shenyu-2.4.0 version of the source code analysis.

RateLimiter 总体设计说明#

​ WebFlux是Spring 提供的基于Reactor模型的异步非阻塞框架,能提升吞吐量,使系统有更好的可伸缩性。Apache Shenyu网关的插件功能基于WebFlux框架实现的。RateLimiter功能是在ratelimiter-plugin中实现。在限流过程中,常用的算法有令牌桶、漏桶等算法,这些算法执行中,需要检核请求的来源,对已使用的流量做计数及逻辑计算,判定是否允许通过。为了提高并发及性能, 将计数和算法逻辑处理,都放到redis中。Java代码负责做数据参数的传递。在调用redis时,lua脚本可以常驻在redis内存中,能减少网络开销,并可以作为一个整体执行,具有原子性。Spring Data Redis 提供了对redis命令执行的抽象,执行序列化,及自动使用redis 脚本缓存。在这个plugin中,由于采用了reactor 非阻塞框架,所以采用Spring Redis Reactive类库实现对redis的功能调用。

​ 这个plugin中的类包图如下,重点标出了与RateLimiter SPI相关的两个package: resolver 和algorithm.

ratelimiter-package-diagram

RateLimiter SPI的设计#

由于采用了Spring data+ Redis +lua架构实现了高并发的需求。 如何做到对算法和限流方式的扩展呢? Shenyu ratelimiter plugin中设计了两个SPI来实现这两个需求:

  • RateLimiterAlgorithm:用来扩展不同的限流算法。
  • RateLimiterKeyResolver: 用于扩展获取请求的关键信息,用于区分流量,例如按IP 地址、按某一段域名等来区分访问的请求。

SPI的具体实作类与配置信息位于:SHENYU_DIRECTORY目录下 (默认在/META-INF/shenyu)下。

RateLimiterKeyResolver#

获取请求的关键信息,用于分组限流,例如按URL/ 用户 / IP 等, RateLimiterKeyResolver 接口定义如下:

@SPIpublic interface RateLimiterKeyResolver {
    /**     * get Key resolver's name.     *     * @return Key resolver's name     */    String getKeyResolverName();
    /**     * resolve.     *     * @param exchange exchange the current server exchange {@linkplain ServerWebExchange}     * @return rate limiter key     */    String resolve(ServerWebExchange exchange);}

@SPI将当前interface 注册为Shenyu SPI 接口。resolve(ServerWebExchange exchange)方法用来提供解析方式。

RateLimiterKeyResolver SPI 提供了两种key resolver, WholeKeyResolveRemoteAddrKeyResolver,其中RemoteAddrKeyResolver中的resolve方法代码如下:

    @Override    public String resolve(final ServerWebExchange exchange) {        return Objects.requireNonNull(exchange.getRequest().getRemoteAddress()).getAddress().getHostAddress();    }

其key值为请求的IP地址。 基于SPI及工厂类的实现,可以非常方便的扩展实现新的key resolver,如URL,用户等等。

RateLimiterAlgorithm SPI#

RateLimiterAlgorithm SPI 用来实现对不同限流算法的识别、加载和定义,其类图如下:

ratelimiteral-class-diagram

本模组使用了工厂模式,提供了接口类、抽象类和工厂类,提供了4个实现类,其中实现类对应的Lua脚本在 RateLimitEnum 中做了定义,放置在 /META-INF/scripts 目录下。接口RateLimiterAlgorithm的代码如下:

@SPIpublic interface RateLimiterAlgorithm<T> {        RedisScript<T> getScript();    List<String> getKeys(String id);        /**     * Callback string.     *     * @param script the script     * @param keys the keys     * @param scriptArgs the script args     */    default void callback(final RedisScript<?> script, final List<String> keys, final List<String> scriptArgs) {    }}

@SPI 将这个接口注册为shenyu SPI, 其中定义了三个方法:

  • getScript() 方法返回一个 RedisScript对象,这个对象将传递给Redis。
  • getKeys(String id) 返回一个键值的List.
  • callback()回调函数用于异步处理一些需要在返回后做的处理,缺省是空方法。

抽象类 AbstractRateLimiterAlgorithm#

在这个类中,实现了接口的模板方法,使用参数类型为List<Long>, 抽象方法getScriptName() 和getKeyName() 留给各个实作类来实现。如下的getScript() 是这个类中读取lua脚本的处理代码。

    public RedisScript<List<Long>> getScript() {        if (!this.initialized.get()) {            DefaultRedisScript redisScript = new DefaultRedisScript<>();            String scriptPath = "/META-INF/scripts/" + getScriptName();            redisScript.setScriptSource(new ResourceScriptSource(new ClassPathResource(scriptPath)));            redisScript.setResultType(List.class);            this.script = redisScript;            initialized.compareAndSet(false, true);            return redisScript;        }        return script;    }

AtomicBoolean类型的变量initialized 用来标记lua脚本是否有被加载。 如果还没有加载,就从/META-INF/scripts/目录下,读取scriptName指定的Lua文件,加载成RedisScript对象。指定结果为List类型, 设定量initialized为true,避免重复加载。 返回 RedisScript对象。

AbstractRateLimiterAlgorithmgetKeys()的代码如下,

    @Override    public List<String> getKeys(final String id) {        String prefix = getKeyName() + ".{" + id;        String tokenKey = prefix + "}.tokens";        String timestampKey = prefix + "}.timestamp";        return Arrays.asList(tokenKey, timestampKey);    }

这个模板方法中,产生了两个字符串,其中,tokenKey会作为Key传递给redis, 指向一个有序集合。 timestampKey是一个以传入id 为识别的字符串。

可以从上面的类图中看到,ConcurrentRateLimiterAlgorithmSlidingWindowRateLimiterAlgorithm 有覆写getKeys(String id)方法,而两外两个算法程序,则采用的是抽象类中的实现。也只有 ConcurrentRateLimiterAlgorithm 重写了callback()方法。下文中我们会对此做进一步的分析。

工厂类RateLimiterAlgorithmFactory#

RateLimiterAlgorithmFactory 中依据算法名称,获取RateLimiterAlgorithm实例的方法代码如下:

public static RateLimiterAlgorithm<?> newInstance(final String name) {    return Optional.ofNullable(ExtensionLoader.getExtensionLoader(RateLimiterAlgorithm.class).getJoin(name)).orElse(new TokenBucketRateLimiterAlgorithm());}

按照Apache shenyu SPI的规则,由加载器ExtensionLoader获得实作类,当找不到算法时,默认返回令牌桶算法实现类。

与Redis做资料交互#

从上面代码我们了解到Apache Shenyu网关中,RateLimiter SPI 的基本扩展点,在Shenyu网关运行中,应用ReactiveRedisTemplate 来异步执行对redis的调用处理。实现代码在RedisRateLimiter类的isAllowed()方法中,其部分代码如下:

    public Mono<RateLimiterResponse> isAllowed(final String id, final RateLimiterHandle limiterHandle) {        // get parameters that will pass to redis from RateLimiterHandle Object        double replenishRate = limiterHandle.getReplenishRate();        double burstCapacity = limiterHandle.getBurstCapacity();        double requestCount = limiterHandle.getRequestCount();        // get the current used RateLimiterAlgorithm        RateLimiterAlgorithm<?> rateLimiterAlgorithm = RateLimiterAlgorithmFactory.newInstance(limiterHandle.getAlgorithmName());                ........        Flux<List<Long>> resultFlux = Singleton.INST.get(ReactiveRedisTemplate.class).execute(script, keys, scriptArgs);        return resultFlux.onErrorResume(throwable -> Flux.just(Arrays.asList(1L, -1L)))                .reduce(new ArrayList<Long>(), (longs, l) -> {                    longs.addAll(l);                    return longs;                }).map(results -> {                    boolean allowed = results.get(0) == 1L;                    Long tokensLeft = results.get(1);                    return new RateLimiterResponse(allowed, tokensLeft);                })                .doOnError(throwable -> log.error("Error occurred while judging if user is allowed by RedisRateLimiter:{}", throwable.getMessage()))                .doFinally(signalType -> rateLimiterAlgorithm.callback(script, keys, scriptArgs));    }

POJO 对象RateLimiterHandle 中,定义了限流所需的属性算法名称, 速录,容量,请求的数量 。首先 从limiterHandle 包装类中取得需要传入redis的几个参数。之后从RateLimiterAlgorithmFactory 从工厂类取得当前配置的限流算法。 之后做Key值和参数的传递。

为了更方便阅读,下图给出了java代码与redis执行参数输入、输出的传递过程。左边是isAllowed() 函数的后半部分代码,右边是一个Lua脚本的输入输出代码。

下面说明Java代码的执行过程:

  1. getKeys()方法获得两个键值List<String>. 其中第一个Key会映射为Redis中的有序集合。

  2. 设定4个参数:速率 replenishRate ,容量 burstCapacity, 时间戳, 返回当前java 纪元秒数(长整数)EpochSecond, 请求的数量 requestcount.

  3. 按所设定的脚本、Key值、参数调用ReactiveRedisTemplate功能,执行redis处理。返回参数是Flux<List<Long>>类型

  4. 通过reduce方法将其返回值从Flux<ArrayList<Long>> 类型转换为Mono<ArrayList<Long>>,再经过map方法,转换为Mono<RateLimiterResponse>返回。

    返回结果有两个资料,allowed =1, 代表允许通过,0-不通过;而第二个返回参数tokensLeft,是可用的剩余请求数量。

5.容错性方面,由于使用的是reactor 的非阻塞通讯模型,当发生错误时,会执行onErrorResume()语句,Flux.just产生返回资料, 默认为allowed=1, 代表允许通过, 并丢出错误日志。

6.之后执行doFinally()方法,执行算法实现类的callback方法。

io-with-lua

4种限流算法#

上面我们了解了网关中如何通过Java代码如何与Redis 做通讯,这一节我们通过简要分析网关中提供的4种限流算法中的一些代码,来理解如何开发使用RateLimiter SPI的接口方法,并与Redis有效协作。

Ratelimiter SPI目前提供了4种限流算法:

Algorithm nameJava classLua script file
Request rate limiterTokenBucketRateLimiterAlgorithmrequest_rate_limiter.lua
Slide window rate limiterSlidingWindowRateLimiterAlgorithmliding_window_request_rate_limiter.lua
Concurrent rate limiterConcurrentRateLimiterAlgorithmconcurrent_request_rate_limiter.lua
Leaky bucket algorithmLeakyBucketRateLimiterAlgorithmrequest_leaky_rate_limiter.lua
  1. 令牌桶限流:按请求数量限流,设置每秒N个请求,超过N的请求会拒绝服务。算法实现时,以时间间隔计算匀速产生令牌的数量。若每次请求的数量,小于桶内令牌的数量,则允许通过。 时间窗口为 2*容积/速率。
  2. 滑动窗口限流:与令牌桶限流不同在于,其窗口大小比令牌桶的窗口小,为一个容积/速率。并且每次移动向后一个时间时间窗口。其他限流原理与令牌桶类似。
  3. 并发的请求速率限流:严格限制并发访问量为N个请求,大于N的请求会被拒绝。每次当有新请求,查看计数是否大于N, 若小于N则允许通过,计数加1。 当这个请求调用结束时,会释放这个信号(计数减1)
  4. 漏桶算法: 相对于令牌桶算法,漏桶算法有助于减少流量聚集,实现更为平滑的限流处理。 漏桶算法强制以常数N的速率输出流量,其以漏桶为模型,可漏水的量为时间间隔 *速率。若可漏水量>已使用量,则已使用量设为0( 清空漏桶),否则已使用量要减去可漏水量。 若请求数量+ 已使用量< 总容量,则允许请求通过。

下面以 并行限流算法为例,解读Lua和Java代码,查看callback 方法的使用。 通过解读令牌桶和滑动窗口算法代码,了解getKey()方法的使用。

并发请求数限流中使用callback方法#

首先ConcurrentRateLimiterAlgorithmgetKeys() 方法覆写了抽象类中的模板方法:

    @Override    public List<String> getKeys(final String id) {        String tokenKey = getKeyName() + ".{" + id + "}.tokens";        String requestKey = UUIDUtils.getInstance().generateShortUuid();        return Arrays.asList(tokenKey, requestKey);    }

第二个元素 requestKey 是一个long型不重复值(由一个分布式ID产生器产生的,递增,比当前时间EpochSecond小), 相应的concurrent_request_rate_limiter.lua的代码:

local key = KEYS[1]
local capacity = tonumber(ARGV[2])local timestamp = tonumber(ARGV[3])local id = KEYS[2]

这里id 即是取得上面的getKeys()方法产生的requestKey, 一个uuid. 后续的处理如下:

local count = redis.call("zcard", key)local allowed = 0
if count < capacity then  redis.call("zadd", key, timestamp, id)  allowed = 1  count = count + 1endreturn { allowed, count }

先用zcard命令统计redis中key值所对应的有序集合中的元素个数,若元素总数count小于容量,则允许通过,并用zadd key score member方法,向key所在的有序集合中,添加一个元素id, 其score为timestamp. 则此时元素的总个数count实际为count+1.

以上的代码都是在redis中作为一个原子操作来执行的。当同一个key (例如Ip下)有大量并发请求时,redis记录的该ip的有序集合的数量count也在不断累加中。当超过容量限制,则会拒绝服务。

并发请求数限流算法中,要求当请求调用结束时,要释放这个信号量,lua代码中并没有做这个处理。

我们来看看 ConcurrentRateLimiterAlgorithm类中的回调函数:

    @Override    @SuppressWarnings("unchecked")    public void callback(final RedisScript<?> script, final List<String> keys, final List<String> scriptArgs) {        Singleton.INST.get(ReactiveRedisTemplate.class).opsForZSet().remove(keys.get(0), keys.get(1)).subscribe();    }

这里做了一个异步的订阅处理,通过ReactiveRedisTemplate删除redis中(key, id)的元素,等待调用结束后,释放这个信号。这个remove的处理不能放到lua脚本中执行,否则逻辑就是错误的。这也正是RateLimiterAlgorithm SPI 设计callback方法的用意。

令牌桶算法中使用getKeys()#

对应的Lua 代码如下:

local tokens_key = KEYS[1]local timestamp_key = KEYS[2]

省略获取参数的代码

local fill_time = capacity/ratelocal ttl = math.floor(fill_time*2)

时间窗口ttl 大概是 2* 容量/速率.

local last_tokens = tonumber(redis.call("get", tokens_key))if last_tokens == nil then  last_tokens = capacityend

从有序集合中取得上次使用的token,如果没有则last_tokens = 容量。

local last_refreshed = tonumber(redis.call("get", timestamp_key))if last_refreshed == nil then  last_refreshed = 0end

以timestamp_key为key,从有序集合中取得上次刷新时间,默认为0.

local delta = math.max(0, now-last_refreshed)local filled_tokens = math.min(capacity, last_tokens+(delta*rate))local allowed = filled_tokens >= requestedlocal allowed_num = 0if allowed then  new_tokens = filled_tokens - requested  allowed_num = 1end

时间间隔*速率匀速产生令牌,若令牌数量>请求数量,则allowed=1, 并且更新令牌数量。

redis.call("setex", tokens_key, ttl, new_tokens)redis.call("setex", timestamp_key, ttl, now)
return { allowed_num, new_tokens }

这里now是传入的当前时间(EpochSecond),设置tokens_key所对应的有序集合的值为 new_tokens(即新令牌数量) , 过期时间为ttl。 更新集合中,timestamp_key的值为当前时间,过期时间为ttl.

滑动窗口算法中使用getKeys方法#

SlidingWindowRateLimiterAlgorithmgetKeys()同样覆写了父类,代码与ConcurrentRateLimiterAlgorithm 方法代码一致。

如下为滑动窗口算法的Lua代码,省略了其他参数的接收代码。

local timestamp_key = KEYS[2]...... local window_size = tonumber(capacity / rate)local window_time = 1

设定窗口大小为容积/速率。

local last_requested = 0local exists_key = redis.call('exists', tokens_key)if (exists_key == 1) then    last_requested = redis.call('zcard', tokens_key)end

获取当前key 的基数

local remain_request = capacity - last_requestedlocal allowed_num = 0if (last_requested < capacity) then    allowed_num = 1    redis.call('zadd', tokens_key, now, timestamp_key)end

计算剩余可用量 = 容量 减去已使用量,若last_requested < capacity ,则允许通过,并且在tokens_key为key的有序集合中,增加一个 元素(key =timestam_key,value= now)

redis.call('zremrangebyscore', tokens_key, 0, now - window_size / window_time)redis.call('expire', tokens_key, window_size)
return { allowed_num, remain_request }

前面已经设定window_time=1, 用Redis的 zremrangebyscore命令,移除有序集合中,score为[0- 当前时间-窗口大小]的元素,即移动一个窗口大小。设定tokens_key的过期时间为窗口大小。

AbstractRateLimiterAlgorithm的模板方法中,getKeys(final String id) 给出的第二个值(以secondKey指代),是拼接了{id} (即resolve key)的一个固定字符串。从上面三个算法代码可以看到,在令牌桶算法中,secondKey在Lua代码执行中会更新为最新的时间,所以无所谓传入的值。而在并发限流算法中,会以此secondKey为条件,在java callback方法中移除对应的元素。而在滑动窗口算法中,这个secondKey的值,会作为一个新元素的key, 增加到当前有序集合中,并在做窗口滑动中,过期的资料会被删除掉。

总之,当设计新的限流算法时,要根据算法需要仔细设计getKey()方法。

如何调用 RateLimiter SPI#

RateLimiter Plug中的doExecute()方法中,传入的三个参数 exchange 为请求的连接, chain 为shenyu插件的调用链,selector 是选择器,rule是系统中配置的规则参数资料。

protected Mono<Void> doExecute(final ServerWebExchange exchange, final ShenyuPluginChain chain, final SelectorData selector, final RuleData rule) {    RateLimiterHandle limiterHandle = RatelimiterRuleHandleCache.getInstance()        .obtainHandle(CacheKeyUtils.INST.getKey(rule));    String resolverKey = Optional.ofNullable(limiterHandle.getKeyResolverName())        .flatMap(name -> Optional.of("-" + RateLimiterKeyResolverFactory.newInstance(name).resolve(exchange)))        .orElse("");    return redisRateLimiter.isAllowed(rule.getId() + resolverKey, limiterHandle)        .flatMap(response -> {            if (!response.isAllowed()) {                exchange.getResponse().setStatusCode(HttpStatus.TOO_MANY_REQUESTS);                Object error = ShenyuResultWrap.error(ShenyuResultEnum.TOO_MANY_REQUESTS.getCode(), ShenyuResultEnum.TOO_MANY_REQUESTS.getMsg(), null);                return WebFluxResultUtils.result(exchange, error);            }            return chain.execute(exchange);        });}

1.首先,从缓存中,取得系统设定的限流参数RateLimiterHandle实例 limiterHandle. 2.根据name指定的Resolver 获得请求的连接Key信息(如地址等). 3.调用 RedisRateLimiter的 isAllowed方法, 获取返回值后, 4.若isAllowd=false,做错误处理 5.如果 isAllowed=true,return chain.execute(exchange), 对该请求做后续处理,传递到调用链的下一关。

Summary#

整个RateLimiter plugin框架基于Spring WebFlux开发,用redis 和lua脚本做限流计数及核心逻辑处理,支持高并发及弹性扩展。

  1. RateLimiter SPI 提供了两个SPI 接口,通过应用面向接口设计及各种设计模式,可以方便的增加新的限流算法,以及各种流量解析规则。

  2. 提供了令牌桶、并发速率限流、滑动窗口、漏桶4种限流算法。在设计算法实现时,需要根据算法特征设计KEY值,用Lua脚本实现在redis中要处理的逻辑,设计callback()方法做后续的数据处理。

  3. 响应式编程,实现过程简洁高效。

SPI设计实现源码分析

· One min read

背景#

最近研读Apache开源项目Shenyu网关的源码,网关的多个核心组件加载都用到了SPI模块。本文就Shenyu中的SPI设计和源码实现进行分析。

什么是SPI#

SPI就是Service Provider Interface,直译"服务提供方接口",是一种动态的服务发现机制,可以基于接口运行时动态加载接口的实现类(也就是接口编程 + 策略模式 + 配置文件的一种开发模式)。最常见的就是JDK内置的数据库驱动接口java.sql.Driver,不同的厂商可以对该接口完成不同的实现,例如MySQLMySQL驱动包中的com.mysql.jdbc.Driver)、PostgreSQLPostgreSQL驱动包中的org.postgresql.Driver)等等。

spi-jdk-api-diagram

JDK内置的SPI使用方式如下:

  • 在类路径的META-INF/services目录创建一个以接口全限定名称命名的文件(本质是一个properties)文件,例如命名为java.sql.Driver
  • 该文件中可以指定具体的实现类,也就是每个实现类的全类型限定名为单独一行,例如META-INF/services/java.sql.Driver中:
# META-INF/services/java.sql.Driver文件内容com.mysql.jdbc.Driverorg.postgresql.Driver
  • 最后通过java.util.ServiceLoader对该文件进行加载,实例化接口的对应实现类(这里隐含了一个约定,所有实现类必须提供无参构造函数

底层的实现涉及到类加载、双亲委托模型等内容,这里就不展开。基于这种设计思路,很多主流框架了自实现了一套SPI扩展,例如DubboSPI扩展模块,就是读取类路径下META-INF/services/dubbo目录的文件内容进行类加载。Shenyu-SPI模块也是沿用类似的设计思路。

shenyu-spi源码分析#

shenyu-spi模块十分精炼,代码结构如下:

- shenyu-spi[module]  - org.apache.shenyu.spi[package]    -- ExtensionFactory    -- ExtensionLoader    -- Join    -- SPI    -- SpiExtensionFactory

这些类功能如下:

  • ExtensionFactorySPI加载器工厂,本身也是一个SPI,用于基于SPI机制加载ExtensionLoader实例同时基于ExtensionLoader实例获取默认的SPI标识接口实现
  • SpiExtensionFactory:其实就是ExtensionFactory的一个实现类
  • SPI:标识注解,用于标识SPI,用于接口上
  • Join:标识注解,用于实现类上,用于标识该类加入SPI系统
  • ExtensionLoaderSPI加载器,类比java.util.ServiceLoader,用于加载SPI中接口的实现类

接下来细看每个类的源码实现。

@SPI#

org.apache.shenyu.spi.SPI作为一个标识注解,主要用于接口上,也就是只有使用了@SPI的接口才能被shenyu-spi加载。这个类的注释中描述到:所有SPI系统相关参考Apache Dubbo的实现(这一点比较合情理,其实SPI扩展已经是一种成熟的方案,实现上大同小异)。该注解只有一个方法:

@Documented@Retention(RetentionPolicy.RUNTIME)@Target(ElementType.TYPE)public @interface SPI {
    /**     * Value string.     *     * @return the string     */    String value() default "";}

唯一的value()方法用于指定默认的SPI实现(可选的),后文在展开ExtensionLoader时候会说明。

@Join#

org.apache.shenyu.spi.Join也是一个标识注解,主要用在使用了@SPI注解的接口的实现类上,用于标识该类加入SPI系统中而后可以被ExtensionLoader加载。该注解也只有一个方法:

@Documented@Retention(RetentionPolicy.RUNTIME)@Target(ElementType.TYPE)public @interface Join {        /**     * It will be sorted according to the current serial number..     * @return int.     */    int order() default 0;}

唯一的order()方法用于指定具体的顺序号,单个使用了@SPI的接口存在多个使用了@Join的实现类的时候,这个顺序号就确定了这些实现类实例的排序(顺序号小的排在前面)。

ExtensionLoader#

ExtensionLoader就是"类型扩展加载器",就是整个SPI模块的核心。先看其成员属性:

public final class ExtensionLoader<T> {        // SLF4J日志句柄    private static final Logger LOG = LoggerFactory.getLogger(ExtensionLoader.class);        // SPI配置文件基于类路径下的相对目录    private static final String SHENYU_DIRECTORY = "META-INF/shenyu/";        // @SPI标识接口类型 -> ExtensionLoader实例的缓存 => 注意这个是一个全局的静态变量    private static final Map<Class<?>, ExtensionLoader<?>> LOADERS = new ConcurrentHashMap<>();        // 当前@SPI标识接口类型    private final Class<T> clazz;        // 类加载器实例    private final ClassLoader classLoader;        // 当前ExtensionLoader缓存的已加载的实现类信息,使用值持有器包装,是一个HashMap,映射关系:实现类别名 -> 实现类信息    private final Holder<Map<String, ClassEntity>> cachedClasses = new Holder<>();        // 当前ExtensionLoader缓存的已加载的实现类实例的值包装器,使用值持有器包装,映射关系:实现类别名 -> 值持有器包装的实现类实体    private final Map<String, Holder<Object>> cachedInstances = new ConcurrentHashMap<>();        // 当前ExtensionLoader缓存的已加载的实现类实例,使用值持有器包装,映射关系:实现类类型 -> 实现类实体    private final Map<Class<?>, Object> joinInstances = new ConcurrentHashMap<>();        // 缓存默认名称,来源于@SPI注解的value()方法非空白返回值,用于加载默认的接口实现    private String cachedDefaultName;        // Holder比较器,按照Holder的order降序,也就是顺序号小的排在前面    private final Comparator<Holder<Object>> holderComparator = (o1, o2) -> {        if (o1.getOrder() > o2.getOrder()) {            return 1;        } else if (o1.getOrder() < o2.getOrder()) {            return -1;        } else {            return 0;        }    };        // ClassEntity比较器,按照ClassEntity的order降序,也就是顺序号小的排在前面    private final Comparator<ClassEntity> classEntityComparator = (o1, o2) -> {        if (o1.getOrder() > o2.getOrder()) {            return 1;        } else if (o1.getOrder() < o2.getOrder()) {            return -1;        } else {            return 0;        }    };        // 暂时省略其他代码
    // 值持有器,简单VO,用来存储泛型值和值加载顺序    public static class Holder<T> {                // 这里的值引用是volatile修饰,便于某线程更变另一线程马上读到最新的值        private volatile T value;                private Integer order;        // 省略setter和getter代码    }        // 类实体,主要存放加载的实现类的信息    static final class ClassEntity {                // 名称,这里是指SPI实现类的别名,不是类名        private String name;                // 加载顺序号        private Integer order;                // SPI实现类        private Class<?> clazz;                private ClassEntity(final String name, final Integer order, final Class<?> clazz) {            this.name = name;            this.order = order;            this.clazz = clazz;        }        // 省略setter和getter代码    }}

分析完成员属性,不难发现下面几点:

  • ExtensionLoader会存在一个全局的静态缓存LOADERS,缓存已经创建的ExtensionLoader实例以防止重复创建的性能开销
  • 每个@SPI标记的接口如果使用ExtensionLoader进行加载,都会生成一个全新的ExtensionLoader实例
  • @SPI标记的接口如果有多个实现,那么最终获取到这些实现实例的时候是有序的

接着看其构造函数和静态工厂方法:

// 私有构造函数,需要入参为@SPI标识的接口类型和类加载器实例private ExtensionLoader(final Class<T> clazz, final ClassLoader cl) {    // 成员变量clazz赋值    this.clazz = clazz;    // 成员变量classLoader赋值    this.classLoader = cl;    // 这里对于非ExtensionFactory接口类型会懒加载一个用于加载ExtensionFactory的ExtensionLoader    if (!Objects.equals(clazz, ExtensionFactory.class)) {        ExtensionLoader.getExtensionLoader(ExtensionFactory.class).getExtensionClassesEntity();    }}
// 实例化getExtensionLoader,静态工厂方法,需要入参为@SPI标识的接口类型和类加载器实例public static <T> ExtensionLoader<T> getExtensionLoader(final Class<T> clazz, final ClassLoader cl) {    // 前缀校验,接口类型必须非空并且必须存在@SPI注解,否则抛出异常中断    Objects.requireNonNull(clazz, "extension clazz is null");    if (!clazz.isInterface()) {        throw new IllegalArgumentException("extension clazz (" + clazz + ") is not interface!");    }    if (!clazz.isAnnotationPresent(SPI.class)) {        throw new IllegalArgumentException("extension clazz (" + clazz + ") without @" + SPI.class + " Annotation");    }    // 从缓存LOADERS中加载ExtensionLoader实例,不存在则创建,典型的懒加载模式    ExtensionLoader<T> extensionLoader = (ExtensionLoader<T>) LOADERS.get(clazz);    if (Objects.nonNull(extensionLoader)) {        return extensionLoader;    }    LOADERS.putIfAbsent(clazz, new ExtensionLoader<>(clazz, cl));    return (ExtensionLoader<T>) LOADERS.get(clazz);}
// 实例化getExtensionLoader,静态工厂方法,需要入参为@SPI标识的接口类型,使用ExtensionLoader类的类加载器public static <T> ExtensionLoader<T> getExtensionLoader(final Class<T> clazz) {    return getExtensionLoader(clazz, ExtensionLoader.class.getClassLoader());}

ExtensionLoader使用了私有构造器,使用了静态工厂方法和懒加载模式。初始化ExtensionLoader完成后并不会触发类加载工作,真正的扫描和加载行为延迟到调用getJoin系列方法执行,这里扫码和加载所有实现类信息的方法调用链:

// 加载所有扩展类信息,这里采用了DCL(双重锁校验)防止并发加载private Map<String, ClassEntity> getExtensionClassesEntity() {    // 缓存不存在    Map<String, ClassEntity> classes = cachedClasses.getValue();    if (Objects.isNull(classes)) {        // 加锁后再检查一次缓存        synchronized (cachedClasses) {            classes = cachedClasses.getValue();            if (Objects.isNull(classes)) {                // 最终确认缓存不存在,则进行加载,并且标记顺序号为0                classes = loadExtensionClass();                cachedClasses.setValue(classes);                cachedClasses.setOrder(0);            }        }    }    return classes;}
// 加载当前ExtensionLoader中clazz的所有SPI系统内的实现类private Map<String, ClassEntity> loadExtensionClass() {    SPI annotation = clazz.getAnnotation(SPI.class);    if (Objects.nonNull(annotation)) {        // 这里就是前面提到,如果@SPI注解的value()方法非空白返回值会作为默认实现的别名        // 也就是如果只使用了@SPI,那么就无法获取默认实现        // 如果使用了@SPI("foo"),可以通过别名foo去映射和获取默认实现        String value = annotation.value();        if (StringUtils.isNotBlank(value)) {            cachedDefaultName = value;        }    }    // 初始化一个Hashmap容器用于存储加载的实现类信息,这个变量会透传到下一个方法链    Map<String, ClassEntity> classes = new HashMap<>(16);    // 加载目录中的属性文件    loadDirectory(classes);    return classes;}
// 加载目录中的属性文件,并且加载文件中的实现类,目标目录:META-INF/shenyu/private void loadDirectory(final Map<String, ClassEntity> classes) {    // 文件名 => META-INF/shenyu/$className    String fileName = SHENYU_DIRECTORY + clazz.getName();    try {        // 这里使用类加载器加载文件资源,如果传入的类加载器为空会使用系统类加载器        Enumeration<URL> urls = Objects.nonNull(this.classLoader) ? classLoader.getResources(fileName)                : ClassLoader.getSystemResources(fileName);        // 遍历解析的文件URL集合        if (Objects.nonNull(urls)) {            while (urls.hasMoreElements()) {                URL url = urls.nextElement();                // 通过文件URL加载资源                loadResources(classes, url);            }        }    } catch (IOException t) {        LOG.error("load extension class error {}", fileName, t);    }}
// 加载文件资源,解析文件并且加载实现类存储到classes中private void loadResources(final Map<String, ClassEntity> classes, final URL url) throws IOException {    // 读取URL文件资源,加载到Properties中,每行格式为name=classPath    try (InputStream inputStream = url.openStream()) {        Properties properties = new Properties();        properties.load(inputStream);        properties.forEach((k, v) -> {            String name = (String) k;            String classPath = (String) v;            if (StringUtils.isNotBlank(name) && StringUtils.isNotBlank(classPath)) {                try {                    // 基于name和classPath进行类加载                    loadClass(classes, name, classPath);                } catch (ClassNotFoundException e) {                    throw new IllegalStateException("load extension resources error", e);                }            }        });    } catch (IOException e) {        throw new IllegalStateException("load extension resources error", e);    }}
// 基于name(别名)和classPath(类全限定名称)进行类加载private void loadClass(final Map<String, ClassEntity> classes,                        final String name, final String classPath) throws ClassNotFoundException {    // 类初始化,并且确定实现类必须是当前@SPI注解标识接口的子类    Class<?> subClass = Objects.nonNull(this.classLoader) ? Class.forName(classPath, true, this.classLoader) : Class.forName(classPath);    if (!clazz.isAssignableFrom(subClass)) {        throw new IllegalStateException("load extension resources error," + subClass + " subtype is not of " + clazz);    }    // 实现类必须存在注解@Join    if (!subClass.isAnnotationPresent(Join.class)) {        throw new IllegalStateException("load extension resources error," + subClass + " without @" + Join.class + " annotation");    }    // 如果缓存中不存在同样别名的实现类才进行缓存,已经存在则校验旧的类型和当前实现类型是否一致    ClassEntity oldClassEntity = classes.get(name);    if (Objects.isNull(oldClassEntity)) {        // 创建类信息实体保存别名、顺序号和实现类并且缓存,映射关系:别名 -> 类信息实体        Join joinAnnotation = subClass.getAnnotation(Join.class);        ClassEntity classEntity = new ClassEntity(name, joinAnnotation.order(), subClass);        classes.put(name, classEntity);    } else if (!Objects.equals(oldClassEntity.getClazz(), subClass)) {        throw new IllegalStateException("load extension resources error,Duplicate class " + clazz.getName() + " name "                + name + " on " + oldClassEntity.getClazz().getName() + " or " + subClass.getName());    }}

通过方法链getExtensionClassesEntity -> loadExtensionClass -> loadDirectory -> loadResources -> loadClass最终得到一个别名->实现类信息的映射,用于后续的实例化,见getJoin()方法:

// 基于别名获取实现类实例public T getJoin(final String name) {    // 别名必须为非空白字符串    if (StringUtils.isBlank(name)) {        throw new NullPointerException("get join name is null");    }    // 这里也使用DCL去cachedInstances缓存中取别名对应的值持有器,值持有器为空则创建    Holder<Object> objectHolder = cachedInstances.get(name);    if (Objects.isNull(objectHolder)) {        cachedInstances.putIfAbsent(name, new Holder<>());        objectHolder = cachedInstances.get(name);    }    Object value = objectHolder.getValue();    if (Objects.isNull(value)) {        synchronized (cachedInstances) {            // 加锁后再次判断值持有器中的值是否存在,不存在的时候则进行实现类实例化            value = objectHolder.getValue();            if (Objects.isNull(value)) {                Holder<T> pair = createExtension(name);                value = pair.getValue();                int order = pair.getOrder();                // 实例化完成后更新值持有器缓存                objectHolder.setValue(value);                objectHolder.setOrder(order);            }        }    }    return (T) value;}
// 基于别名搜索已经加载的实现类信息,并且实例化对应的实现类进行值包装private Holder<T> createExtension(final String name) {    // 加载该@SPI标识接口的所有实现类信息并且获取对应别名的实现类信息    ClassEntity classEntity = getExtensionClassesEntity().get(name);    if (Objects.isNull(classEntity)) {        throw new IllegalArgumentException("name is error");    }    Class<?> aClass = classEntity.getClazz();    // 如果实现类实例缓存中已经存在,则直接封装为值包装器返回,否则进行实例化    Object o = joinInstances.get(aClass);    if (Objects.isNull(o)) {        try {            // 反射实例化并且缓存该实现类实例            joinInstances.putIfAbsent(aClass, aClass.newInstance());            o = joinInstances.get(aClass);        } catch (InstantiationException | IllegalAccessException e) {            throw new IllegalStateException("Extension instance(name: " + name + ", class: "                    + aClass + ")  could not be instantiated: " + e.getMessage(), e);                    }    }    Holder<T> objectHolder = new Holder<>();    objectHolder.setOrder(classEntity.getOrder());    objectHolder.setValue((T) o);    return objectHolder;}

createExtension()方法中可以看到最终是使用反射方式实例化实现类,反射方法newInstance()要求该类必须提供无参构造函数,因为这里有一点隐含的约定:SPI实现类必须提供无参构造函数,否则会实例化失败。剩余的getDefaultJoin()getJoins()是基于getJoin()方法进行扩展,功能并不复杂,这里就不展开分析了。另外,在getJoin()方法用到了多级缓存:

  • cachedInstances:通过别名就可以搜索到对应的实现类实例
  • joinInstances:别名查找失败,则加载所有实现类信息,然后通过别名定位实现类类型,再通过实现类类型查找或者创建并缓存实现类实例后更新cachedInstances缓存

到此,ExtensionLoader的源码分析完毕。这里再通过一个ExtensionLoader实例成员属性内存布局图可以加深理解:

spi-attr-memory-debug

ExtensionFactory#

ExtensionFactory是工厂模式里面的工厂接口,该接口定义了一个获取SPI实现(默认实现,唯一)实例的方法:

@SPI("spi")public interface ExtensionFactory {
    /**     * Gets Extension.     *     * @param <T>   the type parameter     * @param key   此参数暂时没有使用,猜测是预留用于映射@SPI的value()     * @param clazz @SPI标识的接口类型     * @return the extension     */    <T> T getExtension(String key, Class<T> clazz);}

接着看其实现类SpiExtensionFactory的代码:

@Joinpublic class SpiExtensionFactory implements ExtensionFactory {
    @Override    public <T> T getExtension(final String key, final Class<T> clazz) {        return Optional.ofNullable(clazz)   // 入参clazz非空                .filter(Class::isInterface)  // 入参clazz必须是接口                .filter(cls -> cls.isAnnotationPresent(SPI.class))  // 入参clazz必须被@SPI标识                .map(ExtensionLoader::getExtensionLoader)  // 基于clazz这个接口类型实例化ExtensionLoader                .map(ExtensionLoader::getDefaultJoin)  // 获取该@SPI标识接口的默认实现,不存在则返回NULL                .orElse(null);    }}

这里值得注意的是:ExtensionFactory本身也是SPI系统的一部分。因此使用ExtensionFactory的时候可以直接实例化:

ExtensionFactory extensionFactory = new SpiExtensionFactory();

也可以基于ExtensionLoader进行加载:

# 在类路径META-INF/services/shenyu目录下添加一个属性文件org.apache.shenyu.spi.ExtensionFactory,内容是spi=org.apache.shenyu.spi.SpiExtensionFactory
# 然后基于ExtensionLoader进行加载ExtensionFactory extensionFactory = ExtensionLoader.getExtensionLoader(ExtensionFactory.class).getDefaultJoin();

得到ExtensionFactory实例后就可以基于@SPI接口加载其默认实现类的实例。

扩展和建议#

下面是个人的一些见解。目前来看,Shenyu中的SPI模块功能是完备的,建议考虑引入两个常用的功能:

  • 可以在Join注解中添加属性标记SPI接口实现类生成的实例是单例还是全新实例,类似于Spring中的Scope声明(singleton或者prototype)那样,例如:
@Documented@Retention(RetentionPolicy.RUNTIME)@Target(ElementType.TYPE)public @interface Join {        /**     * It will be sorted according to the current serial number..     * @return int.     */    int order() default 0;
    /**     * The join class instance should be singleton or not     * @return true or false     */    boolean isSingleton() default true;}
  • 可选地SPI的实现类实现一个初始化器接口,在该实现类实例化后回调初始化器接口方法,例如:
public interface ExtensionInitializer {        void init();  }
/** * demo */@SPIpublic interface JdbcSPI {
    String getClassName();}
@Joinpublic class MysqlSPI implements JdbcSPI, ExtensionInitializer {
    @Override    public void init() {        // callback when MysqlSPI instance init    }        @Override    public String getClassName() {        return "mysql";    }}

如果添加了这两点,能够满足很多现实场景的需求。另外,ExtensionLoader中的两处比较器成员变量可以进行代码精简,例如对classEntityComparator而言:

private final Comparator<ClassEntity> classEntityComparator = (o1, o2) -> {    if (o1.getOrder() > o2.getOrder()) {        return 1;    } else if (o1.getOrder() < o2.getOrder()) {        return -1;    } else {        return 0;    }};
// 可以精简为Comparator提供的静态工厂方法和方法引用private final Comparator<ClassEntity> classEntityComparator = Comparator.comparing(ClassEntity::getOrder);

小结#

基于Java原生SPI设计思路上设计出来的SPI框架具备了松耦合、高易用性和高扩展性的特点,并且添加了加载实例缓存、并发安全等特性,填补了原生JDKSPI的一些缺陷,ShenyuSPI模块也是如此。正是由于此强大的SPI模块的存在,Shenyu中的其他模块如Plugin模块可以实现快速插拔式配置,让加载一个全新开发的插件实例变得更加容易。