Nacos数据同步源码分析
Apache ShenYu 是一个异步的,高性能的,跨语言的,响应式的
API网关。
在ShenYu网关中,数据同步是指,当在后台管理系统中,数据发送了更新后,如何将更新的数据同步到网关中。Apache ShenYu 网关当前支持ZooKeeper、WebSocket、Http长轮询、Nacos 、Etcd 和 Consul 进行数据同步。本文的主要内容是基于Nacos的数据同步源码分析。
本文基于
shenyu-2.4.0版本进行源码分析,官网的介绍请参考 数据同步原理 。
1. 关于Nacos
Nacos 平台用于动态服务发现,以及配置和服务管理。 Shenyu网关可选择使用Nacos进行数据同步。
2. Admin数据同步
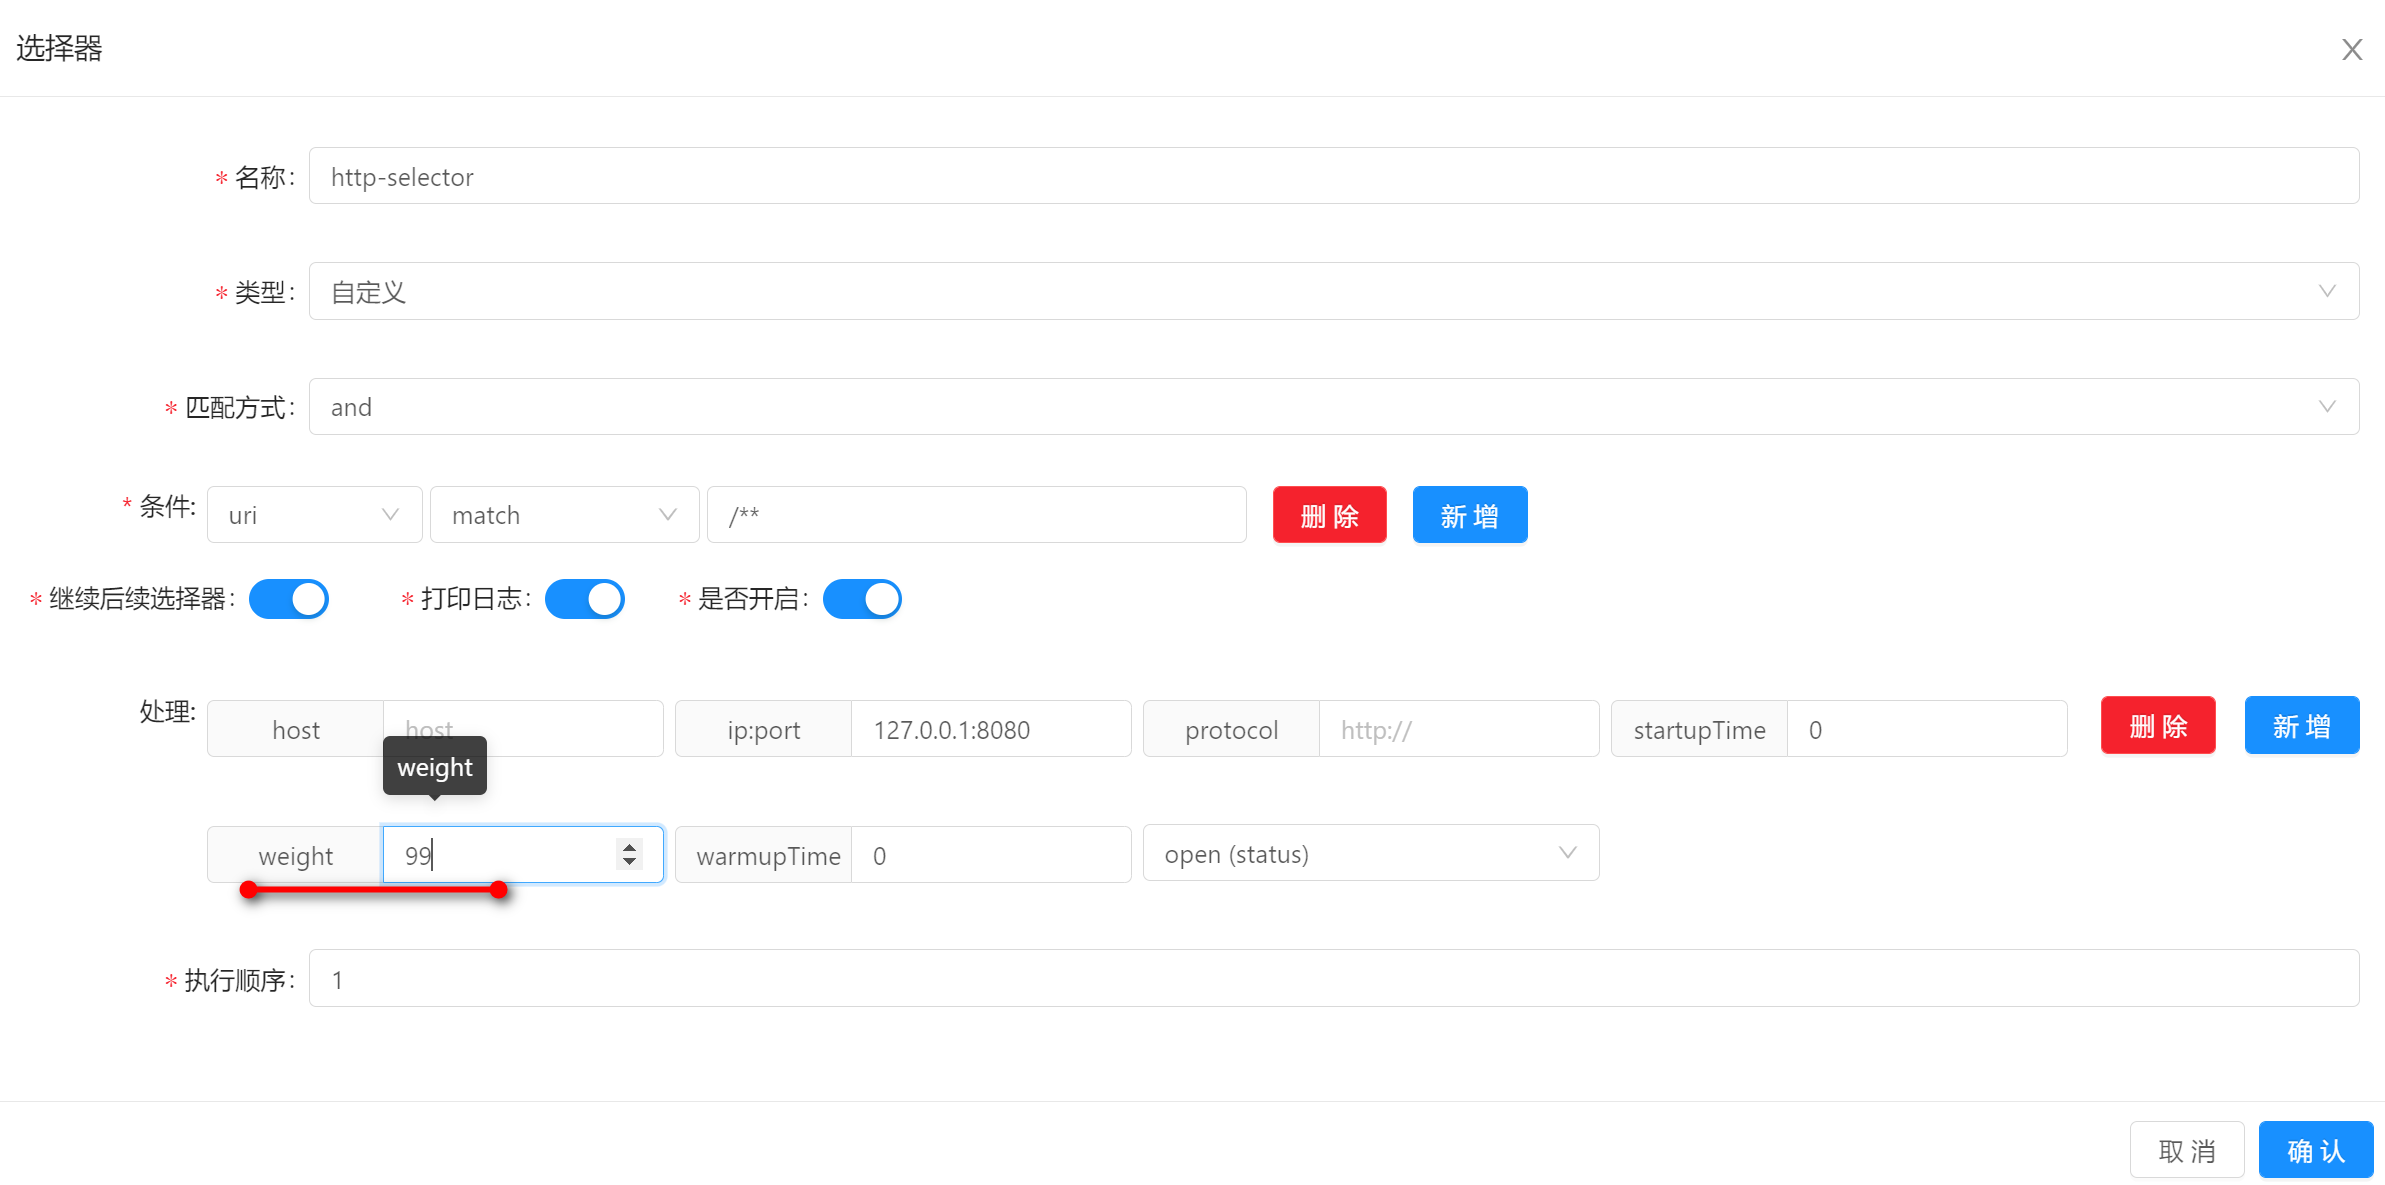
我们从一个实际案例进行源码追踪,比如在后台管理系统中,对Divide插件中的一条选择器数据进行更新,将权重更新为90:
2.1 接收数据
- SelectorController.updateSelector()
进入SelectorController类中的updateSelector()方法,它负责数据的校验,添加或更新数据,返回结果信息。
@Validated
@RequiredArgsConstructor
@RestController
@RequestMapping("/selector")
public class SelectorController {

    @PutMapping("/{id}")
    public ShenyuAdminResult updateSelector(@PathVariable("id") final String id, @Valid @RequestBody final SelectorDTO selectorDTO) {
        // 设置当前选择器数据id
        selectorDTO.setId(id);
        // 创建或更新操作
        Integer updateCount = selectorService.createOrUpdate(selectorDTO);
        // 返回结果信息
        return ShenyuAdminResult.success(ShenyuResultMessage.UPDATE_SUCCESS, updateCount);
    }

    // ......
}
2.2 处理数据
- SelectorServiceImpl.createOrUpdate()
在SelectorServiceImpl类中通过createOrUpdate()方法完成数据的转换,保存到数据库,发布事件,更新upstream。
@RequiredArgsConstructor
@Service
public class SelectorServiceImpl implements SelectorService {
    // 负责事件发布的eventPublisher
    private final ApplicationEventPublisher eventPublisher;

    @Override
    @Transactional(rollbackFor = Exception.class)
    public int createOrUpdate(final SelectorDTO selectorDTO) {
        int selectorCount;
        // 构建数据 DTO --> DO
        SelectorDO selectorDO = SelectorDO.buildSelectorDO(selectorDTO);
        List<SelectorConditionDTO> selectorConditionDTOs = selectorDTO.getSelectorConditions();
        // 判断是添加还是更新
        if (StringUtils.isEmpty(selectorDTO.getId())) {
            // 插入选择器数据
            selectorCount = selectorMapper.insertSelective(selectorDO);
            // 插入选择器中的条件数据
            selectorConditionDTOs.forEach(selectorConditionDTO -> {
                selectorConditionDTO.setSelectorId(selectorDO.getId());
                selectorConditionMapper.insertSelective(SelectorConditionDO.buildSelectorConditionDO(selectorConditionDTO));
            });
            // check selector add
            // 权限检查
            if (dataPermissionMapper.listByUserId(JwtUtils.getUserInfo().getUserId()).size() > 0) {
                DataPermissionDTO dataPermissionDTO = new DataPermissionDTO();
                dataPermissionDTO.setUserId(JwtUtils.getUserInfo().getUserId());
                dataPermissionDTO.setDataId(selectorDO.getId());
                dataPermissionDTO.setDataType(AdminConstants.SELECTOR_DATA_TYPE);
                dataPermissionMapper.insertSelective(DataPermissionDO.buildPermissionDO(dataPermissionDTO));
            }

        } else {
            // 更新数据,先删除再新增
            selectorCount = selectorMapper.updateSelective(selectorDO);
            //delete rule condition then add
            selectorConditionMapper.deleteByQuery(new SelectorConditionQuery(selectorDO.getId()));
            selectorConditionDTOs.forEach(selectorConditionDTO -> {
                selectorConditionDTO.setSelectorId(selectorDO.getId());
                SelectorConditionDO selectorConditionDO = SelectorConditionDO.buildSelectorConditionDO(selectorConditionDTO);
                selectorConditionMapper.insertSelective(selectorConditionDO);
            });
        }
        // 发布事件
        publishEvent(selectorDO, selectorConditionDTOs);

        // 更新upstream
        updateDivideUpstream(selectorDO);
        return selectorCount;
    }


    // ......

}
在Service类完成数据的持久化操作,即保存数据到数据库,这个比较简单,就不深入追踪了。关于更新upstream操作,放到后面对应的章节中进�行分析,重点关注发布事件的操作,它会执行数据同步。
publishEvent()方法的逻辑是:找到选择器对应的插件,构建条件数据,发布变更数据。
     private void publishEvent(final SelectorDO selectorDO, final List<SelectorConditionDTO> selectorConditionDTOs) {
        // 找到选择器对应的插件
        PluginDO pluginDO = pluginMapper.selectById(selectorDO.getPluginId());
        // 构建条件数据
        List<ConditionData> conditionDataList =                selectorConditionDTOs.stream().map(ConditionTransfer.INSTANCE::mapToSelectorDTO).collect(Collectors.toList());
        // 发布变更数据
        eventPublisher.publishEvent(new DataChangedEvent(ConfigGroupEnum.SELECTOR, DataEventTypeEnum.UPDATE,
                Collections.singletonList(SelectorDO.transFrom(selectorDO, pluginDO.getName(), conditionDataList))));
    }
发布变更数据通过eventPublisher.publishEvent()完成,这个eventPublisher对象是一个ApplicationEventPublisher类,这个类的全限定名是org.springframework.context.ApplicationEventPublisher。看到这儿,我们知道了发布数据是通过Spring相关的功能来完成的。
关于
ApplicationEventPublisher:当有状态发生变化时,发布者调用
ApplicationEventPublisher的publishEvent方法发布一个事件,Spring容器广播事件给所有观察者,调用观察者的onApplicationEvent方法把事件对象传递给观察者。调用publishEvent方法有两种途径,一种是实现接口由容器注入ApplicationEventPublisher对象然后调用其方法,另一种是直接调用容器的方法,两种方法发布事件没有太大区别。
ApplicationEventPublisher:发布事件;ApplicationEvent:Spring事件,记录事件源、时间和数据;ApplicationListener:事件监听者,观察者;
在Spring的事件发布机制中,有三个对象,
一个是发布事件的ApplicationEventPublisher,在ShenYu中通过构造器注入了一个eventPublisher。
另一个对象是ApplicationEvent,在ShenYu中通过DataChangedEvent继承了它,表示事件对象。
public class DataChangedEvent extends ApplicationEvent {
//......
}
最后一个是 ApplicationListener,在ShenYu中通过DataChangedEventDispatcher类实现了该接口,作为事件的监听者,负责处理事件对象。
@Component
public class DataChangedEventDispatcher implements ApplicationListener<DataChangedEvent>, InitializingBean {

    //......

}
2.3 分发数据
- DataChangedEventDispatcher.onApplicationEvent()
当事件发布完成后,会自动进入到DataChangedEventDispatcher类中的onApplicationEvent()方法,进行事件处理。
@Component
public class DataChangedEventDispatcher implements ApplicationListener<DataChangedEvent>, InitializingBean {

  /**
     * 有数据变更时,调用此方法
     * @param event
     */
    @Override
    @SuppressWarnings("unchecked")
    public void onApplicationEvent(final DataChangedEvent event) {
        // 遍历数据变更监听器(一般使用一种数据同步的方式就好了)
        for (DataChangedListener listener : listeners) {
            // 哪种数据发生变更
            switch (event.getGroupKey()) {
                case APP_AUTH: // 认证信息
                    listener.onAppAuthChanged((List<AppAuthData>) event.getSource(), event.getEventType());
                    break;
                case PLUGIN:  // 插件信息
                    listener.onPluginChanged((List<PluginData>) event.getSource(), event.getEventType());
                    break;
                case RULE:    // 规则信息
                    listener.onRuleChanged((List<RuleData>) event.getSource(), event.getEventType());
                    break;
                case SELECTOR:   // 选择器信息
                    listener.onSelectorChanged((List<SelectorData>) event.getSource(), event.getEventType());
                    break;
                case META_DATA:  // 元数据
                    listener.onMetaDataChanged((List<MetaData>) event.getSource(), event.getEventType());
                    break;
                default:  // 其他类型,抛出异常
                    throw new IllegalStateException("Unexpected value: " + event.getGroupKey());
            }
        }
    }

}
当有数据变更时,调用onApplicationEvent方法,然后遍历所有数据变更监听器,判断是哪种数据类型,交给相应的数据监听器进行处理。
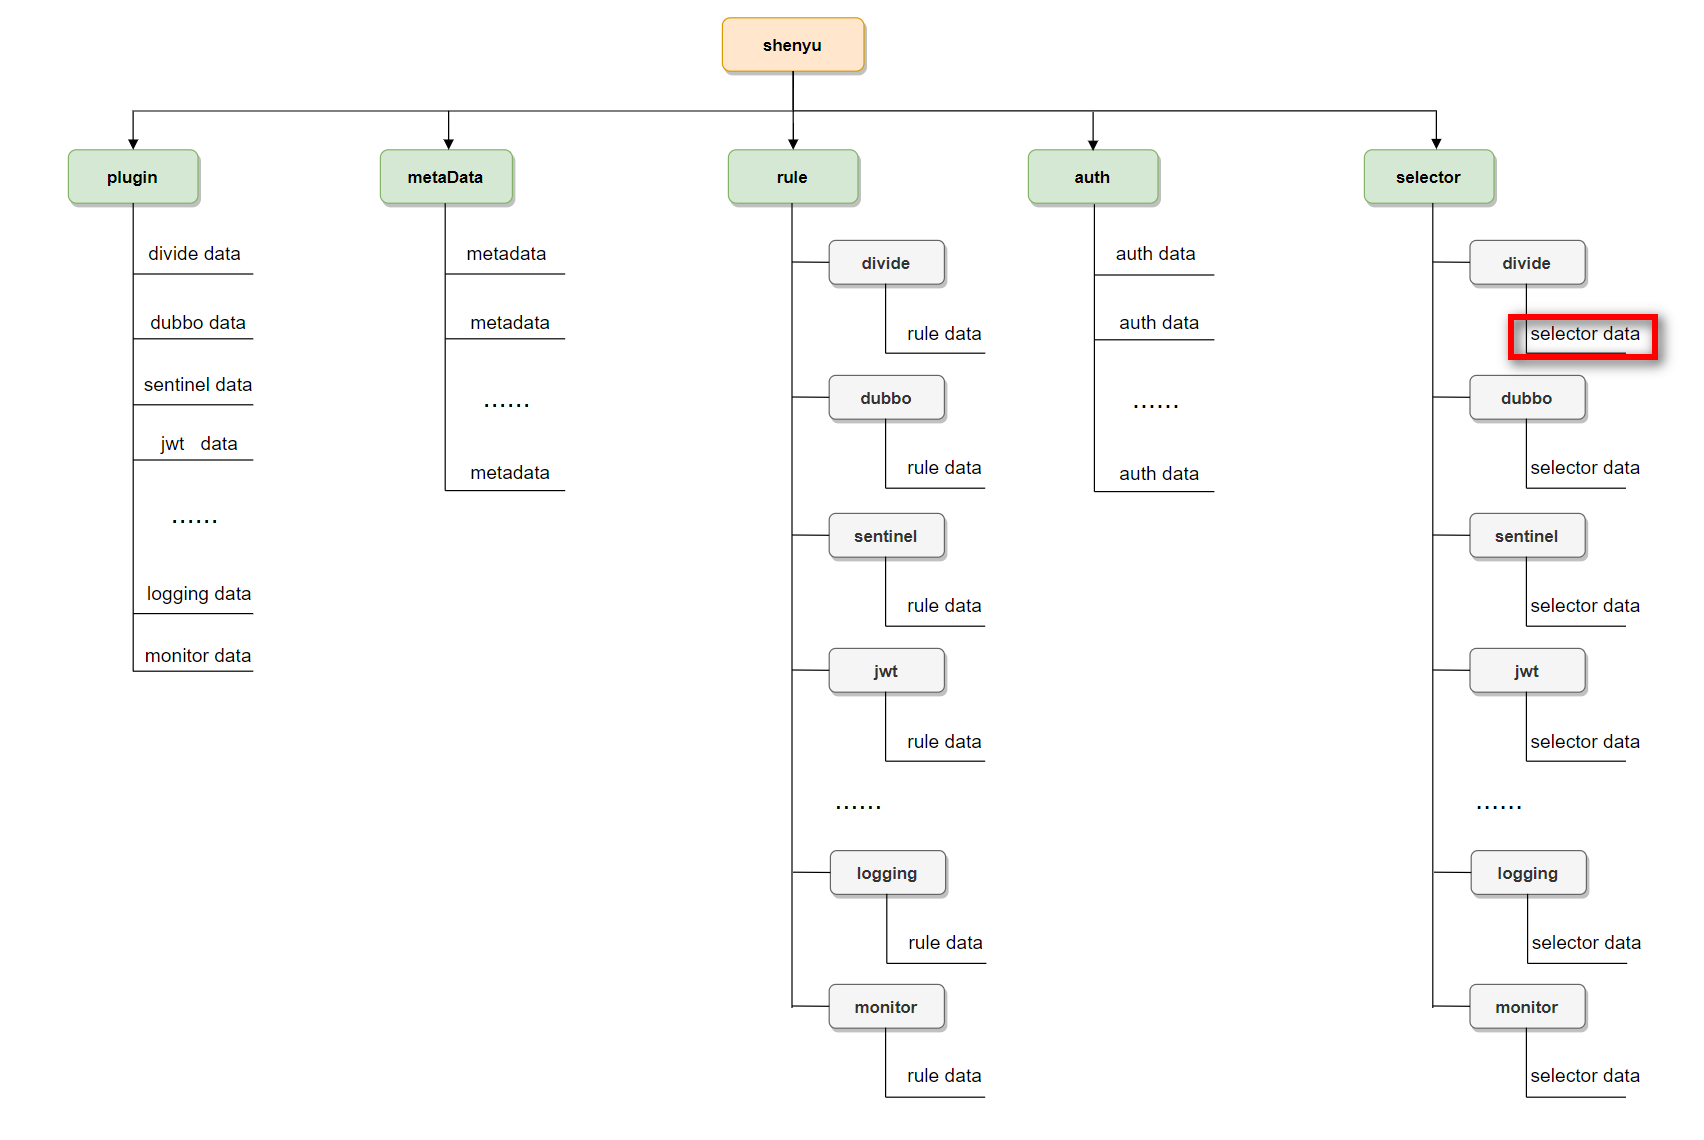
ShenYu将所有数据进行了分组,一共是五种:认证信息、插件信息、规则信息、选择器信息和元数据。
这里的数据变更监听器(DataChangedListener),就是数据同步策略的抽象,它的具体实现有:
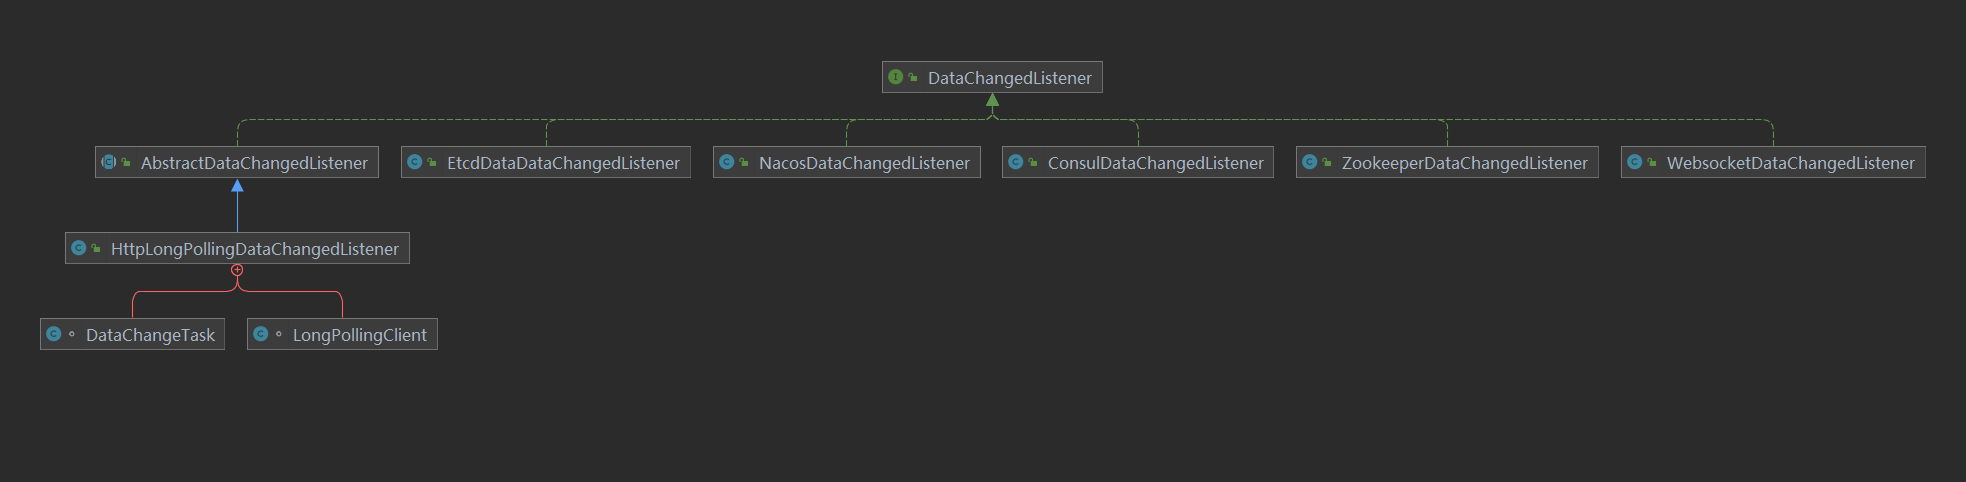
这几个实现类就是当前ShenYu支持的同步策略:
WebsocketDataChangedListener:基于websocket的数据同步;ZookeeperDataChangedListener:基于zookeeper的数据同步;ConsulDataChangedListener:基于consul的数据同步;EtcdDataDataChangedListener:基于etcd的数据同步;HttpLongPollingDataChangedListener:基于http长轮询的数据同步;NacosDataChangedListener:基于nacos的数据同步;
既然有这么多种实现策略,那么如何确定使用哪一种呢?
因为本文是基于Nacos的数据同步源码分析,所以这里以NacosDataChangedListener为例,分析它是如何被加载并实现的。
通过查��看对NacosDataChangedListener类的调用,可以发现,它是在DataSyncConfiguration类进行配置的。
/**
 * 数据同步配置类
 * 通过springboot条件装配实现
 * The type Data sync configuration.
 */
@Configuration
public class DataSyncConfiguration {

   //省略了其他代码......

    /**
     * The type Nacos listener.
     */
    @Configuration
    @ConditionalOnProperty(prefix = "shenyu.sync.nacos", name = "url")
    @Import(NacosConfiguration.class)
    static class NacosListener {

        /**
         * Data changed listener data changed listener.
         *
         * @param configService the config service
         * @return the data changed listener
         */
        @Bean
        @ConditionalOnMissingBean(NacosDataChangedListener.class)
        public DataChangedListener nacosDataChangedListener(final ConfigService configService) {
            return new NacosDataChangedListener(configService);
        }

        /**
         * Nacos data init zookeeper data init.
         *
         * @param configService the config service
         * @param syncDataService the sync data service
         * @return the nacos data init
         */
        @Bean
        @ConditionalOnMissingBean(NacosDataInit.class)
        public NacosDataInit nacosDataInit(final ConfigService configService, final SyncDataService syncDataService) {
            return new NacosDataInit(configService, syncDataService);
        }
    }

   //省略了其他代码......
}
这个配置类是通过SpringBoot条件装配类实现的。在NacosListener类上面有几个注解:
-
@Configuration:配置文件,应用上下文; -
@ConditionalOnProperty(prefix = "shenyu.sync.nacos", name = "url"):属性条件判断,满足条件,该配置类才会生效。也就是说,当我们有如下配置时,就会采用nacos进行数据同步。shenyu:sync:nacos:url: localhost:8848 -
@Import(NacosConfiguration.class):导入另一个配置类NacosConfiguration,NacosConfiguration提供了一个方法ConfigService nacosConfigService(final NacosProperties nacosProp),将Nacos属性转换为ConfigService类型的bean,而Nacos属性是通过@EnableConfigurationProperties(NacosProperties.class)导入的。我们先看ConfigService类型的bean定义。再分析属性配置类和对应的属性配置文件。
/**
* Nacos configuration.
*/
@EnableConfigurationProperties(NacosProperties.class)
public class NacosConfiguration {
/**
* register configService in spring ioc.
*
* @param nacosProp the nacos configuration
* @return ConfigService {@linkplain ConfigService}
* @throws Exception the exception
*/
@Bean
@ConditionalOnMissingBean(ConfigService.class)
public ConfigService nacosConfigService(final NacosProperties nacosProp) throws Exception {
Properties properties = new Properties();
if (nacosProp.getAcm() != null && nacosProp.getAcm().isEnabled()) {
// Use aliyun ACM service
properties.put(PropertyKeyConst.ENDPOINT, nacosProp.getAcm().getEndpoint());
properties.put(PropertyKeyConst.NAMESPACE, nacosProp.getAcm().getNamespace());
// Use subaccount ACM administrative authority
properties.put(PropertyKeyConst.ACCESS_KEY, nacosProp.getAcm().getAccessKey());
properties.put(PropertyKeyConst.SECRET_KEY, nacosProp.getAcm().getSecretKey());
} else {
properties.put(PropertyKeyConst.SERVER_ADDR, nacosProp.getUrl());
if (StringUtils.isNotBlank(nacosProp.getNamespace())) {
properties.put(PropertyKeyConst.NAMESPACE, nacosProp.getNamespace());
}
if (StringUtils.isNotBlank(nacosProp.getUsername())) {
properties.put(PropertyKeyConst.USERNAME, nacosProp.getUsername());
}
if (StringUtils.isNotBlank(nacosProp.getPassword())) {
properties.put(PropertyKeyConst.PASSWORD, nacosProp.getPassword());
}
}
return NacosFactory.createConfigService(properties);
}
}
这个方法主要分成两步,第一步根据是否使用了aliyun的ACM服务,从NacosProperties中获取不同的nacos路径和鉴权信息,第二步根据获取到的这些属性,使用Nacos官方的工厂方法,使用反射的方式,创建configService。
接下来,让我们分析一下Nacos的属性配置和对应的配置文件。
/**
* The type Nacos config.
*/
@ConfigurationProperties(prefix = "shenyu.sync.nacos")
public class NacosProperties {
private String url;
private String namespace;
private String username;
private String password;
private NacosACMProperties acm;
/**
* Gets the value of url.
*
* @return the value of url
*/
public String getUrl() {
return url;
}
/**
* Sets the url.
*
* @param url url
*/
public void setUrl(final String url) {
this.url = url;
}
/**
* Gets the value of namespace.
*
* @return the value of namespace
*/
public String getNamespace() {
return namespace;
}
/**
* Sets the namespace.
*
* @param namespace namespace
*/
public void setNamespace(final String namespace) {
this.namespace = namespace;
}
/**
* Gets the value of username.
*
* @return the value of username
*/
public String getUsername() {
return username;
}
/**
* Sets the username.
*
* @param username username
*/
public void setUsername(final String username) {
this.username = username;
}
/**
* Gets the value of password.
*
* @return the value of password
*/
public String getPassword() {
return password;
}
/**
* Sets the password.
*
* @param password password
*/
public void setPassword(final String password) {
this.password = password;
}
/**
* Gets the value of acm.
*
* @return the value of acm
*/
public NacosACMProperties getAcm() {
return acm;
}
/**
* Sets the acm.
*
* @param acm acm
*/
public void setAcm(final NacosACMProperties acm) {
this.acm = acm;
}
public static class NacosACMProperties {
private boolean enabled;
private String endpoint;
private String namespace;
private String accessKey;
private String secretKey;
/**
* Gets the value of enabled.
*
* @return the value of enabled
*/
public boolean isEnabled() {
return enabled;
}
/**
* Sets the enabled.
*
* @param enabled enabled
*/
public void setEnabled(final boolean enabled) {
this.enabled = enabled;
}
/**
* Gets the value of endpoint.
*
* @return the value of endpoint
*/
public String getEndpoint() {
return endpoint;
}
/**
* Sets the endpoint.
*
* @param endpoint endpoint
*/
public void setEndpoint(final String endpoint) {
this.endpoint = endpoint;
}
/**
* Gets the value of namespace.
*
* @return the value of namespace
*/
public String getNamespace() {
return namespace;
}
/**
* Sets the namespace.
*
* @param namespace namespace
*/
public void setNamespace(final String namespace) {
this.namespace = namespace;
}
/**
* Gets the value of accessKey.
*
* @return the value of accessKey
*/
public String getAccessKey() {
return accessKey;
}
/**
* Sets the accessKey.
*
* @param accessKey accessKey
*/
public void setAccessKey(final String accessKey) {
this.accessKey = accessKey;
}
/**
* Gets the value of secretKey.
*
* @return the value of secretKey
*/
public String getSecretKey() {
return secretKey;
}
/**
* Sets the secretKey.
*
* @param secretKey secretKey
*/
public void setSecretKey(final String secretKey) {
this.secretKey = secretKey;
}
}
}
当我们在配置文件中配置了shenyu.sync.nacos.url属性时,将采用nacos进行数据同步,此时配置类NacosListener会生效,并生成NacosDataChangedListener和NacosDataInit类型的bean。
- 生成
NacosDataChangedListener类型的bean,nacosDataChangedListener,这个bean将ConfigService类型的bean作为成员变量,ConfigService是nacos官方提供的api,当nacosDataChangedListener监听到事件时,进行回调操作,可以通过该api直接与nacos服务器交互,修改配置。 - 生成
NacosDataInit类型的bean,nacosDataInit,这个bean将beanconfigService和beansyncDataService作为成员变量,调用Nacos的apiconfigService判断配置是否未初始化,未初始化则调用syncDataService进行刷新操作,将在下文详述。 根据上文所述,在事件处理方法onApplicationEvent()中,会触发相应的listener的操作。在我们的案例中,是对一条选择器数据进行更新,数据同步采用的是nacos,所以,代码会进入到NacosDataChangedListener进行选择器数据变更处理。
//DataChangedEventDispatcher.java
@Override
@SuppressWarnings("unchecked")
public void onApplicationEvent(final DataChangedEvent event) {
// 遍历数据变更监听器(一般使用一种数据同步的方式就好了)
for (DataChangedListener listener : listeners) {
// 哪种数据发生变更
switch (event.getGroupKey()) {
// 省略了其他逻辑
case SELECTOR: // 选择器信息
listener.onSelectorChanged((List<SelectorData>) event.getSource(), event.getEventType()); // 在我们的案例中,会进入到NacosDataChangedListener进行选择器数据变更处理
break;
}
}
2.4 Nacos数据变更监听器
-
NacosDataChangedListener.onSelectorChanged()
在
onSelectorChanged()方法中,判断操作类型,是刷新同步还是更新或创建同步。根据当前选择器数据信息判断节点是否在nacos中。
/**
* Use nacos to push data changes.
*/
public class NacosDataChangedListener implements DataChangedListener {
// 选择器信息发生改变
@Override
public void onSelectorChanged(final List<SelectorData> changed, final DataEventTypeEnum eventType) {
updateSelectorMap(getConfig(NacosPathConstants.SELECTOR_DATA_ID));
switch (eventType) {
case DELETE:
changed.forEach(selector -> {
List<SelectorData> ls = SELECTOR_MAP
.getOrDefault(selector.getPluginName(), new ArrayList<>())
.stream()
.filter(s -> !s.getId().equals(selector.getId()))
.sorted(SELECTOR_DATA_COMPARATOR)
.collect(Collectors.toList());
SELECTOR_MAP.put(selector.getPluginName(), ls);
});
break;
case REFRESH:
case MYSELF:
SELECTOR_MAP.keySet().removeAll(SELECTOR_MAP.keySet());
changed.forEach(selector -> {
List<SelectorData> ls = SELECTOR_MAP
.getOrDefault(selector.getPluginName(), new ArrayList<>())
.stream()
.sorted(SELECTOR_DATA_COMPARATOR)
.collect(Collectors.toList());
ls.add(selector);
SELECTOR_MAP.put(selector.getPluginName(), ls);
});
break;
default:
changed.forEach(selector -> {
List<SelectorData> ls = SELECTOR_MAP
.getOrDefault(selector.getPluginName(), new ArrayList<>())
.stream()
.filter(s -> !s.getId().equals(selector.getId()))
.sorted(SELECTOR_DATA_COMPARATOR)
.collect(Collectors.toList());
ls.add(selector);
SELECTOR_MAP.put(selector.getPluginName(), ls);
});
break;
}
publishConfig(NacosPathConstants.SELECTOR_DATA_ID, SELECTOR_MAP);
}
}
这部分是核心。changed表示需更新的SelectorData列表,eventType表示事件类型。SELECTOR_MAP的类型是ConcurrentMap<String, List<SelectorData>>,该map的key为selector所属的plugin的名称,value为该plugin下的selector列表。NacosPathConstants.SELECTOR_DATA_ID的值为shenyu.selector.json。操作步骤如下,第一步,使用getConfig方法调用Nacos的api,从Nacos获取group为shenyu.selector.json的配置信息,updateSelectorMap方法使用这些配置信息更新SELECTOR_MAP,这样就同步到了Nacos上最新的selector信息。第二步,再根据事件类型来更新SELECTOR_MAP,最后使用publishConfig方法,调用Nacos的api,将Nacos上,group为shenyu.selector.json的配置进行全量替换。
只要将变动的数据正确写入到Nacos上,admin这边的操作就执行完成了。
在我们当前的案例中,对Divide插件中的一条选择器数据进行更新,将权重更新为90,就会对图中的特定节点更新。
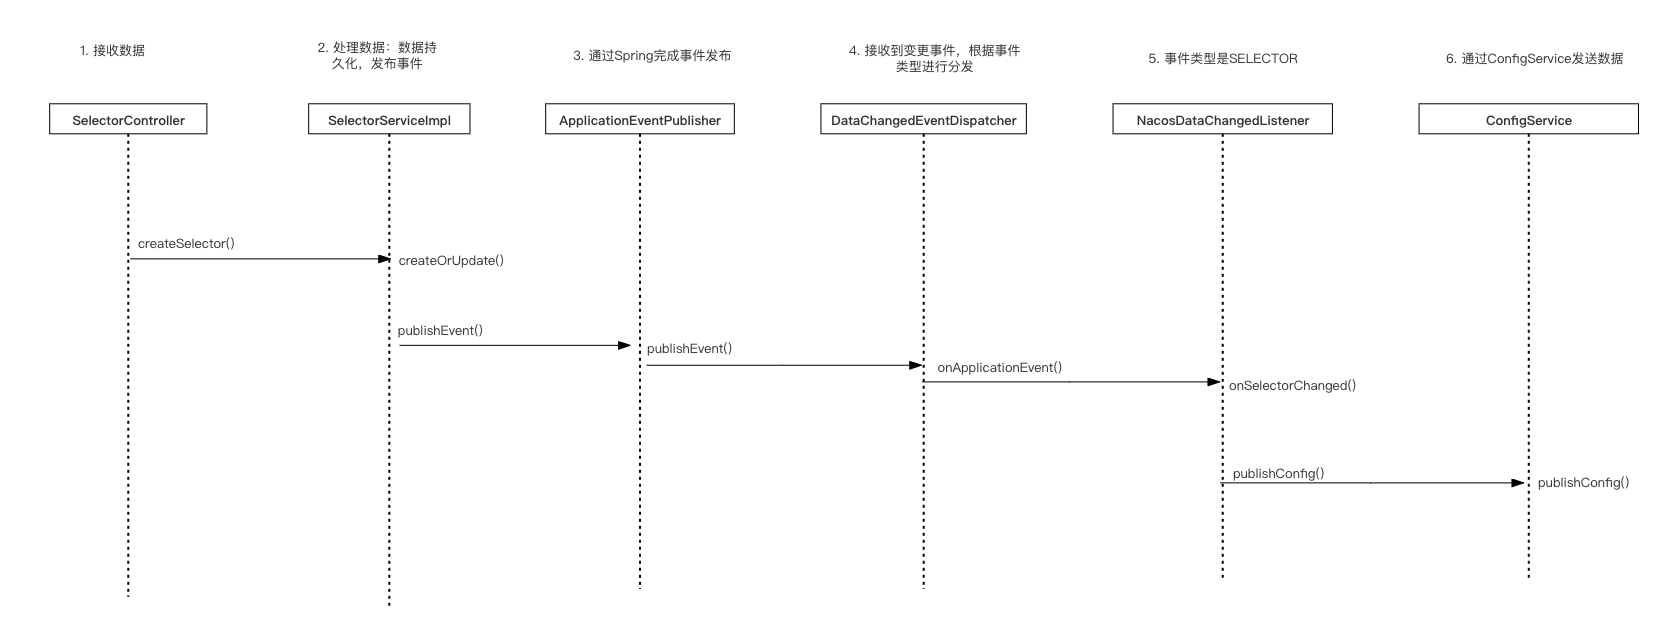
我们用时序图将上面的更新流程串联起来。
3. 网关数据同步
假设ShenYu网关已经在正常运行,使用的数据同步方式也是nacos。那么当在admin端更新选择器数据后,并且向nacos发送了变更的数据,那网关是如何接收并处理数据的呢?接下来我们就继续进行源码分析,一探究竟。
3.1 NacosSyncDataService接收数据
网关是通过NacosSyncDataService对nacos进行监听并获取数据更新的,但是在这部分内容之前,我们先看一下NacosSyncDataService类型的bean是如何生成的。答案是在Spring配置类NacosSyncDataConfiguration中定义的。我们看到NacosSyncDataConfiguration类上的注解,@ConditionalOnProperty(prefix = "shenyu.sync.nacos", name = "url"),这个注解我们在上文对ShenYu的Admin端中的NacosListener类进行分析时看到过,是一个属性条件判断,满足条件,该配置类才会生效。也就是说,当我们在Shenyu网关端有如下配置时,就表示Shenyu网关端采用nacos进行数据同步,NacosSyncDataConfiguration这个配置类生效。
shenyu:
  sync:
     nacos:
          url: localhost:8848
/**
 * Nacos sync data configuration for spring boot.
 */
@Configuration
@ConditionalOnClass(NacosSyncDataService.class)
@ConditionalOnProperty(prefix = "shenyu.sync.nacos", name = "url")
public class NacosSyncDataConfiguration {

    private static final Logger LOGGER = LoggerFactory.getLogger(NacosSyncDataConfiguration.class);

    /**
     * Nacos sync data service.
     *
     * @param configService     the config service
     * @param pluginSubscriber the plugin subscriber
     * @param metaSubscribers   the meta subscribers
     * @param authSubscribers   the auth subscribers
     * @return the sync data service
     */
    @Bean
    public SyncDataService nacosSyncDataService(final ObjectProvider<ConfigService> configService, final ObjectProvider<PluginDataSubscriber> pluginSubscriber,
                                           final ObjectProvider<List<MetaDataSubscriber>> metaSubscribers, final ObjectProvider<List<AuthDataSubscriber>> authSubscribers) {
        LOGGER.info("you use nacos sync shenyu data.......");
        return new NacosSyncDataService(configService.getIfAvailable(), pluginSubscriber.getIfAvailable(),
                metaSubscribers.getIfAvailable(Collections::emptyList), authSubscribers.getIfAvailable(Collections::emptyList));
    }

    /**
     * Nacos config service config service.
     *
     * @param nacosConfig the nacos config
     * @return the config service
     * @throws Exception the exception
     */
    @Bean
    public ConfigService nacosConfigService(final NacosConfig nacosConfig) throws Exception {
        Properties properties = new Properties();
        if (nacosConfig.getAcm() != null && nacosConfig.getAcm().isEnabled()) {
            properties.put(PropertyKeyConst.ENDPOINT, nacosConfig.getAcm().getEndpoint());
            properties.put(PropertyKeyConst.NAMESPACE, nacosConfig.getAcm().getNamespace());
            properties.put(PropertyKeyConst.ACCESS_KEY, nacosConfig.getAcm().getAccessKey());
            properties.put(PropertyKeyConst.SECRET_KEY, nacosConfig.getAcm().getSecretKey());
        } else {
            properties.put(PropertyKeyConst.SERVER_ADDR, nacosConfig.getUrl());
            if (StringUtils.isNotBlank(nacosConfig.getNamespace())) {
                properties.put(PropertyKeyConst.NAMESPACE, nacosConfig.getNamespace());
            }
            if (nacosConfig.getUsername() != null) {
                properties.put(PropertyKeyConst.USERNAME, nacosConfig.getUsername());
            }
            if (nacosConfig.getPassword() != null) {
                properties.put(PropertyKeyConst.PASSWORD, nacosConfig.getPassword());
            }
        }
        return NacosFactory.createConfigService(properties);
    }

    /**
     * Http config http config.
     *
     * @return the http config
     */
    @Bean
    @ConfigurationProperties(prefix = "shenyu.sync.nacos")
    public NacosConfig nacosConfig() {
        return new NacosConfig();
    }
}
我们重点关注一下上面代码中nacosSyncDataService这个bean的生成:
@Bean
public SyncDataService nacosSyncDataService(final ObjectProvider<ConfigService> configService, final ObjectProvider<PluginDataSubscriber> pluginSubscriber,
                                           final ObjectProvider<List<MetaDataSubscriber>> metaSubscribers, final ObjectProvider<List<AuthDataSubscriber>> authSubscribers) {
        LOGGER.info("you use nacos sync shenyu data.......");
        return new NacosSyncDataService(configService.getIfAvailable(), pluginSubscriber.getIfAvailable(),
                metaSubscribers.getIfAvailable(Collections::emptyList), authSubscribers.getIfAvailable(Collections::emptyList));
}
是直接调用NacosSyncDataService的构造方法new了一个该类型的对象。我们继续看构造方法:
public NacosSyncDataService(final ConfigService configService, final PluginDataSubscriber pluginDataSubscriber,
                                final List<MetaDataSubscriber> metaDataSubscribers, final List<AuthDataSubscriber> authDataSubscribers) {

        super(configService, pluginDataSubscriber, metaDataSubscribers, authDataSubscribers);
        start();
}
    public void start() {
        watcherData(NacosPathConstants.PLUGIN_DATA_ID, this::updatePluginMap);
        watcherData(NacosPathConstants.SELECTOR_DATA_ID, this::updateSelectorMap);
        watcherData(NacosPathConstants.RULE_DATA_ID, this::updateRuleMap);
        watcherData(NacosPathConstants.META_DATA_ID, this::updateMetaDataMap);
        watcherData(NacosPathConstants.AUTH_DATA_ID, this::updateAuthMap);
    }
    protected void watcherData(final String dataId, final OnChange oc) {
        Listener listener = new Listener() {
            @Override
            public void receiveConfigInfo(final String configInfo) {
                oc.change(configInfo);
            }

            @Override
            public Executor getExecutor() {
                return null;
            }
        };
        oc.change(getConfigAndSignListener(dataId, listener));
        LISTENERS.computeIfAbsent(dataId, key -> new ArrayList<>()).add(listener);
    }
可以看到,在构造方法中调用了start方法,并且通过watcherData方法创建了监听器,并且关联了回调函数oc,由于我们正在分析selector类型组件的变化,对应的回调函数是updateSelectorMap。这个回调函数用于处理数据。
3.2 处理数据
- NacosCacheHandler.updateSelectorMap()
经过判空逻辑之后,缓存选择器数据的操作又交给了PluginDataSubscriber处理。
    protected void updateSelectorMap(final String configInfo) {
        try {
            List<SelectorData> selectorDataList = GsonUtils.getInstance().toObjectMapList(configInfo, SelectorData.class).values().stream().flatMap(Collection::stream).collect(Collectors.toList());
            selectorDataList.forEach(selectorData -> Optional.ofNullable(pluginDataSubscriber).ifPresent(subscriber -> {
                subscriber.unSelectorSubscribe(selectorData);
                subscriber.onSelectorSubscribe(selectorData);
            }));
        } catch (JsonParseException e) {
            LOG.error("sync selector data have error:", e);
        }
    }
PluginDataSubscriber是一个接口,它只有一个CommonPluginDataSubscriber实现类,负责处理插�件、选择器和规则数据。
3.3 通用插件数据订阅者
- PluginDataSubscriber.onSelectorSubscribe()
它没有其他逻辑,直接调用subscribeDataHandler()方法。在方法中,更具数据类型(插件、选择器或规则),操作类型(更新或删除),去执行不同逻辑。
/**
 * 通用插件数据订阅者,负责处理所有插件、选择器和规则信息
 * The type Common plugin data subscriber.
 */
public class CommonPluginDataSubscriber implements PluginDataSubscriber {
    //......
     // 处理选择器数据
    @Override
    public void onSelectorSubscribe(final SelectorData selectorData) {
        subscribeDataHandler(selectorData, DataEventTypeEnum.UPDATE);
    }

    // 订阅数据处理器,处理数据的更新或删除
    private <T> void subscribeDataHandler(final T classData, final DataEventTypeEnum dataType) {
        Optional.ofNullable(classData).ifPresent(data -> {
            // 插件数据
            if (data instanceof PluginData) {
                PluginData pluginData = (PluginData) data;
                if (dataType == DataEventTypeEnum.UPDATE) { // 更新操作
                    // 将数据保存到网关内存
                    BaseDataCache.getInstance().cachePluginData(pluginData);
                    // 如果每个插件还有自己的处理逻辑,那么就去处理
                    Optional.ofNullable(handlerMap.get(pluginData.getName())).ifPresent(handler -> handler.handlerPlugin(pluginData));
                } else if (dataType == DataEventTypeEnum.DELETE) {  // 删除操作
                    // 从网关内存移除数据
                    BaseDataCache.getInstance().removePluginData(pluginData);
                    // 如果每个插件还有自己的处理逻辑,那么就去处理
                    Optional.ofNullable(handlerMap.get(pluginData.getName())).ifPresent(handler -> handler.removePlugin(pluginData));
                }
            } else if (data instanceof SelectorData) {  // 选择器数据
                SelectorData selectorData = (SelectorData) data;
                if (dataType == DataEventTypeEnum.UPDATE) { // 更新操作
                    // 将数据保存到网关内存
                    BaseDataCache.getInstance().cacheSelectData(selectorData);
                    // 如果每个插件还有自己的处理逻辑,那么就去处理                    Optional.ofNullable(handlerMap.get(selectorData.getPluginName())).ifPresent(handler -> handler.handlerSelector(selectorData));
                } else if (dataType == DataEventTypeEnum.DELETE) {  // 删除操作
                    // 从网关内存移除数据
                    BaseDataCache.getInstance().removeSelectData(selectorData);
                    // 如果每个插件还有自己的处理逻辑,那么就去处理
                    Optional.ofNullable(handlerMap.get(selectorData.getPluginName())).ifPresent(handler -> handler.removeSelector(selectorData));
                }
            } else if (data instanceof RuleData) {  // 规则数据
                RuleData ruleData = (RuleData) data;
                if (dataType == DataEventTypeEnum.UPDATE) { // 更新操作
                    // 将数据保存到网关内存
                    BaseDataCache.getInstance().cacheRuleData(ruleData);
                    // 如果每个插件还有自己的处理逻辑,那么就去处理
                    Optional.ofNullable(handlerMap.get(ruleData.getPluginName())).ifPresent(handler -> handler.handlerRule(ruleData));
                } else if (dataType == DataEventTypeEnum.DELETE) { // 删除操作
                    // 从网关内存移除数据
                    BaseDataCache.getInstance().removeRuleData(ruleData);
                    // 如果每个插件还有自己的处理逻辑,那么就去处理
                    Optional.ofNullable(handlerMap.get(ruleData.getPluginName())).ifPresent(handler -> handler.removeRule(ruleData));
                }
            }
        });
    }

}
3.4 数据缓存到内存
那么更新一条选择器数据,会进入下面的逻辑:
// 将数据保存到网关内存
BaseDataCache.getInstance().cacheSelectData(selectorData);
// 如果每个插件还有自己的处理逻辑,那么就去处理
Optional.ofNullable(handlerMap.get(selectorData.getPluginName())).ifPresent(handler -> handler.handlerSelector(selectorData));
一是将数据保存到网关的内存中。BaseDataCache是最终缓存数据的类,通过单例模式实现。选择器数据就存到了SELECTOR_MAP这个Map中。在后续使用的时候,也是从这里拿数据。
public final class BaseDataCache {
    // 私有变量
    private static final BaseDataCache INSTANCE = new BaseDataCache();
  	// 私有构造器
    private BaseDataCache() {
    }

    /**
     * Gets instance.
     *  公开方法
     * @return the instance
     */
    public static BaseDataCache getInstance() {
        return INSTANCE;
    }

    /**
    *  缓存选择器数据的Map
     * pluginName -> SelectorData.
     */
    private static final ConcurrentMap<String, List<SelectorData>> SELECTOR_MAP = Maps.newConcurrentMap();

    public void cacheSelectData(final SelectorData selectorData) {
        Optional.ofNullable(selectorData).ifPresent(this::selectorAccept);
    }

   /**
     * cache selector data.
     * 缓存选择器数据
     * @param data the selector data
     */
    private void selectorAccept(final SelectorData data) {
        String key = data.getPluginName();
        if (SELECTOR_MAP.containsKey(key)) { // 更新操作,先删除再插入
            List<SelectorData> existList = SELECTOR_MAP.get(key);
            final List<SelectorData> resultList = existList.stream().filter(r -> !r.getId().equals(data.getId())).collect(Collectors.toList());
            resultList.add(data);
            final List<SelectorData> collect = resultList.stream().sorted(Comparator.comparing(SelectorData::getSort)).collect(Collectors.toList());
            SELECTOR_MAP.put(key, collect);
        } else {  // 新增操作,直接放到Map中
            SELECTOR_MAP.put(key, Lists.newArrayList(data));
        }
    }

}
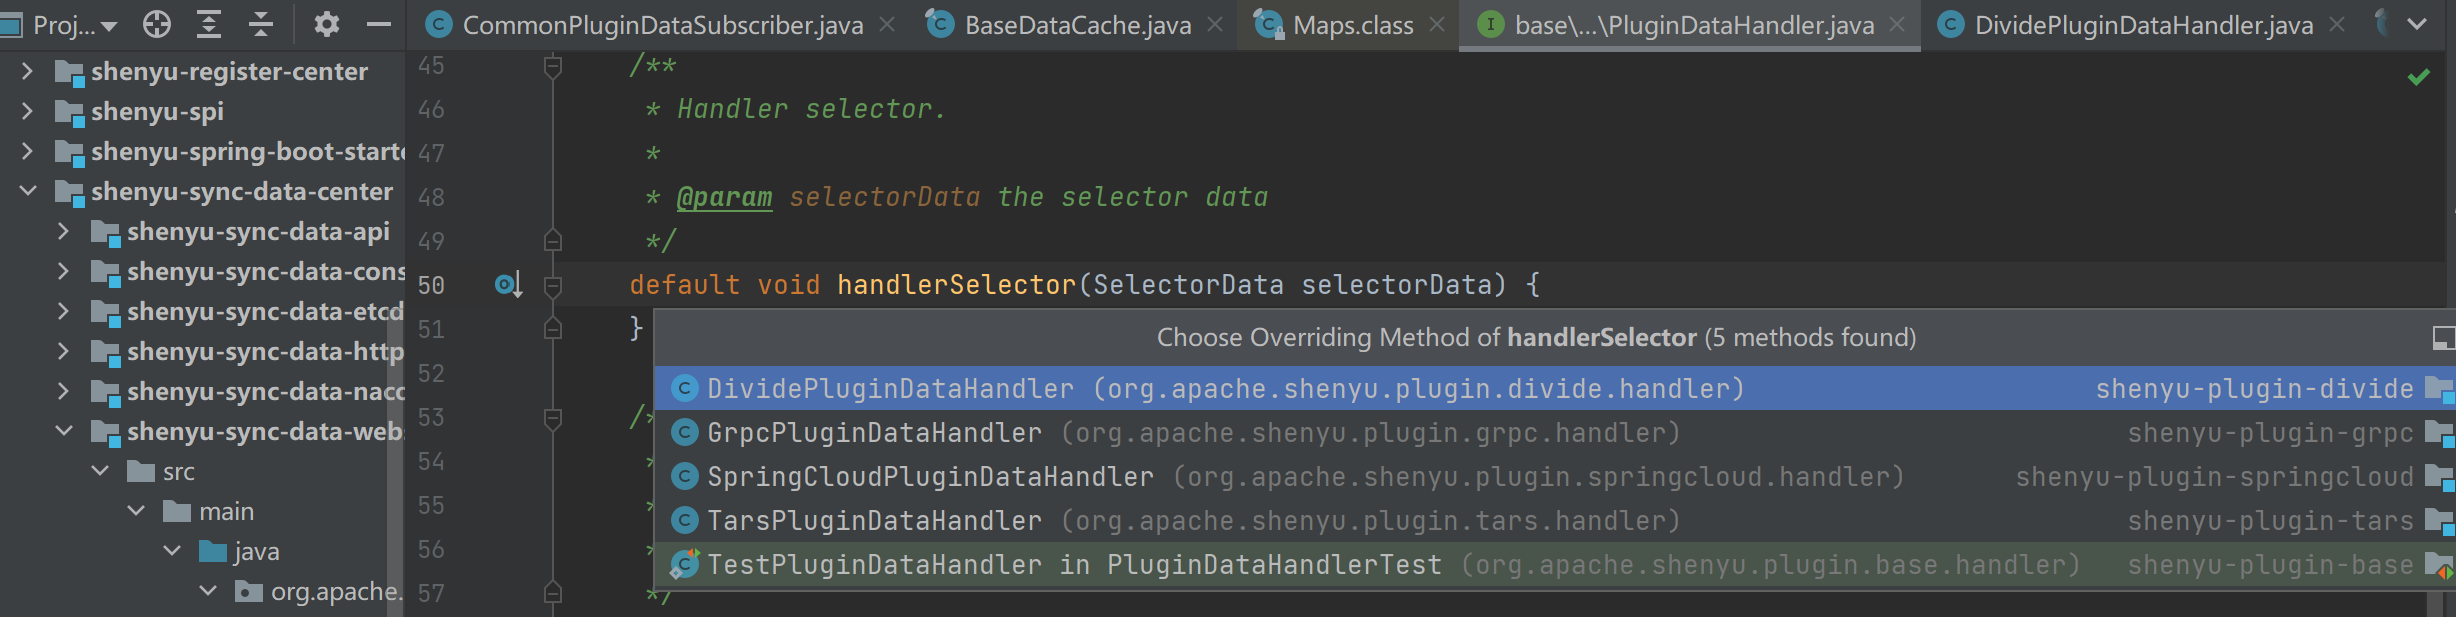
二是如果每个插件还有自己的处理逻辑,那么就去处理。 通过idea编辑器可以看到,当新增一条选择器后,有如下的插件还有处理。这里我们就不再展开了。
经过以上的源码追踪,并通过一个实际的案例,在admin端新增更新一条选择器数据,就将nacos数据同步的流程分析清楚了。
我们还是通过时序图将网关端的数据同步流程串联一下:
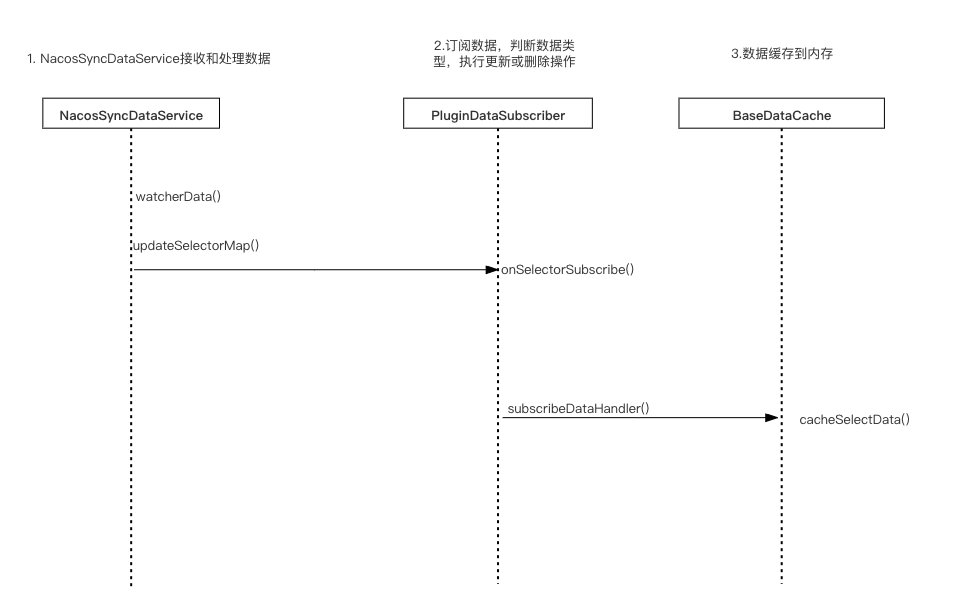
数据同步的流程已经分析完了,为了不让同步流程被打断,在分析过程��中就忽略了其他逻辑。网关同步操作初始化的流程在NacosSyncDataService的start方法中,我们在上文分析网关数据同步时分析过了,下面分析Admin的同步数据初始化。
4. Admin同步数据初始化
admin端,NacosDataInit类型的bean,在NacosListener中进行定义和生成,如果admin的配置中指定了使用nacos进行数据同步,当admin启动后,会将当前的数据信息全量同步到nacos中,实现逻辑如下:
/**
 * The type Nacos data init.
 */
public class NacosDataInit implements CommandLineRunner {

    private static final Logger LOG = LoggerFactory.getLogger(NacosDataInit.class);

    private final ConfigService configService;

    private final SyncDataService syncDataService;

    /**
     * Instantiates a new Nacos data init.
     * @param configService the nacos config service
     * @param syncDataService the sync data service
     */
    public NacosDataInit(final ConfigService configService, final SyncDataService syncDataService) {
        this.configService = configService;
        this.syncDataService = syncDataService;
    }

    @Override
    public void run(final String... args) {
        String pluginDataId = NacosPathConstants.PLUGIN_DATA_ID;
        String authDataId = NacosPathConstants.AUTH_DATA_ID;
        String metaDataId = NacosPathConstants.META_DATA_ID;
        if (dataIdNotExist(pluginDataId) && dataIdNotExist(authDataId) && dataIdNotExist(metaDataId)) {
            syncDataService.syncAll(DataEventTypeEnum.REFRESH);
        }
    }

    private boolean dataIdNotExist(final String pluginDataId) {
        try {
            String group = NacosPathConstants.GROUP;
            long timeout = NacosPathConstants.DEFAULT_TIME_OUT;
            return configService.getConfig(pluginDataId, group, timeout) == null;
        } catch (NacosException e) {
            LOG.error("Get data from nacos error.", e);
            throw new ShenyuException(e.getMessage());
        }
    }
}
判断nacos中是否存在数据,如果不存在,则进行同步。
NacosDataInit实现了CommandLineRunner接口。它是springboot提供的接口,会在所有 Spring Beans初始化之后执行run()方法,常用于项目中初始化的操作。
- SyncDataService.syncAll()
从数据库查询数据,然后进行全量数据同步,所有的认证信息、插件信息、选择器信息、规则信息和元数据信息。主要是通过eventPublisher发布同步事件。这里就跟前面提到的同步逻辑就又�联系起来了,eventPublisher通过publishEvent()发布完事件后,有ApplicationListener执行事件变更操作,在ShenYu中就是前面提到的DataChangedEventDispatcher。
@Service
public class SyncDataServiceImpl implements SyncDataService {
    // 事件发布
    private final ApplicationEventPublisher eventPublisher;

     /***
     * 全量数据同步
     * @param type the type
     * @return
     */
    @Override
    public boolean syncAll(final DataEventTypeEnum type) {
        // 同步认证信息
        appAuthService.syncData();
        // 同步插件信息
        List<PluginData> pluginDataList = pluginService.listAll();
        eventPublisher.publishEvent(new DataChangedEvent(ConfigGroupEnum.PLUGIN, type, pluginDataList));
        // 同步选择器信息
        List<SelectorData> selectorDataList = selectorService.listAll();
        eventPublisher.publishEvent(new DataChangedEvent(ConfigGroupEnum.SELECTOR, type, selectorDataList));
        // 同步规则信息
        List<RuleData> ruleDataList = ruleService.listAll();
        eventPublisher.publishEvent(new DataChangedEvent(ConfigGroupEnum.RULE, type, ruleDataList));
        // 同步元数据信息
        metaDataService.syncData();
        return true;
    }

}
5. 总结
本文通过一个实际案例,对nacos的数据同步原理进行了源码分析。涉及到的主要知识点如下:
- 基于
nacos的数据同步,主要是通过watch机制实现; - 通过
Spring完成事件发布和监听; - 通过抽象
DataChangedListener接口,支持多种同步策略,面向接口编程; - 使用单例设计模式实现缓存数据类
BaseDataCache; - 通过
SpringBoot的条件装配和starter加载机制实现配置类的加载。