LoadBalancer SPI 代码分析

· One min read
Apache ShenYu Contributor

​ 网关应用需要支持多种负载均衡的方案,包括随机选择、Hash、轮询等方式。Apache Shenyu网关中不仅实现了传统网关的这些均衡策略,还通过流量预热(warmup)等细节处理,对服务器节点的加入,做了更平滑的流量处理,获得了更好的整体稳定性。让我们来看看Shenyu是是如何设计和实现这部分功能的。

本文基于shenyu-2.5.0版本进行源码分析.

[TOC]

LoadBalancer SPI#

LoadBalancer SPI 定义在shenyu-loadbalancer模组中,以下是这个核心接口的代码,这个接口很好的诠释了这样一个理念:负载均衡是在一系列服务器节点中选出最合适的节点,也就是选择策略。做流量转发、路由和负载均衡是LoadBalance SPI的基本功能

@SPIpublic interface LoadBalancer {
    /**     * this is select one for upstream list.     *     * @param upstreamList upstream list     * @param ip ip     * @return upstream     */    Upstream select(List<Upstream> upstreamList, String ip);}

接口中,upstreamList是可选路由的一组服务器节点,Upstream 是服务器节点的数据结构,它包括的重要元素有:协议、url 、权重、时间戳,warmup,健康状态等。

public class Upstream {    /**     * protocol.     */    private final String protocol;
    /**     * url.     */    private String url;
    /**     * weight.     */    private final int weight;
    /**     * false close, true open.     */    private boolean status;
    /**     * startup time.     */    private final long timestamp;
    /**     * warmup.     */    private final int warmup;
    /**     * healthy.     */    private boolean healthy;
    /**     * lastHealthTimestamp.     */    private long lastHealthTimestamp;
    /**     * lastUnhealthyTimestamp.     */    private long lastUnhealthyTimestamp;
    /**     * group.     */    private String group;
    /**     * version.     */    private String version;}

Design of LoadBalance module`#

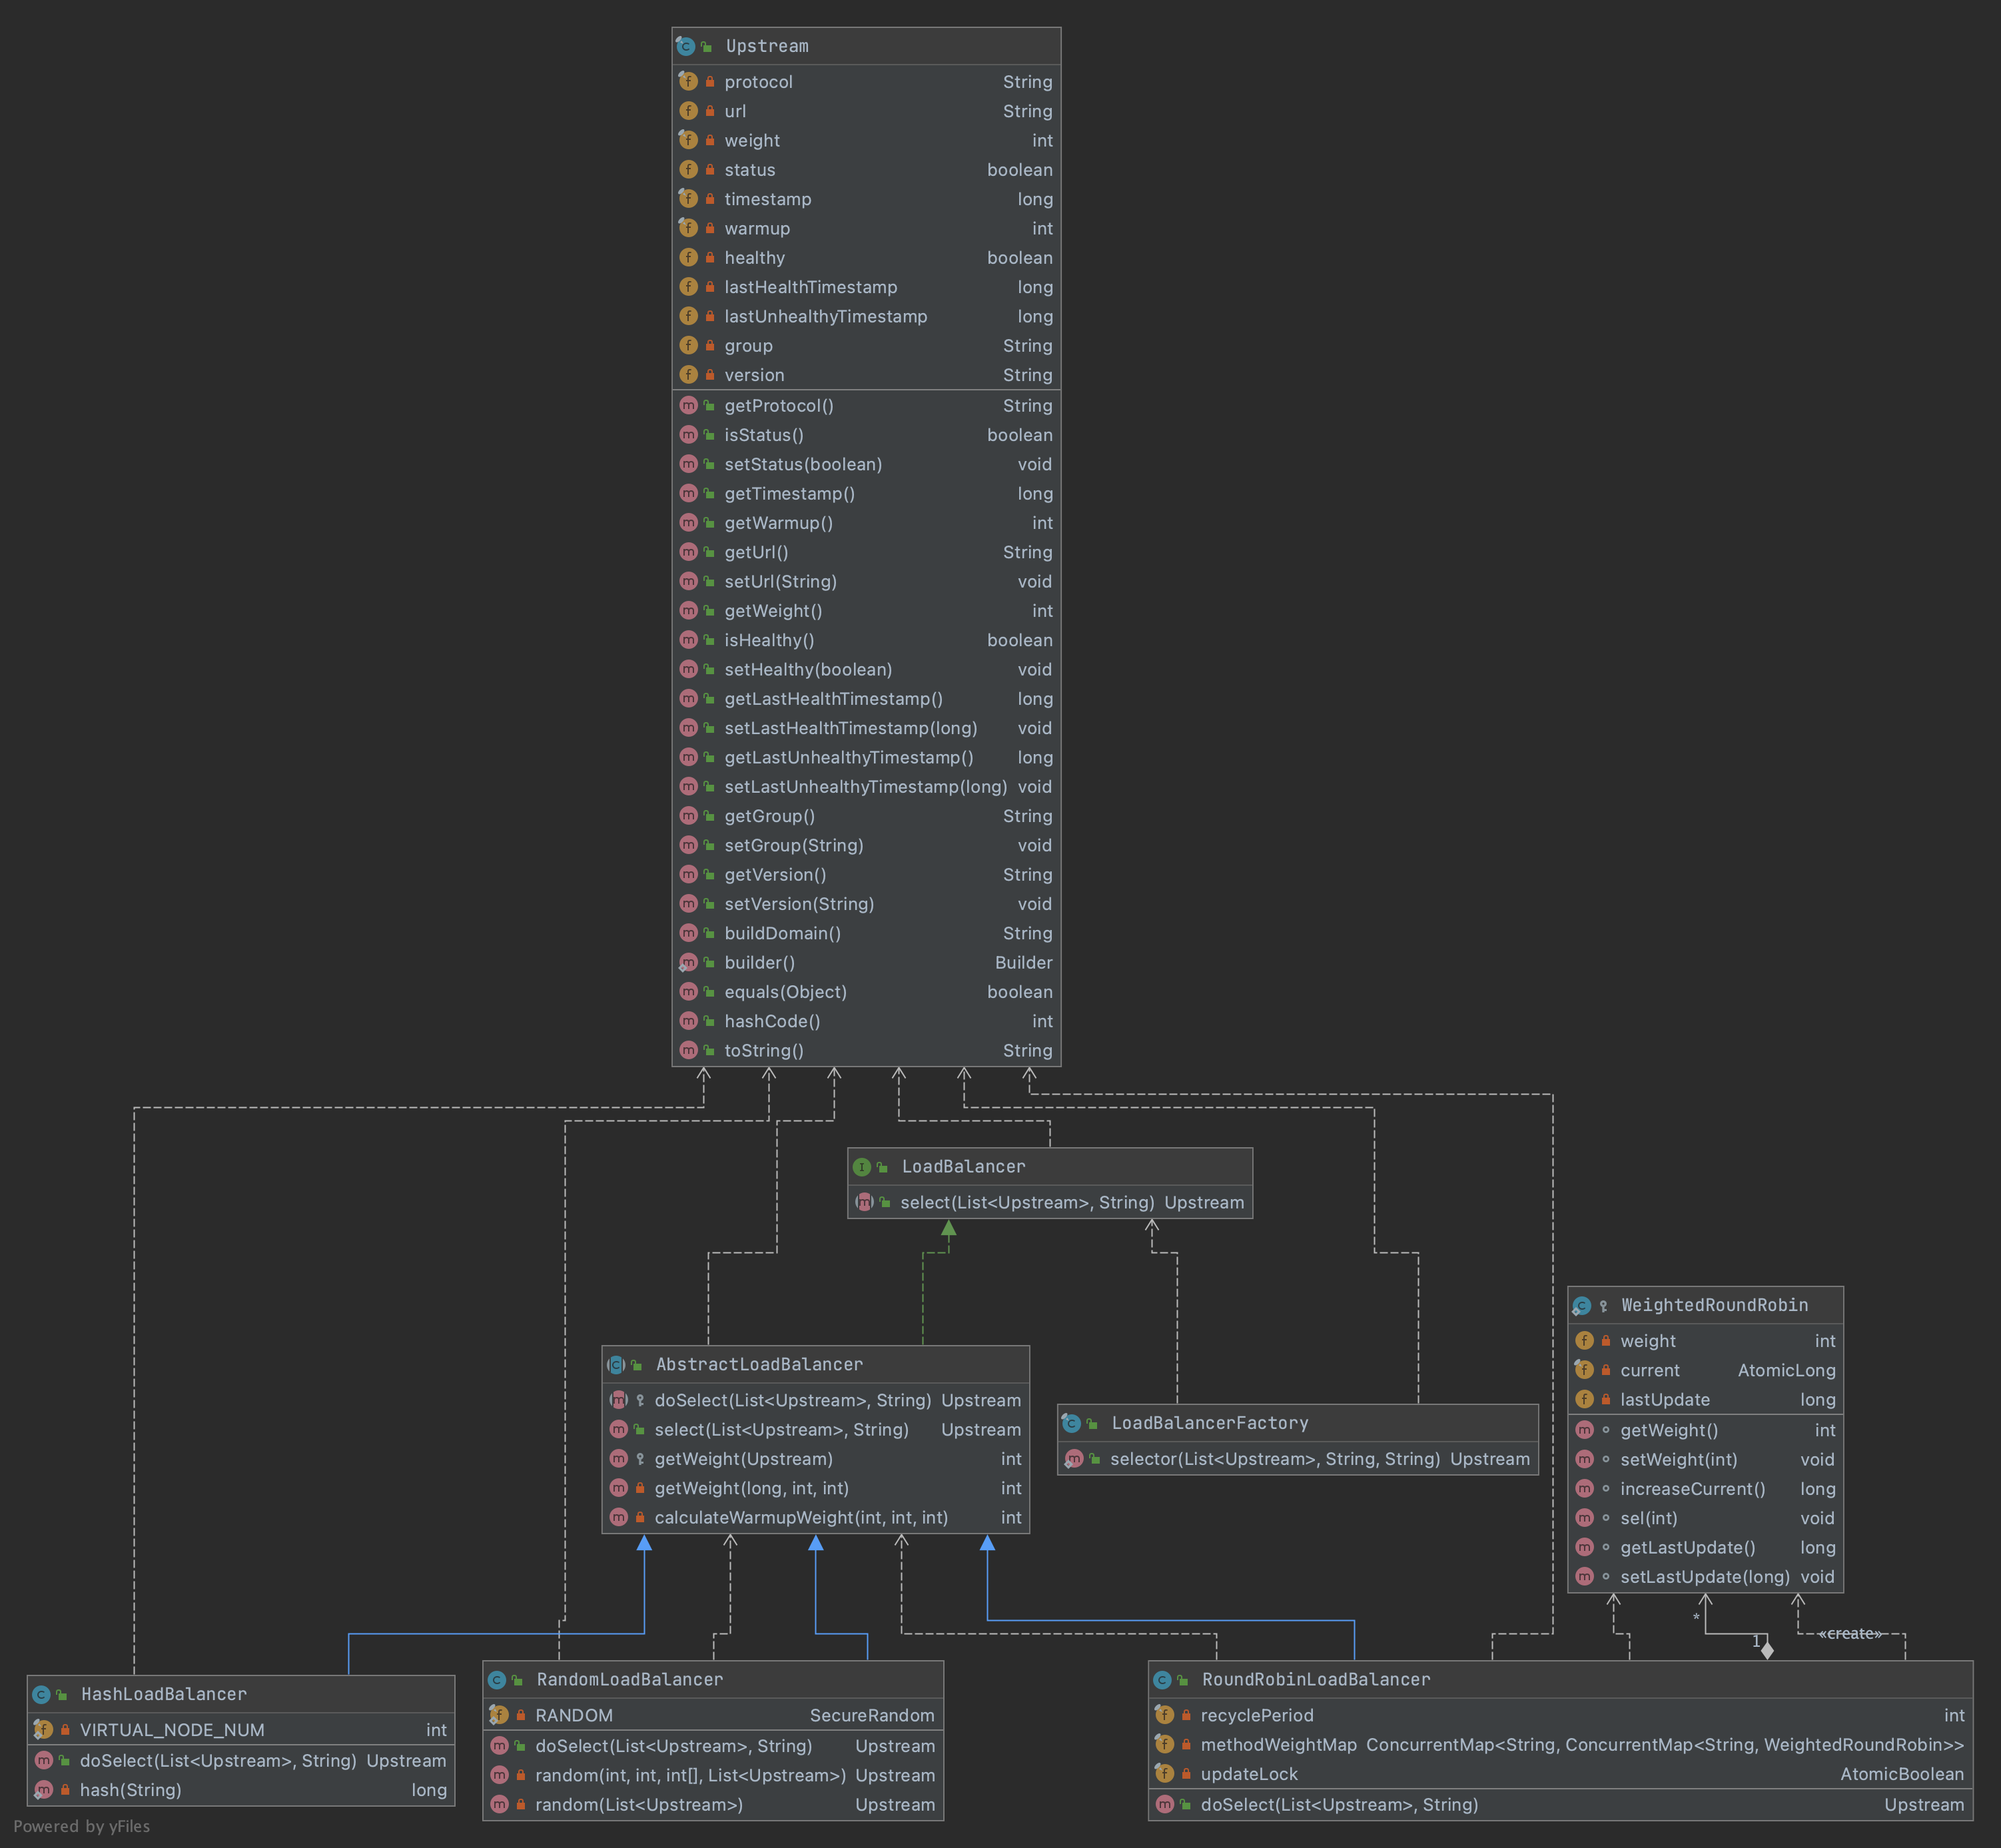
图1是LoadBalancer模组的类图:

loadbalancer-class-diagram

从类图上可以看出LoadBalance的设计概要:

  1. 抽象类AbstractLoadBalancer继承自LoadBalancer SPI接口,并提供选择的模板方法,及权重计算。

  2. 三个实做类继承AbstractLoadBalancer, 实现各自的逻辑处理。

    • RandomLoadBalancer -加权随机选择 Weight Random
    • HashLoadBalancer - 一致性Hash
    • RoundRobinLoadBalancer -加权轮询(Weight Round Robin per-packet)
  3. 由工厂类LoadBalancerFactory 实现对外的静态调用方法。

    另外根据Apache Sheny SPI规范,在SHENYU_DIERECTORY中的添加profile,配置LoadBalance的实现类,配置key=class形式,左边的operator要和LoadBalanceEnum中的定义一致。

random=org.apache.shenyu.loadbalancer.spi.RandomLoadBalancerroundRobin=org.apache.shenyu.loadbalancer.spi.RoundRobinLoadBalancerhash=org.apache.shenyu.loadbalancer.spi.HashLoadBalancer

LoadBalanceEnum的定义如下:

public enum LoadBalanceEnum {    /**     * Hash load balance enum.     */    HASH(1, "hash", true),
    /**     * Random load balance enum.     */    RANDOM(2, "random", true),
    /**     * Round robin load balance enum.     */    ROUND_ROBIN(3, "roundRobin", true);
    private final int code;    private final String name;    private final boolean support;}

AbstractLoadBalancer#

这个抽象类实做了LoadBalancer接口, 定义了抽象方法doSelect()留给实作类处理,在模板方法select() 中先进行校验,之后调用由实作类实现的doSelect()方法。

public abstract class AbstractLoadBalancer implements LoadBalancer {    /**     * Do select divide upstream.     *     * @param upstreamList the upstream list     * @param ip           the ip     * @return the divide upstream     */    protected abstract Upstream doSelect(List<Upstream> upstreamList, String ip);
    @Override    public Upstream select(final List<Upstream> upstreamList, final String ip) {        if (CollectionUtils.isEmpty(upstreamList)) {            return null;        }        if (upstreamList.size() == 1) {            return upstreamList.get(0);        }        return doSelect(upstreamList, ip);    }}

权重的处理方法getWeight()的逻辑是:当有时间戳,并且当前时间与时间戳间隔在流量预热warmup时间内,权重计算的公式为: $$ {1-1} ww = min(1,uptime/(warmup/weight)) $$ 从公式可以看出,最终的权值,与设置的weight成正比,时间间隔越接近warmup时间,权重就越大。也就是说等待的时间越长,被分派的权重越高。没有时间戳时等其他情况下,返回Upstream设置的weight值。

考虑流量预热(warmup)的核心思想是避免在添加新服务器和启动新JVM时网关性能不佳。

下面我们看一下三个实做类的实现。

RandomLoadBalancer#

这里随机LoadBalancer 可以处理两种情况:

  1. 没有权重:所有服务器都没有设定权重,或者权重都一样, 会随机选择一个。
  2. 有权重:服务器设定有不同的权重,会根据权重,进行随机选择。

下面是有权重时的随机选择代码random(): 遍历全部服务器列表,当随机值小于某个服务器权重时,这个服务器被选中(这里提前计算了前一半服务器的权重和,如果随机值大于halfLengthTotalWeight,则遍历从(weights.length + 1) / 2开始,提高了小效率)。 若遍历后没有满足条件,就在全部服务器列表中随机选择一个返回。这里getWeight(final Upstream upstream) 方法是在AbstractLoadBalancer 中定义的,按公式计算权重。

@Overridepublic Upstream doSelect(final List<Upstream> upstreamList, final String ip) {    int length = upstreamList.size();    // every upstream has the same weight?    boolean sameWeight = true;    // the weight of every upstream    int[] weights = new int[length];    int firstUpstreamWeight = getWeight(upstreamList.get(0));    weights[0] = firstUpstreamWeight;    // init the totalWeight    int totalWeight = firstUpstreamWeight;    int halfLengthTotalWeight = 0;    for (int i = 1; i < length; i++) {        int currentUpstreamWeight = getWeight(upstreamList.get(i));        if (i <= (length + 1) / 2) {            halfLengthTotalWeight = totalWeight;        }        weights[i] = currentUpstreamWeight;        totalWeight += currentUpstreamWeight;        if (sameWeight && currentUpstreamWeight != firstUpstreamWeight) {            // Calculate whether the weight of ownership is the same.            sameWeight = false;        }    }    if (totalWeight > 0 && !sameWeight) {        return random(totalWeight, halfLengthTotalWeight, weights, upstreamList);    }    return random(upstreamList);}
private Upstream random(final int totalWeight, final int halfLengthTotalWeight, final int[] weights, final List<Upstream> upstreamList) {    // If the weights are not the same and the weights are greater than 0, then random by the total number of weights.    int offset = RANDOM.nextInt(totalWeight);    int index = 0;    int end = weights.length;    if (offset >= halfLengthTotalWeight) {        index = (weights.length + 1) / 2;        offset -= halfLengthTotalWeight;    } else {        end = (weights.length + 1) / 2;    }    // Determine which segment the random value falls on    for (; index < end; index++) {        offset -= weights[index];        if (offset < 0) {            return upstreamList.get(index);        }    }    return random(upstreamList);}

因此,当采用RandomLoadBalancer时,是按权重随机分派服务器的。

HashLoadBalancer#

Apache ShenyuHashLoadBalancer 中采用了一致性hash算法,使用有序hash环,将key与服务器节点的hash映射缓存起来。对于请求的ip地址,计算出其hash值, 在hash环上顺时针查找距离这个key的hash值最近的节点,将其作为要路由的节点。一致性hash解决了传统取余hash算法的可伸缩性差的问题。

HashLoadBalancer中的采用的是加密的单向MD5散列函数,这个hash函数会hash后产生不可预期但确定性的()的结果,输出为32-bit的长整数。hash代码如下:

private static long hash(final String key) {    // md5 byte    MessageDigest md5;    try {        md5 = MessageDigest.getInstance("MD5");    } catch (NoSuchAlgorithmException e) {        throw new ShenyuException("MD5 not supported", e);    }    md5.reset();    byte[] keyBytes;    keyBytes = key.getBytes(StandardCharsets.UTF_8);    md5.update(keyBytes);    byte[] digest = md5.digest();    // hash code, Truncate to 32-bits    long hashCode = (long) (digest[3] & 0xFF) << 24            | ((long) (digest[2] & 0xFF) << 16)            | ((long) (digest[1] & 0xFF) << 8)            | (digest[0] & 0xFF);    return hashCode & 0xffffffffL;}

再看一下HashLoadBalancer的选择函数doSelect()的实现:

    private static final int VIRTUAL_NODE_NUM = 5;
    @Override    public Upstream doSelect(final List<Upstream> upstreamList, final String ip) {        final ConcurrentSkipListMap<Long, Upstream> treeMap = new ConcurrentSkipListMap<>();        upstreamList.forEach(upstream -> IntStream.range(0, VIRTUAL_NODE_NUM).forEach(i -> {            long addressHash = hash("SHENYU-" + upstream.getUrl() + "-HASH-" + i);            treeMap.put(addressHash, upstream);        }));        long hash = hash(ip);        SortedMap<Long, Upstream> lastRing = treeMap.tailMap(hash);        if (!lastRing.isEmpty()) {            return lastRing.get(lastRing.firstKey());        }        return treeMap.firstEntry().getValue();    }

这个方法中,生成带虚拟服务器节点的hash环, 一个实际节点会生成5个虚拟节点,因此整个hash环的均匀性大大增加,降低数据倾斜的发生。

为了实现hash环的有序性及顺时针查找功能,代码中使用Java 的ConcurrentSkipListMap 来存储带虚拟节点的服务器节点及其hash值, 它既能保证线程安全,又能保证数据的有序性,支持高并发。 另外,ConcurrentSkipListMap提供了一个tailMap(K fromKey)方法,可从map中查找比fromKey大的值的集合,但并不需要遍历整个数据结构。

上述代码中,生成hash环之后,就是调用ConcurrentSkipListMaptailMap()方法,找到大于等于请求的ip的hash值的子集,这个子集的第一个就是要路由的服务器节点。采用了合适的数据结构,这里的代码看上去是不是特别的简洁流畅?

RoundRobinLoadBalancer#

Round-robin轮询方法的原始定义是顺序循环将请求依次循环地连接到每个服务器。当某个服务器发生故障(例如:一分钟连接不上的服务器),从候选队列中取出,不参与下一次的轮询,直到其恢复正常。在 RoundRobinLoadBalancer中实现的是组内加权轮询(Weight Round Robin per-packet)方法:

为了计算和存储每个服务器节点的轮询次数,在这个类中定义了一个静态内部类WeigthRoundRobin,我们先看一下它的主要代码(去掉了注释):

protected static class WeightedRoundRobin {
    private int weight;        private final AtomicLong current = new AtomicLong(0);
    private long lastUpdate;
    void setWeight(final int weight) {        this.weight = weight;        current.set(0);    }    long increaseCurrent() {        return current.addAndGet(weight);    }
    void sel(final int total) {        current.addAndGet(-1 * total);    }    void setLastUpdate(final long lastUpdate) {        this.lastUpdate = lastUpdate;    }}

请重点关注这几个方法:

  • setWeight(final int weight) ,为对象设定权重,并将current重置为0.

  • increaseCurrent() : 对AtomicLong类型的对象current,累加其权重值。

  • sel(final int total): current减去传入的 total值。

下面我们看一下带权重的轮询过程是如何实现的。 首先定义了一个ConcurrentMap类型对象methodWeightMap 两层对象来存储服务器列表与其各个明细节点的轮询资料。

private final ConcurrentMap<String, ConcurrentMap<String, WeightedRoundRobin>> methodWeightMap = new ConcurrentHashMap<>(16);

这个map对象第一层的key为当前服务器列表的第一个节点的upstreamUrl, 第二个对象ConcurrentMap<String, WeightedRoundRobin>存储了组内各个服务器节点的轮询情况,内层Map的key为组内每个服务器的upstreamUrlMap对象使用JUCConcurrentHashMap,不仅存取高效,而且线程安全,支持高并发。

内层map的每个节点对应的WeighedRoundRobin作为静态内部类能确保线程安全,并实现组内的加权轮询选择功能。下面是这个类的doSelect()方法的代码。

@Overridepublic Upstream doSelect(final List<Upstream> upstreamList, final String ip) {    String key = upstreamList.get(0).getUrl();    ConcurrentMap<String, WeightedRoundRobin> map = methodWeightMap.get(key);    if (Objects.isNull(map)) {        methodWeightMap.putIfAbsent(key, new ConcurrentHashMap<>(16));        map = methodWeightMap.get(key);    }    int totalWeight = 0;    long maxCurrent = Long.MIN_VALUE;    long now = System.currentTimeMillis();    Upstream selectedInvoker = null;    WeightedRoundRobin selectedWeightedRoundRobin = null;    for (Upstream upstream : upstreamList) {        String rKey = upstream.getUrl();        WeightedRoundRobin weightedRoundRobin = map.get(rKey);        int weight = getWeight(upstream);        if (Objects.isNull(weightedRoundRobin)) {            weightedRoundRobin = new WeightedRoundRobin();            weightedRoundRobin.setWeight(weight);            map.putIfAbsent(rKey, weightedRoundRobin);        }        if (weight != weightedRoundRobin.getWeight()) {            // weight changed.            weightedRoundRobin.setWeight(weight);        }        long cur = weightedRoundRobin.increaseCurrent();        weightedRoundRobin.setLastUpdate(now);        if (cur > maxCurrent) {            maxCurrent = cur;            selectedInvoker = upstream;            selectedWeightedRoundRobin = weightedRoundRobin;        }        totalWeight += weight;    }    ......  //erase the section which handles the time-out upstreams.     if (selectedInvoker != null) {        selectedWeightedRoundRobin.sel(totalWeight);        return selectedInvoker;    }    // should not happen here    return upstreamList.get(0);}

举例,若服务器组upstreamUrl 分别为: LIST = [upstream-20, upstream-50, upstream-30]时,经过一轮执行后,建立的methodWeightMap 资料如下:

methodWeightMap

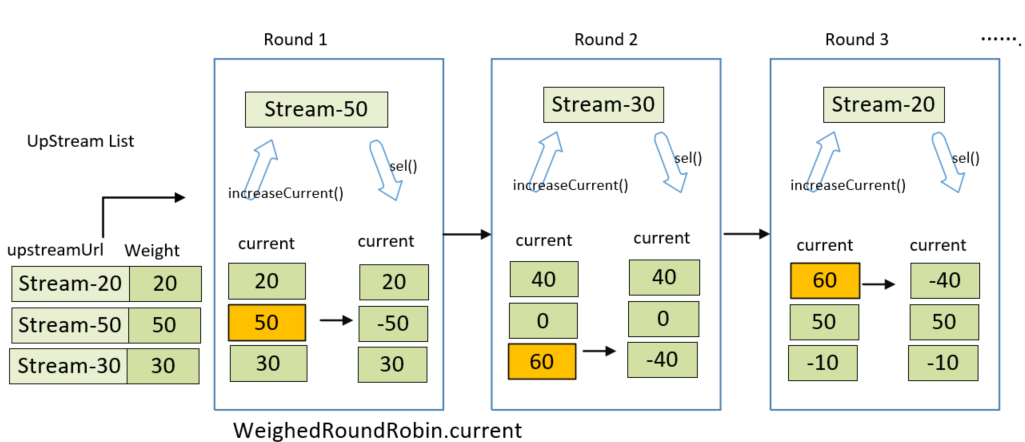
假设上述的LIST中,各个服务器节点的权重数组为: [20,50,30], 下图是内部类current 值变化和轮询选择过程:

weighted-roundrobin-demo

每一轮,选择值current最大的服务器节点:

  • Round1:
    • 对当前服务器LIST做遍历,当服务器节点的weightedRoundRobin 为null时,current被置为各自的权重; 不为null时,累加各自的权重。
    • 即:遍历后current 分别为 [20, 50,30] , 会选择Stream-50, Stream-50对应的WeightRoundRobin静态类做 sel(-total)处理,current 更新为[20,-50, 30].
  • Round 2 遍历后的current是[40,0,60], 会选择Stream-30, current分别更新为[40,0,-40].
  • Round 3 遍历后的current是[60,50,-10], 会选择Stream-20,current分别更新为[-40,50,-10].

中间进行了容错处理, 当服务器的个数与map个数不一样,就对methodWeightMap 加锁做处理。 用先copy 后modify的方式, 把超时的服务器remove掉,即移除掉发生故障的服务器,并更新Map资料。如下是异常时的处理代码:

    if (!updateLock.get() && upstreamList.size() != map.size() && updateLock.compareAndSet(false, true)) {        try {            // copy -> modify -> update reference.            ConcurrentMap<String, WeightedRoundRobin> newMap = new ConcurrentHashMap<>(map);            newMap.entrySet().removeIf(item -> now - item.getValue().getLastUpdate() > recyclePeriod);            methodWeightMap.put(key, newMap);        } finally {            updateLock.set(false);        }    }    if (Objects.nonNull(selectedInvoker)) {        selectedWeightedRoundRobin.sel(totalWeight);        return selectedInvoker;    }    // should not happen here.    return upstreamList.get(0);

LoadBalancerFactory#

在这个工厂类中,提供了调用LoadBalancer的静态方法, 其中ExtensionLoaderApache ShenyuSPI执行入口。也就是说,LoadBalancer模组是可配置、可扩展的。这个静态方法中的algorithm变量是LoadBalanceEnum中定义name枚举类型。

/** * Selector upstream. * * @param upstreamList the upstream list * @param algorithm    the loadBalance algorithm * @param ip           the ip * @return the upstream */public static Upstream selector(final List<Upstream> upstreamList, final String algorithm, final String ip) {    LoadBalancer loadBalance = ExtensionLoader.getExtensionLoader(LoadBalancer.class).getJoin(algorithm);    return loadBalance.select(upstreamList, ip);}

Using of LoadBalancer module#

上面说明了LoadBalancer SPI接口及三个实作类。下面看一下LoadBalancerApache Shenyu中是如何被调用的。DividePlugin是路由选择插件,所有的Http请求都由该插件进行负载均衡处理。当请求头rpcType = http, 且开启该插件时,它将根据请求参数匹配规则,最终交由下游插件进行响应式代理调用。

DividePlugindoExecute方法中,先对要转发的请求的Header大小、content长度等做校验,

@Overrideprotected Mono<Void> doExecute(final ServerWebExchange exchange, final ShenyuPluginChain chain, final SelectorData selector, final RuleData rule) {   ......}

接口方法的第二个参数是ShenyuPluginChain 类型,代表plugin的调用链,具体可参见Apache Sheyuplugin的调用机制。第三个SelectorData类型的参数是选择器, 第四个是RuldData类型,代表规则。分别请查看对应的代码。

下面给出了doExecute()方法中,有关LoadBalancer调用的代码片段:

   //取到要路由的服务器节点列表。   List<Upstream> upstreamList = UpstreamCacheManager.getInstance().findUpstreamListBySelectorId(selector.getId());    ...     //取到请求的ip    String ip = Objects.requireNonNull(exchange.getRequest().getRemoteAddress()).getAddress().getHostAddress();
    //调用Util方法,执行LoadBalancer处理    Upstream upstream = LoadBalancerFactory.selector(upstreamList, ruleHandle.getLoadBalance(), ip);

这里UpstreamCacheManager 是缓存的要路由的服务器节点 , ruleHandle.getLoadBalance()取到的是LoadBalanceEnum定义的枚举name, 如random, hash, roundRobin等.

经过封装,调用负载均衡功能非常的方便。 未来增加新的LoadBalancer类,这些调用的Plugin代码完全不需要变更。

Summary#

经过上面的代码解读,从设计角度总结LoadBalancer 模组具有如下的特点:

  1. 可扩展性:面向接口的设计,及基于Apache Shenyu SPI的实现,使得系统具有良好的可扩展性。可以方便的扩展为其他的动态的负载均衡算法,如最少连接方式(least connection)、最快模式( fastest)。并支持集群处理,具有良好的可扩展性。

  2. 可伸缩性:采用的一致性hash、权重随机和权重轮询算法,都可以无缝支持集群扩容或缩容。

  3. 流量预热等更细致的设计,能带来整体上更为平滑的负载均衡。

MatchStrategy--基于SPI的代码分析

· One min read
Apache ShenYu Contributor

Apache Shenyu 网关的各个Plugin(包括Dubbo, gRPC,Spring-cloud等) 中,routing参数均设计为可以接受多个条件的组合。 为了实现这样的目的,遵循其SPI的机制进行将参数及行为抽象为如下三部分,这些SPIshenyu-plugin-base模组中实现

  • ParameterData-参数资料
  • PredictJudge-断言
  • MatchStrategy-匹配策略

相对而言,匹配策略是需要扩展点最少的部分。想象一下,对多个条件的组合判断,最常见的几种规则是:全部都满足、至少满足一个条件、至少满足第一个,或者大部分满足等等。 并且要做到对各种plugin的不同类型的参数,如IP, header, uri等。针对这些需求,如何将MatchStrategy设计得简单易用且容易扩展?

MatchStrategy#

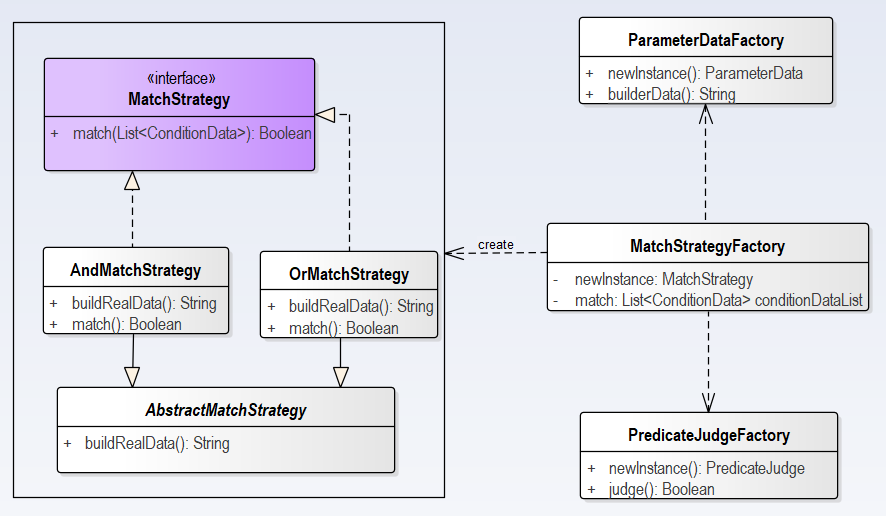
MatchStrategy的实现代码在shenyu-plugin-base模组中,基于Apache ShenyuSPI创建机制, 设计上结合了工厂模式和策略模式,整体MatchStrategy的设计类图如下下:

MatchStrategy-class-diagram

以接口MatchStrategy为基础,设计实现类,并由抽象类AbstractMatchStrategy实现公共方法,由工厂类MatchStrategyFactory提供创建和外部调用功能。

MatchStrategy Interface#

首先来看MatchStrategy SPI接口的定义:

@SPIpublic interface MatchStrategy {
    Boolean match(List<ConditionData> conditionDataList, ServerWebExchange exchange);}

@SPI annotation代表这是一个SPI接口。ServerWebExchangeorg.springframework.web.server.ServerWebExchange ,代表HTTPrequest-response 的交互内容。ConditionData的代码如下,更多说明可以参考PredicateJudge代码分析中的说明,

public class ConditionData {
    private String paramType;    private String operator;
    private String paramName;    private String paramValue;}

AbstractMatchStrategy#

在抽象类AbstractMatchStrategy中,定义MatchStrategy的公共方法, 用buildRealData方法中,用ParameterData工厂类ParameterDataFactory,将多种参数如 Ip, Cookie, Header,uri等资料都以统一的接口方法来呈现。这些参数格式及规则的修改,不会影响到对参数规则匹配MatchStrategy的调用。

public abstract class AbstractMatchStrategy {
    public String buildRealData(final ConditionData condition, final ServerWebExchange exchange) {        return ParameterDataFactory.builderData(condition.getParamType(), condition.getParamName(), exchange);    }}

实现类及Profile#

基于上述接口定义, shenyu-plugin-base 模组提供了两个MatchStrategy实现类

  • AndMatchStrategy-多个条件 AND

  • OrMatchStrategy- 多个条件 OR

    并在SHENYU_DIRECTORY目录下的配置文件中,对实作类做了配置。在系统启动时会由顶层SPIkey-value形式加载并cache起来。

and=org.apache.shenyu.plugin.base.condition.strategy.AndMatchStrategyor=org.apache.shenyu.plugin.base.condition.strategy.OrMatchStrategy

两个实现类AndMatchStrategy 继承AbstractMatchStrategy 并实做了MatchStrategy

AndMatchStrategy- “与”的关系#

由于PredicateJudge封装了条件判断的多样性,ConditionDataParameData封装了多种参数。那么对于多个条件的匹配来说,采用Stream流处理及lamda表达式,非常简洁高效达成了:全部条件都满足,即"AND"的逻辑。

@Joinpublic class AndMatchStrategy extends AbstractMatchStrategy implements MatchStrategy {
    @Override    public Boolean match(final List<ConditionData> conditionDataList, final ServerWebExchange exchange) {        return conditionDataList                .stream()                .allMatch(condition -> PredicateJudgeFactory.judge(condition, buildRealData(condition, exchange)));    }}

OrMatchStrategy是同样的实现方式,实现: 至少满足一个条件"OR"的规则,在此不做赘述。

MatchStrategyFactory#

这是MatchStrategy的工厂类,实现了两个方法,一个是newInstance()方法根据策略代码和名称,返回由SPI ExtensionLoader按key来加载对应的MatchStrategy实现类。

    public static MatchStrategy newInstance(final Integer strategy) {        String matchMode = MatchModeEnum.getMatchModeByCode(strategy);        return ExtensionLoader.getExtensionLoader(MatchStrategy.class).getJoin(matchMode);    }

MatchModeEnum 中定义了match策略的code和name。 调用时由策略名称,如"and","or",根据启动时SPI加载的key-value资料,找到对应的实现类:

AND(0, "and"),  OR(1, "or");

另一个是match()方法,调用实作类的match方法。

    public static boolean match(final Integer strategy, final List<ConditionData> conditionDataList, final ServerWebExchange exchange) {        return newInstance(strategy).match(conditionDataList, exchange);    }

调用方式#

shenyu-plugin模组的各个plugin的基类AbstractShenyuPlugin 中,定义了两个选择的方法:filterSelectorfilterRule 它们都调用了MatchStrategyFactory 方法,下面是AbstractShenyuPluginfilterSelector方法的代码:

    private Boolean filterSelector(final SelectorData selector, final ServerWebExchange exchange) {        if (selector.getType() == SelectorTypeEnum.CUSTOM_FLOW.getCode()) {            if (CollectionUtils.isEmpty(selector.getConditionList())) {                return false;            }            return MatchStrategyFactory.match(selector.getMatchMode(), selector.getConditionList(), exchange);        }        return true;    }

这段代码中,先检测参数匹配条件SelectorData是否为空,之后调用MatchStrategyFactorymatch方法,工厂方法将调用对应的实作类的match方法。同理,如下是AbstractShenyuPluginfilterRule 方法

    private Boolean filterRule(final RuleData ruleData, final ServerWebExchange exchange) {        return ruleData.getEnabled() && MatchStrategyFactory.match(ruleData.getMatchMode(), ruleData.getConditionDataList(), exchange);    }

也同样是调用MatchStrategyFactorymatch方法,看上去是不是特别的简洁甚至是简单? 在PredicteJudge代码分析文中,对shenyu-plugin如何做参数调用方面做了更进一步的描述。

Summary#

由于应用了Apache shenyuSPI框架,使得整体上具有松耦合、易于扩展的特点。在多个参数规则策略方面,MatchStrategy提供了良好的设计,虽然目前只提供了两个AND 和OR的实现类,但未来可以很轻松地扩展为更多MatchStrategy规则,例如 firstOf:即必须满足第一个条件,或mostOf-满足大部分条件等更多复杂策略,而其他调用部分的代码完全不受影响。

有兴趣的读者可以去阅读Shenyu plugin的源码了解更多内容。

PredicateJudge-- 基于SPI的设计实现分析

· One min read
Apache ShenYu Contributor

灵活的插件和规则定义,是Shenyu网关的一大特色。它以插件形式支持多种网络协议和多种流行的微服务框架,如Dubbo, gRPC和 Spring-Cloud 等。 为了实现对各种协议及插件的配置规则的解析,网关在规则策略解析方面,采用了优雅的SPI(Service Provider Interface)实现,当添加新的插件时,规则解析部分可以沿用现有实现或采用SPI机制快速实现,具有良好的可扩展性。

SPI 的顶层设计#

Shenyu的SPI采用接口+ 工厂模式+配置文件的方式,来实现模组的动态加载。在其shen-SPI-模组,做了SPI的顶层设计。定义了@ Join ,@SPI 两个annotation。 其中@Join 代表此类会加入扩展机制,相当于是做申请注册。 @SPI 标明当前类为SPI功能扩展类。

Fig 1 classes in the shenyu-spi

toplevel-SPI

配置文件方面,定义SPI加载的目录为 META-INF/shenyu/

SHENYU_DIRECTORY = "META-INF/shenyu/";

系统启动时,会扫描 SHENYU_DIRECTORY 下的配置文件,并由 ExtensionLoader 类来加载所配置的SPI扩展类,并cache到内存中。 配置文件内容为 key=class的形式。 在系统执行期间, 由ExtensionFactory的实现类,返回key所对应的SPI实现类。

shenyu-plugin的SPI 实现#

shenyu-plugin模组中,按照插件机制,实现了各种请求转发功能,包括支持request, redirect, response, rewrite等http协议功能,及 gRPC, dubbo, hystrix等微服务框架, 并且插件功能还在不断增加中。如果在各自的功能插件实做类中,还要做对routing 参数的解析等处理,不仅会造成程序的冗余,而且当要支持各自匹配规则,如通配符、正则表达式、SpEL解析等,会造成频繁对插件核心代码的修改。因此,在shenyu-plugin模组中,将routing参数解析做了更高一层的抽象,并按照SPI机制做了规则解析的实现。解析由三个部分组成:

  • ParameterData-参数资料,

  • PredictJudge-断言

  • MatchStrategy-匹配策略三个SPI实现。

    这些扩展类定义在 shenyu-plugin-base module中,经过这样抽象后,每个插件实现中,routing 参数解析的功能全部由AbstractShenyuPlugin 来调用上述三个SPI工厂类来定义和实现。做到了功能的专一,并易于扩展,符合SOLID原则。

本节就其中的PredictJudge-断言做详细解析。可以看到这个module中的pom文件中,添加了对shenyu-SPI的依赖

<dependency>    <groupId>org.apache.shenyu</groupId>    <artifactId>shenyu-spi</artifactId>    <version>${project.version}</version></dependency>

PredicateJudge SPI 设计#

PredicateJudge SPI 实现用来解析判断各类规则,当网关中配置的。这个类命名和功能都类似于java 的Predicate ,但对接受行为做了更进一步的抽象。这个SPI通过一个工厂和策略模式实现,首先来看PredicateJudge SPI接口的定义:

@SPI@FunctionalInterfacepublic interface PredicateJudge {
    /**     * judge conditionData and realData is match.     *     * @param conditionData {@linkplain ConditionData}     * @param realData       realData     * @return true is pass  false is not pass.     */    Boolean judge(ConditionData conditionData, String realData);}

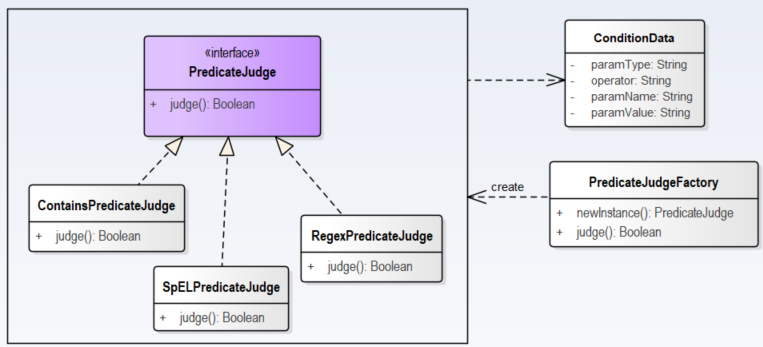
这部分的类图如下:

Fig 2-Predicate class diagram

predicate-class-diagram

PredicateJudgeFactory的重要方法如下:

    public static PredicateJudge newInstance(final String operator) {        return ExtensionLoader.getExtensionLoader(PredicateJudge.class).getJoin(processSpecialOperator(operator));    }
    public static Boolean judge(final ConditionData conditionData, final String realData) {        if (Objects.isNull(conditionData) || StringUtils.isBlank(realData)) {            return false;        }        return newInstance(conditionData.getOperator()).judge(conditionData, realData);    }

这里ConditionData定义如下包含属性四个String类型的属性: paramType, operator,paramName,paramValue

ParamTypeEnum#

参数 paramType必须为系统中枚举类型 ParamTypeEnum,默认支持的paramType有:

post, uri,query, host, ip,header, cookie,req_method

OperatorEnum#

operator 必须为枚举类型 OperatorEnum ,目前支持的操作符有:(注意,严格区分大小写)

   match, =,regex, >,<, contains, SpEL,  Groovy, TimeBefore,TimeAfter

基于以上的规则, plugin 模组实现了如下8个 PredicateJudge 实现类,分别实现上述operator的逻辑匹配规则.

Implementation classRule denotes 规则说明corespondece operator
ContainsPredicateJudge包含关系 "contains", 实际结果,需要包含所定规则的值contains
EqualsPredicateJudge相等"=",=
MatchPredicateJudge用于URI 路径匹配的处理match
TimerAfterPredicateJudge当前local时间是否晚于设定的时间TimeAfter
TimerBeforePredicateJudge当前local时间是否早于设定的时间TimeBefore
GroovyPredicateJudgeGroovy,设定ParamName的值,与设定ParamValue相同Groovy
RegexPredicateJudge正则表达式匹配资料regex

调用方法#

当要做一组参数的解析时,只需要调用PredicateJudgeFactory的judge方法即可:

PredicateJudgeFactory.judge(final ConditionData conditionData, final String realData);

SPI配置文件#

这些PredicateJudge实现类在 SHENYU_DIRECTORY 中的config文件中做了配置,在启动时会加加载并cache到内存中。

PredicateJudge文件的内容如下,为key=class形式,左边的operator要和ParamEnum中的定义一致。

equals=org.apache.shenyu.plugin.base.condition.judge.EqualsPredicateJudge
contains=org.apache.shenyu.plugin.base.condition.judge.ContainsPredicateJudgeGroovy=org.apache.shenyu.plugin.base.condition.judge.GroovyPredicateJudgematch=org.apache.shenyu.plugin.base.condition.judge.MatchPredicateJudgeregex=org.apache.shenyu.plugin.base.condition.judge.RegexPredicateJudgeSpEL=org.apache.shenyu.plugin.base.condition.judge.SpELPredicateJudgeTimeAfter=org.apache.shenyu.plugin.base.condition.judge.TimerAfterPredicateJudgeTimeBefore=org.apache.shenyu.plugin.base.condition.judge.TimerBeforePredicateJudge

PredicateJudge SPI在网关Plugin中的使用#

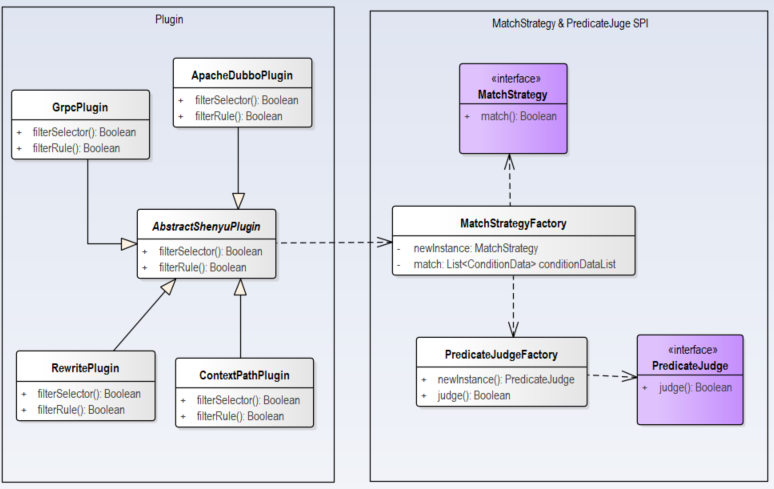
网关系统中,大部分的Plugin 都继承自AbstractShenyuPlugin,这个抽象类中,在做选择和规则解析时,调用了上述SPI中的MatchStrategy,继而在策略判断时调用PredicateJudge 的各个断言类来处理。

Plugin与SPI 的类图如下:

Fig 3- class diagram of plugins with PredicateJudge and MatchStrategy SPI

plugin-SPI-class-diagram

从客户端发来的请求,在系统中调用规则部分的SPI的流程如下:

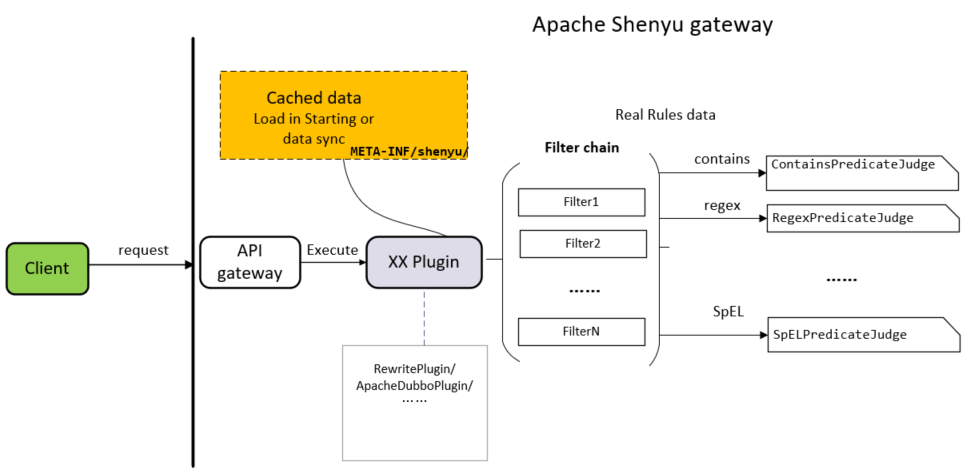
Fig 4- flow chart for Shenyu gateway filter with parameter processing

SPI-flow-diagram

  • 系统启动时,会加载目录下配置的SPI资料到内存中
  • 当client有新的请求发到Apache shenyu 网关系统时,在网关内部,会调用对应的plugin
  • 对实际请求资料做规则匹配时,会根据所包含的operator,调用的对应的PredicateJudge实现类

其他#

PredicateJudge 判断结果举例#

ContainsPredicateJudge- " contains“ rule#

举例:给定一组参数(ConditionData ), paramType="uri", paramValue 是 "/http/**"

当应用 ContainsPredicateJudge包含关系时,判断结果如下表:

ConditionData (operator="contains")real datajudge result
paramType="uri", "/http/**""/http/**/test"true
"/test/http/**/other"true
"/http1/**"false

其他的几个PredicateJudge的具体功能可参考其代码和测试类.

注册中心实现原理之Http注册

· One min read
Apache ShenYu Committer

Apache ShenYu 是一个异步的,高性能的,跨语言的,响应式的 API 网关。

ShenYu网关中,注册中心是用于将客户端信息注册到shenyu-adminadmin再通过数据同步将这些信息同步到网关,网关通过这些数据完成流量筛选。客户端信息主要包括接口信息URI信息

本文基于shenyu-2.5.0版本进行源码分析,官网的介绍请参考 客户端接入原理

1. 注册中心原理#

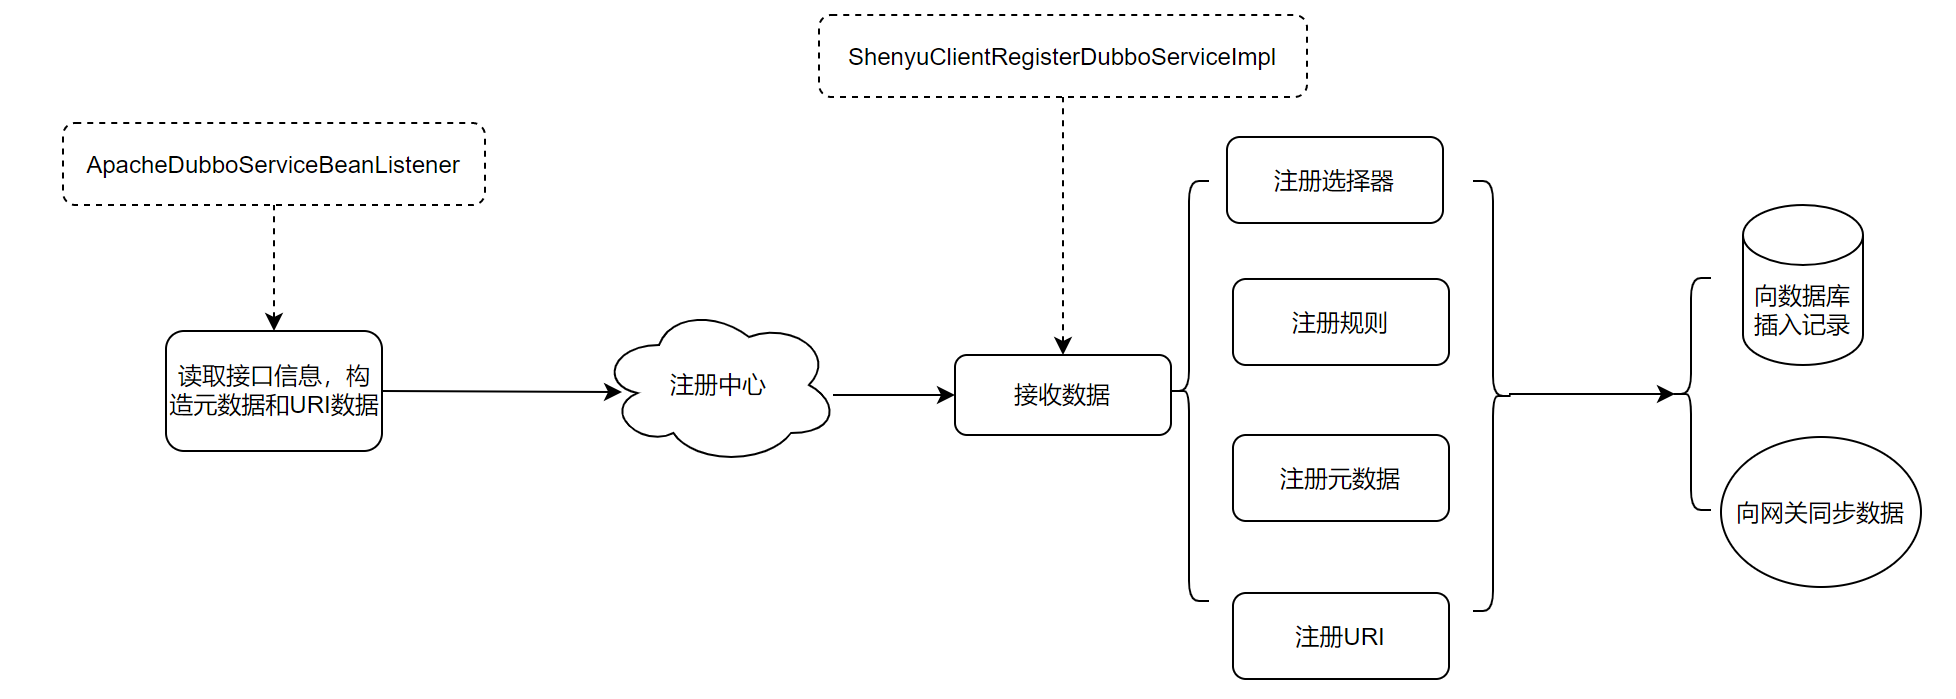
当客户端启动时,读取接口信息和uri信息,通过指定的注册类型,将数据发送到shenyu-admin

图中的注册中心需要用户指定使用哪种注册类型,ShenYu当前支持HttpZookeeperEtcdConsulNacos进行注册。具体如何配置请参考 客户端接入配置

ShenYu在注册中心的原理设计上引入了DisruptorDisruptor队列在其中起到数据与操作解耦,利于扩展。如果注册请求过多,导致注册异常,也有数据缓冲作用。

如图所示,注册中心分为两个部分,一是注册中心客户端register-client,负责处理客户端数据读取。另一个是注册中心服务端register-server,负责处理服务端(就是shenyu-admin)数据写入。通过指定注册类型进行数据发送和接收。

  • 客户端:通常来说就是一个微服务,可以是springmvcspring-clouddubbogrpc等。
  • register-client:注册中心客户端,读取客户接口和uri信息。
  • Disruptor:数据与操作解耦,数据缓冲作用。
  • register-server:注册中心服务端,这里就是shenyu-admin,接收数据,写入数据库,发数据同步事件。
  • 注册类型:指定注册类型,完成数据注册,当前支持HttpZookeeperEtcdConsulNacos

本文分析的是使用Http的方式进行注册,所以具体的处理流程如下:

在客户端,数据出队列后,通过http传输数据,在服务端,提供相应的接口,接收数据,然后写入队列。

2. 客户端注册流程#

当客户端启动后,根据相关配置,读取属性信息,然后写入队列。以官方提供的 shenyu-examples-http 为例,开始源码分析。官方提供的例子是一个由springboot构建的微服务。注册中心的相关配置可以参考官网 客户端接入配置

2.1 加载配置,读取属性#

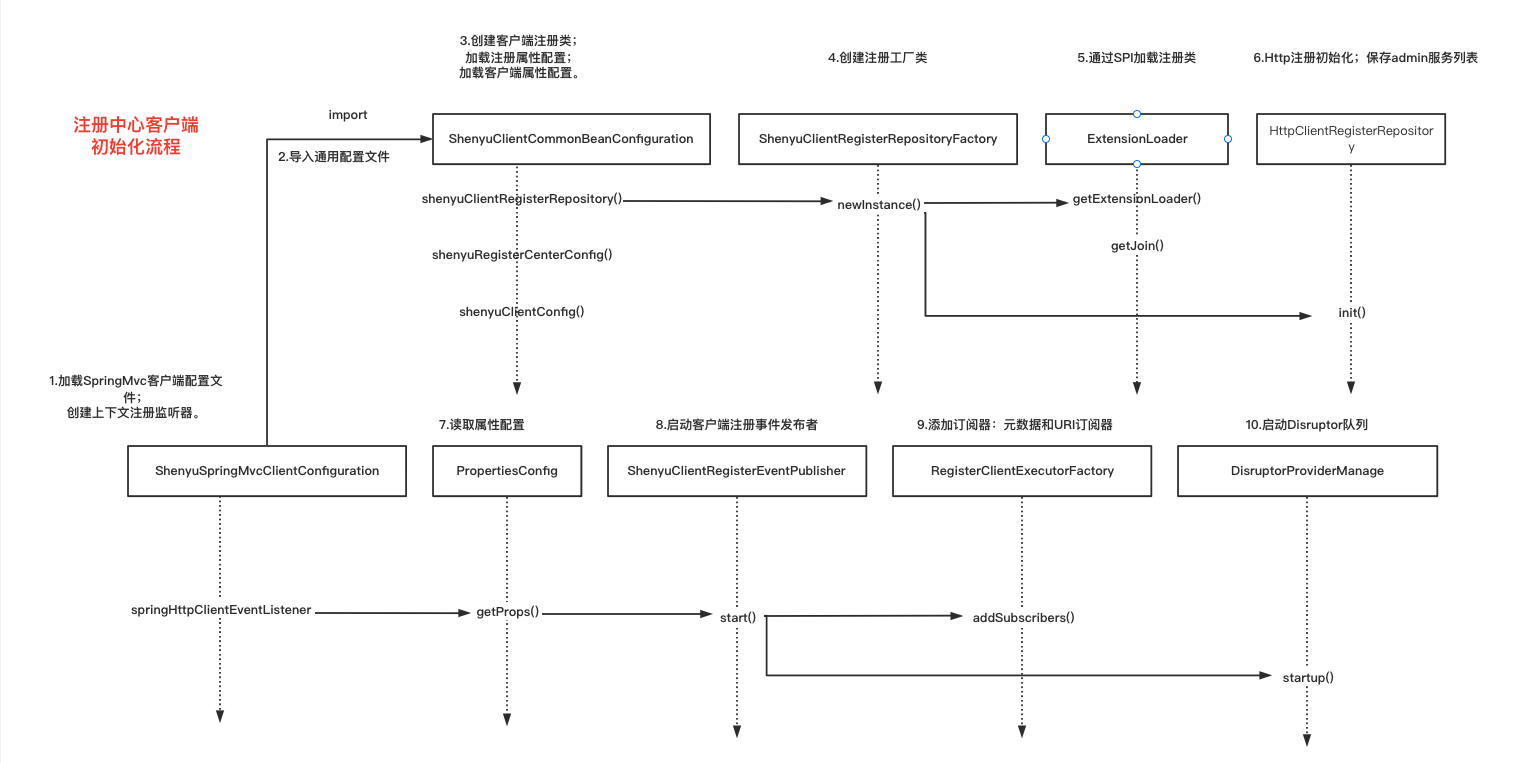
先用一张图串联下注册中心客户端初始化流程:

我们分析的是通过http的方式进行注册,所以需要进行如下配置:

shenyu:  register:    registerType: http    serverLists: http://localhost:9095  props:    username: admin    password: 123456  client:    http:        props:          contextPath: /http          appName: http          port: 8189            isFull: false

每个属性表示的含义如下:

  • registerType: 服务注册类型,填写 http
  • serverList: 为http注册类型时,填写Shenyu-Admin项目的地址,注意加上http://,多个地址用英文逗号分隔。
  • username: Shenyu-Admin用户名
  • password: Shenyu-Admin用户对应的密码
  • port: 你本项目的启动端口,目前springmvc/tars/grpc需要进行填写。
  • contextPath: 为你的这个mvc项目在shenyu网关的路由前缀, 比如/order/product 等等,网关会根据你的这个前缀来进行路由。
  • appName:你的应用名称,不配置的话,会默认取 spring.application.name 的值。
  • isFull: 设置 true 代表代理你的整个服务,false表示代理你其中某几个controller;目前适用于springmvc/springcloud

项目启动后,会先加载配置文件,读取属性信息,生成相应的Bean

首先读取到的配置文件是 ShenyuSpringMvcClientConfiguration,它是shenyu 客户端http注册配置类,通过@Configuration表示这是一个配置类,通过@ImportAutoConfiguration引入其他配置类。创建SpringMvcClientEventListener,主要处理元数据和 URI 信息。

/** * shenyu 客户端http注册配置类 */@Configuration@ImportAutoConfiguration(ShenyuClientCommonBeanConfiguration.class)@ConditionalOnProperty(value = "shenyu.register.enabled", matchIfMissing = true, havingValue = "true")public class ShenyuSpringMvcClientConfiguration {       // 创建SpringMvcClientEventListener,主要处理元数据和URI信息   @Bean   public SpringMvcClientEventListener springHttpClientEventListener(final ShenyuClientConfig clientConfig,                                                                     final ShenyuClientRegisterRepository shenyuClientRegisterRepository) {       return new SpringMvcClientEventListener(clientConfig.getClient().get(RpcTypeEnum.HTTP.getName()), shenyuClientRegisterRepository);   }}

ShenyuClientCommonBeanConfigurationshenyu客户端通用配置类,会创建注册中心客户端通用的bean

  • 创建ShenyuClientRegisterRepository,通过工厂类创建而成。
  • 创建ShenyuRegisterCenterConfig,读取shenyu.register属性配置。
  • 创建ShenyuClientConfig,读取shenyu.client属性配置。

/** * shenyu客户端通用配置类 */@Configurationpublic class ShenyuClientCommonBeanConfiguration {       // 创建ShenyuClientRegisterRepository,通过工厂类创建而成。    @Bean    public ShenyuClientRegisterRepository shenyuClientRegisterRepository(final ShenyuRegisterCenterConfig config) {        return ShenyuClientRegisterRepositoryFactory.newInstance(config);    }        // 创建ShenyuRegisterCenterConfig,读取shenyu.register属性配置    @Bean    @ConfigurationProperties(prefix = "shenyu.register")    public ShenyuRegisterCenterConfig shenyuRegisterCenterConfig() {        return new ShenyuRegisterCenterConfig();    }      // 创建ShenyuClientConfig,读取shenyu.client属性配置    @Bean    @ConfigurationProperties(prefix = "shenyu")    public ShenyuClientConfig shenyuClientConfig() {        return new ShenyuClientConfig();    }}

2.2 用于注册的 HttpClientRegisterRepository#

上面的配置文件中生成的ShenyuClientRegisterRepository是客户端注册的具体实现,它是一个接口,它的实现类如下。

  • HttpClientRegisterRepository:通过http进行注册;
  • ConsulClientRegisterRepository:通过Consul进行注册;
  • EtcdClientRegisterRepository:通过Etcd进行注册;
  • NacosClientRegisterRepository:通过nacos进行注册;
  • ZookeeperClientRegisterRepository通过Zookeeper进行注册。

具体是哪一种方式,是通过SPI进行加载实现的,实现逻辑如下:


/** * 加载 ShenyuClientRegisterRepository */public final class ShenyuClientRegisterRepositoryFactory {        private static final Map<String, ShenyuClientRegisterRepository> REPOSITORY_MAP = new ConcurrentHashMap<>();        /**     * 创建 ShenyuClientRegisterRepository     */    public static ShenyuClientRegisterRepository newInstance(final ShenyuRegisterCenterConfig shenyuRegisterCenterConfig) {        if (!REPOSITORY_MAP.containsKey(shenyuRegisterCenterConfig.getRegisterType())) {            // 通过SPI的方式进行加载,类型由registerType决定            ShenyuClientRegisterRepository result = ExtensionLoader.getExtensionLoader(ShenyuClientRegisterRepository.class).getJoin(shenyuRegisterCenterConfig.getRegisterType());            //执行初始化操作            result.init(shenyuRegisterCenterConfig);            ShenyuClientShutdownHook.set(result, shenyuRegisterCenterConfig.getProps());            REPOSITORY_MAP.put(shenyuRegisterCenterConfig.getRegisterType(), result);            return result;        }        return REPOSITORY_MAP.get(shenyuRegisterCenterConfig.getRegisterType());    }}

加载类型通过registerType指定,也就是我们在配置文件中指定的类型:

shenyu:  register:    registerType: http    serverLists: http://localhost:9095

我们指定的是http,所以会去加载HttpClientRegisterRepository。对象创建成功后,执行的初始化方法init()如下:

@Joinpublic class HttpClientRegisterRepository implements ShenyuClientRegisterRepository {        @Override    public void init(final ShenyuRegisterCenterConfig config) {        this.username = config.getProps().getProperty(Constants.USER_NAME);        this.password = config.getProps().getProperty(Constants.PASS_WORD);        this.serverList = Lists.newArrayList(Splitter.on(",").split(config.getServerLists()));        this.setAccessToken();    }    // 暂时省略其他逻辑}

读取配置文件中的usernamepasswordserverLists,即sheenyu-admin的访问账号、密码和地址信息,为后续数据发送做准备。类注解@Join用于SPI的加载。

SPI 全称为 Service Provider Interface, 是 JDK 内置的一种服务提供发现功能, 一种动态替换发现的机制。

shenyu-spiApache ShenYu网关自定义的SPI扩展实现,设计和实现原理参考了DubboSPI扩展实现

2.3 构建 元数据 和 URI信息 的 SpringMvcClientEventListener#

创建 SpringMvcClientEventListener,负责客户端 元数据URI 数据的构建和注册,它的创建是在配置文件中完成。

@Configuration@ImportAutoConfiguration(ShenyuClientCommonBeanConfiguration.class)@ConditionalOnProperty(value = "shenyu.register.enabled", matchIfMissing = true, havingValue = "true")public class ShenyuSpringMvcClientConfiguration {     // ......        //  创建 SpringMvcClientEventListener    @Bean    public SpringMvcClientEventListener springHttpClientEventListener(final ShenyuClientConfig clientConfig,                                                                      final ShenyuClientRegisterRepository shenyuClientRegisterRepository) {        return new SpringMvcClientEventListener(clientConfig.getClient().get(RpcTypeEnum.HTTP.getName()), shenyuClientRegisterRepository);    }}
  • SpringMvcClientEventListener继承了AbstractContextRefreshedEventListener

AbstractContextRefreshedEventListener是一个抽象类,它实现了ApplicationListener接口,并重写了onApplicationEvent()方法,当有Spring事件发生后,该方法会执行。它的实现目前有八种,每一种表示对应的RPC调用协议的 元数据URI 信息的注册。

  • AlibabaDubboServiceBeanListener:处理使用Alibaba Dubbo协议;
  • ApacheDubboServiceBeanListener:处理使用Apacge Dubbo协议;
  • GrpcClientEventListener:处理使用grpc协议;
  • MotanServiceEventListener:处理使用Mortan协议;
  • SofaServiceEventListener:处理使用Sofa协议;
  • SpringMvcClientEventListener:处理使用http协议;
  • SpringWebSocketClientEventListener:处理使用websocket协议;
  • TarsServiceBeanEventListener:处理使用Tars注册类型;
// 实现了ApplicationListener接口public abstract class AbstractContextRefreshedEventListener<T, A extends Annotation> implements ApplicationListener<ContextRefreshedEvent> {
     //......
    //构造函数    public AbstractContextRefreshedEventListener(final PropertiesConfig clientConfig,                                                 final ShenyuClientRegisterRepository shenyuClientRegisterRepository) {        // 读取 shenyu.client.http 配置信息        Properties props = clientConfig.getProps();        // appName 应用名称        this.appName = props.getProperty(ShenyuClientConstants.APP_NAME);        // contextPath上下文路径        this.contextPath = Optional.ofNullable(props.getProperty(ShenyuClientConstants.CONTEXT_PATH)).map(UriUtils::repairData).orElse("");        if (StringUtils.isBlank(appName) && StringUtils.isBlank(contextPath)) {            String errorMsg = "client register param must config the appName or contextPath";            LOG.error(errorMsg);            throw new ShenyuClientIllegalArgumentException(errorMsg);        }        this.ipAndPort = props.getProperty(ShenyuClientConstants.IP_PORT);        // host信息        this.host = props.getProperty(ShenyuClientConstants.HOST);        // port 客户端端口信息        this.port = props.getProperty(ShenyuClientConstants.PORT);        // 开始事件发布        publisher.start(shenyuClientRegisterRepository);    }
    // 当有上下文刷新事件ContextRefreshedEvent发生时,该方法会执行    @Override    public void onApplicationEvent(@NonNull final ContextRefreshedEvent event) {        //保证该方法的内容只执行一次        if (!registered.compareAndSet(false, true)) {            return;        }        final ApplicationContext context = event.getApplicationContext();        // 获取声明RPC调用的类        Map<String, T> beans = getBeans(context);        if (MapUtils.isEmpty(beans)) {            return;        }        // 构建URI数据并注册        publisher.publishEvent(buildURIRegisterDTO(context, beans));        // 构建元数据并注册        beans.forEach(this::handle);    }
    // 交给不同的子类实现    @SuppressWarnings("all")    protected abstract URIRegisterDTO buildURIRegisterDTO(ApplicationContext context,                                                          Map<String, T> beans);            protected void handle(final String beanName, final T bean) {        Class<?> clazz = getCorrectedClass(bean);        // 获取当前bean的对应shenyu客户端的注解(对应不同的RPC调用注解不一样,像http的就是@ShenyuSpringMvcClient,而像SpringCloud的则是@ShenyuSpringCloudClient)        final A beanShenyuClient = AnnotatedElementUtils.findMergedAnnotation(clazz, getAnnotationType());        // 根据bean获取对应的path(不同子类实现不一样)        final String superPath = buildApiSuperPath(clazz, beanShenyuClient);        // 如果包含Shenyu客户端注解或者path中包括'*',表示注册整个类的接口        if (Objects.nonNull(beanShenyuClient) && superPath.contains("*")) {            // 构建类的元数据,发送注册事件            handleClass(clazz, bean, beanShenyuClient, superPath);            return;        }        // 获取当前bean的所有方法        final Method[] methods = ReflectionUtils.getUniqueDeclaredMethods(clazz);        // 遍历方法        for (Method method : methods) {            // 注册符合条件的方法            handleMethod(bean, clazz, beanShenyuClient, method, superPath);        }    }
    // 构建类元数据并注册的默认实现    protected void handleClass(final Class<?> clazz,                               final T bean,                               @NonNull final A beanShenyuClient,                               final String superPath) {        publisher.publishEvent(buildMetaDataDTO(bean, beanShenyuClient, pathJoin(contextPath, superPath), clazz, null));    }
    // 构建方法元数据并注册的默认实现    protected void handleMethod(final T bean,                                final Class<?> clazz,                                @Nullable final A beanShenyuClient,                                final Method method,                                final String superPath) {        // 如果方法上有Shenyu客户端注解,就表示该方法需要注册        A methodShenyuClient = AnnotatedElementUtils.findMergedAnnotation(method, getAnnotationType());        if (Objects.nonNull(methodShenyuClient)) {            // 构建元数据,发送注册事件            publisher.publishEvent(buildMetaDataDTO(bean, methodShenyuClient, buildApiPath(method, superPath, methodShenyuClient), clazz, method));        }    }
    // 交给不同子类实现    protected abstract MetaDataRegisterDTO buildMetaDataDTO(T bean,                                                            @NonNull A shenyuClient,                                                            String path,                                                            Class<?> clazz,                                                            Method method);}

在构造函数中主要是读取属性配置。

shenyu:  client:    http:      props:        contextPath: /http        appName: http        port: 8189        isFull: false

最后,执行了publisher.start(),开始事件发布,为注册做准备。

  • ShenyuClientRegisterEventPublisher

ShenyuClientRegisterEventPublisher通过单例模式实现,主要是生成元数据和URI订阅器(后续用于数据发布),然后启动Disruptor队列。提供了一个共有方法publishEvent(),发布事件,向Disruptor队列发数据。


public class ShenyuClientRegisterEventPublisher {    // 私有变量    private static final ShenyuClientRegisterEventPublisher INSTANCE = new ShenyuClientRegisterEventPublisher();
    private DisruptorProviderManage<DataTypeParent> providerManage;        /**     * 公开静态方法     *     * @return ShenyuClientRegisterEventPublisher instance     */    public static ShenyuClientRegisterEventPublisher getInstance() {        return INSTANCE;    }        /**     * Start方法执行     *     * @param shenyuClientRegisterRepository shenyuClientRegisterRepository     */    public void start(final ShenyuClientRegisterRepository shenyuClientRegisterRepository) {        // 创建客户端注册工厂类        RegisterClientExecutorFactory factory = new RegisterClientExecutorFactory();        // 添加元数据订阅器        factory.addSubscribers(new ShenyuClientMetadataExecutorSubscriber(shenyuClientRegisterRepository));        //  添加URI订阅器        factory.addSubscribers(new ShenyuClientURIExecutorSubscriber(shenyuClientRegisterRepository));        // 启动Disruptor队列        providerManage = new DisruptorProviderManage(factory);        providerManage.startup();    }        /**     * 发布事件,向Disruptor队列发数据     *     * @param data the data     */    public <T> void publishEvent(final DataTypeParent data) {        DisruptorProvider<DataTypeParent> provider = providerManage.getProvider();        provider.onData(data);    }}

AbstractContextRefreshedEventListener的构造函数逻辑分析完成了,主要是读取属性配置,创建元数据URI订阅器,启动Disruptor队列。

onApplicationEvent()方法是有Spring事件发生时会执行,这里的参数是ContextRefreshedEvent,表示上下文刷新事件。当Spring容器就绪后执行此处逻辑:先构建URI数据并注册,再构建元数据并注册,

ContextRefreshedEventSpring内置事件。ApplicationContext被初始化或刷新时,该事件被触发。这也可以在 ConfigurableApplicationContext接口中使用 refresh() 方法来发生。此处的初始化是指:所有的Bean被成功装载,后处理Bean被检测并激活,所有Singleton Bean 被预实例化,ApplicationContext容器已就绪可用。

再来看AbstractContextRefreshedEventListener的http实现SpringMvcClientEventListener

public class SpringMvcClientEventListener extends AbstractContextRefreshedEventListener<Object, ShenyuSpringMvcClient> {        private final List<Class<? extends Annotation>> mappingAnnotation = new ArrayList<>(3);        private final Boolean isFull;        private final String protocol;        // 构造函数    public SpringMvcClientEventListener(final PropertiesConfig clientConfig,                                        final ShenyuClientRegisterRepository shenyuClientRegisterRepository) {        super(clientConfig, shenyuClientRegisterRepository);        Properties props = clientConfig.getProps();        // 获取 isFull        this.isFull = Boolean.parseBoolean(props.getProperty(ShenyuClientConstants.IS_FULL, Boolean.FALSE.toString()));        // 表示是http协议的实现        this.protocol = props.getProperty(ShenyuClientConstants.PROTOCOL, ShenyuClientConstants.HTTP);        mappingAnnotation.add(ShenyuSpringMvcClient.class);        mappingAnnotation.add(RequestMapping.class);    }        @Override    protected Map<String, Object> getBeans(final ApplicationContext context) {        // 配置属性,如果 isFull=true 的话,表示注册整个微服务        if (Boolean.TRUE.equals(isFull)) {            getPublisher().publishEvent(MetaDataRegisterDTO.builder()                    .contextPath(getContextPath())                    .appName(getAppName())                    .path(PathUtils.decoratorPathWithSlash(getContextPath()))                    .rpcType(RpcTypeEnum.HTTP.getName())                    .enabled(true)                    .ruleName(getContextPath())                    .build());            return null;        }        // 否则获取带Controller注解的bean        return context.getBeansWithAnnotation(Controller.class);    }        // 构造URI数据    @Override    protected URIRegisterDTO buildURIRegisterDTO(final ApplicationContext context,                                                 final Map<String, Object> beans) {        // ...    }        @Override    protected String buildApiSuperPath(final Class<?> clazz, @Nullable final ShenyuSpringMvcClient beanShenyuClient) {        // 如果有带上Shenyu客户端注解,则优先取注解中的不为空的path属性        if (Objects.nonNull(beanShenyuClient) && StringUtils.isNotBlank(beanShenyuClient.path())) {            return beanShenyuClient.path();        }        // 如果有带上RequestMapping注解,且path属性不为空,则返回path数组的第一个值        RequestMapping requestMapping = AnnotationUtils.findAnnotation(clazz, RequestMapping.class);        if (Objects.nonNull(requestMapping) && ArrayUtils.isNotEmpty(requestMapping.path()) && StringUtils.isNotBlank(requestMapping.path()[0])) {            return requestMapping.path()[0];        }        return "";    }        // 声明http实现的客户端注解是ShenyuSpringMvcClient    @Override    protected Class<ShenyuSpringMvcClient> getAnnotationType() {        return ShenyuSpringMvcClient.class;    }        @Override    protected void handleMethod(final Object bean, final Class<?> clazz,                                @Nullable final ShenyuSpringMvcClient beanShenyuClient,                                final Method method, final String superPath) {        // 获取当前bean的RequestMapping注解        final RequestMapping requestMapping = AnnotatedElementUtils.findMergedAnnotation(method, RequestMapping.class);        // 获取当前bean的 ShenyuSpringMvcClient 注解        ShenyuSpringMvcClient methodShenyuClient = AnnotatedElementUtils.findMergedAnnotation(method, ShenyuSpringMvcClient.class);        methodShenyuClient = Objects.isNull(methodShenyuClient) ? beanShenyuClient : methodShenyuClient;        //如果有 ShenyuSpringMvcClient 注解并且包含RequestMapping注解(表示是一个接口),则进行注册        if (Objects.nonNull(methodShenyuClient) && Objects.nonNull(requestMapping)) {            getPublisher().publishEvent(buildMetaDataDTO(bean, methodShenyuClient, buildApiPath(method, superPath, methodShenyuClient), clazz, method));        }    }        //...        // 构造元数据    @Override    protected MetaDataRegisterDTO buildMetaDataDTO(final Object bean,                                                   @NonNull final ShenyuSpringMvcClient shenyuClient,                                                   final String path, final Class<?> clazz,                                                   final Method method) {        //...    }}

注册逻辑都是通过 publisher.publishEvent()完成。

Controller注解和RequestMapping注解是由Spring提供的,这个大家应该很熟悉,不过多赘述。ShenyuSpringMvcClient 注解是由Apache ShenYu提供的,用于注册SpringMvc客户端,它的定义如下:


/** * shenyu 客户端接口,用于方法上或类上 */@Retention(RetentionPolicy.RUNTIME)@Target({ElementType.TYPE, ElementType.METHOD})public @interface ShenyuSpringMvcClient {
    // path 注册路径    @AliasFor(attribute = "path")    String value() default "";        // path 注册路径    @AliasFor(attribute = "value")    String path();        // ruleName 规则名称    String ruleName() default "";        // desc 描述信息    String desc() default "";
    // enabled是否启用    boolean enabled() default true;        // registerMetaData 注册元数据    boolean  registerMetaData() default false;}

它的使用如下:

  • 注册整个接口
@RestController@RequestMapping("/test")@ShenyuSpringMvcClient(path = "/test/**")  // 表示整个接口注册public class HttpTestController { //......}
  • 注册当前方法
@RestController@RequestMapping("/order")@ShenyuSpringMvcClient(path = "/order")public class OrderController {
    /**     * Save order dto.     *     * @param orderDTO the order dto     * @return the order dto     */    @PostMapping("/save")    @ShenyuSpringMvcClient(path = "/save", desc = "Save order") // 注册当前方法    public OrderDTO save(@RequestBody final OrderDTO orderDTO) {        orderDTO.setName("hello world save order");        return orderDTO;    }}
  • publisher.publishEvent() 发布注册事件

该方法会将数据发送到Disruptor队列中,关于Disruptor队列更多细节这里不做更多介绍,这不影响分析注册的流程。

当数据发送后,Disruptor队列的消费者会处理数据,进行消费。

  • QueueConsumer 消费数据

QueueConsumer是一个消费者,它实现了WorkHandler接口,它的创建过程在providerManage.startup()逻辑中。WorkHandler接口是disruptor的数据消费接口,只有一个方法是onEvent()

package com.lmax.disruptor;
public interface WorkHandler<T> {    void onEvent(T event) throws Exception;}

QueueConsumer重写了onEvent()方法,主要逻辑是生成消费任务,然后在线程池中去执行。


/** *  * 队列消费者 */public class QueueConsumer<T> implements WorkHandler<DataEvent<T>> {        // 省略了其他逻辑
    @Override    public void onEvent(final DataEvent<T> t) {        if (t != null) {            // 根据事件类型使用不同的线程池            ThreadPoolExecutor executor = orderly(t);            // 通过工厂创建队列消费任务            QueueConsumerExecutor<T> queueConsumerExecutor = factory.create();            // 保存数据            queueConsumerExecutor.setData(t.getData());            // help gc            t.setData(null);            // 放在线程池中执行 消费任务            executor.execute(queueConsumerExecutor);        }    }}

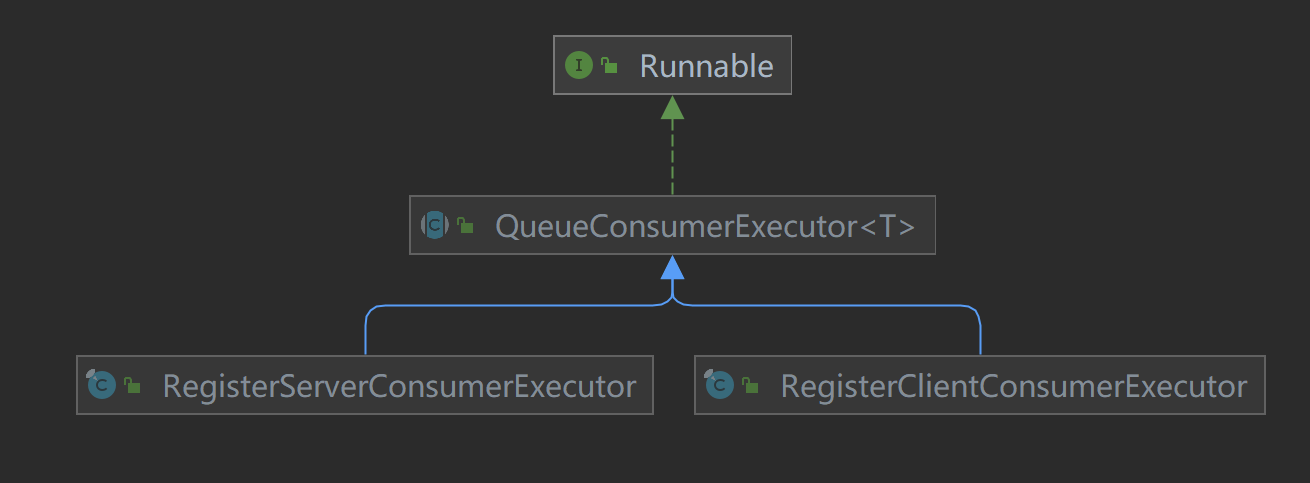
QueueConsumerExecutor是在线程池中被执行的任务,它实现了Runnable接口,具体的实现类有两个:

  • RegisterClientConsumerExecutor:客户端消费者执行器;
  • RegisterServerConsumerExecutor:服务端消费者执行器。

顾名思义,一个负责处理客户端任务,一个负责处理服务端任务(服务端就是admin,在下文进行分析)。

  • RegisterClientConsumerExecutor 消费者执行器

重写的run()逻辑如下:


public final class RegisterClientConsumerExecutor<T extends DataTypeParent> extends QueueConsumerExecutor<T> {        //...... 
    @Override    public void run() {        // 获取数据        final T data = getData();        // 根据数据类型调用相应的处理器进行处理        subscribers.get(data.getType()).executor(Lists.newArrayList(data));    }    }

根据不同的数据类型调用不同的处理器去执行相应的任务。数据类型有两种,一个是元数据,记录客户端注册信息。一个是URI数据,记录客户端服务信息。

//数据类型public enum DataType {   // 元数据    META_DATA,       // URI数据    URI,}
  • ExecutorSubscriber#executor() 执行器订阅者

执行器订阅者也分为两类,一个是处理元数据,一个是处理URI。在客户端和服务端分别有两个,所以一共是四个。

先看元数据处理

  • ShenyuClientMetadataExecutorSubscriber#executor()

客户端这边对元数据处理逻辑是:遍历元数据信息,调用接口方法persistInterface()完成数据的发布。

public class ShenyuClientMetadataExecutorSubscriber implements ExecutorTypeSubscriber<MetaDataRegisterDTO> {       //......        @Override    public DataType getType() {        return DataType.META_DATA; // 元数据    }        @Override    public void executor(final Collection<MetaDataRegisterDTO> metaDataRegisterDTOList) {        for (MetaDataRegisterDTO metaDataRegisterDTO : metaDataRegisterDTOList) {            // 调用接口方法persistInterface()完成数据的发布            shenyuClientRegisterRepository.persistInterface(metaDataRegisterDTO);        }    }}
  • ShenyuClientRegisterRepository#persistInterface()

ShenyuClientRegisterRepository是一个接口,用于表示客户端数据注册,它的实现类目前有五种,每一种就表示一种注册方法。

  • ConsulClientRegisterRepository:通过Consul实现客户端注册;
  • EtcdClientRegisterRepository:通过Etcd实现客户端注册;
  • HttpClientRegisterRepository:通过Http实现客户端注册;
  • NacosClientRegisterRepository:通过Nacos实现客户端注册;
  • ZookeeperClientRegisterRepository:通过Zookeeper实现客户端注册;

从图中可以看出,注册中心的加载是通过SPI的方式完成的。这个在前面提到过了,在客户端通用配置文件中,通过指定配置文件中的属性完成具体的类加载。


/** * 加载 ShenyuClientRegisterRepository */public final class ShenyuClientRegisterRepositoryFactory {        private static final Map<String, ShenyuClientRegisterRepository> REPOSITORY_MAP = new ConcurrentHashMap<>();        /**     * 创建 ShenyuClientRegisterRepository     */    public static ShenyuClientRegisterRepository newInstance(final ShenyuRegisterCenterConfig shenyuRegisterCenterConfig) {        if (!REPOSITORY_MAP.containsKey(shenyuRegisterCenterConfig.getRegisterType())) {            // 通过SPI的方式进行加载,类型由registerType决定            ShenyuClientRegisterRepository result = ExtensionLoader.getExtensionLoader(ShenyuClientRegisterRepository.class).getJoin(shenyuRegisterCenterConfig.getRegisterType());            //执行初始化操作            result.init(shenyuRegisterCenterConfig);            ShenyuClientShutdownHook.set(result, shenyuRegisterCenterConfig.getProps());            REPOSITORY_MAP.put(shenyuRegisterCenterConfig.getRegisterType(), result);            return result;        }        return REPOSITORY_MAP.get(shenyuRegisterCenterConfig.getRegisterType());    }}

本文的源码分析是基于Http的方式进行注册,所以我们先分析HttpClientRegisterRepository,其他的注册方式后续再分析。HttpClientRegisterRepository继承了FailbackRegistryRepository,而FailbackRegistryRepository本身主要用于对Http注册过程中的失败异常的处理,这里就省略了。

通过http的方式注册很简单,就是调用工具类发送http请求。注册元数据和URI都是调用的同一个方法doRegister(),指定接口和类型就好。

  • Constants.URI_PATH的值/shenyu-client/register-metadata:服务端提供的接口用于注册元数据。
  • Constants.META_PATH的值/shenyu-client/register-uri: 服务端提供的接口用于注册URI。
@Joinpublic class HttpClientRegisterRepository extends FailbackRegistryRepository {
    private static final Logger LOGGER = LoggerFactory.getLogger(HttpClientRegisterRepository.class);
    private static URIRegisterDTO uriRegisterDTO;
    private String username;
    private String password;
    private List<String> serverList;
    private String accessToken;        public HttpClientRegisterRepository() {    }        public HttpClientRegisterRepository(final ShenyuRegisterCenterConfig config) {        init(config);    }
    @Override    public void init(final ShenyuRegisterCenterConfig config) {        // admin的用户名        this.username = config.getProps().getProperty(Constants.USER_NAME);        // admin的用户名对应的密码        this.password = config.getProps().getProperty(Constants.PASS_WORD);        // admin服务列表        this.serverList = Lists.newArrayList(Splitter.on(",").split(config.getServerLists()));        // 设置访问的token        this.setAccessToken();    }
    /**     * Persist uri.     *     * @param registerDTO the register dto     */    @Override    public void doPersistURI(final URIRegisterDTO registerDTO) {        if (RuntimeUtils.listenByOther(registerDTO.getPort())) {            return;        }        doRegister(registerDTO, Constants.URI_PATH, Constants.URI);        uriRegisterDTO = registerDTO;    }
    @Override    public void doPersistInterface(final MetaDataRegisterDTO metadata) {        doRegister(metadata, Constants.META_PATH, Constants.META_TYPE);    }
    @Override    public void close() {        if (uriRegisterDTO != null) {            uriRegisterDTO.setEventType(EventType.DELETED);            doRegister(uriRegisterDTO, Constants.URI_PATH, Constants.URI);        }    }
    private void setAccessToken() {        for (String server : serverList) {            try {                Optional<?> login = RegisterUtils.doLogin(username, password, server.concat(Constants.LOGIN_PATH));                login.ifPresent(v -> this.accessToken = String.valueOf(v));            } catch (Exception e) {                LOGGER.error("Login admin url :{} is fail, will retry. cause: {} ", server, e.getMessage());            }        }    }
    private <T> void doRegister(final T t, final String path, final String type) {        int i = 0;        // 遍历admin服务列表(admin可能是集群)        for (String server : serverList) {            i++;            String concat = server.concat(path);            try {                // 设置访问token                if (StringUtils.isBlank(accessToken)) {                    this.setAccessToken();                    if (StringUtils.isBlank(accessToken)) {                        throw new NullPointerException("accessToken is null");                    }                }                // 调用工具类发送 http 请求                RegisterUtils.doRegister(GsonUtils.getInstance().toJson(t), concat, type, accessToken);                return;            } catch (Exception e) {                LOGGER.error("Register admin url :{} is fail, will retry. cause:{}", server, e.getMessage());                if (i == serverList.size()) {                    throw new RuntimeException(e);                }            }        }    }}

将数据序列化后,通过OkHttp发送数据。


public final class RegisterUtils {      //...... 
    // 通过OkHttp发送数据    public static void doRegister(final String json, final String url, final String type) throws IOException {        if (!StringUtils.hasLength(accessToken)) {            LOGGER.error("{} client register error accessToken is null, please check the config : {} ", type, json);            return;        }        Headers headers = new Headers.Builder().add(Constants.X_ACCESS_TOKEN, accessToken).build();        String result = OkHttpTools.getInstance().post(url, json, headers);        if (Objects.equals(SUCCESS, result)) {            LOGGER.info("{} client register success: {} ", type, json);        } else {            LOGGER.error("{} client register error: {} ", type, json);        }    }}

至此,客户端通过http的方式注册元数据的逻辑就分析完了。小结一下:通过读取自定义的注解信息构造元数据,将数据发到Disruptor队列,然后从队列中消费数据,将消费者放到线程池中去执行,最终通过发送http请求到admin

再来看看 URI 数据的处理

  • ShenyuClientURIExecutorSubscriber#executor()

主要逻辑是遍历URI数据集合,通过persistURI()方法实现数据注册。


public class ShenyuClientURIExecutorSubscriber implements ExecutorTypeSubscriber<URIRegisterDTO> {        //......        @Override    public DataType getType() {        return DataType.URI; //数据类型是URI    }        // 注册URI数据    @Override    public void executor(final Collection<URIRegisterDTO> dataList) {        for (URIRegisterDTO uriRegisterDTO : dataList) {            Stopwatch stopwatch = Stopwatch.createStarted();            while (true) {                try (Socket ignored = new Socket(uriRegisterDTO.getHost(), uriRegisterDTO.getPort())) {                    break;                } catch (IOException e) {                    long sleepTime = 1000;                    // maybe the port is delay exposed                    if (stopwatch.elapsed(TimeUnit.SECONDS) > 5) {                        LOG.error("host:{}, port:{} connection failed, will retry",                                uriRegisterDTO.getHost(), uriRegisterDTO.getPort());                        // If the connection fails for a long time, Increase sleep time                        if (stopwatch.elapsed(TimeUnit.SECONDS) > 180) {                            sleepTime = 10000;                        }                    }                    try {                        TimeUnit.MILLISECONDS.sleep(sleepTime);                    } catch (InterruptedException ex) {                        ex.printStackTrace();                    }                }            }            //添加hook,优雅停止客户端             ShenyuClientShutdownHook.delayOtherHooks();                        // 注册URI            shenyuClientRegisterRepository.persistURI(uriRegisterDTO);        }    }}

代码中的while(true)循环是为了保证客户端已经成功启动了,通过hostport可以连接上。

后面的逻辑是:添加hook函数,用于优雅停止客户端 。

通过persistURI()方法实现数据注册。整个逻辑也在前面分析过了,最终就是通过OkHttp客户端向shenyu-admin发起http,通过http的方式注册URI

分析到这里就将客户端的注册逻辑分析完了,将构建的元数据和URI数据发送到Disruptor队列,再从中消费,读取数据,通过httpadmin发送数据。

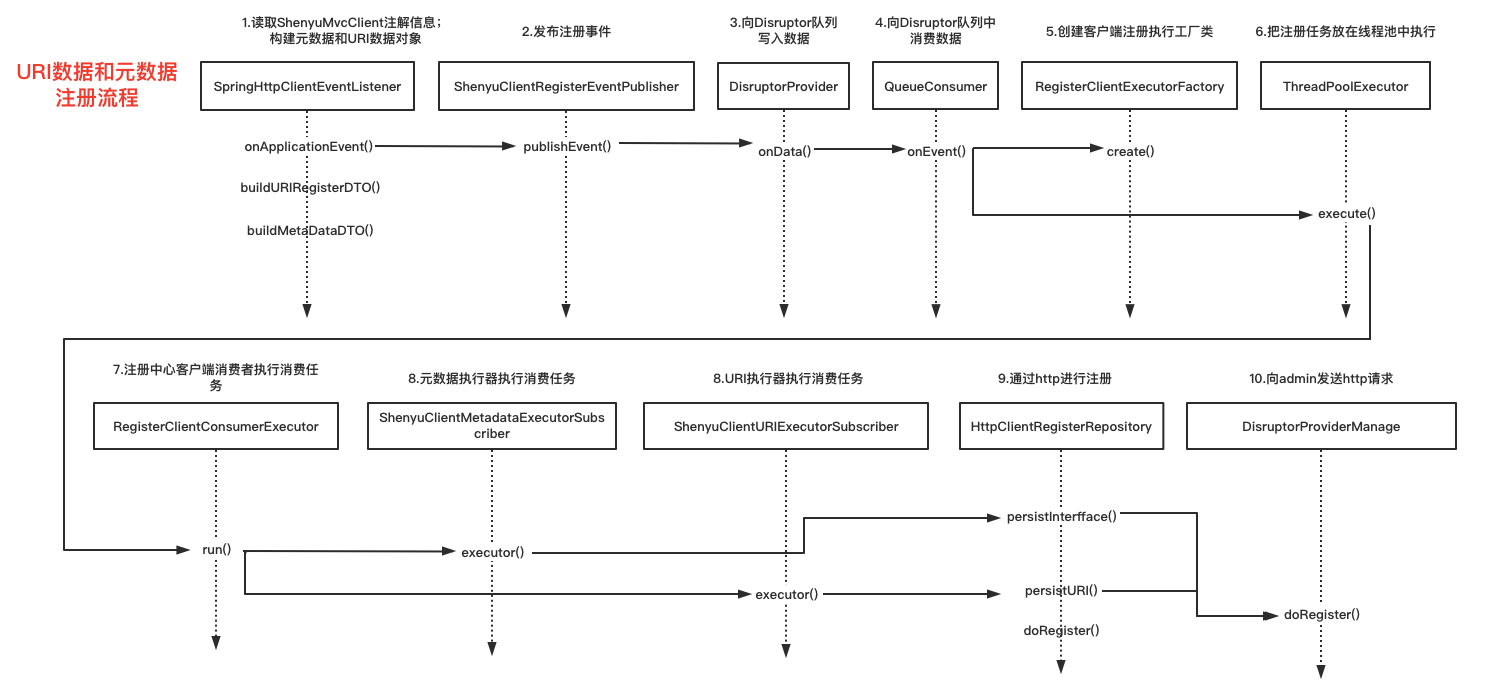
客户端元数据URI注册流程的源码分析完成了,流程图如下:

3. 服务端注册流程#

3.1 注册接口ShenyuClientHttpRegistryController#

从前面的分析可以知道,服务端提供了注册的两个接口:

  • /shenyu-client/register-metadata:服务端提供的接口用于注册元数据。
  • /shenyu-client/register-uri: 服务端提供的接口用于注册URI。

这两个接口位于ShenyuClientHttpRegistryController中,它实现了ShenyuClientServerRegisterRepository接口,是服务端注册的实现类。它用@Join标记,表示通过SPI进行加载。

// shenuyu客户端接口@RequestMapping("/shenyu-client")@Joinpublic class ShenyuClientHttpRegistryController implements ShenyuClientServerRegisterRepository {
    private ShenyuClientServerRegisterPublisher publisher;
    @Override    public void init(final ShenyuClientServerRegisterPublisher publisher, final ShenyuRegisterCenterConfig config) {        this.publisher = publisher;    }
    @Override    public void close() {        publisher.close();    }        // 注册元数据    @PostMapping("/register-metadata")    @ResponseBody    public String registerMetadata(@RequestBody final MetaDataRegisterDTO metaDataRegisterDTO) {        publisher.publish(metaDataRegisterDTO);        return ShenyuResultMessage.SUCCESS;    }           // 注册URI    @PostMapping("/register-uri")    @ResponseBody    public String registerURI(@RequestBody final URIRegisterDTO uriRegisterDTO) {        publisher.publish(uriRegisterDTO);        return ShenyuResultMessage.SUCCESS;    }}

两个注册接口获取到数据好,就调用了publisher.publish()方法,把数据发布到Disruptor队列中。

  • ShenyuClientServerRegisterRepository接口

ShenyuClientServerRegisterRepository接口是服务注册接口,它有五个实现类,表示有五种注册方式:

  • ConsulClientServerRegisterRepository:通过Consul实现注册;
  • EtcdClientServerRegisterRepository:通过Etcd实现注册;
  • NacosClientServerRegisterRepository:通过Nacos实现注册;
  • ShenyuClientHttpRegistryController:通过Http实现注册;
  • ZookeeperClientServerRegisterRepository:通过Zookeeper实现注册。

具体用哪一种方式,是通过配置文件指定的,然后通过SPI进行加载。

shenyu-admin中的application.yml文件中配置注册方式,registerType指定注册类型,当用http进行注册时,serverLists不需要填写,更多配置说明可以参考官网 客户端接入配置

shenyu:  register:    registerType: http     serverLists:
  • RegisterCenterConfiguration 加载配置

在引入相关依赖和属性配置后,启动shenyu-admin时,会先加载配置文件,和注册中心相关的配置文件类是RegisterCenterConfiguration

// 注册中心配置类@Configurationpublic class RegisterCenterConfiguration {    // 读取配置属性    @Bean    @ConfigurationProperties(prefix = "shenyu.register")    public ShenyuRegisterCenterConfig shenyuRegisterCenterConfig() {        return new ShenyuRegisterCenterConfig();    }        //创建ShenyuServerRegisterRepository,用于服务端注册    @Bean(destroyMethod = "close")    public ShenyuServerRegisterRepository shenyuServerRegisterRepository(final ShenyuRegisterCenterConfig shenyuRegisterCenterConfig, final List<ShenyuClientRegisterService> shenyuClientRegisterService) {        // 1.从配置属性中获取注册类型        String registerType = shenyuRegisterCenterConfig.getRegisterType();        // 2.通过注册类型,以SPI的方法加载实现类        ShenyuClientServerRegisterRepository registerRepository = ExtensionLoader.getExtensionLoader(ShenyuClientServerRegisterRepository.class).getJoin(registerType);        // 3.获取publisher,向Disruptor队列中写数据        RegisterClientServerDisruptorPublisher publisher = RegisterClientServerDisruptorPublisher.getInstance();        // 4.注册Service, rpcType -> registerService        Map<String, ShenyuClientRegisterService> registerServiceMap = shenyuClientRegisterService.stream().collect(Collectors.toMap(ShenyuClientRegisterService::rpcType, e -> e));        // 5.事件发布的准备工作        publisher.start(registerServiceMap);        // 6.注册的初始化操作        registerRepository.init(publisher, shenyuRegisterCenterConfig);        return registerRepository;    }}

在配置类中生成了两个bean

  • shenyuRegisterCenterConfig:读取属性配置;

  • shenyuClientServerRegisterRepository:用于服务端注册。

在创建shenyuClientServerRegisterRepository的过程中,也进行了一系列的准备工作:

  • 1.从配置属性中获取注册类型。
  • 2.通过注册类型,以SPI的方法加载实现类:比如指定的类型是http,就会加载ShenyuClientHttpRegistryController
  • 3.获取publisher,向Disruptor队列中写数据。
  • 4.注册ServicerpcType -> registerService:获取注册的Service,每种rpc都有对应的Service。本文的客户端构建是通过springboot,属于http类型,还有其他客户端类型:dubboSpring CloudgRPC等。
  • 5.事件发布的准备工作:添加服务端元数据和URI订阅器,处理数据。并且启动Disruptor队列。
  • 6.注册的初始化操作:http类型的注册初始化操作就是保存publisher
  • RegisterServerDisruptorPublisher#publish()

服务端向Disruptor队列写入数据的发布者 ,通过单例模式构建。


public class RegisterClientServerDisruptorPublisher implements ShenyuClientServerRegisterPublisher {    //私有属性    private static final RegisterClientServerDisruptorPublisher INSTANCE = new RegisterClientServerDisruptorPublisher();
    private DisruptorProviderManage<Collection<DataTypeParent>> providerManage;
    //公开静态方法获取实例    public static RegisterServerDisruptorPublisher getInstance() {        return INSTANCE;    }       //事件发布的准备工作,添加服务端元数据和URI订阅器,处理数据。并且启动Disruptor队列。    public void start(final Map<String, ShenyuClientRegisterService> shenyuClientRegisterService) {        //服务端注册工厂        RegisterServerExecutorFactory factory = new RegisterServerExecutorFactory();        //添加URI数据订阅器        factory.addSubscribers(new URIRegisterExecutorSubscriber(shenyuClientRegisterService));        //添加元数据订阅器        factory.addSubscribers(new MetadataExecutorSubscriber(shenyuClientRegisterService));        //启动Disruptor队列        providerManage = new DisruptorProviderManage(factory);        providerManage.startup();    }        // 向队列中写入数据    @Override    public void publish(final DataTypeParent data) {        DisruptorProvider<Collection<DataTypeParent>> provider = providerManage.getProvider();        provider.onData(Collections.singleton(data));    }
    // 批量向队列中写入数据    @Override    public void publish(final Collection<? extends DataTypeParent> dataList) {        DisruptorProvider<Collection<DataTypeParent>> provider = providerManage.getProvider();        provider.onData(dataList.stream().map(DataTypeParent.class::cast).collect(Collectors.toList()));    }        @Override    public void close() {        providerManage.getProvider().shutdown();    }}

配置文件的加载,可看作是注册中心服务端初始化流程,用图描述如下:

3.2 消费数据QueueConsumer#

在前面分析了客户端disruptor队列消费数据的过。服务端也是一样的逻辑,只是其中执行任务的执行者变了。

QueueConsumer是一个消费者,它实现了WorkHandler接口,它的创建过程在providerManage.startup()逻辑中。WorkHandler接口是disruptor的数据消费接口,只有一个方法是onEvent()

package com.lmax.disruptor;
public interface WorkHandler<T> {    void onEvent(T event) throws Exception;}

QueueConsumer重写了onEvent()方法,主要逻辑是生成消费任务,然后在线程池中去执行。

/** *  * 队列消费者 */public class QueueConsumer<T> implements WorkHandler<DataEvent<T>> {        // 省略了其他逻辑
    @Override    public void onEvent(final DataEvent<T> t) {        if (t != null) {            // 根据事件类型获取相应的线程池            ThreadPoolExecutor executor = orderly(t);            // 通过工厂创建队列消费任务            QueueConsumerExecutor<T> queueConsumerExecutor = factory.create();            // 保存数据            queueConsumerExecutor.setData(t.getData());            // help gc            t.setData(null);            // 放在线程池中执行 消费任务            executor.execute(queueConsumerExecutor);        }    }}

QueueConsumerExecutor是在线程池中被执行的任务,它实现了Runnable接口,具体的实现类有两个:

  • RegisterClientConsumerExecutor:客户端消费者执行器;
  • RegisterServerConsumerExecutor:服务端消费者执行器。

顾名思义,一个负责处理客户端任务,一个负责处理服务端任务。

  • RegisterServerConsumerExecutor#run()

RegisterServerConsumerExecutor是服务端消费者执行器,它通过QueueConsumerExecutor间接实现了Runnable接口,并重写了run()方法。


public final class RegisterServerConsumerExecutor extends QueueConsumerExecutor<Collection<DataTypeParent>> {   // ...
    @Override    public void run() {        //获取从disruptor队列中拿到的数据        Collection<DataTypeParent> results = getData()                .stream()                .filter(this::isValidData)                .collect(Collectors.toList());        if (CollectionUtils.isEmpty(results)) {            return;        }        //根据类型执行操作        selectExecutor(results).executor(results);    }
    // 根据类型获取订阅者    private ExecutorSubscriber<DataTypeParent> selectExecutor(final Collection<DataTypeParent> list) {        final Optional<DataTypeParent> first = list.stream().findFirst();        return subscribers.get(first.orElseThrow(() -> new RuntimeException("the data type is not found")).getType());    }}
  • ExecutorSubscriber#executor()

执行器订阅者分为两类,一个是处理元数据,一个是处理URI。在客户端和服务端分别有两个,所以一共是四个。

  • MetadataExecutorSubscriber#executor()

如果是注册元数据,则通过MetadataExecutorSubscriber#executor()实现:根据类型获取注册Service,调用register()

public class MetadataExecutorSubscriber implements ExecutorTypeSubscriber<MetaDataRegisterDTO> {     //......
    @Override    public DataType getType() {        return DataType.META_DATA;  // 元数据类型    }
    @Override    public void executor(final Collection<MetaDataRegisterDTO> metaDataRegisterDTOList) {        // 遍历元数据列表        metaDataRegisterDTOList.forEach(meta -> {            Optional.ofNullable(this.shenyuClientRegisterService.get(meta.getRpcType())) // 根据类型获取注册Service                    .ifPresent(shenyuClientRegisterService -> {                        // 对元数据进行注册,加锁确保顺序执行,防止并发错误                        synchronized (shenyuClientRegisterService) {                            shenyuClientRegisterService.register(meta);                        }                    });        });    }}
  • URIRegisterExecutorSubscriber#executor()

如果是注册元数据,则通过URIRegisterExecutorSubscriber#executor()实现:构建URI数据,根据注册类型查找Service,通过registerURI方法实现注册。


public class URIRegisterExecutorSubscriber implements ExecutorTypeSubscriber<URIRegisterDTO> {    //......        @Override    public DataType getType() {        return DataType.URI; // URI数据类型    }        @Override    public void executor(final Collection<URIRegisterDTO> dataList) {        if (CollectionUtils.isEmpty(dataList)) {            return;        }        // 根据rpc调用类型聚集数据        final Map<String, List<URIRegisterDTO>> groupByRpcType = dataList.stream()                .filter(data -> StringUtils.isNotBlank(data.getRpcType()))                .collect(Collectors.groupingBy(URIRegisterDTO::getRpcType));        for (Map.Entry<String, List<URIRegisterDTO>> entry : groupByRpcType.entrySet()) {            final String rpcType = entry.getKey();            // 根据类型查找Service            Optional.ofNullable(shenyuClientRegisterService.get(rpcType))                    .ifPresent(service -> {                        final List<URIRegisterDTO> list = entry.getValue();                        // 构建URI数据类型,通过registerURI方法实现注册                        Map<String, List<URIRegisterDTO>> listMap = buildData(list);                        listMap.forEach(service::registerURI);                    });        }    }}
  • ShenyuClientRegisterService#register()

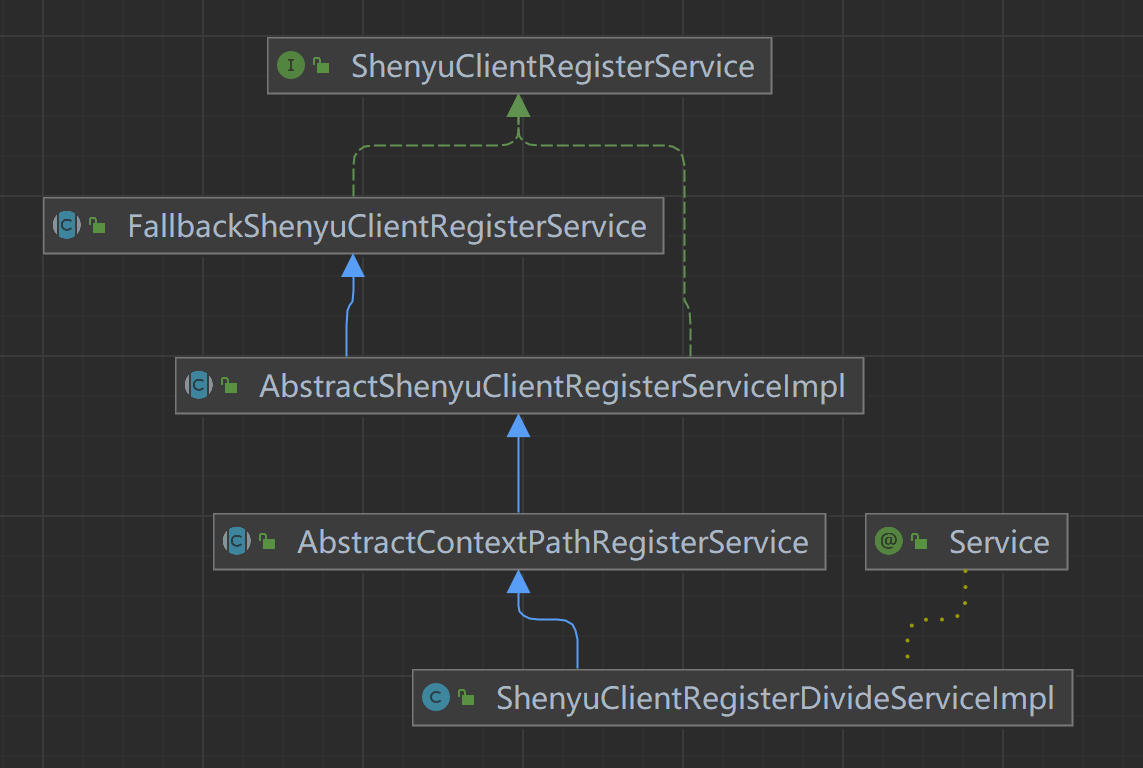
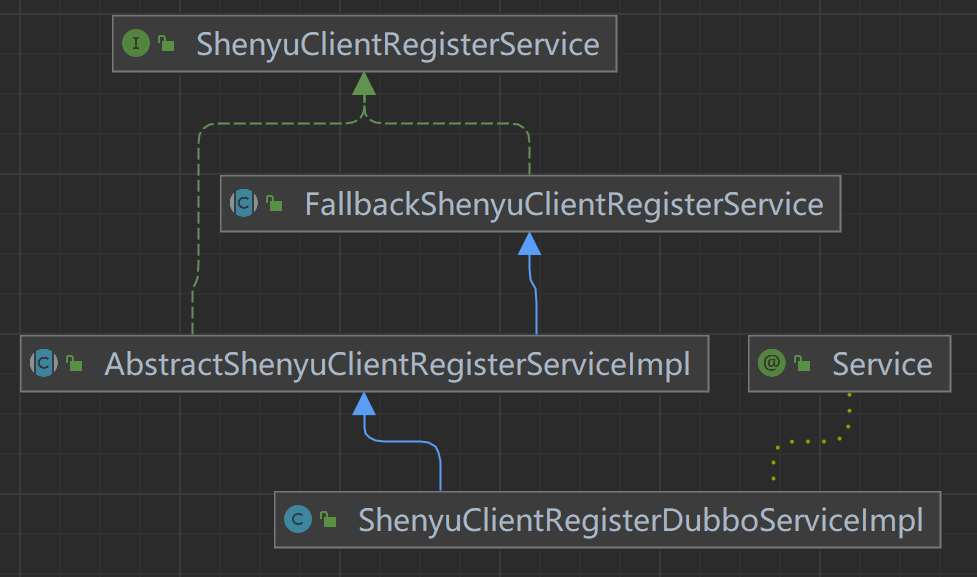
ShenyuClientRegisterService是注册方法接口,它有多个实现类:

  • AbstractContextPathRegisterService:抽象类,处理部分公共逻辑;
  • AbstractShenyuClientRegisterServiceImpl::抽象类,处理部分公共逻辑;
  • ShenyuClientRegisterDivideServiceImpldivide类,处理http注册类型;
  • ShenyuClientRegisterDubboServiceImpldubbo类,处理dubbo注册类型;
  • ShenyuClientRegisterGrpcServiceImplgRPC类,处理gRPC注册类型;
  • ShenyuClientRegisterMotanServiceImplMotan类,处理Motan注册类型;
  • ShenyuClientRegisterSofaServiceImplSofa类,处理Sofa注册类型;
  • ShenyuClientRegisterSpringCloudServiceImplSpringCloud类,处理SpringCloud注册类型;
  • ShenyuClientRegisterTarsServiceImplTars类,处理Tars注册类型;
  • ShenyuClientRegisterWebSocketServiceImplWebsocket类,处理Websocket注册类型;

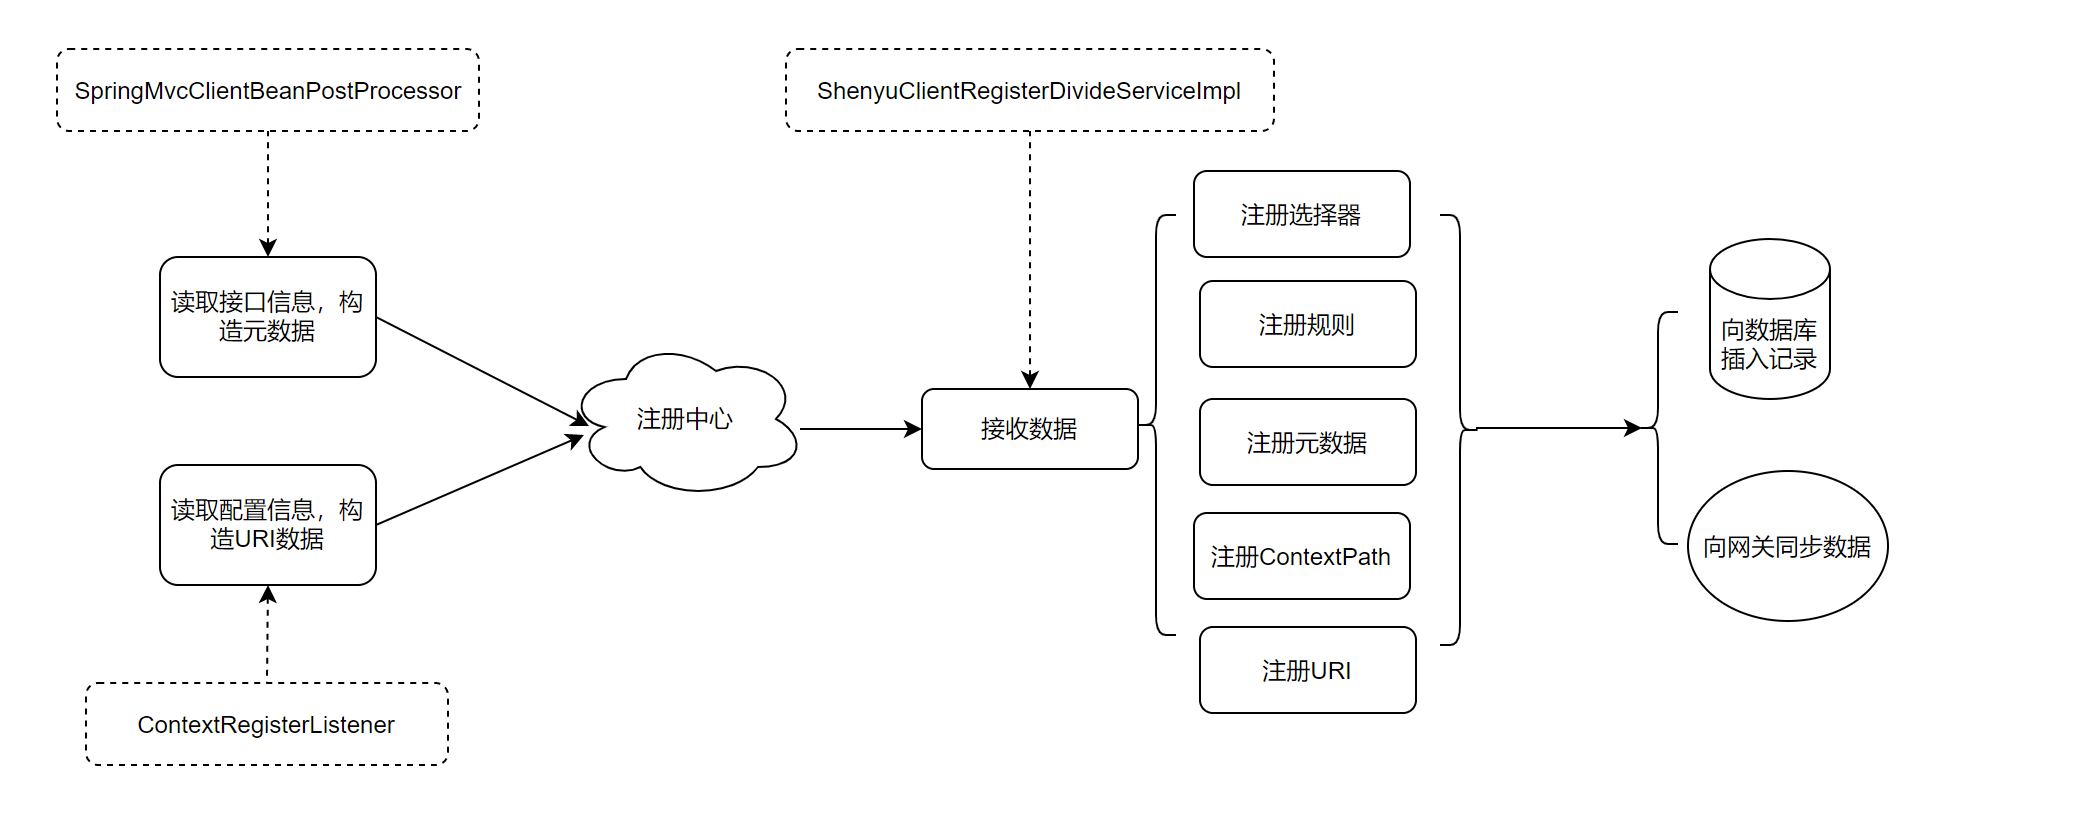
从上面可以看出每种微服务都有对应的注册实现类,本文的源码分析是 以官方提供的 shenyu-examples-http 为例,是属http注册类型,所以元数据和URI数据的注册实现类是 ShenyuClientRegisterDivideServiceImpl

  • register(): 注册元数据
public abstract class AbstractShenyuClientRegisterServiceImpl extends FallbackShenyuClientRegisterService implements ShenyuClientRegisterService {        //......        public String register(final MetaDataRegisterDTO dto) {        // 1.注册选择器信息        String selectorHandler = selectorHandler(dto);        String selectorId = selectorService.registerDefault(dto, PluginNameAdapter.rpcTypeAdapter(rpcType()), selectorHandler);        // 2.注册规则信息        String ruleHandler = ruleHandler();        RuleDTO ruleDTO = buildRpcDefaultRuleDTO(selectorId, dto, ruleHandler);        ruleService.registerDefault(ruleDTO);        // 3.注册元数据信息        registerMetadata(dto);        // 4.注册contextPath        String contextPath = dto.getContextPath();        if (StringUtils.isNotEmpty(contextPath)) {            registerContextPath(dto);        }        return ShenyuResultMessage.SUCCESS;    }}

整个注册逻辑可以分为4个步骤:

  • 1.注册选择器信息
  • 2.注册规则信息
  • 3.注册元数据信息
  • 4.注册contextPath

admin这一侧通过客户端的元数据信息需要构建选择器、规则、元数据和ContextPath。具体的注册过程和细节处理跟rpc类型有关。我们就不再继续向下追踪了,对于注册中心的逻辑分析,跟踪到这里就够了。

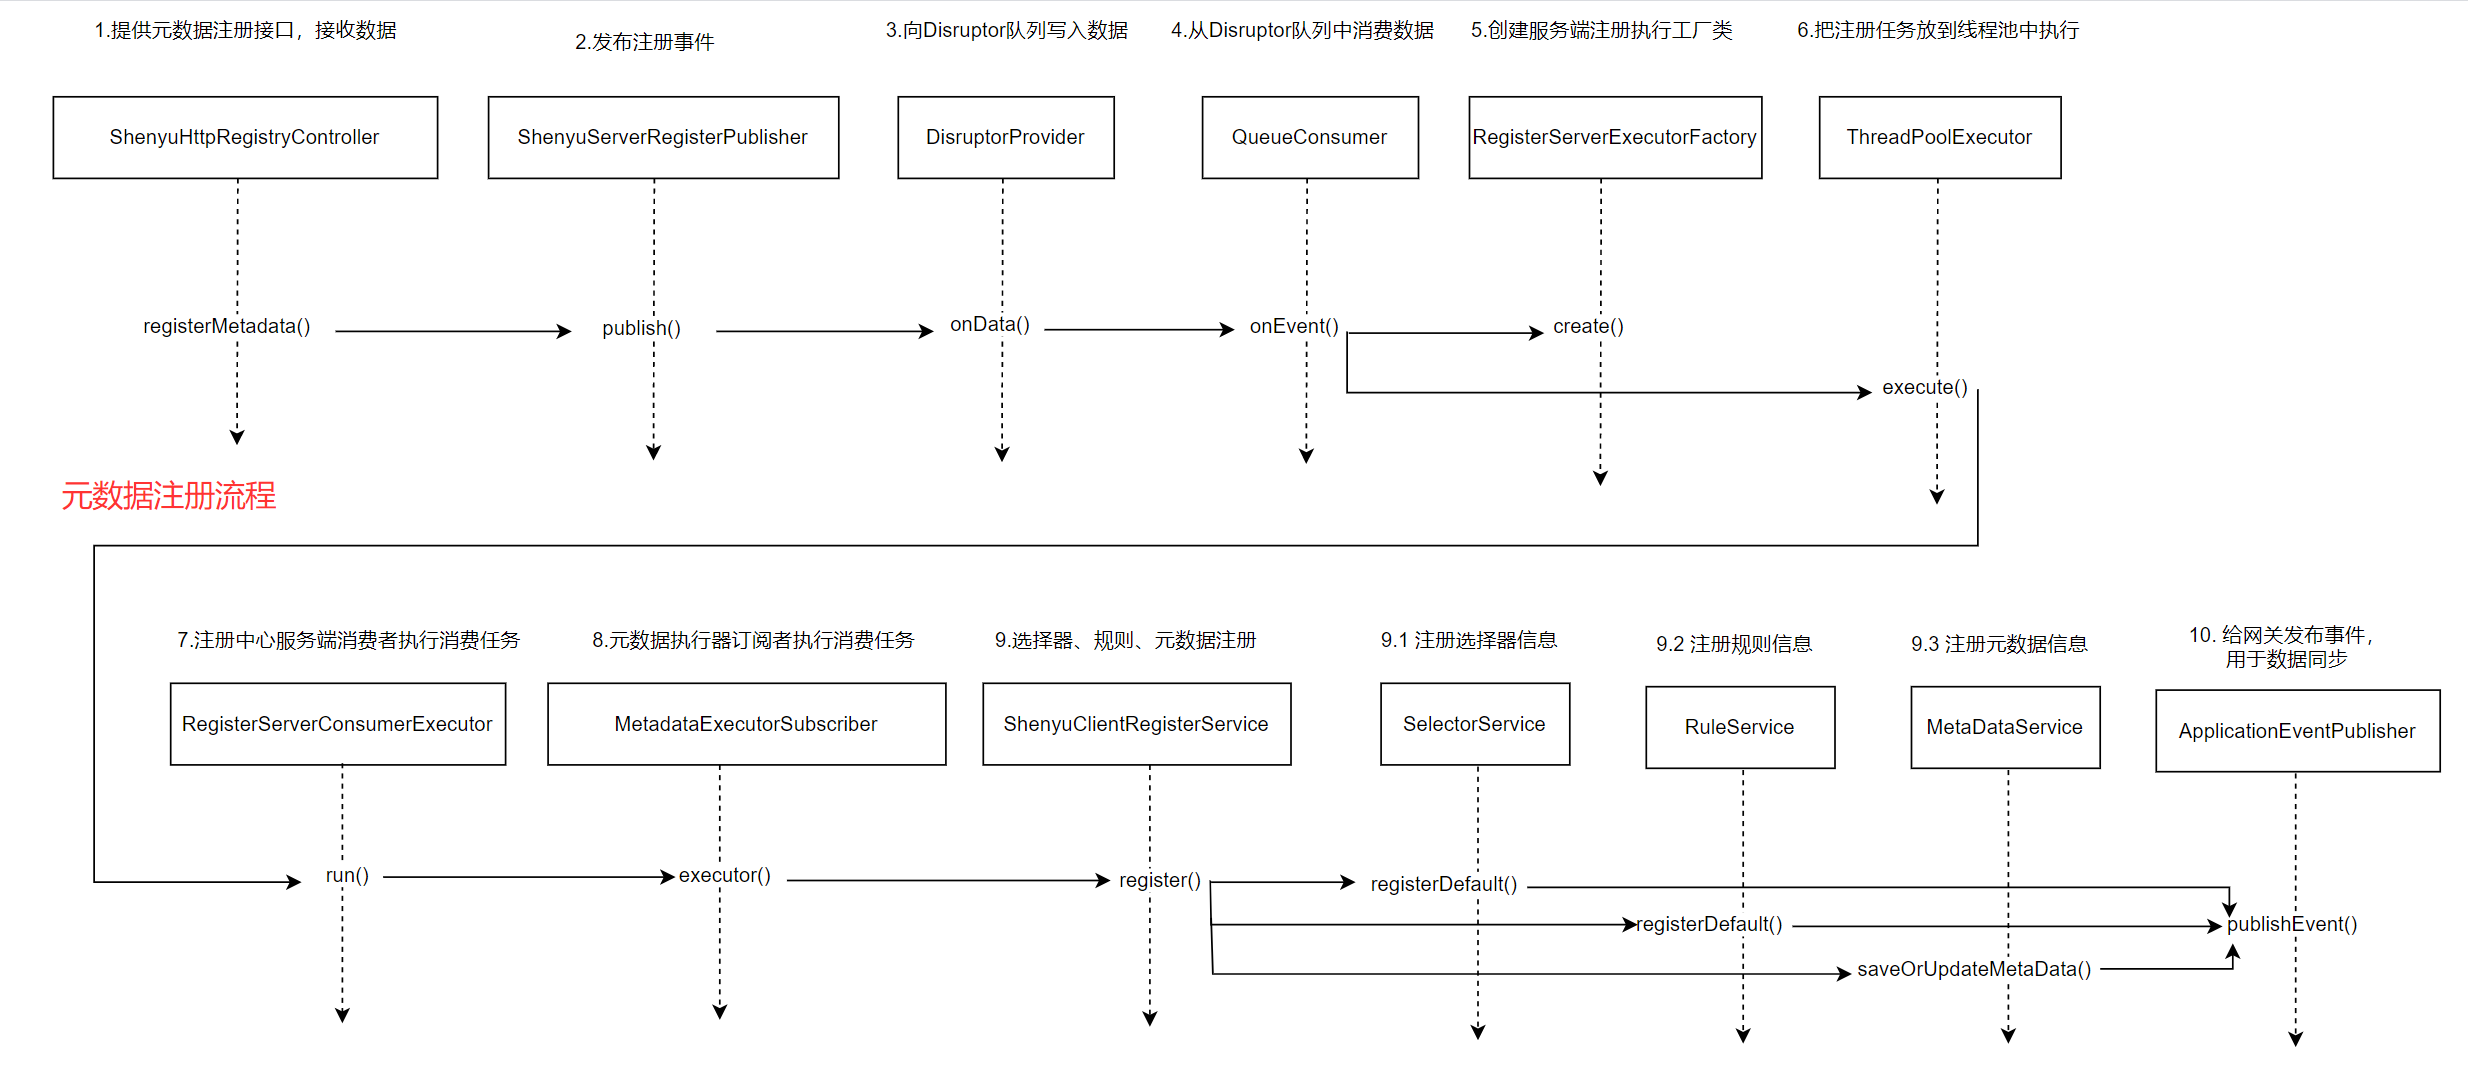
服务端元数据注册流程的源码分析完了,流程图描述如下:

  • registerURI(): 注册URI数据
public abstract class AbstractShenyuClientRegisterServiceImpl extends FallbackShenyuClientRegisterService implements ShenyuClientRegisterService {
    //......        public String doRegisterURI(final String selectorName, final List<URIRegisterDTO> uriList) {        if (CollectionUtils.isEmpty(uriList)) {            return "";        }        // 对应的选择器是否存在        SelectorDO selectorDO = selectorService.findByNameAndPluginName(selectorName, PluginNameAdapter.rpcTypeAdapter(rpcType()));        if (Objects.isNull(selectorDO)) {            throw new ShenyuException("doRegister Failed to execute,wait to retry.");        }        List<URIRegisterDTO> validUriList = uriList.stream().filter(dto -> Objects.nonNull(dto.getPort()) && StringUtils.isNotBlank(dto.getHost())).collect(Collectors.toList());        // 处理选择器中的handler信息        String handler = buildHandle(validUriList, selectorDO);        if (handler != null) {            selectorDO.setHandle(handler);            SelectorData selectorData = selectorService.buildByName(selectorName, PluginNameAdapter.rpcTypeAdapter(rpcType()));            selectorData.setHandle(handler);            // 更新数据库中的记录            selectorService.updateSelective(selectorDO);            // 发布事件            eventPublisher.publishEvent(new DataChangedEvent(ConfigGroupEnum.SELECTOR, DataEventTypeEnum.UPDATE, Collections.singletonList(selectorData)));        }        return ShenyuResultMessage.SUCCESS;    }}

admin拿到URI数据后,主要是更新选择器中的handler信息,然后写入到数据库,最后发布事件通知网关。通知网关的逻辑是由数据同步操作完成,这在之前的文章中已经分析过了,就不再赘述。

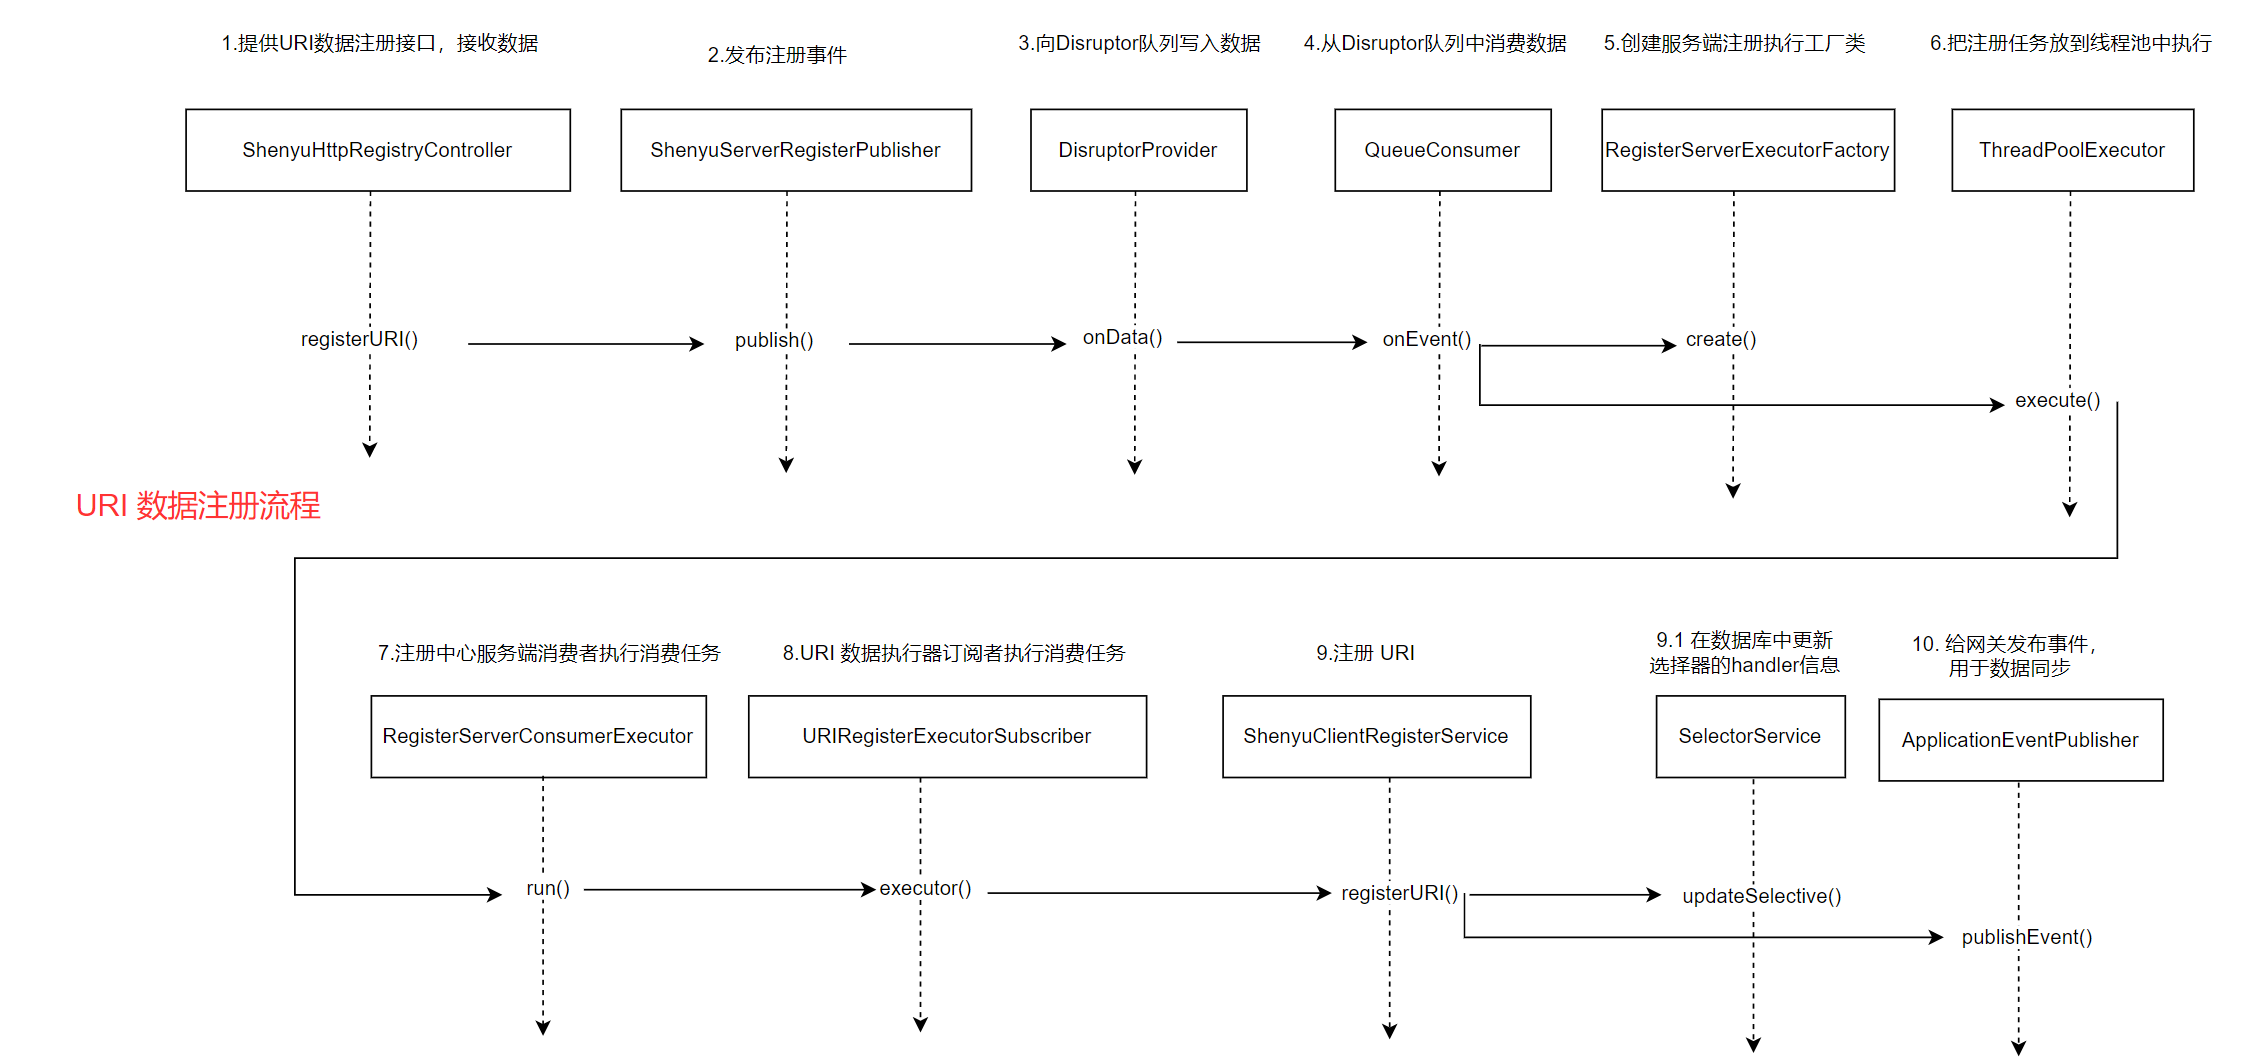
服务端URI注册流程的源码分析完成了,用图描述如下:

至此,服务端注册流程也就分析完了,主要通过对外提供的接口,接受客户端的注册信息,然后写入到Disruptor队列,再从中消费数据,根据接收到的元数据和URI数据更新admin的选择器、规则、元数据和选择器的handler

4. 总结#

本文主要对Apache ShenYu网关中的http注册模块进行了源码分析。涉及到的主要知识点,归纳如下:

  • 注册中心是为了将客户端信息注册到admin,方便流量筛选;
  • http注册是将客户端元数据信息和URI信息注册到admin
  • http服务的接入通过注解@ShenyuSpringMvcClient标识;
  • 注册信息的构建主要通过Spring应用监听器ApplicationListener
  • 注册类型的加载通过SPI完成;
  • 引入Disruptor队列是为了数据与操作解耦,以及数据缓冲。
  • 注册中心的实现采用了面向接口编程,使用模板方法、单例、观察者等设计模式。

社区新人开发者启动及开发防踩坑指南

· One min read
Yuxuan Zhang
Apache ShenYu Contributor

前言#

作为 Shenyu 社区初来乍到的开发者,我在按照相关教程进行项目启动及开发的过程中,遇到了一些教程中并未提及到的 “坑” , 我将我启动shenyu , shenyu-dashboard, shenyu-website 的详细步骤记录在这篇博客中,希望可以帮到社区中更多的新人开发者。

环境准备#

  • 本地正确安装 JDK1.8+
  • 本地正确安装 Git
  • 选择一款开发工具,本文使用 IDEA 为例

ShenYu 后端启动指南#

安装并配置Maven#

Maven是一个跨平台的项目管理工具。作为Apache组织顶级开源项目,其主要服务于基于Java平台的项目创建,依赖管理和项目信息管理。

  1. 下载 maven,并解压到一个没有中文没有空格的路径下。

  2. maven 目录下的 bin 目录添加至环境变量中。以 Windows 为例,若下载目录为 E:\apache-maven-3.9.1 ,则将E:\apache-maven-3.9.1\bin 添加至 Path 系统变量中。

  3. 验证是否安装成功。在命令行窗口中输入 mvn -v ,若出现 Maven 版本及 Java 版本即为安装成功。如下所示:

    C:\Users\pc>mvn -vApache Maven 3.9.1 (2e178502fcdbffc201671fb2537d0cb4b4cc58f8)Maven home: E:\apache-maven-3.9.1Java version: 18.0.1.1, vendor: Oracle Corporation, runtime: C:\Program Files\Java\jdk-18.0.1.1Default locale: zh_CN, platform encoding: UTF-8OS name: "windows 10", version: "10.0", arch: "amd64", family: "windows"
  4. 为了加快项目相关依赖的下载速度,需要更改 Maven 镜像,此处添加阿里云等镜像。将 conf/settings.xml<mirrors> </mirrors> 标签对更改为以下内容:

    <mirrors>    <mirror>    <id>alimaven</id>    <name>aliyun maven</name>    <url>http://maven.aliyun.com/nexus/content/groups/public/</url>    <mirrorOf>central</mirrorOf>    </mirror>
        <mirror>    <id>alimaven</id>    <mirrorOf>central</mirrorOf>    <name>aliyun maven</name>    <url>http://maven.aliyun.com/nexus/content/repositories/central/</url>    </mirror>
        <mirror>    <id>maven</id>    <mirrorOf>central</mirrorOf>    <name>name_</name>    <url>http://repo1.maven.org/maven2</url>    </mirror> 
        <mirror>    <id>junit</id>    <mirrorOf>central</mirrorOf>    <name>junit address/</name>    <url>http://jcenter.bintray.com/</url>    </mirror></mirrors>

    并在 </mirrors> 下一行添加 <localRepository>E:/maven_local_repository</localRepository>设置 Maven 本地仓库位置。具体位置可自行指定。

拉取 ShenYu 代码#

  1. 在 Github 上 Fork ShenYu 仓库到自己的存储库中,以后可在此仓库中进行开发并提交 PR

  2. 使用 Git 将上一步 Fork 的仓库下载到本地:

    git clone git@github.com:${YOUR_USERNAME}/${TARGET_REPO}.git

    若提示文件名过长,则通过命令行执行下面的命令:

    git config --global core.longpaths true

ShenYu 初启动#

准备工作#

  1. shenyu 目录下使用 Maven 进行编译:

    mvn clean install -Dmaven.javadoc.skip=true -B -Drat.skip=true -Djacoco.skip=true -DskipITs -DskipTests
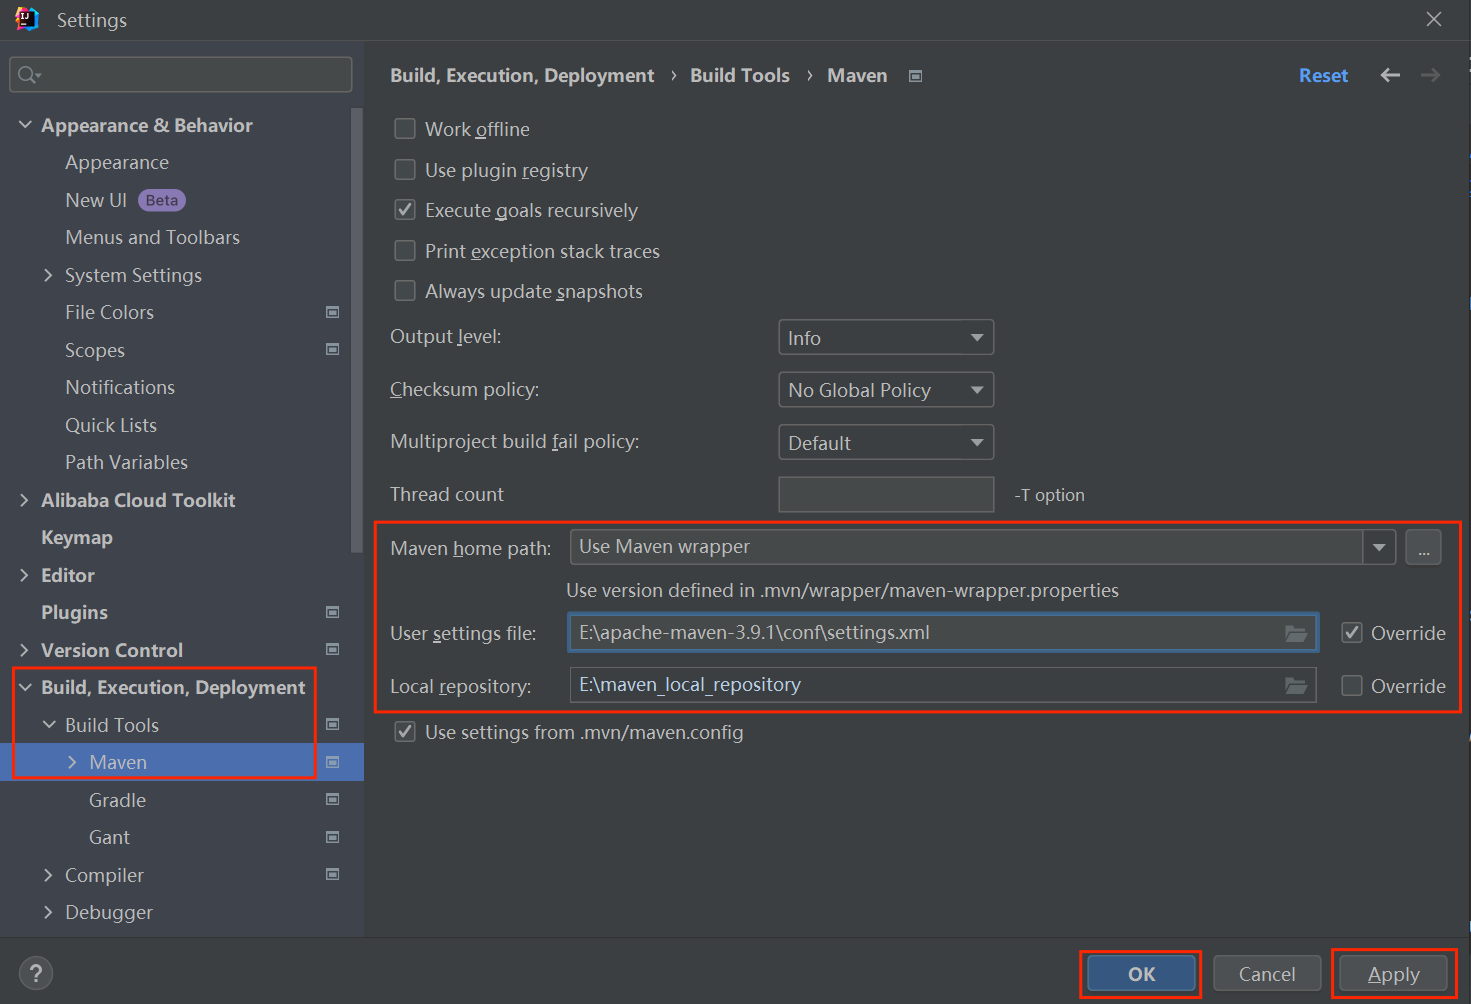
  2. 配置 IDEA 环境。使用 IDEA 打开 shenyu 项目,点击左上角 File -> Settings ,按照下图配置 Maven 。其中 User settings file 选择你的 settings.xml 所在目录, Local repository 会自动加载 settings.xml 中设置的 localRepository 路径:

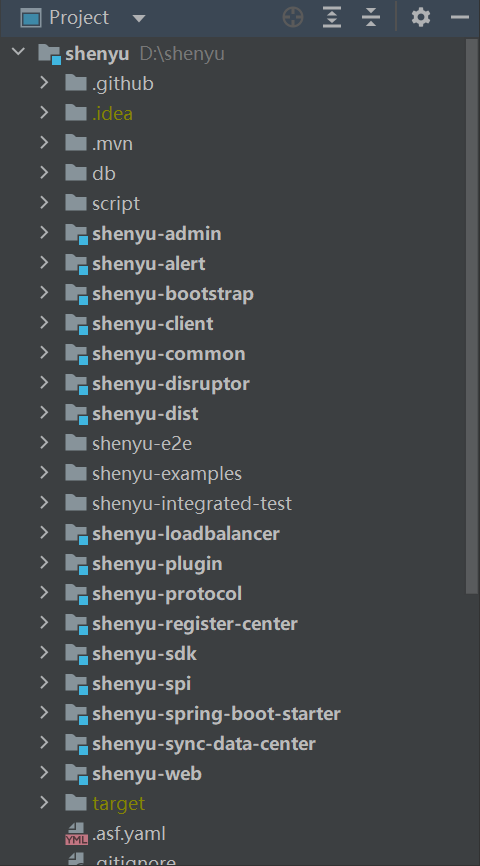
  3. 此时,IDEA 会自动下载项目相关依赖,需等待一会,完成后如下图所示:

    可以发现, shenyu-e2e, shenyu-examples, shenyu-integrated-test 没有被 IDEA 标记为 Maven 项目,需手动添加。分别选中包中的 pom.xml 文件,右键点击 Add as Maven Project 。 若 shenyu-e2e 构建失败,则将其 pom.xml<relativePath>./pom.xml</relativePath> 改为 <relativePath/>

启动网关服务#

  1. 启动 shenyu-admin 控制台(默认使用H2数据库)

  2. 启动 shenyu-bootstrap

到这一步,shenyu网关已经启动。

我们可以打开浏览器,访问admin控制台:http://localhost:9095/

默认账号:admin ,默认密码:123456

启动应用服务#

Apache ShenYu提供了Http、Dubbo、SpringCloud等应用接入shenyu网关的样例,位于 shenyu-example 模块,这里以Http服务为例。

启动 shenyu-examples-http

这时,shenyu-examples-http 会自动把加 @ShenyuSpringMvcClient 注解的接口方法,以及application.yml中的相关配置注册到网关。我们打开 admin控制台,即可在插件列表 -> Proxy -> divide 中看到相关配置。

测试Http请求#

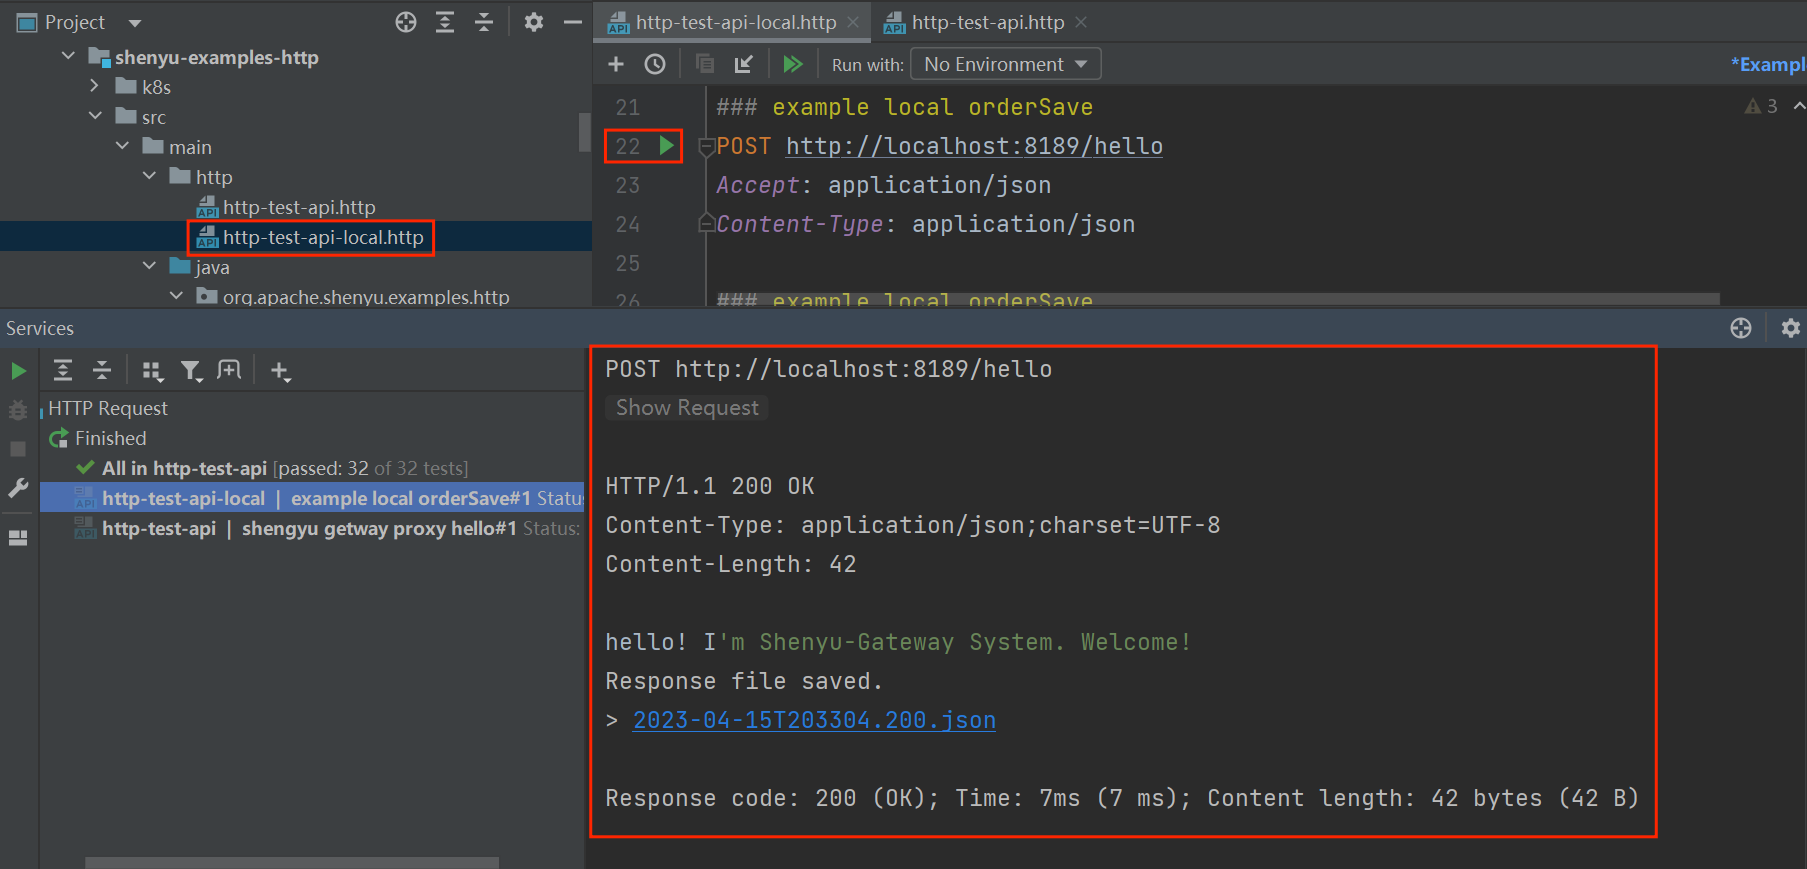
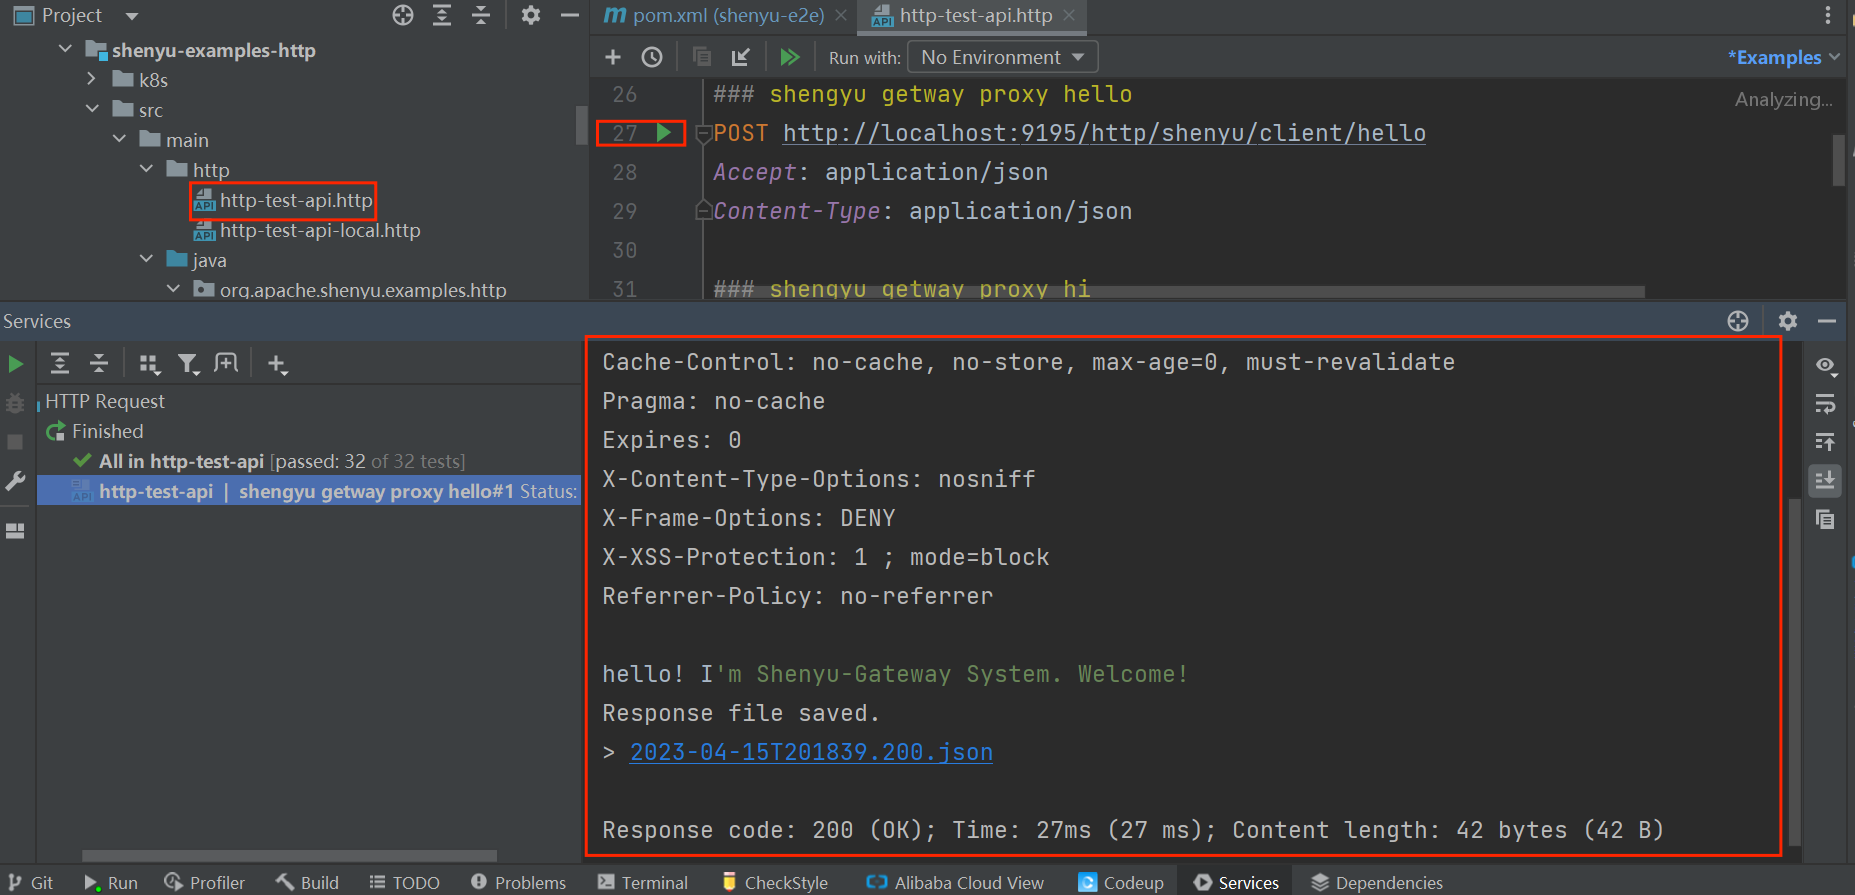
下面使用 IDEA HTTP Client Plugin 模拟 http 的方式来访问 http 服务。

  • 本地访问,不使用 shenyu 代理

  • 使用 shenyu 代理

使用更多插件#

我们可以参考 官方文档左侧插件集合,来使用所需要插件。

Shenyu 前端启动指南#

安装 Node.js#

下载#

  1. 官网下载并安装Node.js ,选择 LTS 版本即可

  2. 安装时,除了设置安装路径,其他一直点 Next 即可

  3. 安装完成后,在命令行中进行验证:

    C:\Users\pc>node -vv12.22.12
    C:\Users\pc>npm -v6.14.16

换源#

为了加快 npm 下载速度,需要进行换源:

# 查看当前源npm config get registry# 换为中国 npmmirror 镜像源npm config set registry https://registry.npmmirror.com# 查看是否换源成功npm config get registry

拉取 ShenYu Dashboard 代码#

  1. Fork ShenYu Dashboard 仓库

  2. 使用 Git 下载到本地:

    git clone git@github.com:${YOUR_USERNAME}/${TARGET_REPO}.git

前后端联合开发#

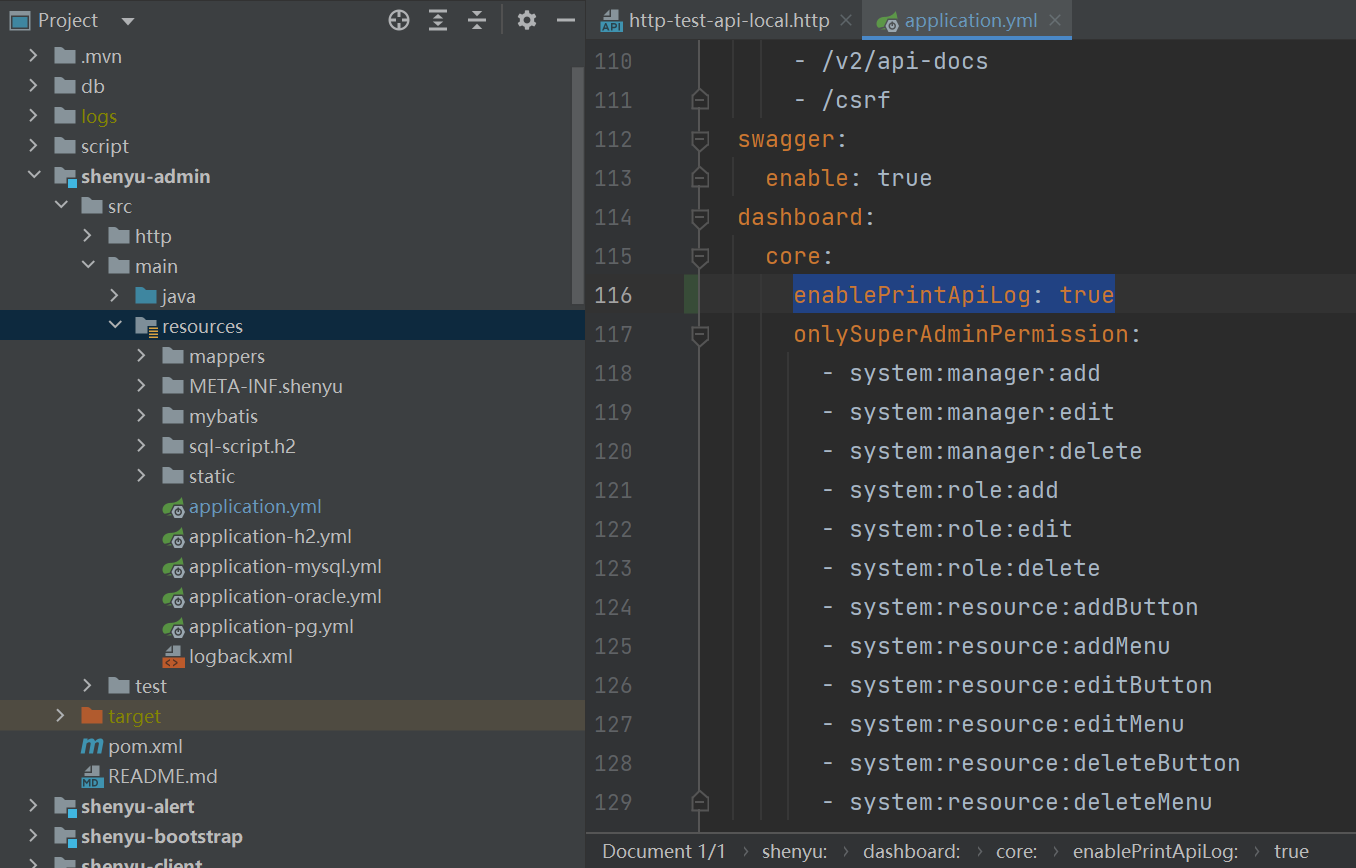
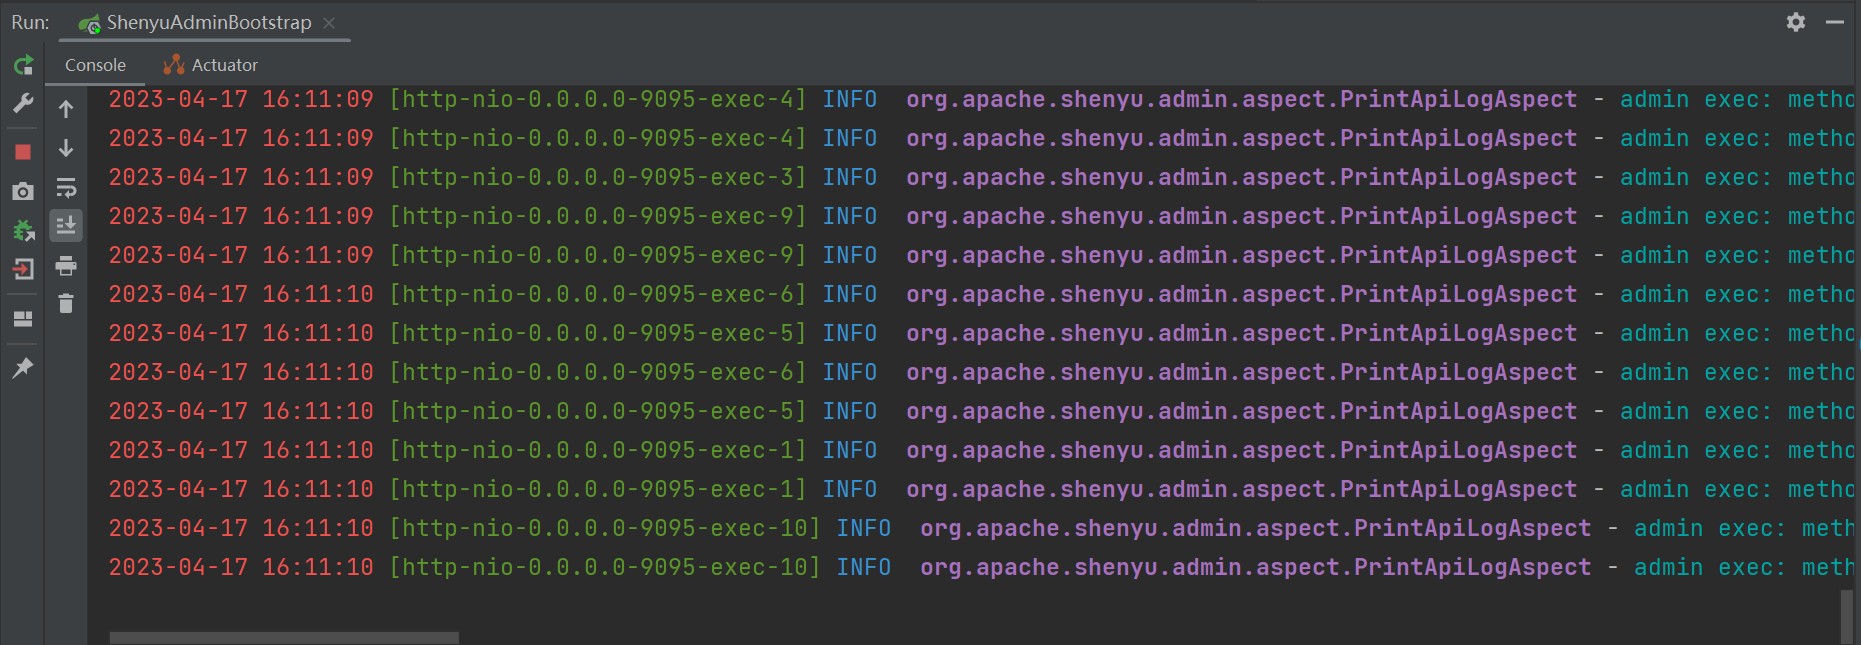
  1. 在后端仓库 shenyushenyu-admin/src/main/resources/application.yml 文件中按下图所示添加 enablePrintApiLog: true ,以在后端控制台显示前端接口被调用的日志。

  2. 启动 ShenyuAdminBootstrap

  3. 切换至前端仓库 shenyu-dashboard ,打开 README ,依次点击 npm install, npm start 或通过命令行输入上述命令即可通过 http://localhost:8000 访问前端界面,并可在后端控制台中显示前端接口被调用的日志,实现前后端联合开发。

打包前端代码#

执行 READMEnpm build 命令,并将 dist 文件夹下生成的所有文件复制到后端仓库中 shenyu-admin/src/main/resources/static/ 目录下。

为 Shenyu 官网做贡献#

按照 shenyu-websiteREADME 进行操作即可。

小贴士#

  1. 可以为 yarn 进行换源,流程同 npm
  2. 建议下载 Node 官网LTS 版本
  3. Windows 系统无法进行部署,如需对你的更改进行验证,可以在Linux 虚拟机或服务器上进行部署

RateLimiter SPI 代码分析

· One min read
Apache ShenYu Contributor

限流是网关必备的功能,用来应对高并发请求的场景。当系统受到异常攻击,短期内聚集了大量的流量;当有大量低级别的请求,处理这些请求会影响关键业务的处理,需要限制这些请求的访问速度; 或者系统内部出现一些异常,不能满负荷的服务整个应用请求等等。这些情况下,都需要启用限流来保护系统。可以拒绝服务、等待或降级处理,将流量限制到系统可接受的量,或者只允许某些域名(或某些业务)的请求优先处理。

针对以上的场景需求,在设计一个API网关的限流功能时,就需要考虑如下的扩展点:

  1. 可以支持多种限流的算法,并易于扩展。

  2. 要可以支持多种限流的方式,能区分用户群、高低优先级的请求。

  3. 要支持高并发,能快速的做出限制或通过的决策。

  4. 要有容错处理,如果限流程序出错,网关系统能继续执行。

    本文会先介绍shenyu网关限流部分的总体技术架构,之后重点分析RateLimiter SPI扩展实现的代码。

This article based on shenyu-2.4.0 version of the source code analysis.

RateLimiter 总体设计说明#

​ WebFlux是Spring 提供的基于Reactor模型的异步非阻塞框架,能提升吞吐量,使系统有更好的可伸缩性。Apache Shenyu网关的插件功能基于WebFlux框架实现的。RateLimiter功能是在ratelimiter-plugin中实现。在限流过程中,常用的算法有令牌桶、漏桶等算法,这些算法执行中,需要检核请求的来源,对已使用的流量做计数及逻辑计算,判定是否允许通过。为了提高并发及性能, 将计数和算法逻辑处理,都放到redis中。Java代码负责做数据参数的传递。在调用redis时,lua脚本可以常驻在redis内存中,能减少网络开销,并可以作为一个整体执行,具有原子性。Spring Data Redis 提供了对redis命令执行的抽象,执行序列化,及自动使用redis 脚本缓存。在这个plugin中,由于采用了reactor 非阻塞框架,所以采用Spring Redis Reactive类库实现对redis的功能调用。

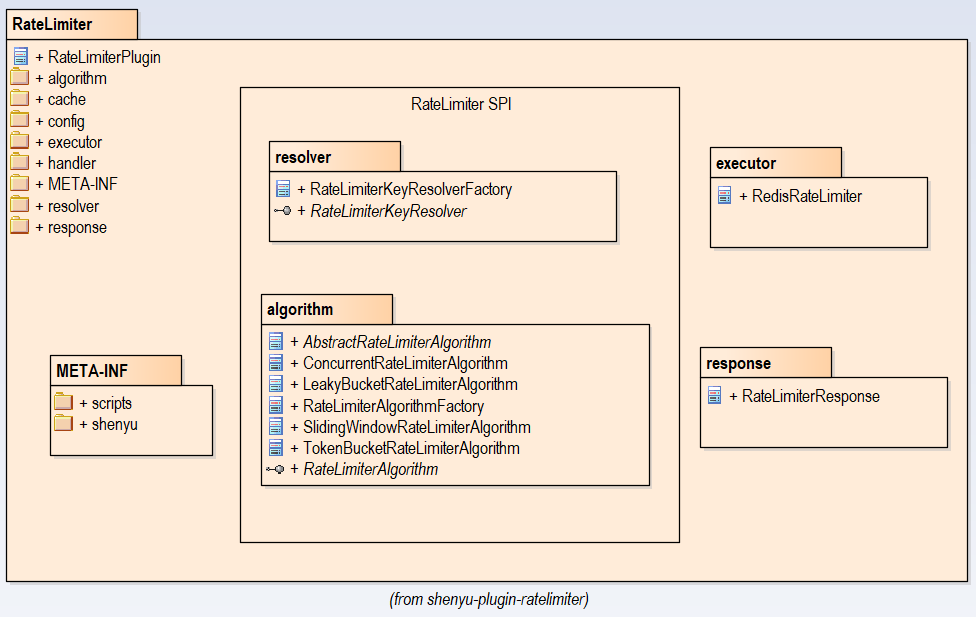
​ 这个plugin中的类包图如下,重点标出了与RateLimiter SPI相关的两个package: resolver 和algorithm.

ratelimiter-package-diagram

RateLimiter SPI的设计#

由于采用了Spring data+ Redis +lua架构实现了高并发的需求。 如何做到对算法和限流方式的扩展呢? Shenyu ratelimiter plugin中设计了两个SPI来实现这两个需求:

  • RateLimiterAlgorithm:用来扩展不同的限流算法。
  • RateLimiterKeyResolver: 用于扩展获取请求的关键信息,用于区分流量,例如按IP 地址、按某一段域名等来区分访问的请求。

SPI的具体实作类与配置信息位于:SHENYU_DIRECTORY目录下 (默认在/META-INF/shenyu)下。

RateLimiterKeyResolver#

获取请求的关键信息,用于分组限流,例如按URL/ 用户 / IP 等, RateLimiterKeyResolver 接口定义如下:

@SPIpublic interface RateLimiterKeyResolver {
    /**     * get Key resolver's name.     *     * @return Key resolver's name     */    String getKeyResolverName();
    /**     * resolve.     *     * @param exchange exchange the current server exchange {@linkplain ServerWebExchange}     * @return rate limiter key     */    String resolve(ServerWebExchange exchange);}

@SPI将当前interface 注册为Shenyu SPI 接口。resolve(ServerWebExchange exchange)方法用来提供解析方式。

RateLimiterKeyResolver SPI 提供了两种key resolver, WholeKeyResolveRemoteAddrKeyResolver,其中RemoteAddrKeyResolver中的resolve方法代码如下:

    @Override    public String resolve(final ServerWebExchange exchange) {        return Objects.requireNonNull(exchange.getRequest().getRemoteAddress()).getAddress().getHostAddress();    }

其key值为请求的IP地址。 基于SPI及工厂类的实现,可以非常方便的扩展实现新的key resolver,如URL,用户等等。

RateLimiterAlgorithm SPI#

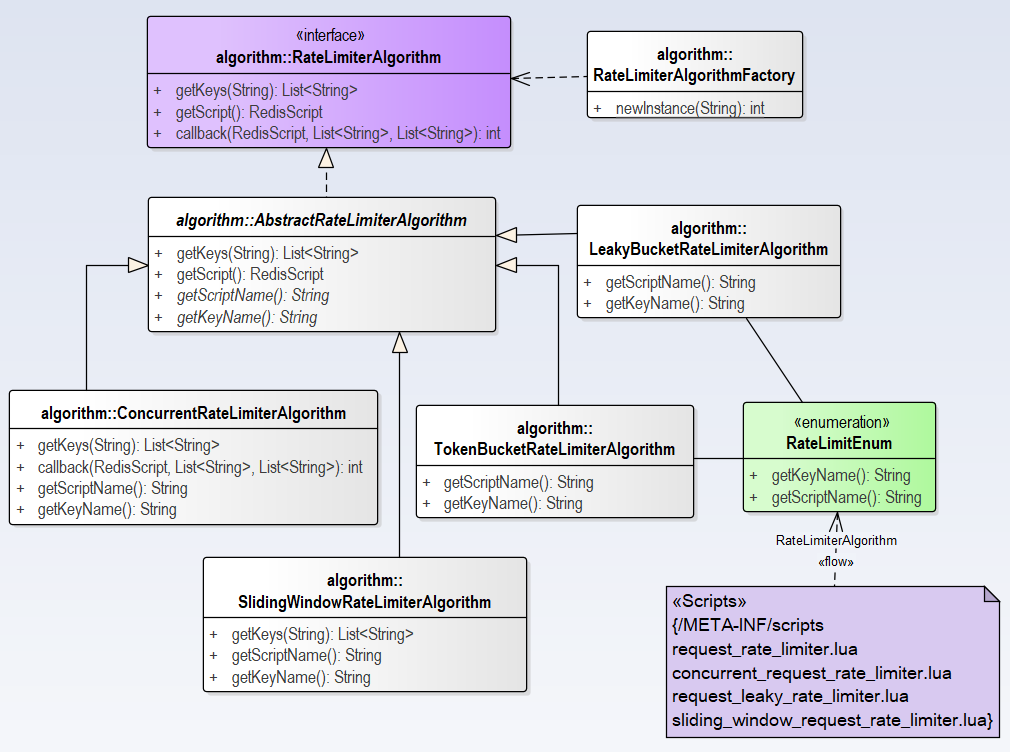
RateLimiterAlgorithm SPI 用来实现对不同限流算法的识别、加载和定义,其类图如下:

ratelimiteral-class-diagram

本模组使用了工厂模式,提供了接口类、抽象类和工厂类,提供了4个实现类,其中实现类对应的Lua脚本在 RateLimitEnum 中做了定义,放置在 /META-INF/scripts 目录下。接口RateLimiterAlgorithm的代码如下:

@SPIpublic interface RateLimiterAlgorithm<T> {        RedisScript<T> getScript();    List<String> getKeys(String id);        /**     * Callback string.     *     * @param script the script     * @param keys the keys     * @param scriptArgs the script args     */    default void callback(final RedisScript<?> script, final List<String> keys, final List<String> scriptArgs) {    }}

@SPI 将这个接口注册为shenyu SPI, 其中定义了三个方法:

  • getScript() 方法返回一个 RedisScript对象,这个对象将传递给Redis。
  • getKeys(String id) 返回一个键值的List.
  • callback()回调函数用于异步处理一些需要在返回后做的处理,缺省是空方法。

抽象类 AbstractRateLimiterAlgorithm#

在这个类中,实现了接口的模板方法,使用参数类型为List<Long>, 抽象方法getScriptName() 和getKeyName() 留给各个实作类来实现。如下的getScript() 是这个类中读取lua脚本的处理代码。

    public RedisScript<List<Long>> getScript() {        if (!this.initialized.get()) {            DefaultRedisScript redisScript = new DefaultRedisScript<>();            String scriptPath = "/META-INF/scripts/" + getScriptName();            redisScript.setScriptSource(new ResourceScriptSource(new ClassPathResource(scriptPath)));            redisScript.setResultType(List.class);            this.script = redisScript;            initialized.compareAndSet(false, true);            return redisScript;        }        return script;    }

AtomicBoolean类型的变量initialized 用来标记lua脚本是否有被加载。 如果还没有加载,就从/META-INF/scripts/目录下,读取scriptName指定的Lua文件,加载成RedisScript对象。指定结果为List类型, 设定量initialized为true,避免重复加载。 返回 RedisScript对象。

AbstractRateLimiterAlgorithmgetKeys()的代码如下,

    @Override    public List<String> getKeys(final String id) {        String prefix = getKeyName() + ".{" + id;        String tokenKey = prefix + "}.tokens";        String timestampKey = prefix + "}.timestamp";        return Arrays.asList(tokenKey, timestampKey);    }

这个模板方法中,产生了两个字符串,其中,tokenKey会作为Key传递给redis, 指向一个有序集合。 timestampKey是一个以传入id 为识别的字符串。

可以从上面的类图中看到,ConcurrentRateLimiterAlgorithmSlidingWindowRateLimiterAlgorithm 有覆写getKeys(String id)方法,而两外两个算法程序,则采用的是抽象类中的实现。也只有 ConcurrentRateLimiterAlgorithm 重写了callback()方法。下文中我们会对此做进一步的分析。
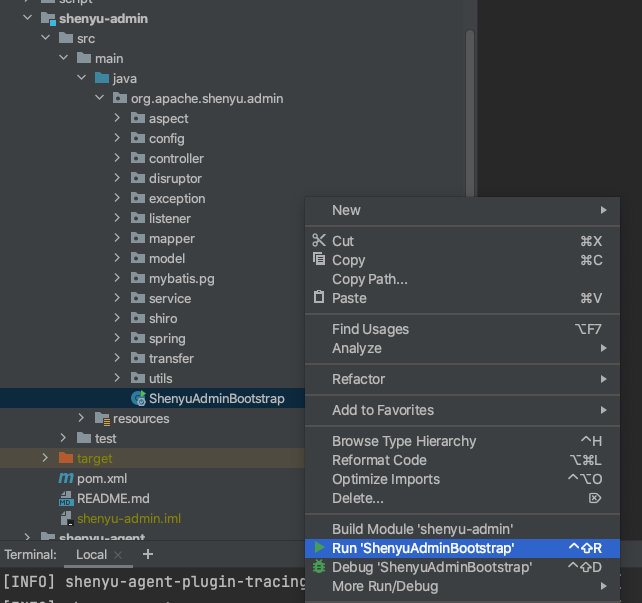
工厂类RateLimiterAlgorithmFactory#

RateLimiterAlgorithmFactory 中依据算法名称,获取RateLimiterAlgorithm实例的方法代码如下:

public static RateLimiterAlgorithm<?> newInstance(final String name) {    return Optional.ofNullable(ExtensionLoader.getExtensionLoader(RateLimiterAlgorithm.class).getJoin(name)).orElse(new TokenBucketRateLimiterAlgorithm());}

按照Apache shenyu SPI的规则,由加载器ExtensionLoader获得实作类,当找不到算法时,默认返回令牌桶算法实现类。

与Redis做资料交互#

从上面代码我们了解到Apache Shenyu网关中,RateLimiter SPI 的基本扩展点,在Shenyu网关运行中,应用ReactiveRedisTemplate 来异步执行对redis的调用处理。实现代码在RedisRateLimiter类的isAllowed()方法中,其部分代码如下:

    public Mono<RateLimiterResponse> isAllowed(final String id, final RateLimiterHandle limiterHandle) {        // get parameters that will pass to redis from RateLimiterHandle Object        double replenishRate = limiterHandle.getReplenishRate();        double burstCapacity = limiterHandle.getBurstCapacity();        double requestCount = limiterHandle.getRequestCount();        // get the current used RateLimiterAlgorithm        RateLimiterAlgorithm<?> rateLimiterAlgorithm = RateLimiterAlgorithmFactory.newInstance(limiterHandle.getAlgorithmName());                ........        Flux<List<Long>> resultFlux = Singleton.INST.get(ReactiveRedisTemplate.class).execute(script, keys, scriptArgs);        return resultFlux.onErrorResume(throwable -> Flux.just(Arrays.asList(1L, -1L)))                .reduce(new ArrayList<Long>(), (longs, l) -> {                    longs.addAll(l);                    return longs;                }).map(results -> {                    boolean allowed = results.get(0) == 1L;                    Long tokensLeft = results.get(1);                    return new RateLimiterResponse(allowed, tokensLeft);                })                .doOnError(throwable -> log.error("Error occurred while judging if user is allowed by RedisRateLimiter:{}", throwable.getMessage()))                .doFinally(signalType -> rateLimiterAlgorithm.callback(script, keys, scriptArgs));    }

POJO 对象RateLimiterHandle 中,定义了限流所需的属性算法名称, 速录,容量,请求的数量 。首先 从limiterHandle 包装类中取得需要传入redis的几个参数。之后从RateLimiterAlgorithmFactory 从工厂类取得当前配置的限流算法。 之后做Key值和参数的传递。

为了更方便阅读,下图给出了java代码与redis执行参数输入、输出的传递过程。左边是isAllowed() 函数的后半部分代码,右边是一个Lua脚本的输入输出代码。

下面说明Java代码的执行过程:

  1. getKeys()方法获得两个键值List<String>. 其中第一个Key会映射为Redis中的有序集合。

  2. 设定4个参数:速率 replenishRate ,容量 burstCapacity, 时间戳, 返回当前java 纪元秒数(长整数)EpochSecond, 请求的数量 requestcount.

  3. 按所设定的脚本、Key值、参数调用ReactiveRedisTemplate功能,执行redis处理。返回参数是Flux<List<Long>>类型

  4. 通过reduce方法将其返回值从Flux<ArrayList<Long>> 类型转换为Mono<ArrayList<Long>>,再经过map方法,转换为Mono<RateLimiterResponse>返回。

    返回结果有两个资料,allowed =1, 代表允许通过,0-不通过;而第二个返回参数tokensLeft,是可用的剩余请求数量。

5.容错性方面,由于使用的是reactor 的非阻塞通讯模型,当发生错误时,会执行onErrorResume()语句,Flux.just产生返回资料, 默认为allowed=1, 代表允许通过, 并丢出错误日志。

6.之后执行doFinally()方法,执行算法实现类的callback方法。

io-with-lua

4种限流算法#

上面我们了解了网关中如何通过Java代码如何与Redis 做通讯,这一节我们通过简要分析网关中提供的4种限流算法中的一些代码,来理解如何开发使用RateLimiter SPI的接口方法,并与Redis有效协作。

Ratelimiter SPI目前提供了4种限流算法:

Algorithm nameJava classLua script file
Request rate limiterTokenBucketRateLimiterAlgorithmrequest_rate_limiter.lua
Slide window rate limiterSlidingWindowRateLimiterAlgorithmliding_window_request_rate_limiter.lua
Concurrent rate limiterConcurrentRateLimiterAlgorithmconcurrent_request_rate_limiter.lua
Leaky bucket algorithmLeakyBucketRateLimiterAlgorithmrequest_leaky_rate_limiter.lua
  1. 令牌桶限流:按请求数量限流,设置每秒N个请求,超过N的请求会拒绝服务。算法实现时,以时间间隔计算匀速产生令牌的数量。若每次请求的数量,小于桶内令牌的数量,则允许通过。 时间窗口为 2*容积/速率。
  2. 滑动窗口限流:与令牌桶限流不同在于,其窗口大小比令牌桶的窗口小,为一个容积/速率。并且每次移动向后一个时间时间窗口。其他限流原理与令牌桶类似。
  3. 并发的请求速率限流:严格限制并发访问量为N个请求,大于N的请求会被拒绝。每次当有新请求,查看计数是否大于N, 若小于N则允许通过,计数加1。 当这个请求调用结束时,会释放这个信号(计数减1)
  4. 漏桶算法: 相对于令牌桶算法,漏桶算法有助于减少流量聚集,实现更为平滑的限流处理。 漏桶算法强制以常数N的速率输出流量,其以漏桶为模型,可漏水的量为时间间隔 *速率。若可漏水量>已使用量,则已使用量设为0( 清空漏桶),否则已使用量要减去可漏水量。 若请求数量+ 已使用量< 总容量,则允许请求通过。

下面以 并行限流算法为例,解读Lua和Java代码,查看callback 方法的使用。 通过解读令牌桶和滑动窗口算法代码,了解getKey()方法的使用。

并发请求数限流中使用callback方法#

首先ConcurrentRateLimiterAlgorithmgetKeys() 方法覆写了抽象类中的模板方法:

    @Override    public List<String> getKeys(final String id) {        String tokenKey = getKeyName() + ".{" + id + "}.tokens";        String requestKey = UUIDUtils.getInstance().generateShortUuid();        return Arrays.asList(tokenKey, requestKey);    }

第二个元素 requestKey 是一个long型不重复值(由一个分布式ID产生器产生的,递增,比当前时间EpochSecond小), 相应的concurrent_request_rate_limiter.lua的代码:

local key = KEYS[1]
local capacity = tonumber(ARGV[2])local timestamp = tonumber(ARGV[3])local id = KEYS[2]

这里id 即是取得上面的getKeys()方法产生的requestKey, 一个uuid. 后续的处理如下:

local count = redis.call("zcard", key)local allowed = 0
if count < capacity then  redis.call("zadd", key, timestamp, id)  allowed = 1  count = count + 1endreturn { allowed, count }

先用zcard命令统计redis中key值所对应的有序集合中的元素个数,若元素总数count小于容量,则允许通过,并用zadd key score member方法,向key所在的有序集合中,添加一个元素id, 其score为timestamp. 则此时元素的总个数count实际为count+1.

以上的代码都是在redis中作为一个原子操作来执行的。当同一个key (例如Ip下)有大量并发请求时,redis记录的该ip的有序集合的数量count也在不断累加中。当超过容量限制,则会拒绝服务。

并发请求数限流算法中,要求当请求调用结束时,要释放这个信号量,lua代码中并没有做这个处理。

我们来看看 ConcurrentRateLimiterAlgorithm类中的回调函数:

    @Override    @SuppressWarnings("unchecked")    public void callback(final RedisScript<?> script, final List<String> keys, final List<String> scriptArgs) {        Singleton.INST.get(ReactiveRedisTemplate.class).opsForZSet().remove(keys.get(0), keys.get(1)).subscribe();    }

这里做了一个异步的订阅处理,通过ReactiveRedisTemplate删除redis中(key, id)的元素,等待调用结束后,释放这个信号。这个remove的处理不能放到lua脚本中执行,否则逻辑就是错误的。这也正是RateLimiterAlgorithm SPI 设计callback方法的用意。

令牌桶算法中使用getKeys()#

对应的Lua 代码如下:

local tokens_key = KEYS[1]local timestamp_key = KEYS[2]

省略获取参数的代码

local fill_time = capacity/ratelocal ttl = math.floor(fill_time*2)

时间窗口ttl 大概是 2* 容量/速率.

local last_tokens = tonumber(redis.call("get", tokens_key))if last_tokens == nil then  last_tokens = capacityend

从有序集合中取得上次使用的token,如果没有则last_tokens = 容量。

local last_refreshed = tonumber(redis.call("get", timestamp_key))if last_refreshed == nil then  last_refreshed = 0end

以timestamp_key为key,从有序集合中取得上次刷新时间,默认为0.

local delta = math.max(0, now-last_refreshed)local filled_tokens = math.min(capacity, last_tokens+(delta*rate))local allowed = filled_tokens >= requestedlocal allowed_num = 0if allowed then  new_tokens = filled_tokens - requested  allowed_num = 1end

时间间隔*速率匀速产生令牌,若令牌数量>请求数量,则allowed=1, 并且更新令牌数量。

redis.call("setex", tokens_key, ttl, new_tokens)redis.call("setex", timestamp_key, ttl, now)
return { allowed_num, new_tokens }

这里now是传入的当前时间(EpochSecond),设置tokens_key所对应的有序集合的值为 new_tokens(即新令牌数量) , 过期时间为ttl。 更新集合中,timestamp_key的值为当前时间,过期时间为ttl.

滑动窗口算法中使用getKeys方法#

SlidingWindowRateLimiterAlgorithmgetKeys()同样覆写了父类,代码与ConcurrentRateLimiterAlgorithm 方法代码一致。

如下为滑动窗口算法的Lua代码,省略了其他参数的接收代码。

local timestamp_key = KEYS[2]...... local window_size = tonumber(capacity / rate)local window_time = 1

设定窗口大小为容积/速率。

local last_requested = 0local exists_key = redis.call('exists', tokens_key)if (exists_key == 1) then    last_requested = redis.call('zcard', tokens_key)end

获取当前key 的基数

local remain_request = capacity - last_requestedlocal allowed_num = 0if (last_requested < capacity) then    allowed_num = 1    redis.call('zadd', tokens_key, now, timestamp_key)end

计算剩余可用量 = 容量 减去已使用量,若last_requested < capacity ,则允许通过,并且在tokens_key为key的有序集合中,增加一个 元素(key =timestam_key,value= now)

redis.call('zremrangebyscore', tokens_key, 0, now - window_size / window_time)redis.call('expire', tokens_key, window_size)
return { allowed_num, remain_request }

前面已经设定window_time=1, 用Redis的 zremrangebyscore命令,移除有序集合中,score为[0- 当前时间-窗口大小]的元素,即移动一个窗口大小。设定tokens_key的过期时间为窗口大小。

AbstractRateLimiterAlgorithm的模板方法中,getKeys(final String id) 给出的第二个值(以secondKey指代),是拼接了{id} (即resolve key)的一个固定字符串。从上面三个算法代码可以看到,在令牌桶算法中,secondKey在Lua代码执行中会更新为最新的时间,所以无所谓传入的值。而在并发限流算法中,会以此secondKey为条件,在java callback方法中移除对应的元素。而在滑动窗口算法中,这个secondKey的值,会作为一个新元素的key, 增加到当前有序集合中,并在做窗口滑动中,过期的资料会被删除掉。

总之,当设计新的限流算法时,要根据算法需要仔细设计getKey()方法。

如何调用 RateLimiter SPI#

RateLimiter Plug中的doExecute()方法中,传入的三个参数 exchange 为请求的连接, chain 为shenyu插件的调用链,selector 是选择器,rule是系统中配置的规则参数资料。

protected Mono<Void> doExecute(final ServerWebExchange exchange, final ShenyuPluginChain chain, final SelectorData selector, final RuleData rule) {    RateLimiterHandle limiterHandle = RatelimiterRuleHandleCache.getInstance()        .obtainHandle(CacheKeyUtils.INST.getKey(rule));    String resolverKey = Optional.ofNullable(limiterHandle.getKeyResolverName())        .flatMap(name -> Optional.of("-" + RateLimiterKeyResolverFactory.newInstance(name).resolve(exchange)))        .orElse("");    return redisRateLimiter.isAllowed(rule.getId() + resolverKey, limiterHandle)        .flatMap(response -> {            if (!response.isAllowed()) {                exchange.getResponse().setStatusCode(HttpStatus.TOO_MANY_REQUESTS);                Object error = ShenyuResultWrap.error(ShenyuResultEnum.TOO_MANY_REQUESTS.getCode(), ShenyuResultEnum.TOO_MANY_REQUESTS.getMsg(), null);                return WebFluxResultUtils.result(exchange, error);            }            return chain.execute(exchange);        });}

1.首先,从缓存中,取得系统设定的限流参数RateLimiterHandle实例 limiterHandle. 2.根据name指定的Resolver 获得请求的连接Key信息(如地址等). 3.调用 RedisRateLimiter的 isAllowed方法, 获取返回值后, 4.若isAllowd=false,做错误处理 5.如果 isAllowed=true,return chain.execute(exchange), 对该请求做后续处理,传递到调用链的下一关。

Summary#

整个RateLimiter plugin框架基于Spring WebFlux开发,用redis 和lua脚本做限流计数及核心逻辑处理,支持高并发及弹性扩展。

  1. RateLimiter SPI 提供了两个SPI 接口,通过应用面向接口设计及各种设计模式,可以方便的增加新的限流算法,以及各种流量解析规则。

  2. 提供了令牌桶、并发速率限流、滑动窗口、漏桶4种限流算法。在设计算法实现时,需要根据算法特征设计KEY值,用Lua脚本实现在redis中要处理的逻辑,设计callback()方法做后续的数据处理。

  3. 响应式编程,实现过程简洁高效。

Apache ShenYu 启动示例

· One min read
Kunshuai Zhu
Apache ShenYu Contributor

环境准备#

  • 本地正确安装JDK1.8+
  • 本地正确安装Git
  • 本地正确安装Maven
  • 选择一款开发工具,比如IDEA

拉取ShenYu代码#

使用Git拉取代码

git clone https://github.com/apache/incubator-shenyu.git

编译代码#

使用Maven进行编译

cd incubator-shenyumvn clean install -Dmaven.javadoc.skip=true -B -Drat.skip=true -Djacoco.skip=true -DskipITs -DskipTests

启动网关服务#

使用开发工具,以IDEA为例。

启动 shenyu-admin 控制台(默认使用H2数据库)

start-demo-admin

启动 shenyu-bootstrap

start-demo-bootstrap

到这一步,shenyu网关已经启动。

我们可以打开浏览器,访问admin控制台:http://localhost:9095/

启动应用服务#

Apache ShenYu提供了Http、Dubbo、SpringCloud等应用接入shenyu网关的样例,位于 shenyu-example 模块,这里以Http服务为例。

shenyu-example 未被IDEA标记为Maven项目,可以右键点击 shenyu-example 目录下的 pom.xml 文件,将其添加为Maven项目。

start-demo-maven

启动 shenyu-examples-http

start-demo-examples-http

这时,shenyu-examples-http 会自动把加 @ShenyuSpringMvcClient 注解的接口方法,以及application.yml中的相关配置注册到网关。我们打开admin控制台,即可在divide、context_path中看到相关配置。

测试Http请求#

下面使用postman模拟http的方式来请求你的http服务:

start-demo-post-http

使用更多插件#

我们可以参考 官方文档,来使用其他的插件。

这里以使用 param-mapping 插件为例。

BasicConfig -> Plugin 编辑 param-mapping 插件,设置 status

start-demo-plugin

PluginList -> http process 配置选择器和规则。

start-demo-selector

start-demo-rules

然后使用 postman/http/test/payment 发起http请求。

start-demo-post-param-mapping

Etcd数据同步源码分析

· One min read
Apache ShenYu Contributor

Apache ShenYu 是一个异步的,高性能的,跨语言的,响应式的 API 网关。

ShenYu网关中,数据同步是指,当在后台管理系统中,数据发送了更新后,如何将更新的数据同步到网关中。Apache ShenYu 网关当前支持ZooKeeperWebSocketHttp长轮询NacosEtcdConsul 进行数据同步。本文的主要内容是基于Etcd的数据同步源码分析。
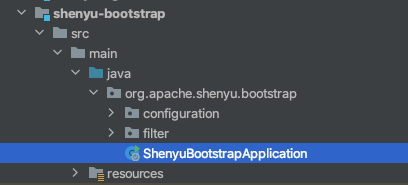
本文基于shenyu-2.4.0版本进行源码分析,官网的介绍请参考 数据同步原理

1. 关于Etcd#

Etcd是一个分布式的键值对存储系统,它为大型分布式计算提供分布式配置服务、同步服务和命名注册。
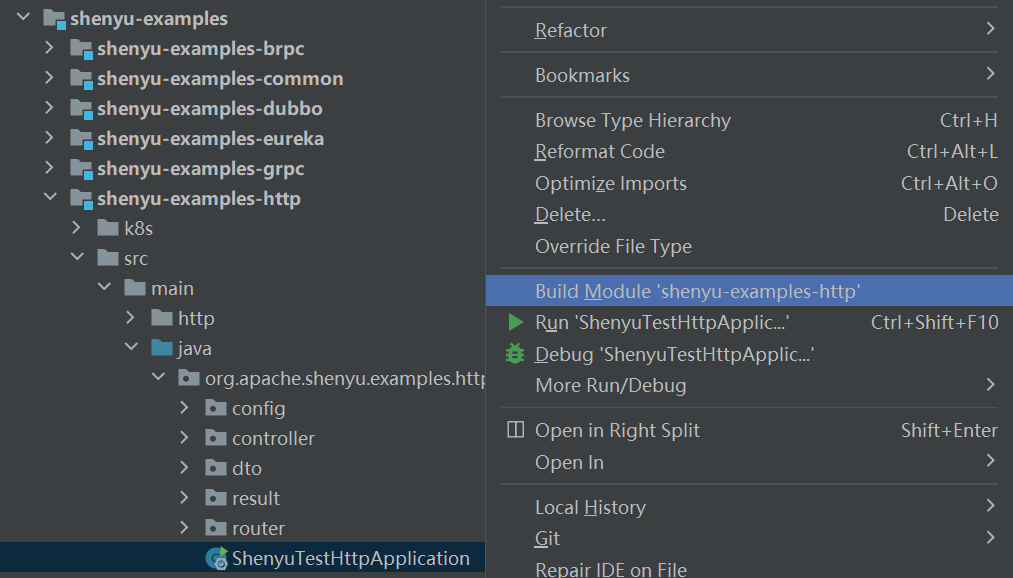
2. Admin数据同步#

我们从一个实际案例进行源码追踪,比如在后台管理系统中,对Divide插件中的一条选择器数据进行更新,将权重更新为90:

2.1 接收数据#

  • SelectorController.createSelector()

进入SelectorController类中的updateSelector()方法,它负责数据的校验,添加或更新数据,返回结果信息。

@Validated@RequiredArgsConstructor@RestController@RequestMapping("/selector")public class SelectorController {        @PutMapping("/{id}")    public ShenyuAdminResult updateSelector(@PathVariable("id") final String id, @Valid @RequestBody final SelectorDTO selectorDTO) {        // 设置当前选择器数据id        selectorDTO.setId(id);        // 创建或更新操作        Integer updateCount = selectorService.createOrUpdate(selectorDTO);        // 返回结果信息        return ShenyuAdminResult.success(ShenyuResultMessage.UPDATE_SUCCESS, updateCount);    }        // ......}

2.2 处理数据#

  • SelectorServiceImpl.createOrUpdate()

SelectorServiceImpl类中通过createOrUpdate()方法完成数据的转换,保存到数据库,发布事件,更新upstream

@RequiredArgsConstructor@Servicepublic class SelectorServiceImpl implements SelectorService {    // 负责事件发布的eventPublisher    private final ApplicationEventPublisher eventPublisher;        @Override    @Transactional(rollbackFor = Exception.class)    public int createOrUpdate(final SelectorDTO selectorDTO) {        int selectorCount;        // 构建数据 DTO --> DO        SelectorDO selectorDO = SelectorDO.buildSelectorDO(selectorDTO);        List<SelectorConditionDTO> selectorConditionDTOs = selectorDTO.getSelectorConditions();        // 判断是添加还是更新        if (StringUtils.isEmpty(selectorDTO.getId())) {            // 插入选择器数据            selectorCount = selectorMapper.insertSelective(selectorDO);            // 插入选择器中的条件数据            selectorConditionDTOs.forEach(selectorConditionDTO -> {                selectorConditionDTO.setSelectorId(selectorDO.getId());                selectorConditionMapper.insertSelective(SelectorConditionDO.buildSelectorConditionDO(selectorConditionDTO));            });            // check selector add            // 权限检查            if (dataPermissionMapper.listByUserId(JwtUtils.getUserInfo().getUserId()).size() > 0) {                DataPermissionDTO dataPermissionDTO = new DataPermissionDTO();                dataPermissionDTO.setUserId(JwtUtils.getUserInfo().getUserId());                dataPermissionDTO.setDataId(selectorDO.getId());                dataPermissionDTO.setDataType(AdminConstants.SELECTOR_DATA_TYPE);                dataPermissionMapper.insertSelective(DataPermissionDO.buildPermissionDO(dataPermissionDTO));            }
        } else {            // 更新数据,先删除再新增            selectorCount = selectorMapper.updateSelective(selectorDO);            //delete rule condition then add            selectorConditionMapper.deleteByQuery(new SelectorConditionQuery(selectorDO.getId()));            selectorConditionDTOs.forEach(selectorConditionDTO -> {                selectorConditionDTO.setSelectorId(selectorDO.getId());                SelectorConditionDO selectorConditionDO = SelectorConditionDO.buildSelectorConditionDO(selectorConditionDTO);                selectorConditionMapper.insertSelective(selectorConditionDO);            });        }        // 发布事件        publishEvent(selectorDO, selectorConditionDTOs);
        // 更新upstream        updateDivideUpstream(selectorDO);        return selectorCount;    }            // ......    }

Service类完成数据的持久化操作,即保存数据到数据库,这个比较简单,就不深入追踪了。关于更新upstream操作,放到后面对应的章节中进行分析,重点关注发布事件的操作,它会执行数据同步。

publishEvent()方法的逻辑是:找到选择器对应的插件,构建条件数据,发布变更数据。

     private void publishEvent(final SelectorDO selectorDO, final List<SelectorConditionDTO> selectorConditionDTOs) {        // 找到选择器对应的插件        PluginDO pluginDO = pluginMapper.selectById(selectorDO.getPluginId());        // 构建条件数据        List<ConditionData> conditionDataList =                selectorConditionDTOs.stream().map(ConditionTransfer.INSTANCE::mapToSelectorDTO).collect(Collectors.toList());        // 发布变更数据        eventPublisher.publishEvent(new DataChangedEvent(ConfigGroupEnum.SELECTOR, DataEventTypeEnum.UPDATE,                Collections.singletonList(SelectorDO.transFrom(selectorDO, pluginDO.getName(), conditionDataList))));    }

发布变更数据通过eventPublisher.publishEvent()完成,这个eventPublisher对象是一个ApplicationEventPublisher类,这个类的全限定名是org.springframework.context.ApplicationEventPublisher。看到这儿,我们知道了发布数据是通过Spring相关的功能来完成的。

关于ApplicationEventPublisher

当有状态发生变化时,发布者调用 ApplicationEventPublisherpublishEvent 方法发布一个事件,Spring容器广播事件给所有观察者,调用观察者的 onApplicationEvent 方法把事件对象传递给观察者。调用 publishEvent方法有两种途径,一种是实现接口由容器注入 ApplicationEventPublisher 对象然后调用其方法,另一种是直接调用容器的方法,两种方法发布事件没有太大区别。

  • ApplicationEventPublisher:发布事件;
  • ApplicationEventSpring 事件,记录事件源、时间和数据;
  • ApplicationListener:事件监听者,观察者;

Spring的事件发布机制中,有三个对象,

一个是发布事件的ApplicationEventPublisher,在ShenYu中通过构造器注入了一个eventPublisher

另一个对象是ApplicationEvent,在ShenYu中通过DataChangedEvent继承了它,表示事件对象。

public class DataChangedEvent extends ApplicationEvent {//......}

最后一个是 ApplicationListener,在ShenYu中通过DataChangedEventDispatcher类实现了该接口,作为事件的监听者,负责处理事件对象。

@Componentpublic class DataChangedEventDispatcher implements ApplicationListener<DataChangedEvent>, InitializingBean {
    //......    }

2.3 分发数据#

  • DataChangedEventDispatcher.onApplicationEvent()

当事件发布完成后,会自动进入到DataChangedEventDispatcher类中的onApplicationEvent()方法,进行事件处理。

@Componentpublic class DataChangedEventDispatcher implements ApplicationListener<DataChangedEvent>, InitializingBean {
  /**     * 有数据变更时,调用此方法     * @param event     */    @Override    @SuppressWarnings("unchecked")    public void onApplicationEvent(final DataChangedEvent event) {        // 遍历数据变更监听器(一般使用一种数据同步的方式就好了)        for (DataChangedListener listener : listeners) {            // 哪种数据发生变更            switch (event.getGroupKey()) {                case APP_AUTH: // 认证信息                    listener.onAppAuthChanged((List<AppAuthData>) event.getSource(), event.getEventType());                    break;                case PLUGIN:  // 插件信息                    listener.onPluginChanged((List<PluginData>) event.getSource(), event.getEventType());                    break;                case RULE:    // 规则信息                    listener.onRuleChanged((List<RuleData>) event.getSource(), event.getEventType());                    break;                case SELECTOR:   // 选择器信息                    listener.onSelectorChanged((List<SelectorData>) event.getSource(), event.getEventType());                    break;                case META_DATA:  // 元数据                    listener.onMetaDataChanged((List<MetaData>) event.getSource(), event.getEventType());                    break;                default:  // 其他类型,抛出异常                    throw new IllegalStateException("Unexpected value: " + event.getGroupKey());            }        }    }    }

当有数据变更时,调用onApplicationEvent方法,然后遍历所有数据变更监听器,判断是哪种数据类型,交给相应的数据监听器进行处理。

ShenYu将所有数据进行了分组,一共是五种:认证信息、插件信息、规则信息、选择器信息和元数据。

这里的数据变更监听器(DataChangedListener),就是数据同步策略的抽象,它的具体实现有:

这几个实现类就是当前ShenYu支持的同步策略:

  • WebsocketDataChangedListener:基于websocket的数据同步;
  • ZookeeperDataChangedListener:基于zookeeper的数据同步;
  • ConsulDataChangedListener:基于consul的数据同步;
  • EtcdDataDataChangedListener:基于etcd的数据同步;
  • HttpLongPollingDataChangedListener:基于http长轮询的数据同步;
  • NacosDataChangedListener:基于nacos的数据同步;

既然有这么多种实现策略,那么如何确定使用哪一种呢?

因为本文是基于Etcd的数据同步源码分析,所以这里以EtcdDataDataChangedListener为例,分析它是如何被加载并实现的。

通过查看对EtcdDataDataChangedListener类的调用,可以发现,它是在DataSyncConfiguration类进行配置的。

/** * 数据同步配置类 * 通过springboot条件装配实现 * The type Data sync configuration. */@Configurationpublic class DataSyncConfiguration {
   //省略了其他代码......    /**   * The type Etcd listener.   */  @Configuration  @ConditionalOnProperty(prefix = "shenyu.sync.etcd", name = "url")  @EnableConfigurationProperties(EtcdProperties.class)  static class EtcdListener {
    @Bean    public EtcdClient etcdClient(final EtcdProperties etcdProperties) {      Client client = Client.builder()              .endpoints(etcdProperties.getUrl())              .build();      return new EtcdClient(client);    }
    /**     * Config event listener data changed listener.     * 创建Etcd数据变更监听器     * @param etcdClient the etcd client     * @return the data changed listener     */    @Bean    @ConditionalOnMissingBean(EtcdDataDataChangedListener.class)    public DataChangedListener etcdDataChangedListener(final EtcdClient etcdClient) {      return new EtcdDataDataChangedListener(etcdClient);    }
    /**     * data init.     * 创建Etcd数据初始化类     * @param etcdClient        the etcd client     * @param syncDataService the sync data service     * @return the etcd data init     */    @Bean    @ConditionalOnMissingBean(EtcdDataInit.class)    public EtcdDataInit etcdDataInit(final EtcdClient etcdClient, final SyncDataService syncDataService) {      return new EtcdDataInit(etcdClient, syncDataService);    }  }        //省略了其他代码......}

这个配置类是通过SpringBoot条件装配类实现的。在EtcdListener类上面有几个注解:

  • @Configuration:配置文件,应用上下文;

  • @ConditionalOnProperty(prefix = "shenyu.sync.etcd", name = "url"):属性条件判断,满足条件,该配置类才会生效。也就是说,当我们有如下配置时,就会采用etcd进行数据同步。

    shenyu:    sync:     etcd:          url: localhost:2181
  • @EnableConfigurationProperties(EtcdProperties.class):导入另一个属性类EtcdPropertiesEtcdProperties中各属性对应配置文件中以shenyu.sync.etcd作为前缀的各属性。

@Data@ConfigurationProperties(prefix = "shenyu.sync.etcd")public class EtcdProperties {
  private String url;
  private Integer sessionTimeout;
  private Integer connectionTimeout;
  private String serializer;}

当我们在配置文件中配置了shenyu.sync.etcd.url属性时,Admin将采用etcd进行数据同步,此时配置类EtcdListener会生效,并生成EtcdClient, EtcdDataDataChangedListenerEtcdDataInit类型的bean。

  • 生成EtcdClient类型的bean,etcdClient,这个bean根据配置文件,配置了与etcd服务器的连接信息,可以直接操作etcd节点。
  • 生成EtcdDataDataChangedListener类型的bean,etcdDataDataChangedListener,这个bean将beanetcdClient作为成员变量,当监听到事件时,进行回调操作,可以直接使用该bean操作etcd节点。
  • 生成EtcdDataInit类型的bean,etcdDataInit,这个bean将beanetcdClient和beansyncDataService作为成员变量,使用etcdClient根据etcd路径,判断数据是否未初始化,当未初始化时,将调用syncDataService进行刷新操作,将在下文详述。 根据上文所述,在事件处理方法onApplicationEvent()中,就会到相应的listener中。在我们的案例中,是对一条选择器数据进行更新,数据同步采用的是etcd,所以,代码会进入到EtcdDataDataChangedListener进行选择器数据变更处理。
    //DataChangedEventDispatcher.java        @Override    @SuppressWarnings("unchecked")    public void onApplicationEvent(final DataChangedEvent event) {        // 遍历数据变更监听器(一般使用一种数据同步的方式就好了)        for (DataChangedListener listener : listeners) {            // 哪种数据发生变更            switch (event.getGroupKey()) {                                    // 省略了其他逻辑                                    case SELECTOR:   // 选择器信息                    listener.onSelectorChanged((List<SelectorData>) event.getSource(), event.getEventType());   // 在我们的案例中,会进入到EtcdDataDataChangedListener进行选择器数据变更处理                    break;         }    }

2.4 Etcd数据变更监听器#

  • EtcdDataDataChangedListener.onSelectorChanged()

    onSelectorChanged()方法中,判断操作类型,是刷新同步还是更新或创建同步。根据当前选择器数据信息判断节点是否在etcd中。

/** * EtcdDataDataChangedListener. */@Slf4jpublic class EtcdDataDataChangedListener implements DataChangedListener {
    private final EtcdClient etcdClient;
    public EtcdDataDataChangedListener(final EtcdClient client) {        this.etcdClient = client;    }
    // 选择器信息发生改变    @Override    public void onSelectorChanged(final List<SelectorData> changed, final DataEventTypeEnum eventType) {      // 刷新操作      if (eventType == DataEventTypeEnum.REFRESH && !changed.isEmpty()) {        String selectorParentPath = DefaultPathConstants.buildSelectorParentPath(changed.get(0).getPluginName());        etcdClient.deleteEtcdPathRecursive(selectorParentPath);      }      // 发生变更的数据      for (SelectorData data : changed) {        // 构建选择器数据的真实路径        String selectorRealPath = DefaultPathConstants.buildSelectorRealPath(data.getPluginName(), data.getId());        //删除操作        if (eventType == DataEventTypeEnum.DELETE) {          etcdClient.delete(selectorRealPath);          continue;        }        //create or update,创建或更新操作        updateNode(selectorRealPath, data);      }    }    }

这部分是核心。changed表示需更新的SelectorData列表,eventType表示事件类型。当事件类型为刷新REFRESH,并且SelectorData有改动时,会先将etcd中该plugin下的selector节点都先删除。注意这里的条件SelectorData有改动是必须的,否则会出现没有改动时进行刷新,将所有selector节点都删除的bug。 获取到selector对应路径后,会对节点进行删除、创建或更新。

只要将变动的数据正确写入到etcd的节点上,admin这边的操作就执行完成了。

在我们当前的案例中,对Divide插件中的一条选择器数据进行更新,将权重更新为90,就会对图中的特定节点更新。

我们用时序图将上面的更新流程串联起来。

3. 网关数据同步#

假设ShenYu网关已经在正常运行,使用的数据同步方式也是etcd。那么当在admin端更新选择器数据后,并且向etcd发送了变更的数据,那网关是如何接收并处理数据的呢?接下来我们就继续进行源码分析,一探究竟。

3.1 EtcdClient接收数据#

  • EtcdClient.watchDataChange()

在网关端有一个EtcdSyncDataService类,它通过etcdClient订阅了数据节点,当数据发生变更时,可以感知到。

/** * Data synchronize of etcd. */@Slf4jpublic class EtcdSyncDataService implements SyncDataService, AutoCloseable {    //省略其它代码    private void subscribeSelectorDataChanges(final String path) {      etcdClient.watchDataChange(path, (updateNode, updateValue) -> cacheSelectorData(updateValue),              this::unCacheSelectorData);    }  //省略其它代码}

EtcdWatch机制,会给订阅的客户端发送节点变更通知。在我们的案例中,更新选择器信息,就会进入到watchDataChange()方法。通过cacheSelectorData()去处理数据。

3.2 处理数据#

  • EtcdSyncDataService.cacheSelectorData()

经过判空逻辑之后,缓存选择器数据的操作又交给了PluginDataSubscriber处理。

    private void cacheSelectorData(final String dataString) {        final SelectorData selectorData = GsonUtils.getInstance().fromJson(dataString, SelectorData.class);        Optional.ofNullable(selectorData)            .ifPresent(data -> Optional.ofNullable(pluginDataSubscriber).ifPresent(e -> e.onSelectorSubscribe(data)));        }

PluginDataSubscriber是一个接口,它只有一个CommonPluginDataSubscriber实现类,负责处理插件、选择器和规则数据。

3.3 通用插件数据订阅者#

  • PluginDataSubscriber.onSelectorSubscribe()

它没有其他逻辑,直接调用subscribeDataHandler()方法。在方法中,更具数据类型(插件、选择器或规则),操作类型(更新或删除),去执行不同逻辑。

/** * 通用插件数据订阅者,负责处理所有插件、选择器和规则信息 * The type Common plugin data subscriber. */public class CommonPluginDataSubscriber implements PluginDataSubscriber {    //......     // 处理选择器数据    @Override    public void onSelectorSubscribe(final SelectorData selectorData) {        subscribeDataHandler(selectorData, DataEventTypeEnum.UPDATE);    }            // 订阅数据处理器,处理数据的更新或删除    private <T> void subscribeDataHandler(final T classData, final DataEventTypeEnum dataType) {        Optional.ofNullable(classData).ifPresent(data -> {            // 插件数据            if (data instanceof PluginData) {                PluginData pluginData = (PluginData) data;                if (dataType == DataEventTypeEnum.UPDATE) { // 更新操作                    // 将数据保存到网关内存                    BaseDataCache.getInstance().cachePluginData(pluginData);                    // 如果每个插件还有自己的处理逻辑,那么就去处理                    Optional.ofNullable(handlerMap.get(pluginData.getName())).ifPresent(handler -> handler.handlerPlugin(pluginData));                } else if (dataType == DataEventTypeEnum.DELETE) {  // 删除操作                    // 从网关内存移除数据                    BaseDataCache.getInstance().removePluginData(pluginData);                    // 如果每个插件还有自己的处理逻辑,那么就去处理                    Optional.ofNullable(handlerMap.get(pluginData.getName())).ifPresent(handler -> handler.removePlugin(pluginData));                }            } else if (data instanceof SelectorData) {  // 选择器数据                SelectorData selectorData = (SelectorData) data;                if (dataType == DataEventTypeEnum.UPDATE) { // 更新操作                    // 将数据保存到网关内存                    BaseDataCache.getInstance().cacheSelectData(selectorData);                    // 如果每个插件还有自己的处理逻辑,那么就去处理                    Optional.ofNullable(handlerMap.get(selectorData.getPluginName())).ifPresent(handler -> handler.handlerSelector(selectorData));                } else if (dataType == DataEventTypeEnum.DELETE) {  // 删除操作                    // 从网关内存移除数据                    BaseDataCache.getInstance().removeSelectData(selectorData);                    // 如果每个插件还有自己的处理逻辑,那么就去处理                    Optional.ofNullable(handlerMap.get(selectorData.getPluginName())).ifPresent(handler -> handler.removeSelector(selectorData));                }            } else if (data instanceof RuleData) {  // 规则数据                RuleData ruleData = (RuleData) data;                if (dataType == DataEventTypeEnum.UPDATE) { // 更新操作                    // 将数据保存到网关内存                    BaseDataCache.getInstance().cacheRuleData(ruleData);                    // 如果每个插件还有自己的处理逻辑,那么就去处理                    Optional.ofNullable(handlerMap.get(ruleData.getPluginName())).ifPresent(handler -> handler.handlerRule(ruleData));                } else if (dataType == DataEventTypeEnum.DELETE) { // 删除操作                    // 从网关内存移除数据                    BaseDataCache.getInstance().removeRuleData(ruleData);                    // 如果每个插件还有自己的处理逻辑,那么就去处理                    Optional.ofNullable(handlerMap.get(ruleData.getPluginName())).ifPresent(handler -> handler.removeRule(ruleData));                }            }        });    }    }

3.4 数据缓存到内存#

那么更新一条选择器数据,会进入下面的逻辑:

// 将数据保存到网关内存BaseDataCache.getInstance().cacheSelectData(selectorData);// 如果每个插件还有自己的处理逻辑,那么就去处理                    Optional.ofNullable(handlerMap.get(selectorData.getPluginName())).ifPresent(handler -> handler.handlerSelector(selectorData));

一是将数据保存到网关的内存中。BaseDataCache是最终缓存数据的类,通过单例模式实现。选择器数据就存到了SELECTOR_MAP这个Map中。在后续使用的时候,也是从这里拿数据。

public final class BaseDataCache {    // 私有变量    private static final BaseDataCache INSTANCE = new BaseDataCache();    // 私有构造器    private BaseDataCache() {    }        /**     * Gets instance.     *  公开方法     * @return the instance     */    public static BaseDataCache getInstance() {        return INSTANCE;    }        /**    *  缓存选择器数据的Map     * pluginName -> SelectorData.     */    private static final ConcurrentMap<String, List<SelectorData>> SELECTOR_MAP = Maps.newConcurrentMap();        public void cacheSelectData(final SelectorData selectorData) {        Optional.ofNullable(selectorData).ifPresent(this::selectorAccept);    }           /**     * cache selector data.     * 缓存选择器数据     * @param data the selector data     */    private void selectorAccept(final SelectorData data) {        String key = data.getPluginName();        if (SELECTOR_MAP.containsKey(key)) { // 更新操作,先删除再插入            List<SelectorData> existList = SELECTOR_MAP.get(key);            final List<SelectorData> resultList = existList.stream().filter(r -> !r.getId().equals(data.getId())).collect(Collectors.toList());            resultList.add(data);            final List<SelectorData> collect = resultList.stream().sorted(Comparator.comparing(SelectorData::getSort)).collect(Collectors.toList());            SELECTOR_MAP.put(key, collect);        } else {  // 新增操作,直接放到Map中            SELECTOR_MAP.put(key, Lists.newArrayList(data));        }    }    }

二是如果每个插件还有自己的处理逻辑,那么就去处理。 通过idea编辑器可以看到,当新增一条选择器后,有如下的插件还有处理。这里我们就不再展开了。

经过以上的源码追踪,并通过一个实际的案例,在admin端新增更新一条选择器数据,就将etcd数据同步的流程分析清楚了。

我们还是通过时序图将网关端的数据同步流程串联一下:

数据同步的流程已经分析完了,为了不让同步流程被打断,在分析过程中就忽略了其他逻辑。我们还需要分析Admin同步数据初始化和网关同步操作初始化的流程。

4. Admin同步数据初始化#

admin启动后,会将当前的数据信息全量同步到etcd中,实现逻辑如下:


/** * EtcdDataInit. */@Slf4jpublic class EtcdDataInit implements CommandLineRunner {
  private final EtcdClient etcdClient;
  private final SyncDataService syncDataService;
  public EtcdDataInit(final EtcdClient client, final SyncDataService syncDataService) {    this.etcdClient = client;    this.syncDataService = syncDataService;  }
  @Override  public void run(final String... args) throws Exception {    final String pluginPath = DefaultPathConstants.PLUGIN_PARENT;    final String authPath = DefaultPathConstants.APP_AUTH_PARENT;    final String metaDataPath = DefaultPathConstants.META_DATA;    if (!etcdClient.exists(pluginPath) && !etcdClient.exists(authPath) && !etcdClient.exists(metaDataPath)) {      log.info("Init all data from database");      syncDataService.syncAll(DataEventTypeEnum.REFRESH);    }  }}

判断etcd中是否存在数据,如果不存在,则进行同步。

EtcdDataInit实现了CommandLineRunner接口。它是springboot提供的接口,会在所有 Spring Beans初始化之后执行run()方法,常用于项目中初始化的操作。

  • SyncDataService.syncAll()

从数据库查询数据,然后进行全量数据同步,所有的认证信息、插件信息、选择器信息、规则信息和元数据信息。主要是通过eventPublisher发布同步事件。这里就跟前面提到的同步逻辑就又联系起来了,eventPublisher通过publishEvent()发布完事件后,有ApplicationListener执行事件变更操作,在ShenYu中就是前面提到的DataChangedEventDispatcher

@Servicepublic class SyncDataServiceImpl implements SyncDataService {    // 事件发布    private final ApplicationEventPublisher eventPublisher;         /***     * 全量数据同步     * @param type the type     * @return     */    @Override    public boolean syncAll(final DataEventTypeEnum type) {        // 同步认证信息        appAuthService.syncData();        // 同步插件信息        List<PluginData> pluginDataList = pluginService.listAll();        eventPublisher.publishEvent(new DataChangedEvent(ConfigGroupEnum.PLUGIN, type, pluginDataList));        // 同步选择器信息        List<SelectorData> selectorDataList = selectorService.listAll();        eventPublisher.publishEvent(new DataChangedEvent(ConfigGroupEnum.SELECTOR, type, selectorDataList));        // 同步规则信息        List<RuleData> ruleDataList = ruleService.listAll();        eventPublisher.publishEvent(new DataChangedEvent(ConfigGroupEnum.RULE, type, ruleDataList));        // 同步元数据信息        metaDataService.syncData();        return true;    }    }

5. 网关同步操作初始化#

网关这边的数据同步初始化操作主要是订阅etcd中的节点,当有数据变更时,收到变更数据。这依赖于EtcdWatch机制。在ShenYu中,负责etcd数据同步的是EtcdSyncDataService,也在前面提到过。

EtcdSyncDataService的功能逻辑是在实例化的过程中完成的:对etcd中的shenyu数据同步节点完成订阅。这里的订阅分两类,一类是已经存在的节点上面数据发生更新,这通过etcdClient.watchDataChange()方法实现;另一类是当前节点下有新增或删除节点,即子节点发生变化,这通过etcdClient.watchChildChange()方法实现。

EtcdSyncDataService的代码有点多,这里我们以插件数据的读取和订阅进行追踪,其他类型的数据操作原理是一样的。

/** * etcd 数据同步服务 */@Slf4jpublic class EtcdSyncDataService implements SyncDataService, AutoCloseable {  // 在实例化的时候,完成从etcd中读取数据的操作,并订阅节点  public EtcdSyncDataService(/*省略构造参数*/) {    this.etcdClient = etcdClient;    this.pluginDataSubscriber = pluginDataSubscriber;    this.metaDataSubscribers = metaDataSubscribers;    this.authDataSubscribers = authDataSubscribers;    // 订阅插件、选择器和规则数据    watcherData();    // 订阅认证数据    watchAppAuth();    // 订阅元数据    watchMetaData();  }
  private void watcherData() {    // 插件节点路径    final String pluginParent = DefaultPathConstants.PLUGIN_PARENT;    // 所有插件节点    List<String> pluginZKs = etcdClientGetChildren(pluginParent);    for (String pluginName : pluginZKs) {      // 订阅当前所有插件、选择器和规则数据      watcherAll(pluginName);    }    // 订阅子节点(新增或删除一个插件)    etcdClient.watchChildChange(pluginParent, (updateNode, updateValue) -> {      if (!updateNode.isEmpty()) {        // 需要订阅子节点的所有插件、选择器和规则数据        watcherAll(updateNode);      }    }, null);  }
  private void watcherAll(final String pluginName) {    // 订阅插件数据    watcherPlugin(pluginName);    // 订阅选择器数据    watcherSelector(pluginName);    // 订阅规则数据    watcherRule(pluginName);  }
  private void watcherPlugin(final String pluginName) {    // 当前插件路径    String pluginPath = DefaultPathConstants.buildPluginPath(pluginName);    // 缓存到网关内存中    cachePluginData(etcdClient.get(pluginPath));    // 订阅插件节点    subscribePluginDataChanges(pluginPath, pluginName);  }    private void cachePluginData(final String dataString) {    final PluginData pluginData = GsonUtils.getInstance().fromJson(dataString, PluginData.class);    Optional.ofNullable(pluginData)      .flatMap(data -> Optional.ofNullable(pluginDataSubscriber)).ifPresent(e -> e.onSubscribe(pluginData));  }  
  private void subscribePluginDataChanges(final String pluginPath, final String pluginName) {    // 订阅数据变更:更新或删除,两个lambda表达式分别为更新和删除操作    etcdClient.watchDataChange(pluginPath, (updatePath, updateValue) -> {      final String dataPath = buildRealPath(pluginPath, updatePath);      final String dataStr = etcdClient.get(dataPath);      final PluginData data = GsonUtils.getInstance().fromJson(dataStr, PluginData.class);      Optional.ofNullable(data)              .ifPresent(d -> Optional.ofNullable(pluginDataSubscriber).ifPresent(e -> e.onSubscribe(d)));    }, deleteNode -> deletePlugin(pluginName));  }
}

上面的源代码中都给出了注释,相信大家可以看明白。订阅插件数据的主要逻辑如下:

  1. 构造当前插件路径
  2. 读取etcd上当前节点数据,并反序列化
  3. 插件数据缓存到网关内存中
  4. 订阅插件节点

6. 总结#

本文通过一个实际案例,对etcd的数据同步原理进行了源码分析。涉及到的主要知识点如下:

  • 基于etcd的数据同步,主要是通过watch机制实现;
  • 通过Spring完成事件发布和监听;
  • 通过抽象DataChangedListener接口,支持多种同步策略,面向接口编程;
  • 使用单例设计模式实现缓存数据类BaseDataCache
  • 通过SpringBoot的条件装配和starter加载机制实现配置类的加载。

Http长轮询数据同步源码分析

· One min read
Apache ShenYu Committer

Apache ShenYu 是一个异步的,高性能的,跨语言的,响应式的 API 网关。

ShenYu网关中,数据同步是指,当在后台管理系统中,数据发送了更新后,如何将更新的数据同步到网关中。Apache ShenYu 网关当前支持ZooKeeperWebSocketHttp长轮询NacosEtcdConsul 进行数据同步。本文的主要内容是基于Http长轮询的数据同步源码分析。

本文基于shenyu-2.5.0版本进行源码分析,官网的介绍请参考 数据同步原理

1. Http长轮询#

这里直接引用官网的相关描述:

ZookeeperWebSocket 数据同步的机制比较简单,而 Http长轮询则比较复杂。 Apache ShenYu 借鉴了 ApolloNacos 的设计思想,取其精华,自己实现了 Http长轮询数据同步功能。注意,这里并非传统的 ajax 长轮询!

Http长轮询 机制如上所示,Apache ShenYu网关主动请求 shenyu-admin 的配置服务,读取超时时间为 90s,意味着网关层请求配置服务最多会等待 90s,这样便于 shenyu-admin 配置服务及时响应变更数据,从而实现准实时推送。

Http长轮询 机制是由网关主动请求 shenyu-admin ,所以这次的源码分析,我们从网关这一侧开始。

2. 网关数据同步#

2.1 加载配置#

Http长轮询 数据同步配置的加载是通过spring bootstarter机制,当我们引入相关依赖和在配置文件中有如下配置时,就会加载。

pom文件中引入依赖:

<!--shenyu data sync start use http--><dependency>    <groupId>org.apache.shenyu</groupId>    <artifactId>shenyu-spring-boot-starter-sync-data-http</artifactId>    <version>${project.version}</version></dependency>

application.yml配置文件中添加配置:

shenyu:    sync:       http:          url : http://localhost:9095

当网关启动时,配置类HttpSyncDataConfiguration就会执行,加载相应的Bean

/** * Http sync data configuration for spring boot. */@Configuration@ConditionalOnClass(HttpSyncDataService.class)@ConditionalOnProperty(prefix = "shenyu.sync.http", name = "url")@EnableConfigurationProperties(value = HttpConfig.class)public class HttpSyncDataConfiguration {
  private static final Logger LOGGER = LoggerFactory.getLogger(HttpSyncDataConfiguration.class);
  /**   * Rest template.   * 创建RestTemplate   * @param httpConfig the http config       http配置   * @return the rest template   */  @Bean  public RestTemplate restTemplate(final HttpConfig httpConfig) {    OkHttp3ClientHttpRequestFactory factory = new OkHttp3ClientHttpRequestFactory();    factory.setConnectTimeout(Objects.isNull(httpConfig.getConnectionTimeout()) ? (int) HttpConstants.CLIENT_POLLING_CONNECT_TIMEOUT : httpConfig.getConnectionTimeout());    factory.setReadTimeout(Objects.isNull(httpConfig.getReadTimeout()) ? (int) HttpConstants.CLIENT_POLLING_READ_TIMEOUT : httpConfig.getReadTimeout());    factory.setWriteTimeout(Objects.isNull(httpConfig.getWriteTimeout()) ? (int) HttpConstants.CLIENT_POLLING_WRITE_TIMEOUT : httpConfig.getWriteTimeout());    return new RestTemplate(factory);  }
  /**   * AccessTokenManager.   * 创建AccessTokenManager,专门用户对admin进行http请求时access token的处理   * @param httpConfig   the http config.         * @param restTemplate the rest template.   * @return the access token manager.   */  @Bean  public AccessTokenManager accessTokenManager(final HttpConfig httpConfig, final RestTemplate restTemplate) {    return new AccessTokenManager(restTemplate, httpConfig);  }
  /**   * Http sync data service.   * 创建 HttpSyncDataService    * @param httpConfig         the http config   * @param pluginSubscriber   the plugin subscriber   * @param restTemplate       the rest template   * @param metaSubscribers    the meta subscribers   * @param authSubscribers    the auth subscribers   * @param accessTokenManager the access token manager   * @return the sync data service   */  @Bean  public SyncDataService httpSyncDataService(final ObjectProvider<HttpConfig> httpConfig,                                             final ObjectProvider<PluginDataSubscriber> pluginSubscriber,                                             final ObjectProvider<RestTemplate> restTemplate,                                             final ObjectProvider<List<MetaDataSubscriber>> metaSubscribers,                                             final ObjectProvider<List<AuthDataSubscriber>> authSubscribers,                                             final ObjectProvider<AccessTokenManager> accessTokenManager) {    LOGGER.info("you use http long pull sync shenyu data");    return new HttpSyncDataService(            Objects.requireNonNull(httpConfig.getIfAvailable()),            Objects.requireNonNull(pluginSubscriber.getIfAvailable()),            Objects.requireNonNull(restTemplate.getIfAvailable()),            metaSubscribers.getIfAvailable(Collections::emptyList),            authSubscribers.getIfAvailable(Collections::emptyList),            Objects.requireNonNull(accessTokenManager.getIfAvailable())    );  }}

HttpSyncDataConfigurationHttp长轮询数据同步的配置类,负责创建HttpSyncDataService(负责http数据同步的具体实现)、RestTemplateAccessTokenManager (负责与adminhttp调用时access token的处理)。它的注解如下:

  • @Configuration:表示这是一个配置类;
  • @ConditionalOnClass(HttpSyncDataService.class):条件注解,表示要有HttpSyncDataService这个类;
  • @ConditionalOnProperty(prefix = "shenyu.sync.http", name = "url"):条件注解,要有shenyu.sync.http.url这个属性配置。
  • @EnableConfigurationProperties(value = HttpConfig.class):表示让HttpConfig上的注解@ConfigurationProperties(prefix = "shenyu.sync.http")生效,将HttpConfig这个配置类注入Ioc容器中。

2.2 属性初始化#

  • HttpSyncDataService

HttpSyncDataService的构造函数中,完成属性初始化。

public class HttpSyncDataService implements SyncDataService {
    // 省略了属性字段......
    public HttpSyncDataService(final HttpConfig httpConfig,                               final PluginDataSubscriber pluginDataSubscriber,                               final RestTemplate restTemplate,                               final List<MetaDataSubscriber> metaDataSubscribers,                               final List<AuthDataSubscriber> authDataSubscribers,                               final AccessTokenManager accessTokenManager) {          // 1.设置accessTokenManager          this.accessTokenManager = accessTokenManager;          // 2.创建数据处理器          this.factory = new DataRefreshFactory(pluginDataSubscriber, metaDataSubscribers, authDataSubscribers);          // 3.shenyu-admin的url, 多个用逗号(,)分割          this.serverList = Lists.newArrayList(Splitter.on(",").split(httpConfig.getUrl()));          // 4.只用于http长轮询的restTemplate          this.restTemplate = restTemplate;          // 5.开始执行长轮询任务          this.start();    }
    //......}

上面代码中省略了其他函数和相关字段,在构造函数中完成属性的初始化,主要是:

  • 设置accessTokenManager,定时向admin请求更新accessToken的值。然后每次向admin发起请求时都必须将headerX-Access-Token属性设置成accessToken对应的值;

  • 创建数据处理器,用于后续缓存各种类型的数据(插件、选择器、规则、元数据和认证数据);

  • 获取admin属性配置,主要是获取adminurladmin有可能是集群,多个用逗号(,)分割;

  • 设置RestTemplate,用于向admin发起请求;

  • 开始执行长轮询任务。

2.3 开始长轮询#

  • HttpSyncDataService#start()

start()方法中,干了两件事情,一个是获取全量数据,即请求admin端获取所有需要同步的数据,然后将获取到的数据缓存到网关内存中。另一个是开启多线程执行长轮询任务。

public class HttpSyncDataService implements SyncDataService {        // ......
    private void start() {      // // 只初始化一次,通过原子类实现。       if (RUNNING.compareAndSet(false, true)) {        // 初次启动,获取全量数据        this.fetchGroupConfig(ConfigGroupEnum.values());        // 一个后台服务,一个线程        int threadSize = serverList.size();        // 自定义线程池        this.executor = new ThreadPoolExecutor(threadSize, threadSize, 60L, TimeUnit.SECONDS,                new LinkedBlockingQueue<>(),                ShenyuThreadFactory.create("http-long-polling", true));        // 开始长轮询,一个admin服务,创建一个线程用于数据同步        this.serverList.forEach(server -> this.executor.execute(new HttpLongPollingTask(server)));      } else {        LOG.info("shenyu http long polling was started, executor=[{}]", executor);      }    }      // ......}
2.3.1 获取全量数据#
  • HttpSyncDataService#fetchGroupConfig()

ShenYu将所有需要同步的数据进行了分组,一共有5种数据类型,分别是插件、选择器、规则、元数据和认证数据。

public enum ConfigGroupEnum {    APP_AUTH, // 认证数据    PLUGIN, //插件    RULE, // 规则    SELECTOR, // 选择器    META_DATA; // 元数据}

admin有可能是集群,这里通过循环的方式向每个admin发起请求,有一个执行成功了,那么向admin获取全量数据并缓存到网关的操作就执行成功。如果出现了异常,就向下一个admin发起请求。

public class HttpSyncDataService implements SyncDataService {
  // ......
  private void fetchGroupConfig(final ConfigGroupEnum... groups) throws ShenyuException {    // admin有可能是集群,这里通过循环的方式向每个admin发起请求    for (int index = 0; index < this.serverList.size(); index++) {      String server = serverList.get(index);      try {        // 真正去执行        this.doFetchGroupConfig(server, groups);        // 有一个成功,就成功了,可以退出循环        break;      } catch (ShenyuException e) {        // 出现异常,尝试执行下一个        // 最后一个也执行失败了,抛出异常        if (index >= serverList.size() - 1) {          throw e;        }        LOG.warn("fetch config fail, try another one: {}", serverList.get(index + 1));      }    }  }
  // ......}
  • HttpSyncDataService#doFetchGroupConfig()

在此方法中,首先拼装请求参数,然后通过httpClient发起请求,到admin中获取数据,最后将获取到的数据更新到网关内存中。

public class HttpSyncDataService implements SyncDataService {  private void doFetchGroupConfig(final String server, final ConfigGroupEnum... groups) {    // 1. 拼请求参数,所有分组枚举类型    StringBuilder params = new StringBuilder();    for (ConfigGroupEnum groupKey : groups) {      params.append("groupKeys").append("=").append(groupKey.name()).append("&");    }    // admin端提供的接口  /configs/fetch    String url = server + Constants.SHENYU_ADMIN_PATH_CONFIGS_FETCH + "?" + StringUtils.removeEnd(params.toString(), "&");    LOG.info("request configs: [{}]", url);    String json;    try {      HttpHeaders headers = new HttpHeaders();      // 设置accessToken      headers.set(Constants.X_ACCESS_TOKEN, this.accessTokenManager.getAccessToken());      HttpEntity<String> httpEntity = new HttpEntity<>(headers);      // 2. 发起请求,获取变更数据      json = this.restTemplate.exchange(url, HttpMethod.GET, httpEntity, String.class).getBody();    } catch (RestClientException e) {      String message = String.format("fetch config fail from server[%s], %s", url, e.getMessage());      LOG.warn(message);      throw new ShenyuException(message, e);    }    // 3. 更新网关内存中数据    boolean updated = this.updateCacheWithJson(json);    if (updated) {      LOG.debug("get latest configs: [{}]", json);      return;    }    // 更新成功,此方法就执行完成了    LOG.info("The config of the server[{}] has not been updated or is out of date. Wait for 30s to listen for changes again.", server);    // 服务端没有数据更新,就等30s    ThreadUtils.sleep(TimeUnit.SECONDS, 30);  }}

从代码中,可以看到 admin端提供的获取全量数据接口是 /configs/fetch,这里先不进一步深入,放在后文再分析。

获取到admin返回结果数据,并成功更新,那么此方法就执行结束了。如果没有更新成功,那么有可能是服务端没有数据更新,就等待30s

这里需要提前说明一下,网关在判断是否更新成功时,有比对数据的操作,马上就会提到。

  • HttpSyncDataService#updateCacheWithJson()

更新网关内存中的数据。使用GSON进行反序列化,从属性data中拿真正的数据,然后交给DataRefreshFactory去做更新。

    private boolean updateCacheWithJson(final String json) {        // 使用GSON进行反序列化        JsonObject jsonObject = GSON.fromJson(json, JsonObject.class);        // if the config cache will be updated?        return factory.executor(jsonObject.getAsJsonObject("data"));    }
  • DataRefreshFactory#executor()

根据不同数据类型去更新数据,返回更新结果。具体更新逻辑交给了dataRefresh.refresh()方法。在更新结果中,有一种数据类型进行了更新,就表示此次操作发生了更新。

    public boolean executor(final JsonObject data) {        //并行更新数据        List<Boolean> result = ENUM_MAP.values().parallelStream()                .map(dataRefresh -> dataRefresh.refresh(data))                .collect(Collectors.toList());        //有一个更新就表示此次发生了更新操作        return result.stream().anyMatch(Boolean.TRUE::equals);    }
  • AbstractDataRefresh#refresh()

数据更新逻辑采用的是模板方法设计模式,通用操作在抽象方法中完成,不同的实现逻辑由子类完成。5种数据类型具体的更新逻辑有些差异,但是也存在通用的更新逻辑,类图关系如下:

在通用的refresh()方法中,负责数据类型转换,判断是否需要更新,和实际的数据刷新操作。

public abstract class AbstractDataRefresh<T> implements DataRefresh {
  // ......
  @Override  public Boolean refresh(final JsonObject data) {    // 数据类型转换    JsonObject jsonObject = convert(data);    if (Objects.isNull(jsonObject)) {      return false;    }
    boolean updated = false;    // 得到数据类型    ConfigData<T> result = fromJson(jsonObject);    // 是否需要更新    if (this.updateCacheIfNeed(result)) {      updated = true;      // 真正的更新逻辑,数据刷新操作      refresh(result.getData());    }
    return updated;  }
  // ......}
  • AbstractDataRefresh#updateCacheIfNeed()

数据转换的过程,就是根据不同的数据类型进行转换,我们就不再进一步追踪了,看看数据是否需要更新的逻辑。方法名是updateCacheIfNeed(),通过方法重载实现。

public abstract class AbstractDataRefresh<T> implements DataRefresh {
  // ......
  // result是数据  protected abstract boolean updateCacheIfNeed(ConfigData<T> result);
  // newVal是获取到的最新的值  // groupEnum 是哪种数据类型  protected boolean updateCacheIfNeed(final ConfigData<T> newVal, final ConfigGroupEnum groupEnum) {    // 如果是第一次,那么直接放到cache中,返回 true,表示此次进行了更新    if (GROUP_CACHE.putIfAbsent(groupEnum, newVal) == null) {      return true;    }    ResultHolder holder = new ResultHolder(false);    GROUP_CACHE.merge(groupEnum, newVal, (oldVal, value) -> {      // md5 值相同,不需要更新      if (StringUtils.equals(oldVal.getMd5(), newVal.getMd5())) {        LOG.info("Get the same config, the [{}] config cache will not be updated, md5:{}", groupEnum, oldVal.getMd5());        return oldVal;      }
      // 当前缓存的数据修改时间大于 新来的数据,不需要更新      // must compare the last update time      if (oldVal.getLastModifyTime() >= newVal.getLastModifyTime()) {        LOG.info("Last update time earlier than the current configuration, the [{}] config cache will not be updated", groupEnum);        return oldVal;      }      LOG.info("update {} config: {}", groupEnum, newVal);      holder.result = true;      return newVal;    });    return holder.result;  }
  // ......}

从上面的源码中可以看到,有两种情况不需要更新:

  • 两个的数据的md5 值相同,不需要更新;
  • 当前缓存的数据修改时间大于 新来的数据,不需要更新。

其他情况需要更新数据。

分析到这里,就将start() 方法中初次启动,获取全量数据的逻辑分析完了,接下来是长轮询的操作。为了方便,我将start()方法再粘贴一次:

public class HttpSyncDataService implements SyncDataService {
  // ......
  private void start() {    // // 只初始化一次,通过原子类实现。     if (RUNNING.compareAndSet(false, true)) {      // 初次启动,获取全量数据      this.fetchGroupConfig(ConfigGroupEnum.values());      // 一个后台服务,一个线程      int threadSize = serverList.size();      // 自定义线程池      this.executor = new ThreadPoolExecutor(threadSize, threadSize, 60L, TimeUnit.SECONDS,              new LinkedBlockingQueue<>(),              ShenyuThreadFactory.create("http-long-polling", true));      // 开始长轮询,一个admin服务,创建一个线程用于数据同步      this.serverList.forEach(server -> this.executor.execute(new HttpLongPollingTask(server)));    } else {      LOG.info("shenyu http long polling was started, executor=[{}]", executor);    }  }
  // ......}
2.3.2 执行长轮询任务#
  • HttpLongPollingTask#run()

长轮询任务是HttpLongPollingTask,它实现了Runnable接口,任务逻辑在run()方法中。通过while()循环实现不断执行任务,即长轮询。在每一次的轮询中有三次重试逻辑,一次轮询任务失败了,等 5s 再继续,3 次都失败了,等5 分钟再试。

开始长轮询,一个admin服务,创建一个线程用于数据同步。

class HttpLongPollingTask implements Runnable {
  private final String server;
  HttpLongPollingTask(final String server) {    this.server = server;  }
  @Override  public void run() {    // 一直轮询    while (RUNNING.get()) {      // 默认重试 3 次      int retryTimes = 3;      for (int time = 1; time <= retryTimes; time++) {        try {          doLongPolling(server);        } catch (Exception e) {          if (time < retryTimes) {            LOG.warn("Long polling failed, tried {} times, {} times left, will be suspended for a while! {}",                    time, retryTimes - time, e.getMessage());            // 长轮询失败了,等 5s 再继续            ThreadUtils.sleep(TimeUnit.SECONDS, 5);            continue;          }          LOG.error("Long polling failed, try again after 5 minutes!", e);          // 3 次都失败了,等 5 分钟再试          ThreadUtils.sleep(TimeUnit.MINUTES, 5);        }      }    }    LOG.warn("Stop http long polling.");  }}
  • HttpSyncDataService#doLongPolling()

执行长轮询任务的核心逻辑:

  • 根据数据类型组装请求参数:md5lastModifyTime
  • 组装请求头和请求体;
  • admin发起请求,判断组数据是否发生变更;
  • 根据发生变更的组,再去获取数据。
public class HttpSyncDataService implements SyncDataService {  private void doLongPolling(final String server) {    // 组装请求参数:md5 和 lastModifyTime    MultiValueMap<String, String> params = new LinkedMultiValueMap<>(8);    for (ConfigGroupEnum group : ConfigGroupEnum.values()) {      ConfigData<?> cacheConfig = factory.cacheConfigData(group);      if (cacheConfig != null) {        String value = String.join(",", cacheConfig.getMd5(), String.valueOf(cacheConfig.getLastModifyTime()));        params.put(group.name(), Lists.newArrayList(value));      }    }    // 组装请求头和请求体    HttpHeaders headers = new HttpHeaders();    headers.setContentType(MediaType.APPLICATION_FORM_URLENCODED);    // 设置accessToken    headers.set(Constants.X_ACCESS_TOKEN, this.accessTokenManager.getAccessToken());    HttpEntity<MultiValueMap<String, String>> httpEntity = new HttpEntity<>(params, headers);    String listenerUrl = server + Constants.SHENYU_ADMIN_PATH_CONFIGS_LISTENER;
    JsonArray groupJson;    //向admin发起请求,判断组数据是否发生变更    //这里只是判断了某个组是否发生变更    try {      String json = this.restTemplate.postForEntity(listenerUrl, httpEntity, String.class).getBody();      LOG.info("listener result: [{}]", json);      JsonObject responseFromServer = GsonUtils.getGson().fromJson(json, JsonObject.class);      groupJson = responseFromServer.getAsJsonArray("data");    } catch (RestClientException e) {      String message = String.format("listener configs fail, server:[%s], %s", server, e.getMessage());      throw new ShenyuException(message, e);    }    // 根据发生变更的组,再去获取数据    /**     * 官网对此处的解释:     * 网关收到响应信息之后,只知道是哪个 Group 发生了配置变更,还需要再次请求该 Group 的配置数据。     * 这里可能会存在一个疑问:为什么不是直接将变更的数据写出?     * 我们在开发的时候,也深入讨论过该问题,因为 http 长轮询机制只能保证准实时,如果在网关层处理不及时,     * 或者管理员频繁更新配置,很有可能便错过了某个配置变更的推送,安全起见,我们只告知某个 Group 信息发生了变更。     *     * 个人理解:     * 如果将变更数据直接写出,当管理员频繁更新配置时,第一次更新了,将client移除阻塞队列,返回响应信息给网关。     * 如果这个时候进行了第二次更新,那么当前的client是不在阻塞队列中,所以这一次的变更就会错过。     * 网关层处理不及时,也是同理。     * 这是一个长轮询,一个网关一个同步线程,可能存在耗时的过程。     * 如果admin有数据变更,当前网关client是没有在阻塞队列中,就不到数据。     */    if (Objects.nonNull(groupJson) && groupJson.size() > 0) {      // fetch group configuration async.      ConfigGroupEnum[] changedGroups = GsonUtils.getGson().fromJson(groupJson, ConfigGroupEnum[].class);      LOG.info("Group config changed: {}", Arrays.toString(changedGroups));      this.doFetchGroupConfig(server, changedGroups);    }  }}

这里需要特别解释一点的是:在长轮询任务中,为什么不直接拿到变更的数据?而是先判断哪个分组数据发生了变更,然后再次请求admin,获取变更数据?

官网对此处的解释是:

网关收到响应信息之后,只知道是哪个 Group 发生了配置变更,还需要再次请求该 Group 的配置数据。 这里可能会存在一个疑问:为什么不是直接将变更的数据写出? 我们在开发的时候,也深入讨论过该问题,因为 http 长轮询机制只能保证准实时,如果在网关层处理不及时, 或者管理员频繁更新配置,很有可能便错过了某个配置变更的推送,安全起见,我们只告知某个 Group 信息发生了变更。

个人理解是:

如果将变更数据直接写出,管理员频繁更新配置时,第一次更新了,将client移除阻塞队列,返回响应信息给网关。如果这个时候进行了第二次更新,那么当前的client是不在阻塞队列中,所以这一次的变更就会错过。网关层处理不及时,也是同理。 这是一个长轮询,一个网关一个同步线程,可能存在耗时的过程。如果admin有数据变更,当前网关client是没有在阻塞队列中,就会更新不到数据。

我们还没有分析到admin端的处理逻辑,先大概说一下。在admin端,会将网关client放到阻塞队列,有数据变更,网关client就会出队列,发送变更数据。所以,如果有数据变更时,网关client不在阻塞队列,那么就无法得到当前变更的数据。

知道哪个分组数据发生变更时,主动再向admin获取变更的数据,根据分组不同,全量拿数据。调用方法是doFetchGroupConfig(),这个在前面已经分析过了。

分析到这里,网关端的数据同步操作就完成了。长轮询任务就是不断向admin发起请求,看看数据是否发生变更,如果有分组数据发生变更,那么就再主动向admin发起请求,获取变更数据,然后更新网关内存中的数据。

网关端长轮询任务流程:

3. admin数据同步#

从前面分析的过程中,可以看到,网关端主要调用admin的两个接口:

  • /configs/listener:判断组数据是否发生变更;
  • /configs/fetch:获取变更组数据。

直接从这两个接口分析的话,可能有的地方不好理解,所以我们还是从admin启动流程开始分析数据同步过程。

3.1 加载配置#

如果在配置文件application.yml中,进行了如下配置,就表示通过http长轮询的方式进行数据同步。

shenyu:  sync:      http:        enabled: true

程序启动时,通过springboot条件装配实现数据同步类的配置加载。在这个过程中,会创建HttpLongPollingDataChangedListener,负责处理长轮询的相关实现逻辑。

/** * 数据同步配置类 * 通过springboot条件装配实现 * The type Data sync configuration. */@Configurationpublic class DataSyncConfiguration {
    /**     * http长轮询     * http long polling.     */    @Configuration    @ConditionalOnProperty(name = "shenyu.sync.http.enabled", havingValue = "true")    @EnableConfigurationProperties(HttpSyncProperties.class)    static class HttpLongPollingListener {
        @Bean        @ConditionalOnMissingBean(HttpLongPollingDataChangedListener.class)        public HttpLongPollingDataChangedListener httpLongPollingDataChangedListener(final HttpSyncProperties httpSyncProperties) {            return new HttpLongPollingDataChangedListener(httpSyncProperties);        }    }}

3.2 数据变更监听器实例化#

  • HttpLongPollingDataChangedListener

数据变更监听器通过构造函数的方式完成实例化和初始化操作。在构造函数中会创建阻塞队列,用于存放客户端;创建线程池,用于执行延迟任务,周期任务;保存长轮询相关属性信息。

    public HttpLongPollingDataChangedListener(final HttpSyncProperties httpSyncProperties) {        // 默认客户端(这里是网关)1024个        this.clients = new ArrayBlockingQueue<>(1024);        // 创建线程池        // ScheduledThreadPoolExecutor 可以执行延迟任务,周期任务,普通任务        this.scheduler = new ScheduledThreadPoolExecutor(1,                ShenyuThreadFactory.create("long-polling", true));        // 长轮询的属性信息        this.httpSyncProperties = httpSyncProperties;    }

另外,它的类图关系如下:

实现了InitializingBean接口,所以在bean的初始化过程中执行afterInitialize()方法。通过线程池执行周期任务:更新内存中(CACHE)的数据每隔5分钟执行一次,5分钟后开始执行。刷新本地缓存就是从数据库读取数据到本地缓存(这里就是内存),通过refreshLocalCache()完成。

public class HttpLongPollingDataChangedListener extends AbstractDataChangedListener {
  // ......
  /**   * 在 InitializingBean接口中的afterPropertiesSet()方法中被调用,即在bean的初始化过程中执行   */  @Override  protected void afterInitialize() {    long syncInterval = httpSyncProperties.getRefreshInterval().toMillis();    // 执行周期任务:更新内存中(CACHE)的数据每隔5分钟执行一次,5分钟后开始执行    // 防止admin先启动一段时间后,产生了数据;然后网关初次连接时,没有拿到全量数据    scheduler.scheduleWithFixedDelay(() -> {      LOG.info("http sync strategy refresh config start.");      try {        // 从数据库读取数据到本地缓存(这里就是内存)        this.refreshLocalCache();        LOG.info("http sync strategy refresh config success.");      } catch (Exception e) {        LOG.error("http sync strategy refresh config error!", e);      }    }, syncInterval, syncInterval, TimeUnit.MILLISECONDS);    LOG.info("http sync strategy refresh interval: {}ms", syncInterval);  }
  // ......}
  • refreshLocalCache()

分别对5种数据类型进行更新。

public abstract class AbstractDataChangedListener implements DataChangedListener, InitializingBean {
  // ......
  // 从数据库读取数据到本地缓存(这里就是内存)  private void refreshLocalCache() {    //更新认证数据    this.updateAppAuthCache();    //更新插件数据    this.updatePluginCache();    //更新规则数据    this.updateRuleCache();    //更新选择器数据    this.updateSelectorCache();    //更新元数据    this.updateMetaDataCache();  }
  // ......}

5个更新方法的逻辑是类似的,调用service方法获取数据,然后放到内存CACHE中。以更新规则数据方法updateRuleCache()为例,传入规则枚举类型,调用ruleService.listAll()从数据库获取所有规则数据。

    /**     * Update rule cache.     */    protected void updateRuleCache() {        this.updateCache(ConfigGroupEnum.RULE, ruleService.listAll());    }
  • updateCache()

使用数据库中的数据更新内存中的数据。

public abstract class AbstractDataChangedListener implements DataChangedListener, InitializingBean {
  // ......
  // 缓存数据的 Map  protected static final ConcurrentMap<String, ConfigDataCache> CACHE = new ConcurrentHashMap<>();
  /**   * if md5 is not the same as the original, then update lcoal cache.   * 更新缓存中的数据   * @param group ConfigGroupEnum   * @param <T> the type of class   * @param data the new config data   */  protected <T> void updateCache(final ConfigGroupEnum group, final List<T> data) {    //数据序列化    String json = GsonUtils.getInstance().toJson(data);    //传入md5值和修改时间    ConfigDataCache newVal = new ConfigDataCache(group.name(), json, Md5Utils.md5(json), System.currentTimeMillis());    //更新分组数据    ConfigDataCache oldVal = CACHE.put(newVal.getGroup(), newVal);    LOG.info("update config cache[{}], old: {}, updated: {}", group, oldVal, newVal);  }
  // ......}

初始化的过程就是启动周期性任务,定时从数据库获取数据更新内存数据。

接下来开始对两个接口开始分析:

  • /configs/listener:判断组数据是否发生变更;
  • /configs/fetch:获取变更组数据。

3.3 数据变更轮询接口#

  • /configs/listener:判断组数据是否发生变更;

接口类是ConfigController,只有使用http长轮询进行数据同步时才会生效。接口方法listener()没有其他逻辑,直接调用doLongPolling()方法。

   /** * This Controller only when HttpLongPollingDataChangedListener exist, will take effect. */@ConditionalOnBean(HttpLongPollingDataChangedListener.class)@RestController@RequestMapping("/configs")public class ConfigController {
    private final HttpLongPollingDataChangedListener longPollingListener;
    public ConfigController(final HttpLongPollingDataChangedListener longPollingListener) {      this.longPollingListener = longPollingListener;    }        // 省略其他逻辑
    /**     * Listener.     * 监听数据变更,执行长轮询     * @param request  the request     * @param response the response     */    @PostMapping(value = "/listener")    public void listener(final HttpServletRequest request, final HttpServletResponse response) {        longPollingListener.doLongPolling(request, response);    }
}
  • HttpLongPollingDataChangedListener#doLongPolling()

执行长轮询任务:如果有数据变更,将会立即响应给客户端(这里就是网关端)。否则,客户端会一直被阻塞,直到有数据变更或者超时。

public class HttpLongPollingDataChangedListener extends AbstractDataChangedListener {
  // ......
  /**   * 执行长轮询:如果有数据变更,会立即响应给客户端(这里就是网关端)。   * 否则,否则客户端会一直被阻塞,直到有数据变更或者超时。   * @param request   * @param response   */  public void doLongPolling(final HttpServletRequest request, final HttpServletResponse response) {    // compare group md5    // 比较md5,判断网关的数据和admin端的数据是否一致,得到发生变更的数据组    List<ConfigGroupEnum> changedGroup = compareChangedGroup(request);    String clientIp = getRemoteIp(request);    // response immediately.    // 有变更的数据,则立即向网关响应    if (CollectionUtils.isNotEmpty(changedGroup)) {      this.generateResponse(response, changedGroup);      Log.info("send response with the changed group, ip={}, group={}", clientIp, changedGroup);      return;    }
    // 没有变更,则将客户端(这里就是网关)放进阻塞队列    final AsyncContext asyncContext = request.startAsync();    asyncContext.setTimeout(0L);    scheduler.execute(new LongPollingClient(asyncContext, clientIp, HttpConstants.SERVER_MAX_HOLD_TIMEOUT));  }
  // ......}
  • HttpLongPollingDataChangedListener#compareChangedGroup()

判断组数据是否发生变更,判断逻辑是比较网关端和admin端的md5值和lastModifyTime

  • 如果md5值不一样,那么需要更新;
  • 如果admin端的lastModifyTime大于网关端的lastModifyTime,那么需要更新。
 /**     * 判断组数据是否发生变更     * @param request     * @return     */    private List<ConfigGroupEnum> compareChangedGroup(final HttpServletRequest request) {        List<ConfigGroupEnum> changedGroup = new ArrayList<>(ConfigGroupEnum.values().length);        for (ConfigGroupEnum group : ConfigGroupEnum.values()) {            // 网关端数据的md5值和lastModifyTime            String[] params = StringUtils.split(request.getParameter(group.name()), ',');            if (params == null || params.length != 2) {                throw new ShenyuException("group param invalid:" + request.getParameter(group.name()));            }            String clientMd5 = params[0];            long clientModifyTime = NumberUtils.toLong(params[1]);            ConfigDataCache serverCache = CACHE.get(group.name());            // do check. 判断组数据是否发生变更            if (this.checkCacheDelayAndUpdate(serverCache, clientMd5, clientModifyTime)) {                changedGroup.add(group);            }        }        return changedGroup;    }
  • LongPollingClient

没有变更数据,则将客户端(这里就是网关)放进阻塞队列。阻塞时间是60秒,即60秒后移除,并响应客户端。

class LongPollingClient implements Runnable {      // 省略了其他逻辑            @Override        public void run() {            try {                // 先设置定时任务:60秒后移除,并响应客户端                this.asyncTimeoutFuture = scheduler.schedule(() -> {                    clients.remove(LongPollingClient.this);                    List<ConfigGroupEnum> changedGroups = compareChangedGroup((HttpServletRequest) asyncContext.getRequest());                    sendResponse(changedGroups);                }, timeoutTime, TimeUnit.MILLISECONDS);
                // 添加到阻塞队列                clients.add(this);
            } catch (Exception ex) {                log.error("add long polling client error", ex);            }        }
        /**         * Send response.         *         * @param changedGroups the changed groups         */        void sendResponse(final List<ConfigGroupEnum> changedGroups) {            // cancel scheduler            if (null != asyncTimeoutFuture) {                asyncTimeoutFuture.cancel(false);            }            // 响应变更的组            generateResponse((HttpServletResponse) asyncContext.getResponse(), changedGroups);            asyncContext.complete();        }    }

3.4 获取变更数据接口#

  • /configs/fetch:获取变更数据;

根据网关传入的参数,获取分组数据,返回结果。主要实现方法是longPollingListener.fetchConfig()


@ConditionalOnBean(HttpLongPollingDataChangedListener.class)@RestController@RequestMapping("/configs")public class ConfigController {
    private final HttpLongPollingDataChangedListener longPollingListener;      public ConfigController(final HttpLongPollingDataChangedListener longPollingListener) {      this.longPollingListener = longPollingListener;    }
    /**     * Fetch configs shenyu result.     * 全量获取分组数据     * @param groupKeys the group keys     * @return the shenyu result     */    @GetMapping("/fetch")    public ShenyuAdminResult fetchConfigs(@NotNull final String[] groupKeys) {        Map<String, ConfigData<?>> result = Maps.newHashMap();        for (String groupKey : groupKeys) {            ConfigData<?> data = longPollingListener.fetchConfig(ConfigGroupEnum.valueOf(groupKey));            result.put(groupKey, data);        }        return ShenyuAdminResult.success(ShenyuResultMessage.SUCCESS, result);    }      // 省略了其他接口
}
  • AbstractDataChangedListener#fetchConfig()

数据获取直接从CACHE中拿,然后根据不同分组类型进行匹配,封装。

public abstract class AbstractDataChangedListener implements DataChangedListener, InitializingBean {  /**   * fetch configuration from cache.   * 获取分组下的全量数据   * @param groupKey the group key   * @return the configuration data   */  public ConfigData<?> fetchConfig(final ConfigGroupEnum groupKey) {    // 直接从 CACHE 中拿数据    ConfigDataCache config = CACHE.get(groupKey.name());    switch (groupKey) {      case APP_AUTH: // 认证数据        return buildConfigData(config, AppAuthData.class);      case PLUGIN: // 插件数据        return buildConfigData(config, PluginData.class);      case RULE:   // 规则数据        return buildConfigData(config, RuleData.class);      case SELECTOR:  // 选择器数据        return buildConfigData(config, SelectorData.class);      case META_DATA: // 元数据        return buildConfigData(config, MetaData.class);      default:  // 其他类型,抛出异常        throw new IllegalStateException("Unexpected groupKey: " + groupKey);    }  }}

3.5 数据变更#

在之前的websocket数据同步和zookeeper数据同步源码分析文章中,我们知道admin端数据同步设计结构如下:

各种数据变更监听器都是DataChangedListener的子类。

当在admin端修改数据后,通过Spring的事件处理机制,发送事件通知。发送逻辑如下:


/** * Event forwarders, which forward the changed events to each ConfigEventListener. * 数据变更事件分发器:当admin端有数据发生变更时,将变更数据同步到 ShenYu 网关 * 数据变更依赖于Spring的事件监听机制:ApplicationEventPublisher --> ApplicationEvent --> ApplicationListener * */@Componentpublic class DataChangedEventDispatcher implements ApplicationListener<DataChangedEvent>, InitializingBean {
   //省略了其他逻辑
    /**     * 有数据变更时,调用此方法     * @param event     */    @Override    @SuppressWarnings("unchecked")    public void onApplicationEvent(final DataChangedEvent event) {        // 遍历数据变更监听器(一般使用一种数据同步的方式就好了)        for (DataChangedListener listener : listeners) {            // 哪种数据发生变更            switch (event.getGroupKey()) {                case APP_AUTH: // 认证信息                    listener.onAppAuthChanged((List<AppAuthData>) event.getSource(), event.getEventType());                    break;                case PLUGIN:  // 插件信息                    listener.onPluginChanged((List<PluginData>) event.getSource(), event.getEventType());                    break;                case RULE:    // 规则信息                    listener.onRuleChanged((List<RuleData>) event.getSource(), event.getEventType());                    break;                case SELECTOR:   // 选择器信息                    listener.onSelectorChanged((List<SelectorData>) event.getSource(), event.getEventType());                    // 当选择器数据更新时,更新API文档信息                    applicationContext.getBean(LoadServiceDocEntry.class).loadDocOnSelectorChanged((List<SelectorData>) event.getSource(), event.getEventType());                    break;                case META_DATA:  // 元数据                    listener.onMetaDataChanged((List<MetaData>) event.getSource(), event.getEventType());                    break;                default:  // 其他类型,抛出异常                    throw new IllegalStateException("Unexpected value: " + event.getGroupKey());            }        }    }}

假设,对插件信息进行了修改,通过http长轮询的方式进行数据同步,那么listener.onPluginChanged()的实际调用的是org.apache.shenyu.admin.listener.AbstractDataChangedListener#onPluginChanged

    /**     * 在admin的操作,有插件发生了更新     * @param changed   the changed     * @param eventType the event type     */    @Override    public void onPluginChanged(final List<PluginData> changed, final DataEventTypeEnum eventType) {        if (CollectionUtils.isEmpty(changed)) {            return;        }        // 更新内存CACHE        this.updatePluginCache();        // 执行变更任务        this.afterPluginChanged(changed, eventType);    }

有两个处理操作,一是更新内存CACHE,这个在前面分析过了;另一个是执行变更任务,在线程池中执行。

  • HttpLongPollingDataChangedListener#afterPluginChanged()
    @Override    protected void afterPluginChanged(final List<PluginData> changed, final DataEventTypeEnum eventType) {        // 在线程池中执行        scheduler.execute(new DataChangeTask(ConfigGroupEnum.PLUGIN));    }
  • DataChangeTask

数据变更任务:将阻塞队列中的客户端依次移除,并发送响应,通知网关有组数据发生变更。

class DataChangeTask implements Runnable {        //省略了其他逻辑         @Override        public void run() {            // 阻塞队列中的客户端超过了给定的值100,则分批执行            if (clients.size() > httpSyncProperties.getNotifyBatchSize()) {                List<LongPollingClient> targetClients = new ArrayList<>(clients.size());                clients.drainTo(targetClients);                List<List<LongPollingClient>> partitionClients = Lists.partition(targetClients, httpSyncProperties.getNotifyBatchSize());               // 分批执行                partitionClients.forEach(item -> scheduler.execute(() -> doRun(item)));            } else {                // 执行任务                doRun(clients);            }        }
        private void doRun(final Collection<LongPollingClient> clients) {            // 通知所有客户端发生了数据变更            for (Iterator<LongPollingClient> iter = clients.iterator(); iter.hasNext();) {                LongPollingClient client = iter.next();                iter.remove();                // 发送响应                client.sendResponse(Collections.singletonList(groupKey));                LOG.info("send response with the changed group,ip={}, group={}, changeTime={}", client.ip, groupKey, changeTime);            }        }    }

至此,admin端数据同步逻辑就分析完了。在基于http长轮询数据同步是,它主要有三个功能:

  • 提供数据变更监听接口;
  • 提供获取变更数据接口;
  • 有数据变更时,移除阻塞队列中的客户端,并响应结果。

最后,用三张图描述下admin端长轮询任务流程:

  • /configs/listener数据变更监听接口:

  • /configs/fetch获取变更数据接口:

  • 在admin后台管理系统更新数据,进行数据同步:

4. 总结#

本文主要对ShenYu网关中的http长轮询数据同步进行了源码分析。涉及到的主要知识点如下:

  • http长轮询由网关端主动发起请求,不断请求admin端;
  • 变更数据以组为粒度(认证信息、插件、选择器、规则、元数据);
  • http长轮询结果只拿到了变更组,还需要再次发起请求获取组数据;
  • 数据是否更新由md5值和修改时间lastModifyTime决定。

Apollo数据同步源码分析

· One min read
Apache ShenYu Contributor

本文基于shenyu-2.6.1版本进行源码分析,官网的介绍请参考 数据同步原理

Admin管理端#

以新增插件的流程来理解下整体的流程

接收数据#

  • PluginController.createPlugin()

进入PluginController类中的createPlugin()方法,它负责数据的校验,添加或更新数据,返回结果信息。

@Validated@RequiredArgsConstructor@RestController@RequestMapping("/plugin")public class PluginController {
  @PostMapping("")  @RequiresPermissions("system:plugin:add")  public ShenyuAdminResult createPlugin(@Valid @ModelAttribute final PluginDTO pluginDTO) {      // 调用pluginService.createOrUpdate 进行处理逻辑      return ShenyuAdminResult.success(pluginService.createOrUpdate(pluginDTO));  }        // ......}

处理数据#

  • PluginServiceImpl.createOrUpdate() -> PluginServiceImpl.create()

PluginServiceImpl类中通过create()方法完成数据的转换,保存到数据库,发布事件。

@RequiredArgsConstructor@Servicepublic class PluginServiceImpl implements SelectorService {    // 事件发布对象 pluginEventPublisher    private final PluginEventPublisher pluginEventPublisher;
   private String create(final PluginDTO pluginDTO) {      // 判断有没有对应的插件      Assert.isNull(pluginMapper.nameExisted(pluginDTO.getName()), AdminConstants.PLUGIN_NAME_IS_EXIST);      // 自定义的插件jar      if (!Objects.isNull(pluginDTO.getFile())) {        Assert.isTrue(checkFile(Base64.decode(pluginDTO.getFile())), AdminConstants.THE_PLUGIN_JAR_FILE_IS_NOT_CORRECT_OR_EXCEEDS_16_MB);      }      // 创建plugin对象      PluginDO pluginDO = PluginDO.buildPluginDO(pluginDTO);      // 插入对象到数据库      if (pluginMapper.insertSelective(pluginDO) > 0) {        // 插件新增成功,则发布创建事件        // publish create event. init plugin data        pluginEventPublisher.onCreated(pluginDO);      }      return ShenyuResultMessage.CREATE_SUCCESS;  }            // ......    }

PluginServiceImpl类完成数据的持久化操作,即保存数据到数据库,并通过 pluginEventPublisher 进行发布事件。

pluginEventPublisher.onCreateed方法的逻辑是:发布变更的事件。

    @Overridepublic void onCreated(final PluginDO plugin) {        // 发布DataChangeEvent事件:事件分组(插件、选择器、规则)、事件类型(创建、删除、更新)、变更的数据        publisher.publishEvent(new DataChangedEvent(ConfigGroupEnum.PLUGIN, DataEventTypeEnum.CREATE,        Collections.singletonList(PluginTransfer.INSTANCE.mapToData(plugin))));        // 发布PluginCreatedEvent        publish(new PluginCreatedEvent(plugin, SessionUtil.visitorName()));}

发布变更数据通过publisher.publishEvent()完成,这个publisher对象是一个ApplicationEventPublisher类,这个类的全限定名是org.springframework.context.ApplicationEventPublisher。看到这儿,我们知道了发布数据是通过Spring相关的功能来完成的。

关于ApplicationEventPublisher

当有状态发生变化时,发布者调用 ApplicationEventPublisherpublishEvent 方法发布一个事件,Spring容器广播事件给所有观察者,调用观察者的 onApplicationEvent 方法把事件对象传递给观察者。调用 publishEvent方法有两种途径,一种是实现接口由容器注入 ApplicationEventPublisher 对象然后调用其方法,另一种是直接调用容器的方法,两种方法发布事件没有太大区别。

  • ApplicationEventPublisher:发布事件;
  • ApplicationEventSpring 事件,记录事件源、时间和数据;
  • ApplicationListener:事件监听者,观察者;

Spring的事件发布机制中,有三个对象,

一个是发布事件的ApplicationEventPublisher,在ShenYu中通过构造器注入了一个eventPublisher

另一个对象是ApplicationEvent,在ShenYu中通过DataChangedEvent继承了它,表示事件对象。

public class DataChangedEvent extends ApplicationEvent {//......}

最后一个是 ApplicationListener,在ShenYu中通过DataChangedEventDispatcher类实现了该接口,作为事件的监听者,负责处理事件对象。

@Componentpublic class DataChangedEventDispatcher implements ApplicationListener<DataChangedEvent>, InitializingBean {
    //......    }

分发数据#

  • DataChangedEventDispatcher.onApplicationEvent()

当事件发布完成后,会自动进入到DataChangedEventDispatcher类中的onApplicationEvent()方法,进行事件处理。

@Componentpublic class DataChangedEventDispatcher implements ApplicationListener<DataChangedEvent>, InitializingBean {
  /**     * 有数据变更时,调用此方法     * @param event     */  @Override  @SuppressWarnings("unchecked")  public void onApplicationEvent(final DataChangedEvent event) {    // 遍历数据变更监听器(这里只会注册ApolloDataChangedListener)    for (DataChangedListener listener : listeners) {      // 依据不同的分组类型进行转发      switch (event.getGroupKey()) {        case APP_AUTH: // 认证信息          listener.onAppAuthChanged((List<AppAuthData>) event.getSource(), event.getEventType());          break;        case PLUGIN: // 插件事件          // 调用注册的listener对象          listener.onPluginChanged((List<PluginData>) event.getSource(), event.getEventType());          break;        case RULE: // 规则事件          listener.onRuleChanged((List<RuleData>) event.getSource(), event.getEventType());          break;        case SELECTOR: // 选择器事件          listener.onSelectorChanged((List<SelectorData>) event.getSource(), event.getEventType());          break;        case META_DATA: // 元数据事件          listener.onMetaDataChanged((List<MetaData>) event.getSource(), event.getEventType());          break;        case PROXY_SELECTOR: // 代理选择器事件          listener.onProxySelectorChanged((List<ProxySelectorData>) event.getSource(), event.getEventType());          break;        case DISCOVER_UPSTREAM: // 注册发现下游列表事件          listener.onDiscoveryUpstreamChanged((List<DiscoverySyncData>) event.getSource(), event.getEventType());          applicationContext.getBean(LoadServiceDocEntry.class).loadDocOnUpstreamChanged((List<DiscoverySyncData>) event.getSource(), event.getEventType());          break;        default:          throw new IllegalStateException("Unexpected value: " + event.getGroupKey());      }    }  }    }

当有数据变更时,调用onApplicationEvent方法,然后遍历所有数据变更监听器,判断是哪种数据类型,交给相应的数据监听器进行处理。

ShenYu将所有数据进行了分组,一共会有以下种:认证信息、插件信息、规则信息、选择器信息、元数据、代理选择器、发现下游事件。

这里的数据变更监听器(DataChangedListener),就是数据同步策略的抽象,由特定的实现来处理,而不同的监听由不同的实现来处理,当前分析的是Apollo来 监听,所以这里只关注 ApolloDataChangedListener

// 继承AbstractNodeDataChangedListenerpublic class ApolloDataChangedListener extends AbstractNodeDataChangedListener {    }

ApolloDataChangedListener 继承了 AbstractNodeDataChangedListener 类,该类主要是以key作为存储方式的基类,如apollo、nacos等,其他的如zookeeper、 consul、etcd 等是以path的方式进行分层级来查找的。

// 以key作为查找存储方式的基类public abstract class AbstractNodeDataChangedListener implements DataChangedListener {         protected AbstractNodeDataChangedListener(final ChangeData changeData) {      this.changeData = changeData;    }}

AbstractNodeDataChangedListener 接收 ChangeData作为参数,该对象定义了存储于Apollo中的各个数据的key命名,存储于Apollo中的数据包括以下数据:

  • 插件(plugin)
  • 选择器(selector)
  • 规则(rule)
  • 授权(auth)
  • 元数据(meta)
  • 代理选择器(proxy.selector)
  • 下游列表(discovery)

这些信息由ApolloDataChangedListener构造器指定:

public class ApolloDataChangedListener extends AbstractNodeDataChangedListener {  public ApolloDataChangedListener(final ApolloClient apolloClient) {    // 配置几类分组数据的前缀    super(new ChangeData(ApolloPathConstants.PLUGIN_DATA_ID,            ApolloPathConstants.SELECTOR_DATA_ID,            ApolloPathConstants.RULE_DATA_ID,            ApolloPathConstants.AUTH_DATA_ID,            ApolloPathConstants.META_DATA_ID,            ApolloPathConstants.PROXY_SELECTOR_DATA_ID,            ApolloPathConstants.DISCOVERY_DATA_ID));    // 操作apollo的对象    this.apolloClient = apolloClient;  }}

DataChangedListener 定义了以下几个方法:

// 数据变更监听器public interface DataChangedListener {
    // 授权信息变更时调用    default void onAppAuthChanged(List<AppAuthData> changed, DataEventTypeEnum eventType) {    }
    // 插件信息变更时调用    default void onPluginChanged(List<PluginData> changed, DataEventTypeEnum eventType) {    }
    // 选择器信息变更时调用    default void onSelectorChanged(List<SelectorData> changed, DataEventTypeEnum eventType) {    }         // 元数据信息变更时调用    default void onMetaDataChanged(List<MetaData> changed, DataEventTypeEnum eventType) {
    }
    // 规则信息变更时调用    default void onRuleChanged(List<RuleData> changed, DataEventTypeEnum eventType) {    }
    // 代理选择器变更时调用    default void onProxySelectorChanged(List<ProxySelectorData> changed, DataEventTypeEnum eventType) {    }    // 发现下游信息变更时调用    default void onDiscoveryUpstreamChanged(List<DiscoverySyncData> changed, DataEventTypeEnum eventType) {    }
}

DataChangedEventDispatcher处理插件时,调用方法 listener.onPluginChanged, 接下来分析下对象的逻辑,实现由AbstractNodeDataChangedListener处理:

public abstract class AbstractNodeDataChangedListener implements DataChangedListener {  @Override  public void onPluginChanged(final List<PluginData> changed, final DataEventTypeEnum eventType) {    // 配置前缀为plugin.    final String configKeyPrefix = changeData.getPluginDataId() + DefaultNodeConstants.JOIN_POINT;    this.onCommonChanged(configKeyPrefix, changed, eventType, PluginData::getName, PluginData.class);    LOG.debug("[DataChangedListener] PluginChanged {}", configKeyPrefix);  }}

首先构建配置数据的key前缀为:plugin., 再调用onCommonChanged统一处理:

private <T> void onCommonChanged(final String configKeyPrefix, final List<T> changedList,                                     final DataEventTypeEnum eventType, final Function<? super T, ? extends String> mapperToKey,                                     final Class<T> tClass) {        // Avoiding concurrent operations on list nodes        final ReentrantLock reentrantLock = listSaveLockMap.computeIfAbsent(configKeyPrefix, key -> new ReentrantLock());        try {            reentrantLock.lock();            // 当前传入的插件列表            final List<String> changeNames = changedList.stream().map(mapperToKey).collect(Collectors.toList());            switch (eventType) {                // 删除操作                case DELETE:                    // 按 plugin.${pluginName} 进行删除                    changedList.stream().map(mapperToKey).forEach(removeKey -> {                        delConfig(configKeyPrefix + removeKey);                    });                    // 从plugin.list中移除对应的插件名称                    // plugin.list 记录下了目前启用的列表                    delChangedData(configKeyPrefix, changeNames);                    break;                case REFRESH:                case MYSELF:                    // 重载逻辑                    // 获取plugin.list中的所有插件列表                    final List<String> configDataNames = this.getConfigDataNames(configKeyPrefix);                    // 依次更新当前调整的每个插件                    changedList.forEach(changedData -> {                        // 发布配置                        publishConfig(configKeyPrefix + mapperToKey.apply(changedData), changedData);                    });                    // 目前存储的列表中,如果数据比当前传入的多,则删除多余的数据                    if (configDataNames != null && configDataNames.size() > changedList.size()) {                        // 踢除当前加载的数据                        configDataNames.removeAll(changeNames);                        // 逐个删除已经取消的数据                        configDataNames.forEach(this::delConfig);                    }                    // 重新更新列表数据                    publishConfig(configKeyPrefix + DefaultNodeConstants.LIST_STR, changeNames);                    break;                default:                    // 新增或是更新                    changedList.forEach(changedData -> {                        publishConfig(configKeyPrefix + mapperToKey.apply(changedData), changedData);                    });                    // 将新加的插件更新                    putChangeData(configKeyPrefix, changeNames);                    break;            }        } catch (Exception e) {            LOG.error("AbstractNodeDataChangedListener onCommonMultiChanged error ", e);        } finally {            reentrantLock.unlock();        }    }

在以上逻辑,其实包含全量重载(REFRESH、MYSELF)与增量(DELETE、UPDATE、CREATE)的处理

在插件中主要包含两个节点:

  • plugin.list 当前生效的插件列表
  • plugin.${plugin.name} 具体插件的详细信息 最后,将这两个节点对应的数据写入Apollo。

数据初始化#

admin启动后,会将当前的数据信息全量同步到apollo中,由ApolloDataChangedInit实现:

// 继承AbstractDataChangedInitpublic class ApolloDataChangedInit extends AbstractDataChangedInit {    // apollo操作对象    private final ApolloClient apolloClient;        public ApolloDataChangedInit(final ApolloClient apolloClient) {        this.apolloClient = apolloClient;    }        @Override    protected boolean notExist() {        // 判断 plugin、auth、meta、proxy.selector等节点是否存在        // 只要有一个不存在,则进入重新加载(这些节点不会创建,为什么要判断一次呢?)        return Stream.of(ApolloPathConstants.PLUGIN_DATA_ID, ApolloPathConstants.AUTH_DATA_ID, ApolloPathConstants.META_DATA_ID, ApolloPathConstants.PROXY_SELECTOR_DATA_ID).allMatch(                this::dataIdNotExist);    }
    /**     * Data id not exist boolean.     *     * @param pluginDataId the plugin data id     * @return the boolean     */    private boolean dataIdNotExist(final String pluginDataId) {        return Objects.isNull(apolloClient.getItemValue(pluginDataId));    }}

判断apollo中是否存在数据,如果不存在,则进行同步。 这里有一个bug, 因为这里判断的key,在同步时,并不会创建,则会导致每次重启时都重新加载数据,已提PR#5435

ApolloDataChangedInit实现了CommandLineRunner接口。它是springboot提供的接口,会在所有 Spring Beans初始化之后执行run()方法,常用于项目中初始化的操作。

  • SyncDataService.syncAll()

从数据库查询数据,然后进行全量数据同步,所有的认证信息、插件信息、规则信息、选择器信息、元数据、代理选择器、发现下游事件。主要是通过eventPublisher发布同步事件,eventPublisher通过publishEvent()发布完事件后,有ApplicationListener执行事件变更操作,在ShenYu中就是前面提到的DataChangedEventDispatcher

@Servicepublic class SyncDataServiceImpl implements SyncDataService {    // 事件发布    private final ApplicationEventPublisher eventPublisher;         /***     * 全量数据同步     * @param type the type     * @return     */     @Override     public boolean syncAll(final DataEventTypeEnum type) {         // 同步auth数据         appAuthService.syncData();         // 同步插件数据         List<PluginData> pluginDataList = pluginService.listAll();         // 通过spring发布/订阅机制进行通知订阅者(发布DataChangedEvent)         // 统一由DataChangedEventDispatcher进行监听         // DataChangedEvent带上了配置分组类型、当前操作类型、数据         eventPublisher.publishEvent(new DataChangedEvent(ConfigGroupEnum.PLUGIN, type, pluginDataList));         // 同步选择器         List<SelectorData> selectorDataList = selectorService.listAll();         eventPublisher.publishEvent(new DataChangedEvent(ConfigGroupEnum.SELECTOR, type, selectorDataList));         // 同步规则         List<RuleData> ruleDataList = ruleService.listAll();         eventPublisher.publishEvent(new DataChangedEvent(ConfigGroupEnum.RULE, type, ruleDataList));         //元数据         metaDataService.syncData();         // 下游列表         discoveryService.syncData();         return true;     }    }

bootstrap同步操作初始化#

网关这边的数据同步初始化操作主要是订阅apollo中的节点,当有数据变更时,收到变更数据。这依赖于apollolistener机制。在ShenYu中,负责apollo数据同步的是ApolloDataService

ApolloDataService的功能逻辑是在实例化的过程中完成的:对apollo中的shenyu数据同步节点完成订阅。通过configService.addChangeListener()方法实现;

public class ApolloDataService extends AbstractNodeDataSyncService implements SyncDataService {    public ApolloDataService(final Config configService, final PluginDataSubscriber pluginDataSubscriber,                             final List<MetaDataSubscriber> metaDataSubscribers,                             final List<AuthDataSubscriber> authDataSubscribers,                             final List<ProxySelectorDataSubscriber> proxySelectorDataSubscribers,                             final List<DiscoveryUpstreamDataSubscriber> discoveryUpstreamDataSubscribers) {        // 配置监听的前缀        super(new ChangeData(ApolloPathConstants.PLUGIN_DATA_ID,                        ApolloPathConstants.SELECTOR_DATA_ID,                        ApolloPathConstants.RULE_DATA_ID,                        ApolloPathConstants.AUTH_DATA_ID,                        ApolloPathConstants.META_DATA_ID,                        ApolloPathConstants.PROXY_SELECTOR_DATA_ID,                        ApolloPathConstants.DISCOVERY_DATA_ID),                pluginDataSubscriber, metaDataSubscribers, authDataSubscribers, proxySelectorDataSubscribers, discoveryUpstreamDataSubscribers);        this.configService = configService;        // 开始监听        // 注:Apollo该方法,只负责获取apollo的数据获取,并添加到本地缓存中,不处理监听        startWatch();        // 配置监听        apolloWatchPrefixes();    }}

首先配置需要处理的key信息,同admin同步的key。接着调用startWatch() 方法进行处理数据获取与监听。但对于Apollo的实现中,该方法只负责处理数据的获取并设置到本地缓存中。 监听由apolloWatchPrefixes方法来处理

private void apolloWatchPrefixes() {        // 定义监听器        final ConfigChangeListener listener = changeEvent -> {            changeEvent.changedKeys().forEach(changeKey -> {                try {                    final ConfigChange configChange = changeEvent.getChange(changeKey);                    // 未变更则跳过                    if (configChange == null) {                        LOG.error("apollo watchPrefixes error configChange is null {}", changeKey);                        return;                    }                    final String newValue = configChange.getNewValue();                    // skip last is "list"                    // 如果是list结尾的Key,如plugin.list则跳过,因为这里只是记录生效的一个列表,不会在本地缓存中                    final int lastListStrIndex = changeKey.length() - DefaultNodeConstants.LIST_STR.length();                    if (changeKey.lastIndexOf(DefaultNodeConstants.LIST_STR) == lastListStrIndex) {                        return;                    }                    // 如果是plugin.开头 => 处理插件数据                    if (changeKey.indexOf(ApolloPathConstants.PLUGIN_DATA_ID) == 0) {                        // 删除                        if (PropertyChangeType.DELETED.equals(configChange.getChangeType())) {                            // 清除缓存                            unCachePluginData(changeKey);                        } else {                            // 更新缓存                            cachePluginData(newValue);                        }                        // 如果是selector.开头 => 处理选择器数据                    } else if (changeKey.indexOf(ApolloPathConstants.SELECTOR_DATA_ID) == 0) {                        if (PropertyChangeType.DELETED.equals(configChange.getChangeType())) {                            unCacheSelectorData(changeKey);                        } else {                            cacheSelectorData(newValue);                        }                        // 如果是rule.开头 => 处理规则数据                    } else if (changeKey.indexOf(ApolloPathConstants.RULE_DATA_ID) == 0) {                        if (PropertyChangeType.DELETED.equals(configChange.getChangeType())) {                            unCacheRuleData(changeKey);                        } else {                            cacheRuleData(newValue);                        }                        // 如果是auth.开头 => 处理授权数据                    } else if (changeKey.indexOf(ApolloPathConstants.AUTH_DATA_ID) == 0) {                        if (PropertyChangeType.DELETED.equals(configChange.getChangeType())) {                            unCacheAuthData(changeKey);                        } else {                            cacheAuthData(newValue);                        }                        // 如果是meta.开头 => 处理元数据                    } else if (changeKey.indexOf(ApolloPathConstants.META_DATA_ID) == 0) {                        if (PropertyChangeType.DELETED.equals(configChange.getChangeType())) {                            unCacheMetaData(changeKey);                        } else {                            cacheMetaData(newValue);                        }                        // 如果是proxy.selector.开头 => 处理代理选择器数据                    } else if (changeKey.indexOf(ApolloPathConstants.PROXY_SELECTOR_DATA_ID) == 0) {                        if (PropertyChangeType.DELETED.equals(configChange.getChangeType())) {                            unCacheProxySelectorData(changeKey);                        } else {                            cacheProxySelectorData(newValue);                        }                        // 如果是discovery.开头 => 处理下游列表数据                    } else if (changeKey.indexOf(ApolloPathConstants.DISCOVERY_DATA_ID) == 0) {                        if (PropertyChangeType.DELETED.equals(configChange.getChangeType())) {                            unCacheDiscoveryUpstreamData(changeKey);                        } else {                            cacheDiscoveryUpstreamData(newValue);                        }                    }                } catch (Exception e) {                    LOG.error("apollo sync listener change key handler error", e);                }            });        };        watchConfigChangeListener = listener;        // 添加监听        configService.addChangeListener(listener, Collections.emptySet(), ApolloPathConstants.pathKeySet());
    }

由前面admin加载数据的逻辑,插件只会增加两个Key:plugin.listplugin.${plugin.name},而 plugin.list 是所有启用的插件列表,该key的数据在 本地缓存中没有数据,只会关注plugin.${plugin.name} key对应的数据,这是对应的插件的详细信息。

至此,bootstrap在apollo中的同步逻辑就分析完成。