Divide插件源码分析
Apache ShenYu 是一个异步的,高性能的,跨语言的,响应式的
API网关。
ShenYu 网关使用 divide 插件来处理 http 请求。你可以查看官方文档 Http快速开始 了解如何使用该插件。
本文基于
shenyu-2.4.3版本进行源码分析,官网的介绍请参考 Http服务接入 。
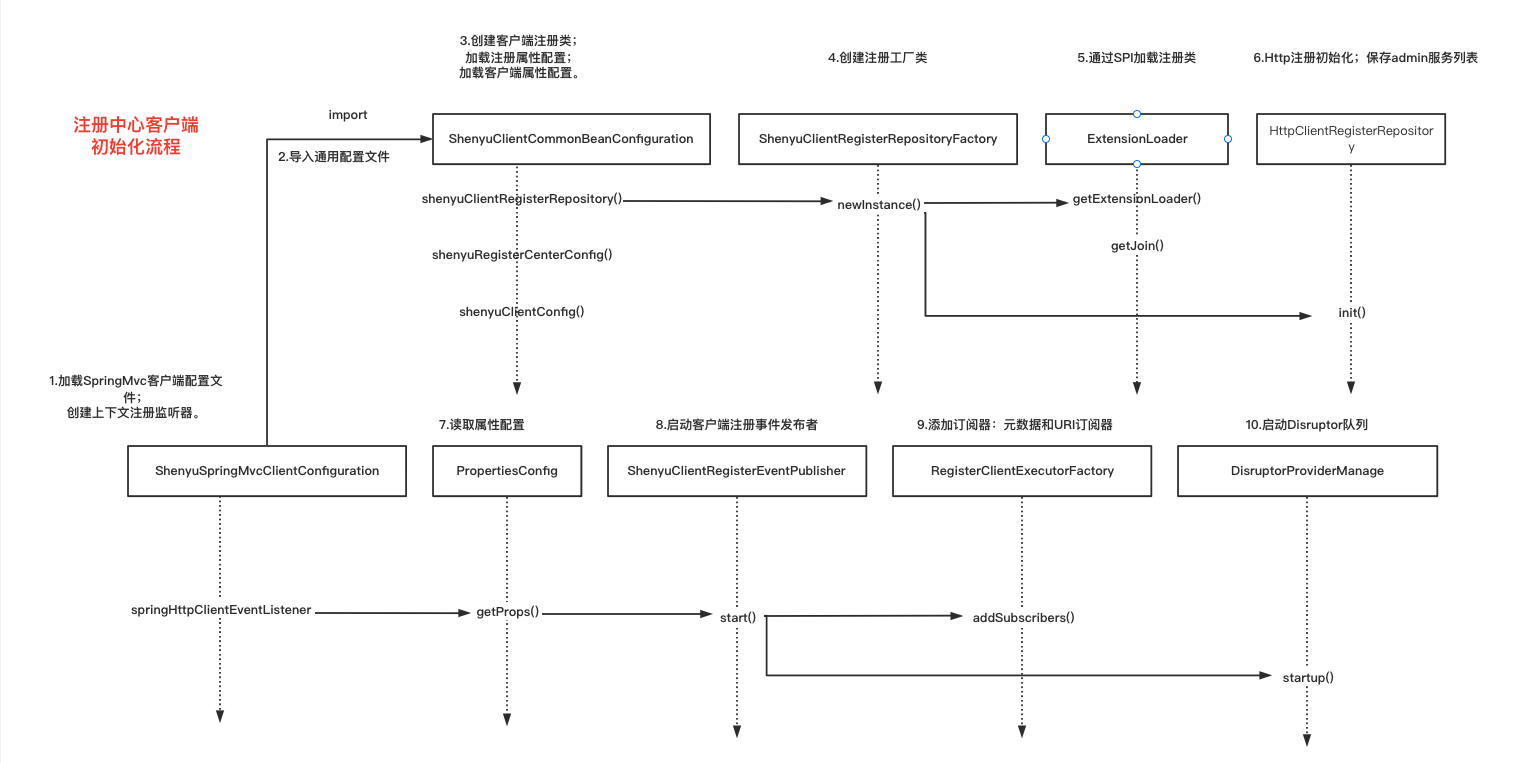
1. 服务注册
1.1 声明注册接口
使用注解@ShenyuSpringMvcClient将服务注册到网关。简单demo如下:
@RestController
@RequestMapping("/order")
@ShenyuSpringMvcClient(path = "/order")  // API注册
public class OrderController {
    @GetMapping("/findById")
    @ShenyuSpringMvcClient(path = "/findById", desc = "Find by id") // 方法注册
    public OrderDTO findById(@RequestParam("id") final String id) {
        return build(id, "hello world findById");
    }
}
注解定义:
/**
 * 作用于类和方法上
 */
@Retention(RetentionPolicy.RUNTIME)
@Target({ElementType.TYPE, ElementType.METHOD})
public @interface ShenyuSpringMvcClient {

	//注册路径
    String path() default "";

    //规则名称
    String ruleName() default "";

    //描述信息
    String desc() default "";

    //是否启用
    boolean enabled() default true;

    //注册元数据
    boolean registerMetaData() default false;
}
1.2 扫描注解信息
注解扫描通过SpringMvcClientBeanPostProcessor完成,它实现了BeanPostProcessor接口,是Spring提供的后置处理器。
在构造器实例化的过程中:
- 读取属性配置
- 添加注解,读取
path信息 - 启动注册中心,向
shenyu-admin注册
public class SpringMvcClientBeanPostProcessor implements BeanPostProcessor {
    //...
    /**
     * 构造器实例化
     */
    public SpringMvcClientBeanPostProcessor(final PropertiesConfig clientConfig,
                                            final ShenyuClientRegisterRepository shenyuClientRegisterRepository) {
        // 1. 读取属性配置
        Properties props = clientConfig.getProps();
        this.appName = props.getProperty(ShenyuClientConstants.APP_NAME);
        this.contextPath = props.getProperty(ShenyuClientConstants.CONTEXT_PATH, "");
        if (StringUtils.isBlank(appName) && StringUtils.isBlank(contextPath)) {
            String errorMsg = "http register param must config the appName or contextPath";
            LOG.error(errorMsg);
            throw new ShenyuClientIllegalArgumentException(errorMsg);
        }
        this.isFull = Boolean.parseBoolean(props.getProperty(ShenyuClientConstants.IS_FULL, Boolean.FALSE.toString()));
        // 2. 添加注解
        mappingAnnotation.add(ShenyuSpringMvcClient.class);
        mappingAnnotation.add(PostMapping.class);
        mappingAnnotation.add(GetMapping.class);
        mappingAnnotation.add(DeleteMapping.class);
        mappingAnnotation.add(PutMapping.class);
        mappingAnnotation.add(RequestMapping.class);
        // 3. 启动注册中心
        publisher.start(shenyuClientRegisterRepository);
    }

    @Override
    public Object postProcessAfterInitialization(@NonNull final Object bean, @NonNull final String beanName) throws BeansException {
       // 重写后置处理器逻辑

        return bean;
    }
- SpringMvcClientBeanPostProcessor#postProcessAfterInitialization()
重写后置处理器逻辑:读取注解信息,构建元数据对象和URI对象,并向shenyu-admin注册。
    @Override
    public Object postProcessAfterInitialization(@NonNull final Object bean, @NonNull final String beanName) throws BeansException {
        // 1. 如果是注册整个服务或者不是Controller类,就不处理
        if (Boolean.TRUE.equals(isFull) || !hasAnnotation(bean.getClass(), Controller.class)) {
            return bean;
        }
        // 2. 读取类上的注解 ShenyuSpringMvcClient
        final ShenyuSpringMvcClient beanShenyuClient = AnnotationUtils.findAnnotation(bean.getClass(), ShenyuSpringMvcClient.class);
        // 2.1构建superPath
        final String superPath = buildApiSuperPath(bean.getClass());
        // 2.2 是否注册整个类方法
        if (Objects.nonNull(beanShenyuClient) && superPath.contains("*")) {
            // 构建元数据对象,然后向shenyu-admin注册
            publisher.publishEvent(buildMetaDataDTO(beanShenyuClient, pathJoin(contextPath, superPath)));
            return bean;
        }
        // 3. 读取所有方法
        final Method[] methods = ReflectionUtils.getUniqueDeclaredMethods(bean.getClass());
        for (Method method : methods) {
            // 3.1 读取方法上的注解 ShenyuSpringMvcClient
            ShenyuSpringMvcClient methodShenyuClient = AnnotationUtils.findAnnotation(method, ShenyuSpringMvcClient.class);
            // 如果方法上面没有注解,就用类上面的注解
            methodShenyuClient = Objects.isNull(methodShenyuClient) ? beanShenyuClient : methodShenyuClient;
            if (Objects.nonNull(methodShenyuClient)) {
               // 3.2 构建path信息,构建元数据对象,向shenyu-admin注册
                publisher.publishEvent(buildMetaDataDTO(methodShenyuClient, buildApiPath(method, superPath)));
            }
        }

        return bean;
    }
- 1.如果是注册整个服务或者不是
Controller类,就不处理 - 2.�读取类上的注解
ShenyuSpringMvcClient,如果是注册整个类,就在这里构建元数据对象,然后向shenyu-admin注册 - 3.处理方法上的注解
ShenyuSpringMvcClient,针对特定方法构建path信息,构建元数据对象,然后向shenyu-admin注册
这里有两个取path的方法,需要特别说明一下:
-
buildApiSuperPath()
构造
SuperPath:先从类上的注解ShenyuSpringMvcClient取path属性,如果没有,就从当前类的RequestMapping注解中取path信息。
    private String buildApiSuperPath(@NonNull final Class<?> method) {
        // 先从类上的注解ShenyuSpringMvcClient取path属性
        ShenyuSpringMvcClient shenyuSpringMvcClient = AnnotationUtils.findAnnotation(method, ShenyuSpringMvcClient.class);
        if (Objects.nonNull(shenyuSpringMvcClient) && StringUtils.isNotBlank(shenyuSpringMvcClient.path())) {
            return shenyuSpringMvcClient.path();
        }
        // 从当前类的RequestMapping注解中取path信息
        RequestMapping requestMapping = AnnotationUtils.findAnnotation(method, RequestMapping.class);
        if (Objects.nonNull(requestMapping) && ArrayUtils.isNotEmpty(requestMapping.path()) && StringUtils.isNotBlank(requestMapping.path()[0])) {
            return requestMapping.path()[0];
        }
        return "";
    }
-
buildApiPath()
构建
path:先读取方法上的注解ShenyuSpringMvcClient,如果存在就构建;否则从方法的其他注解上获取path信息;完整的path = contextPath(上下文信息)+superPath(类信息)+methodPath(方法信息)。
private String buildApiPath(@NonNull final Method method, @NonNull final String superPath) {
// 1. 读取方法上的注解ShenyuSpringMvcClient
ShenyuSpringMvcClient shenyuSpringMvcClient = AnnotationUtils.findAnnotation(method, ShenyuSpringMvcClient.class);
// 1.1如果��存在path,就构建
if (Objects.nonNull(shenyuSpringMvcClient) && StringUtils.isNotBlank(shenyuSpringMvcClient.path())) {
//1.2完整 path = contextPath+superPath+methodPath
return pathJoin(contextPath, superPath, shenyuSpringMvcClient.path());
}
// 2.从方法的其他注解上获取path信息
final String path = getPathByMethod(method);
if (StringUtils.isNotBlank(path)) {
// 2.1 完整的path = contextPath+superPath+methodPath
return pathJoin(contextPath, superPath, path);
}
return pathJoin(contextPath, superPath);
}
-
getPathByMethod()
从方法的其他注解上获取
path信息,其他注解包括:- ShenyuSpringMvcClient
- PostMapping
- GetMapping
- DeleteMapping
- PutMapping
- RequestMapping
    private String getPathByMethod(@NonNull final Method method) {
        // 遍历接口注解获取path信息
        for (Class<? extends Annotation> mapping : mappingAnnotation) {
            final String pathByAnnotation = getPathByAnnotation(AnnotationUtils.findAnnotation(method, mapping), pathAttributeNames);
            if (StringUtils.isNotBlank(pathByAnnotation)) {
                return pathByAnnotation;
            }
        }
        return null;
    }
扫描注解完成后,构建元数据对象,然后将该对象发送到shenyu-admin,即可完成注册。
-
元数据对象
包括当前注册方法的规则信息:contextPath,appName,注册路径,描述信息,注册类型,是否启用,规则名称和是否注册元数据。
 private MetaDataRegisterDTO buildMetaDataDTO(@NonNull final ShenyuSpringMvcClient shenyuSpringMvcClient, final String path) {
        return MetaDataRegisterDTO.builder()
                .contextPath(contextPath) // contextPath
                .appName(appName) // appName
                .path(path) // 注册路径,在网关规则匹配时使用
                .pathDesc(shenyuSpringMvcClient.desc()) // 描述信息
                .rpcType(RpcTypeEnum.HTTP.getName()) // divide插件,默认时http类型
                .enabled(shenyuSpringMvcClient.enabled()) // 是否启用规则
                .ruleName(StringUtils.defaultIfBlank(shenyuSpringMvcClient.ruleName(), path))//规则名称
                .registerMetaData(shenyuSpringMvcClient.registerMetaData()) //是否注册元数据信息
                .build();
    }
具体的注册逻辑由注册中心实现,在之�前的文章中已经分析过了,这里就不再深入分析。
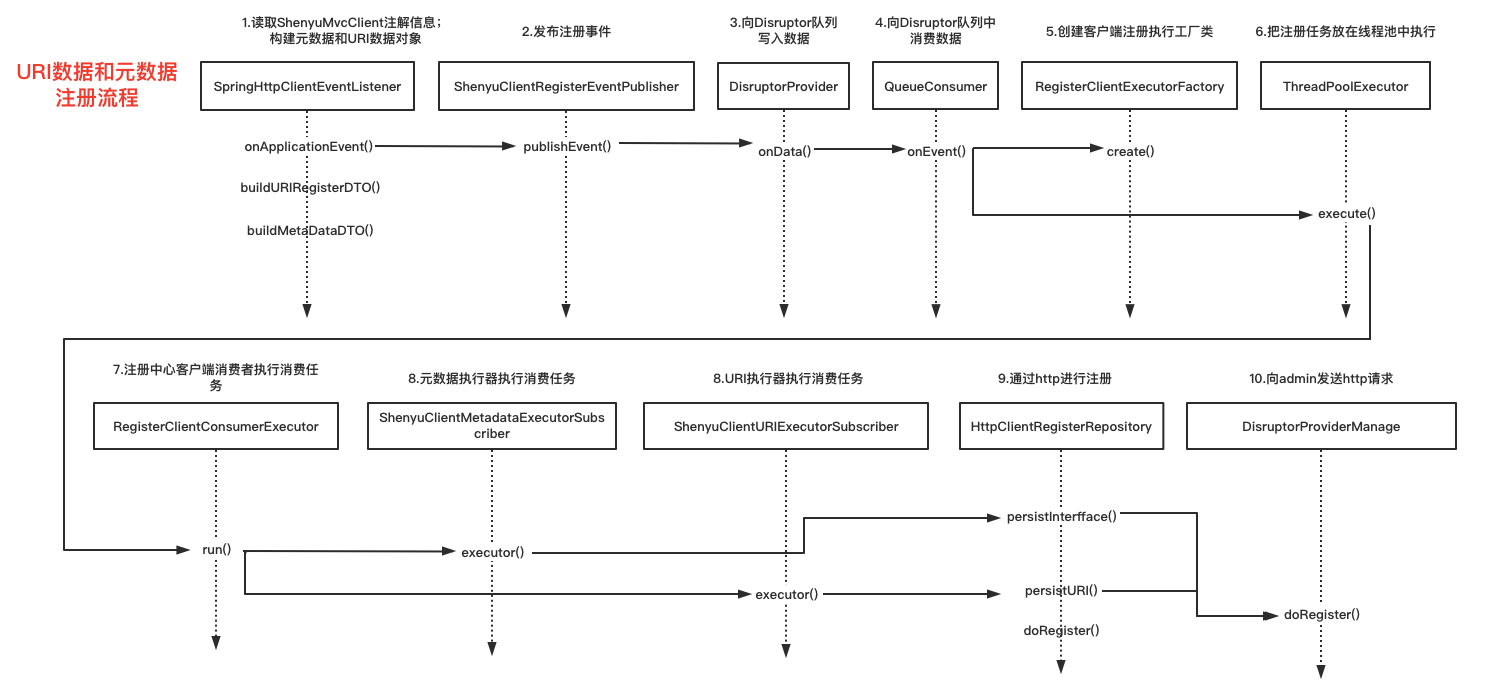
1.3 注册URI信息
ContextRegisterListener负责将客户端的URI信息注册到shenyu-admin,它实现了ApplicationListener接口,发生上下文刷新事件ContextRefreshedEvent时,执行onApplicationEvent()方法,实现注册逻辑。
public class ContextRegisterListener implements ApplicationListener<ContextRefreshedEvent>, BeanFactoryAware {
	//......

    /**
     * 构造器实例化
     */
    public ContextRegisterListener(final PropertiesConfig clientConfig) {
        // 读取属性配置
        final Properties props = clientConfig.getProps();
        this.isFull = Boolean.parseBoolean(props.getProperty(ShenyuClientConstants.IS_FULL, Boolean.FALSE.toString()));
        this.contextPath = props.getProperty(ShenyuClientConstants.CONTEXT_PATH);
        if (Boolean.TRUE.equals(isFull)) {
            if (StringUtils.isBlank(contextPath)) {
                final String errorMsg = "http register param must config the contextPath";
                LOG.error(errorMsg);
                throw new ShenyuClientIllegalArgumentException(errorMsg);
            }
        }
        this.port = Integer.parseInt(Optional.ofNullable(props.getProperty(ShenyuClientConstants.PORT)).orElseGet(() -> "-1"));
        this.appName = props.getProperty(ShenyuClientConstants.APP_NAME);
        this.protocol = props.getProperty(ShenyuClientConstants.PROTOCOL, ShenyuClientConstants.HTTP);
        this.host = props.getProperty(ShenyuClientConstants.HOST);
    }

    @Override
    public void setBeanFactory(final BeanFactory beanFactory) throws BeansException {
        this.beanFactory = beanFactory;
    }

    // 执行应用事件
    @Override
    public void onApplicationEvent(@NonNull final ContextRefreshedEvent contextRefreshedEvent) {
        // 保证该方法执行一次
        if (!registered.compareAndSet(false, true)) {
            return;
        }
        // 1. 如果是注册整个服务
        if (Boolean.TRUE.equals(isFull)) {
            // 构建元数据,并注册
            publisher.publishEvent(buildMetaDataDTO());
        }
        try {
            // 获取端口信息
            final int mergedPort = port <= 0 ? PortUtils.findPort(beanFactory) : port;
            // 2. 构建URI数据,并注册
            publisher.publishEvent(buildURIRegisterDTO(mergedPort));
        } catch (ShenyuException e) {
            throw new ShenyuException(e.getMessage() + "please config ${shenyu.client.http.props.port} in xml/yml !");
        }
    }

    // 构建URI数据
    private URIRegisterDTO buildURIRegisterDTO(final int port) {
        return URIRegisterDTO.builder()
            .contextPath(this.contextPath) // contextPath
            .appName(appName) // appName
            .protocol(protocol) // 服务使用的协议
            .host(IpUtils.isCompleteHost(this.host) ? this.host : IpUtils.getHost(this.host)) //主机
            .port(port) // 端口
            .rpcType(RpcTypeEnum.HTTP.getName()) // divide插件,默认注册http类型
            .build();
    }

    // 构建元数据
    private MetaDataRegisterDTO buildMetaDataDTO() {
        return MetaDataRegisterDTO.builder()
            .contextPath(contextPath)
            .appName(appName)
            .path(contextPath)
            .rpcType(RpcTypeEnum.HTTP.getName())
            .enabled(true)
            .ruleName(contextPath)
            .build();
    }
}
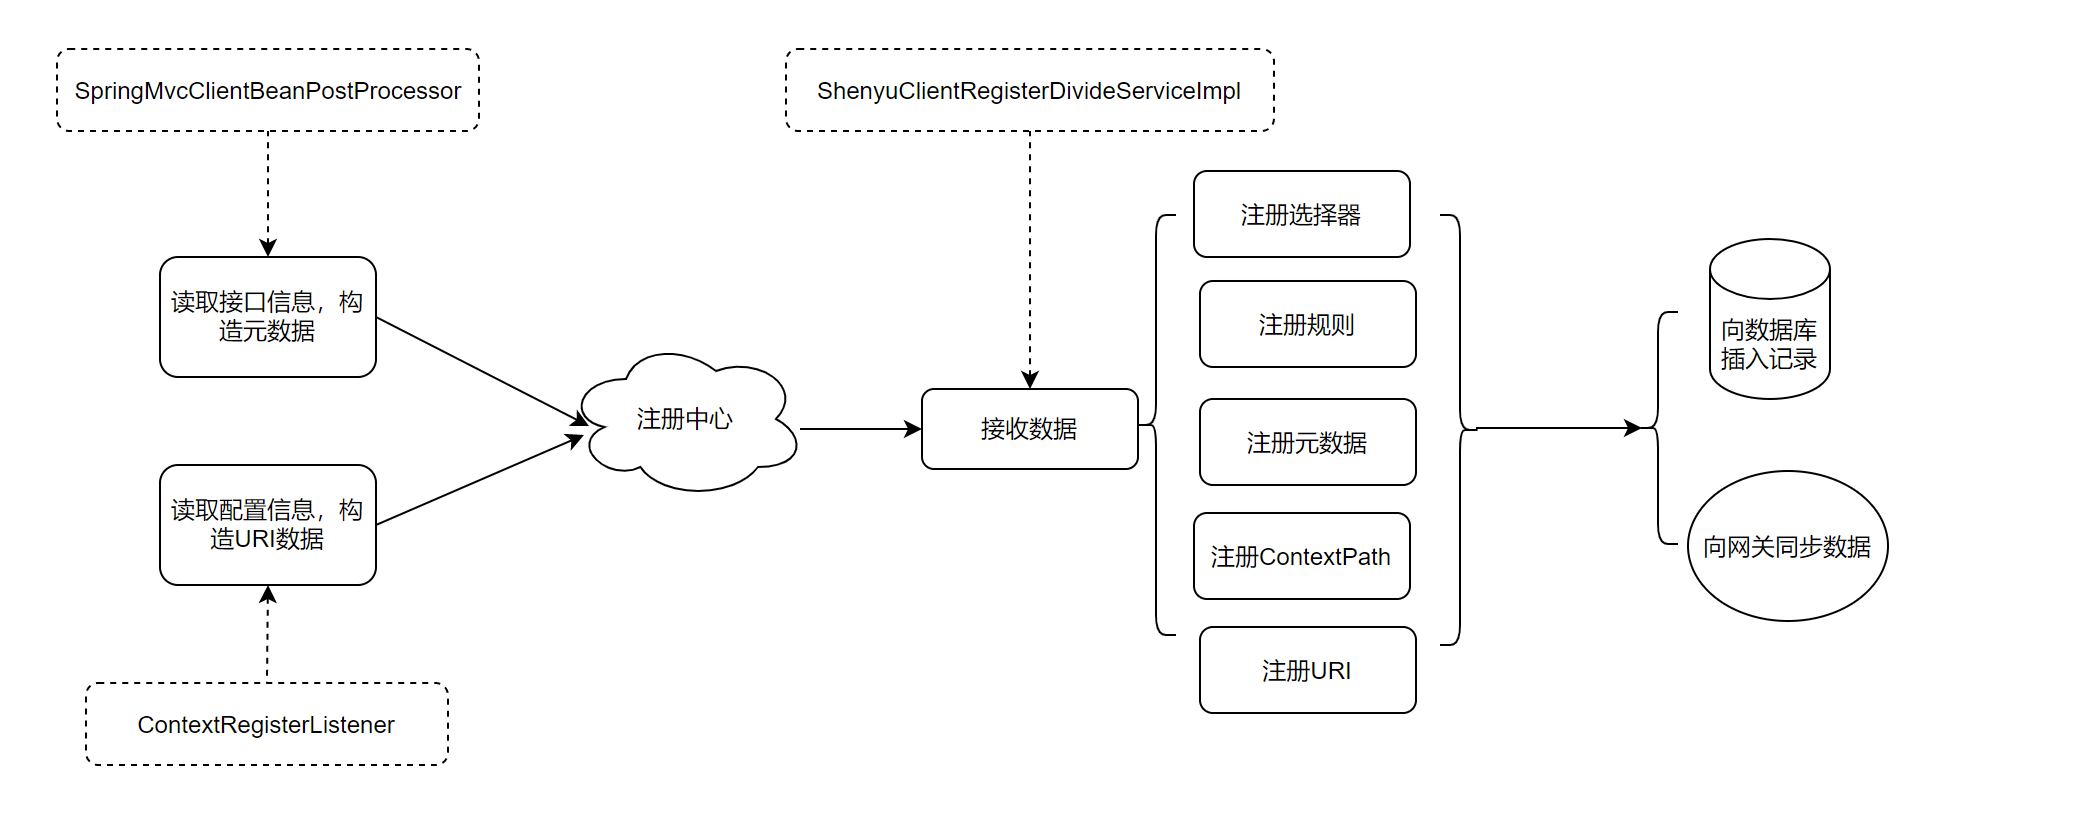
1.4 处理注册信息
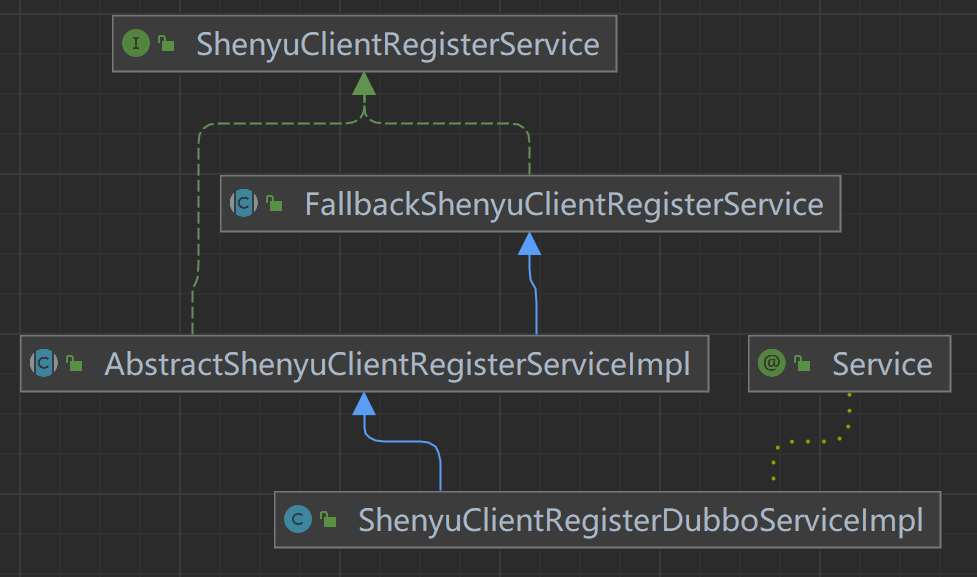
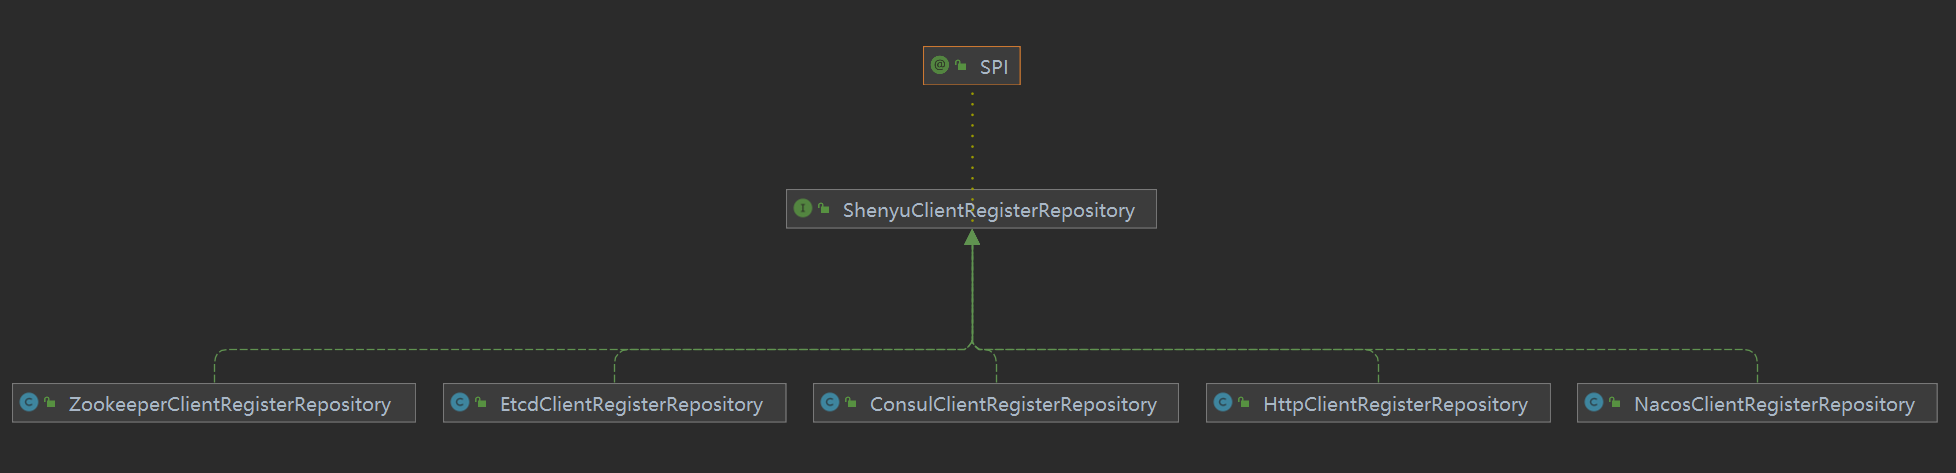
客户端通过注册中心注册的元数据和URI数据,在shenyu-admin进行处理,负责存储到数据库和同步给shenyu网关。Divide插件的客户端注册处理逻辑在ShenyuClientRegisterDivideServiceImpl中。继承关系如下:
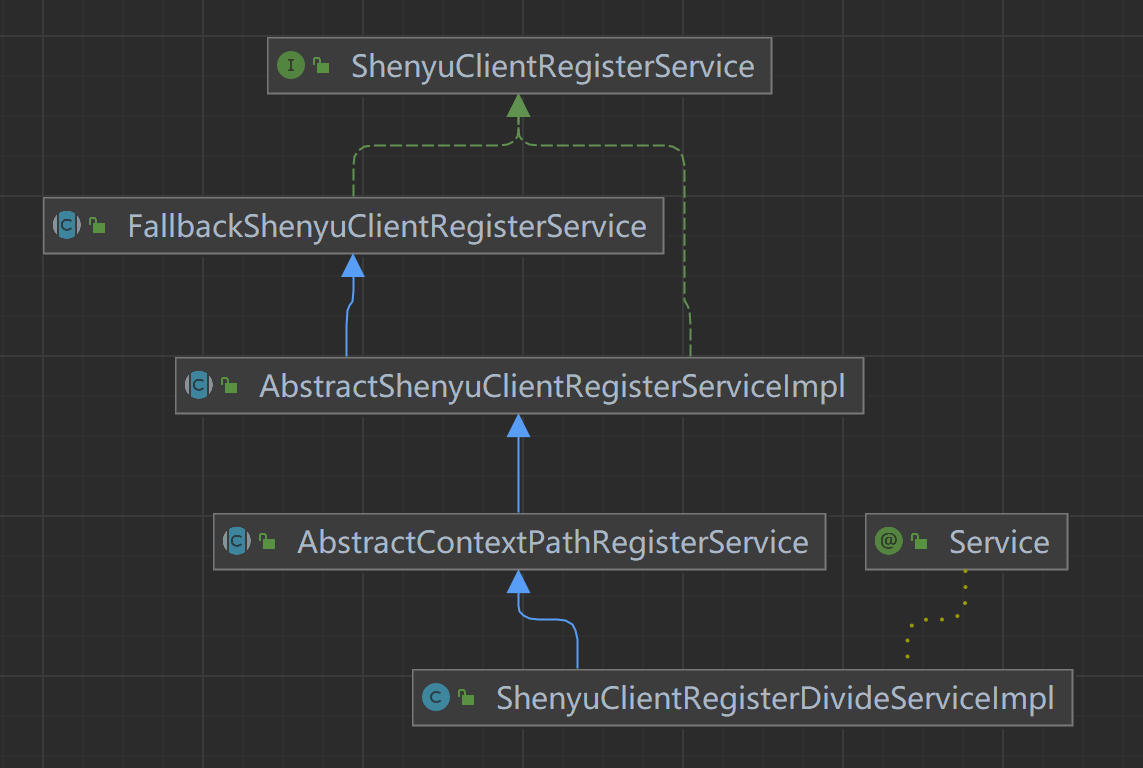
- ShenyuClientRegisterService:客户端注册服务,顶层接口;
- FallbackShenyuClientRegisterService:注册失败,提供重试操作;
- AbstractShenyuClientRegisterServiceImpl:抽象类,实现部分公共注册逻辑;
- AbstractContextPathRegisterService:抽象类,负责注册
ContextPath; - ShenyuClientRegisterDivideServiceImpl:实现
Divide插件的注册;
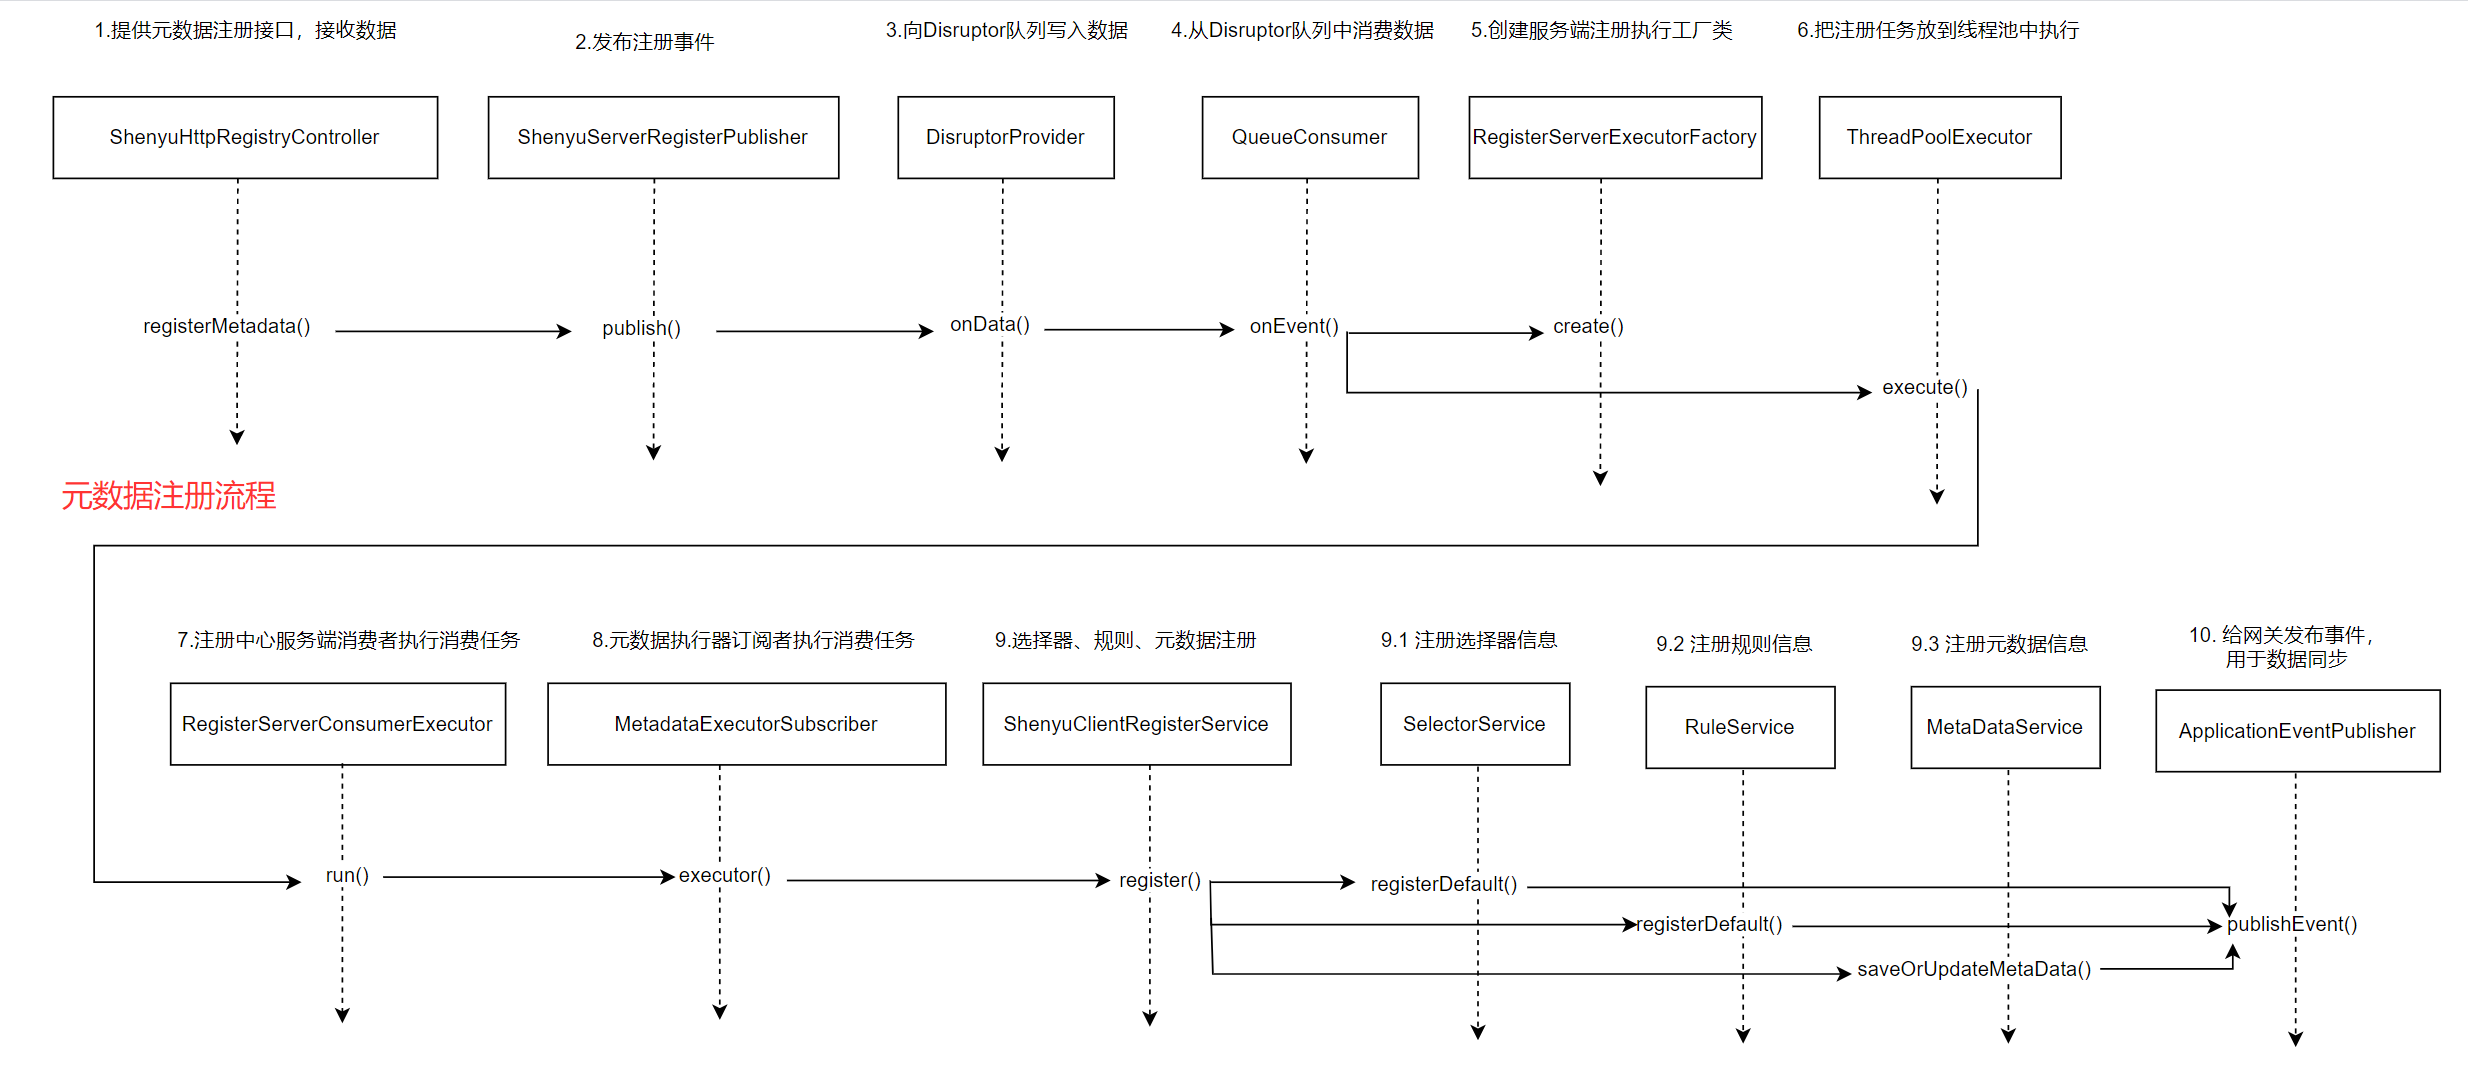
1.4.1 注册服务
-
org.apache.shenyu.admin.service.register.AbstractShenyuClientRegisterServiceImpl#register()
客户端通过注册中心注册的元数据
MetaDataRegisterDTO对象在shenyu-admin的register()方法被接送到。
   @Override
    public String register(final MetaDataRegisterDTO dto) {
        //1. 注册选择器
        String selectorHandler = selectorHandler(dto);
        String selectorId = selectorService.registerDefault(dto, PluginNameAdapter.rpcTypeAdapter(rpcType()), selectorHandler);
        //2. 注册规则
        String ruleHandler = ruleHandler();
        RuleDTO ruleDTO = buildRpcDefaultRuleDTO(selectorId, dto, ruleHandler);
        ruleService.registerDefault(ruleDTO);
        //3. 注册元数据
        registerMetadata(dto);
        //4. 注册ContextPath
        String contextPath = dto.getContextPath();
        if (StringUtils.isNotEmpty(contextPath)) {
            registerContextPath(dto);
        }
        return ShenyuResultMessage.SUCCESS;
    }
1.4.1.1 注册选择器
- org.apache.shenyu.admin.service.impl.SelectorServiceImpl#registerDefault()
构建contextPath,查找选择器信息是否存在,如果存在就返回id;不存在就创建默认的选择器信息。
    @Override
    public String registerDefault(final MetaDataRegisterDTO dto, final String pluginName, final String selectorHandler) {
        // 构建contextPath
        String contextPath = ContextPathUtils.buildContextPath(dto.getContextPath(), dto.getAppName());
        // 通过名称查找选择器信息是否存在
        SelectorDO selectorDO = findByNameAndPluginName(contextPath, pluginName);
        if (Objects.isNull(selectorDO)) {
            // 不存在就创建默认的选择器信息
            return registerSelector(contextPath, pluginName, selectorHandler);
        }
        return selectorDO.getId();
    }
-
默认选择器信息
在这里构建默认选择器信息及其条件属性。
   //注册选择器
   private String registerSelector(final String contextPath, final String pluginName, final String selectorHandler) {
        //构建选择器
        SelectorDTO selectorDTO = buildSelectorDTO(contextPath, pluginMapper.selectByName(pluginName).getId());
        selectorDTO.setHandle(selectorHandler);
        //注册默认选择器
        return registerDefault(selectorDTO);
    }
     //构建选择器
    private SelectorDTO buildSelectorDTO(final String contextPath, final String pluginId) {
        //构建默认选择器
        SelectorDTO selectorDTO = buildDefaultSelectorDTO(contextPath);
        selectorDTO.setPluginId(pluginId);
         //构建默认选择器的条件属性
        selectorDTO.setSelectorConditions(buildDefaultSelectorConditionDTO(contextPath));
        return selectorDTO;
    }
- 构建默认选择器
private SelectorDTO buildDefaultSelectorDTO(final String name) {
    return SelectorDTO.builder()
            .name(name) // 名称
            .type(SelectorTypeEnum.CUSTOM_FLOW.getCode()) // 默认类型自定义
            .matchMode(MatchModeEnum.AND.getCode()) //默认匹配方式 and
            .enabled(Boolean.TRUE)  //默认启开启
            .loged(Boolean.TRUE)  //默认记录日志
            .continued(Boolean.TRUE) //默认继续后续选择器
            .sort(1) //默认顺序1
            .build();
}
- 构建默认选择器条件属性
private List<SelectorConditionDTO> buildDefaultSelectorConditionDTO(final String contextPath) {
    SelectorConditionDTO selectorConditionDTO = new SelectorConditionDTO();
    selectorConditionDTO.setParamType(ParamTypeEnum.URI.getName()); // 默认参数类型URI
    selectorConditionDTO.setParamName("/");
    selectorConditionDTO.setOperator(OperatorEnum.MATCH.getAlias()); // 默认匹配策略 match
    selectorConditionDTO.setParamValue(contextPath + AdminConstants.URI_SUFFIX); // 默认值 /contextPath/**
    return Collections.singletonList(selectorConditionDTO);
}
- 注册默认选择器
@Override
public String registerDefault(final SelectorDTO selectorDTO) {
    //选择器信息
    SelectorDO selectorDO = SelectorDO.buildSelectorDO(selectorDTO);
    //选择器条件属性
    List<SelectorConditionDTO> selectorConditionDTOs = selectorDTO.getSelectorConditions();
    if (StringUtils.isEmpty(selectorDTO.getId())) {
        // 向数据库插入选择器信息
        selectorMapper.insertSelective(selectorDO);
          // 向数据库插入选择器条件属性
        selectorConditionDTOs.forEach(selectorConditionDTO -> {
            selectorConditionDTO.setSelectorId(selectorDO.getId());
                selectorConditionMapper.insertSelective(SelectorConditionDO.buildSelectorConditionDO(selectorConditionDTO));
        });
    }
    // 发布同步事件,向网关同步选择信息及其条件属性
    publishEvent(selectorDO, selectorConditionDTOs);
    return selectorDO.getId();
}
1.4.1.2 注册规则
在注册服务的第二步中,开始构建默认规则,然后注册规则。
@Override
    public String register(final MetaDataRegisterDTO dto) {
        //1. 注册选择器
        //......

        //2. 注册规则
        // 默认规则处理属性
        String ruleHandler = ruleHandler();
        // 构建默认规则信息
        RuleDTO ruleDTO = buildRpcDefaultRuleDTO(selectorId, dto, ruleHandler);
        // 注册规则
        ruleService.registerDefault(ruleDTO);

        //3. 注册元数据
        //......

        //4. 注册ContextPath
        //......

        return ShenyuResultMessage.SUCCESS;
    }
- 默认规则处理属性
    @Override
    protected String ruleHandler() {
        // 默认规则处理属性
        return new DivideRuleHandle().toJson();
    }
Divide插件默认规则处理属性
public class DivideRuleHandle implements RuleHandle {

    /**
     * 负载均衡:默认随机
     */
    private String loadBalance = LoadBalanceEnum.RANDOM.getName();

    /**
     * 重试策略:默认重试当前服务
     */
    private String retryStrategy = RetryEnum.CURRENT.getName();

    /**
     * 重试次数:默认3次
     */
    private int retry = 3;

    /**
     * 调用超时:默认 3000
     */
    private long timeout = Constants.TIME_OUT;

    /**
     * header最大值:10240 byte
     */
    private long headerMaxSize = Constants.HEADER_MAX_SIZE;

    /**
     * request最大值:102400 byte
     */
    private long requestMaxSize = Constants.REQUEST_MAX_SIZE;
}
- 构建默认规则信息
  // 构建默认规则信息
    private RuleDTO buildRpcDefaultRuleDTO(final String selectorId, final MetaDataRegisterDTO metaDataDTO, final String ruleHandler) {
        return buildRuleDTO(selectorId, ruleHandler, metaDataDTO.getRuleName(), metaDataDTO.getPath());
    }
   //  构建默认规则信息
    private RuleDTO buildRuleDTO(final String selectorId, final String ruleHandler, final String ruleName, final String path) {
        RuleDTO ruleDTO = RuleDTO.builder()
                .selectorId(selectorId) //关联的选择器id
                .name(ruleName) //规则名称
                .matchMode(MatchModeEnum.AND.getCode()) // 默认匹配模式 and
                .enabled(Boolean.TRUE) // 默认开启
                .loged(Boolean.TRUE) //默认记录日志
                .sort(1) //默认顺序 1
                .handle(ruleHandler)
                .build();
        RuleConditionDTO ruleConditionDTO = RuleConditionDTO.builder()
                .paramType(ParamTypeEnum.URI.getName()) // 默认参数类型URI
                .paramName("/")
                .paramValue(path) //参数值path
                .build();
        if (path.indexOf("*") > 1) {
            ruleConditionDTO.setOperator(OperatorEnum.MATCH.getAlias()); //如果path中有*,操作类型则默认为 match
        } else {
            ruleConditionDTO.setOperator(OperatorEnum.EQ.getAlias()); // 否则,默认操作类型 =
        }
        ruleDTO.setRuleConditions(Collections.singletonList(ruleConditionDTO));
        return ruleDTO;
    }
- org.apache.shenyu.admin.service.impl.RuleServiceImpl#registerDefault()
注册规则:向数据库插入记录,并向网关发布事件,进行数据同步。
    @Override
    public String registerDefault(final RuleDTO ruleDTO) {
        RuleDO exist = ruleMapper.findBySelectorIdAndName(ruleDTO.getSelectorId(), ruleDTO.getName());
        if (Objects.nonNull(exist)) {
            return "";
        }

        RuleDO ruleDO = RuleDO.buildRuleDO(ruleDTO);
        List<RuleConditionDTO> ruleConditions = ruleDTO.getRuleConditions();
        if (StringUtils.isEmpty(ruleDTO.getId())) {
            // 向数据库插入规则信息
            ruleMapper.insertSelective(ruleDO);
            //向数据库插入规则体条件属性
            ruleConditions.forEach(ruleConditionDTO -> {
                ruleConditionDTO.setRuleId(ruleDO.getId());
                ruleConditionMapper.insertSelective(RuleConditionDO.buildRuleConditionDO(ruleConditionDTO));
            });
        }
        // 向网关发布事件,进行数据同步
        publishEvent(ruleDO, ruleConditions);
        return ruleDO.getId();
    }
1.4.1.3 注册元数据
   @Override
    public String register(final MetaDataRegisterDTO dto) {
        //1. 注册选择器
        //......

        //2. 注册规则
        //......

        //3. 注册元数据
        registerMetadata(dto);

        //4. 注册ContextPath
        //......

        return ShenyuResultMessage.SUCCESS;
    }
-
org.apache.shenyu.admin.service.register.ShenyuClientRegisterDivideServiceImpl#registerMetadata()
插入或更新元数据,然后发布同步事件到网关。
    @Override
    protected void registerMetadata(final MetaDataRegisterDTO dto) {
        if (dto.isRegisterMetaData()) { // 如果注册元数据
            // 获取metaDataService
            MetaDataService metaDataService = getMetaDataService();
            // 元数据是否存在
            MetaDataDO exist = metaDataService.findByPath(dto.getPath());
            // 插入或更新元数据
            metaDataService.saveOrUpdateMetaData(exist, dto);
        }
    }

    @Override
    public void saveOrUpdateMetaData(final MetaDataDO exist, final MetaDataRegisterDTO metaDataDTO) {
        DataEventTypeEnum eventType;
        // 数据类型转换 DTO->DO
        MetaDataDO metaDataDO = MetaDataTransfer.INSTANCE.mapRegisterDTOToEntity(metaDataDTO);
        // 插入数据
        if (Objects.isNull(exist)) {
            Timestamp currentTime = new Timestamp(System.currentTimeMillis());
            metaDataDO.setId(UUIDUtils.getInstance().generateShortUuid());
            metaDataDO.setDateCreated(currentTime);
            metaDataDO.setDateUpdated(currentTime);
            metaDataMapper.insert(metaDataDO);
            eventType = DataEventTypeEnum.CREATE;
        } else {
            // 更新数据
            metaDataDO.setId(exist.getId());
            metaDataMapper.update(metaDataDO);
            eventType = DataEventTypeEnum.UPDATE;
        }
        // 发布同步事件到网关
        eventPublisher.publishEvent(new DataChangedEvent(ConfigGroupEnum.META_DATA, eventType,
                Collections.singletonList(MetaDataTransfer.INSTANCE.mapToData(metaDataDO))));
    }
1.4.1.4 注册ContextPath
   @Override
    public String register(final MetaDataRegisterDTO dto) {
        //1. 注册选择器
        //......

        //2. 注册规则
        //......

        //3. 注册元数据
        //......

        //4. 注册ContextPath
        String contextPath = dto.getContextPath();
        if (StringUtils.isNotEmpty(contextPath)) {
            registerContextPath(dto);
        }
        return ShenyuResultMessage.SUCCESS;
    }
- org.apache.shenyu.admin.service.register.AbstractContextPathRegisterService#registerContextPath()
    @Override
    public void registerContextPath(final MetaDataRegisterDTO dto) {
        // 设置选择器的contextPath
        String contextPathSelectorId = getSelectorService().registerDefault(dto, PluginEnum.CONTEXT_PATH.getName(), "");
        ContextMappingRuleHandle handle = new ContextMappingRuleHandle();
        handle.setContextPath(PathUtils.decoratorContextPath(dto.getContextPath()));
        // 设置规则的contextPath
        getRuleService().registerDefault(buildContextPathDefaultRuleDTO(contextPathSelectorId, dto, handle.toJson()));
    }
1.4.2 注册URI
- org.apache.shenyu.admin.service.register.FallbackShenyuClientRegisterService#registerURI()
服务端收到客户端注册的URI信息后,进行处理。
    @Override
    public String registerURI(final String selectorName, final List<URIRegisterDTO> uriList) {
        String result;
        String key = key(selectorName);
        try {
            this.removeFallBack(key);
            // 注册URI
            result = this.doRegisterURI(selectorName, uriList);
            logger.info("Register success: {},{}", selectorName, uriList);
        } catch (Exception ex) {
            logger.warn("Register exception: cause:{}", ex.getMessage());
            result = "";
            // 注册失败后,进行重试
            this.addFallback(key, new FallbackHolder(selectorName, uriList));
        }
        return result;
    }
- org.apache.shenyu.admin.service.register.AbstractShenyuClientRegisterServiceImpl#doRegisterURI()
从客户端注册的URI中获取有效的URI,更新对应的选择器handle属性,向网关发送选择器更新事件。
@Override
    public String doRegisterURI(final String selectorName, final List<URIRegisterDTO> uriList) {
        //参数检查
        if (CollectionUtils.isEmpty(uriList)) {
            return "";
        }
        //获取选择器信息
        SelectorDO selectorDO = selectorService.findByNameAndPluginName(selectorName, PluginNameAdapter.rpcTypeAdapter(rpcType()));
        if (Objects.isNull(selectorDO)) {
            throw new ShenyuException("doRegister Failed to execute,wait to retry.");
        }
        // 获取有效的URI
        List<URIRegisterDTO> validUriList = uriList.stream().filter(dto -> Objects.nonNull(dto.getPort()) && StringUtils.isNotBlank(dto.getHost())).collect(Collectors.toList());
        // 构建选择器的handle属性
        String handler = buildHandle(validUriList, selectorDO);
        if (handler != null) {
            selectorDO.setHandle(handler);
            SelectorData selectorData = selectorService.buildByName(selectorName, PluginNameAdapter.rpcTypeAdapter(rpcType()));
            selectorData.setHandle(handler);
            // 向数据库更新选择器的handle属性
            selectorService.updateSelective(selectorDO);
            // 向网关发送选择器更新事件
            eventPublisher.publishEvent(new DataChangedEvent(ConfigGroupEnum.SELECTOR, DataEventTypeEnum.UPDATE, Collections.singletonList(selectorData)));
        }
        return ShenyuResultMessage.SUCCESS;
    }
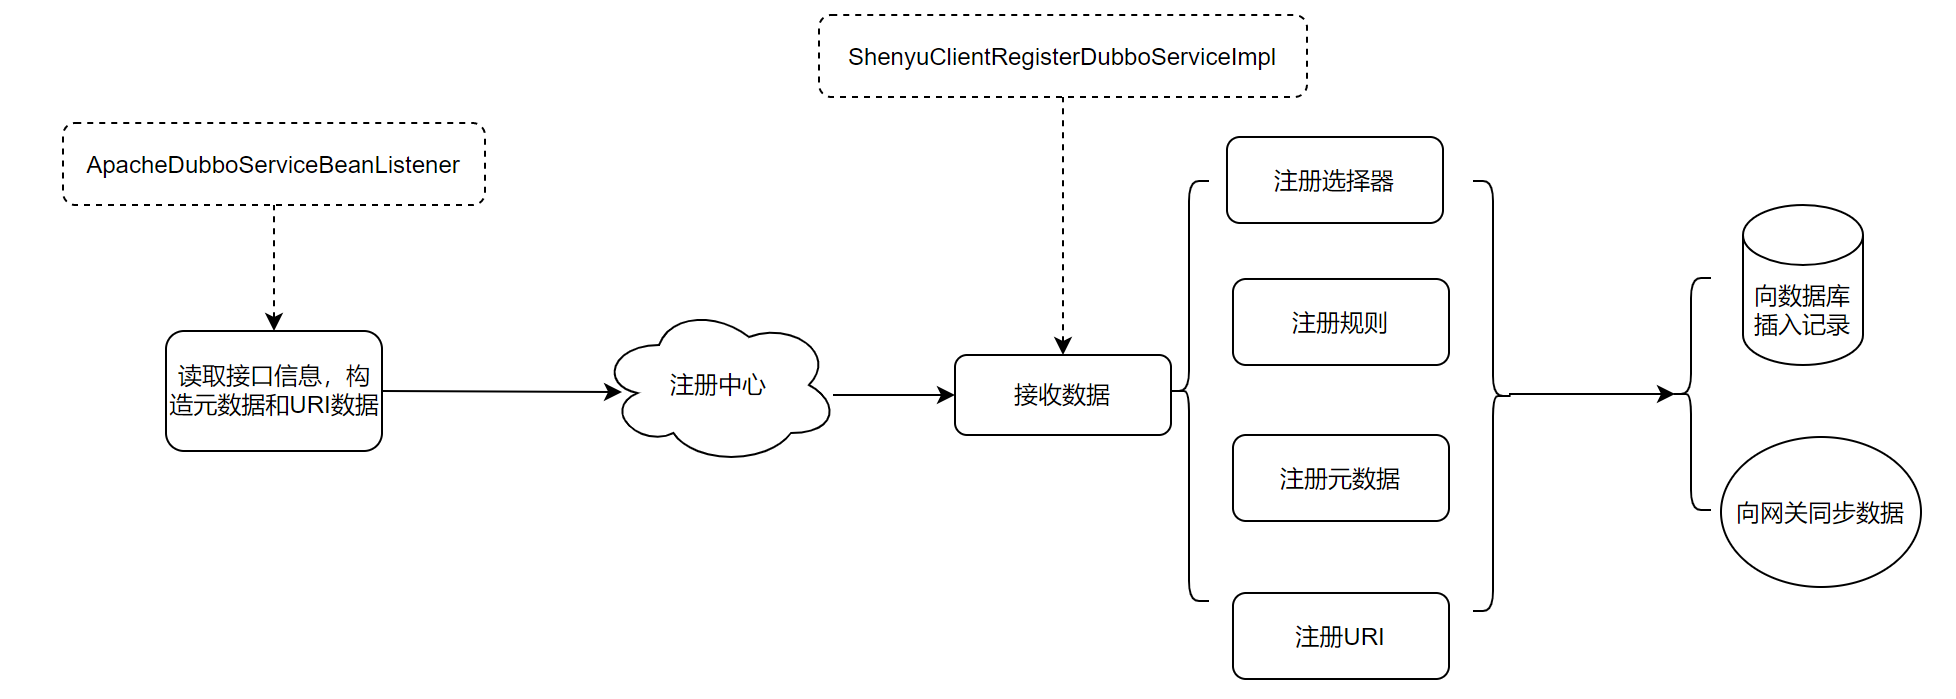
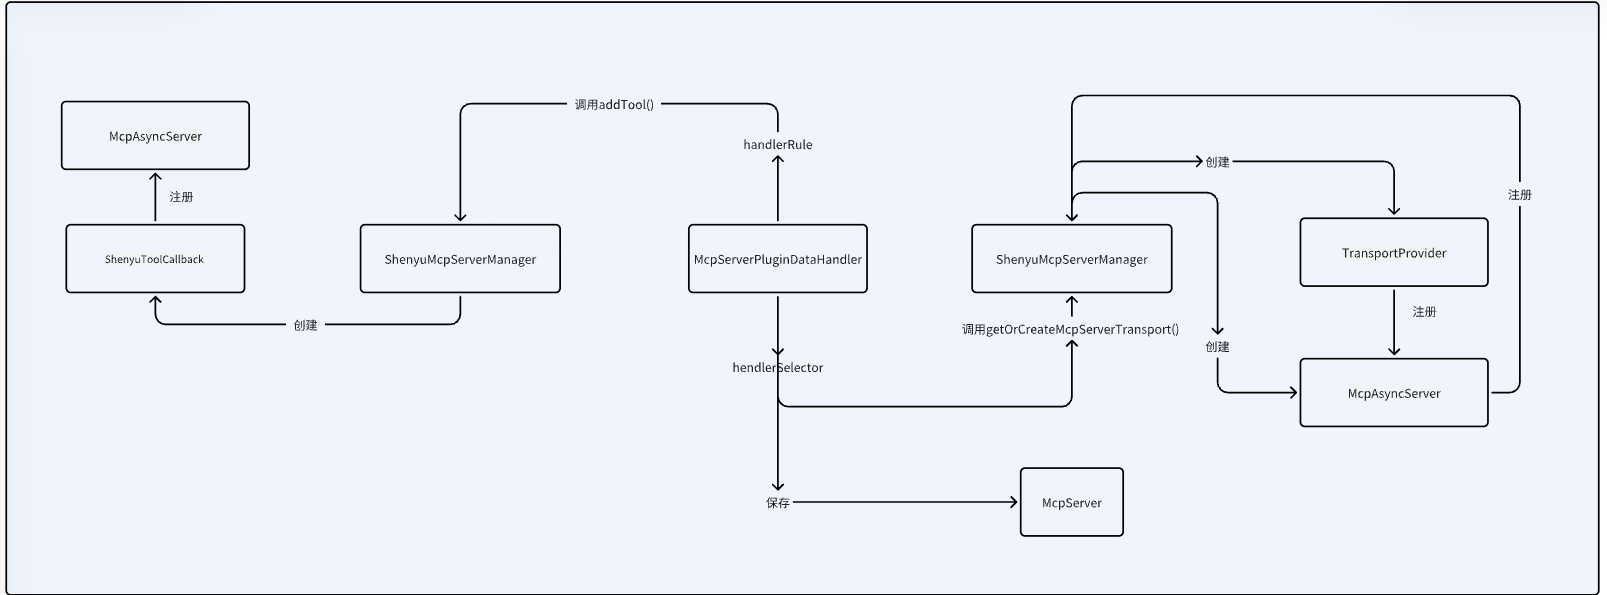
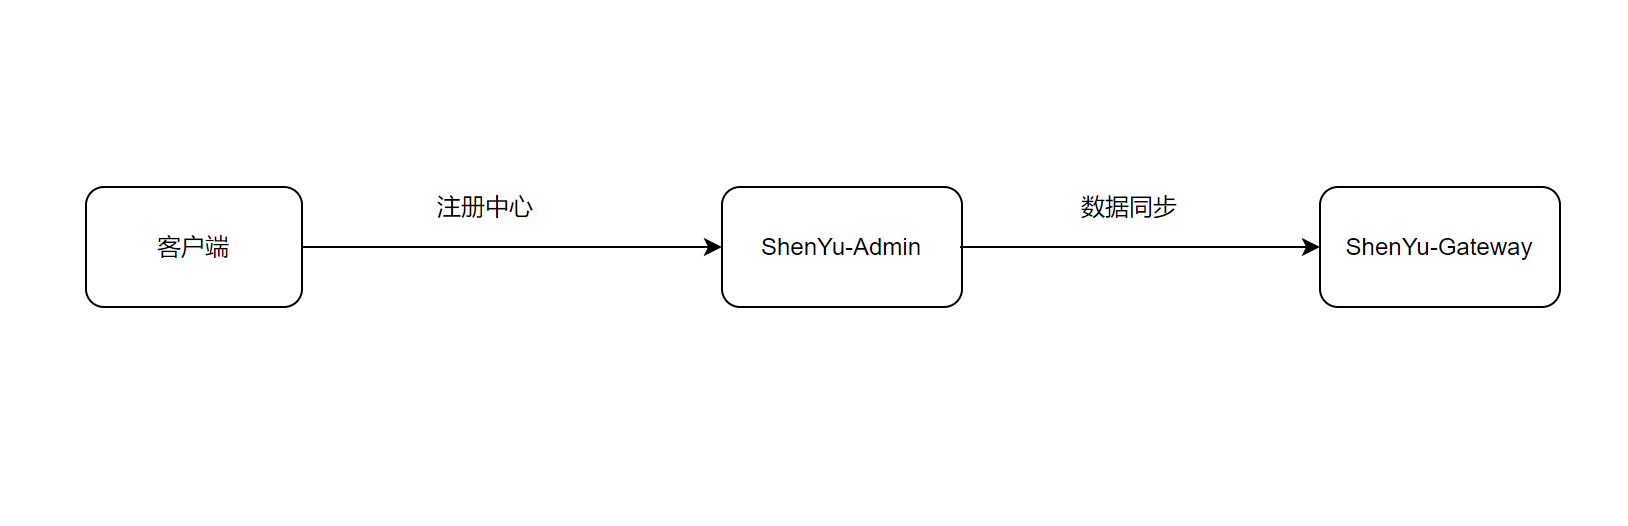
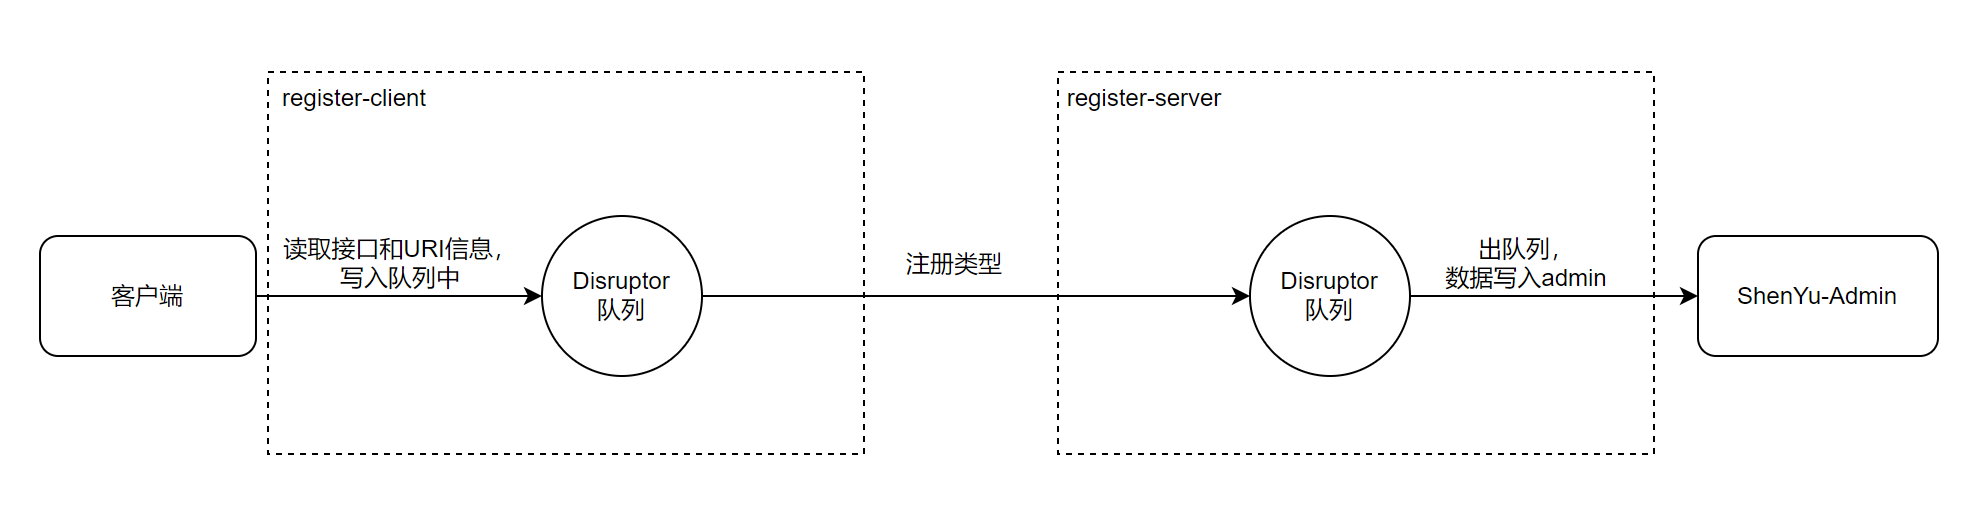
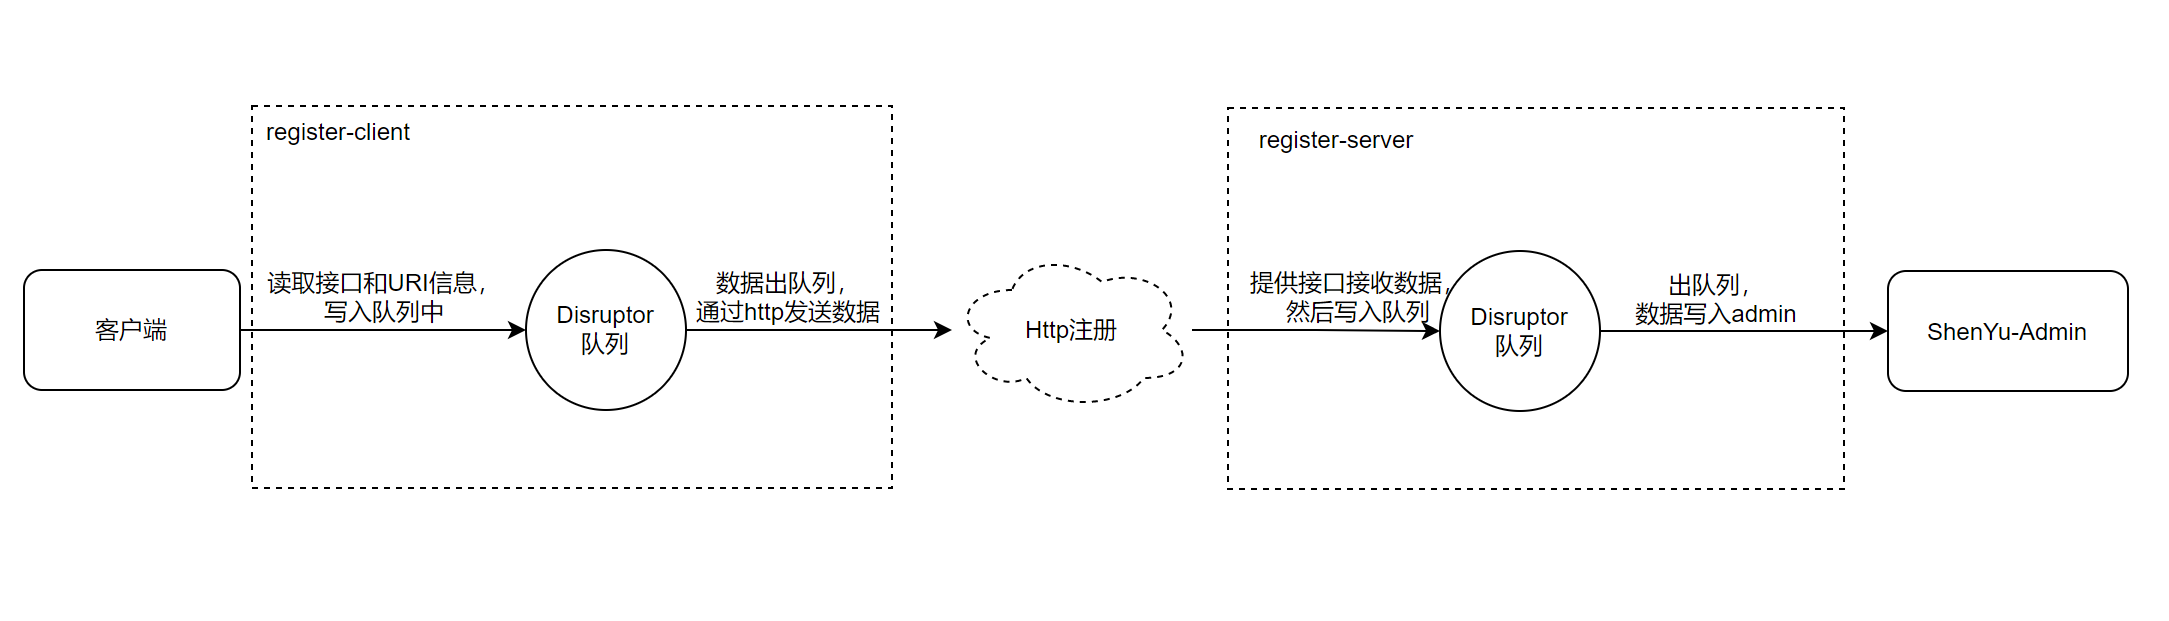
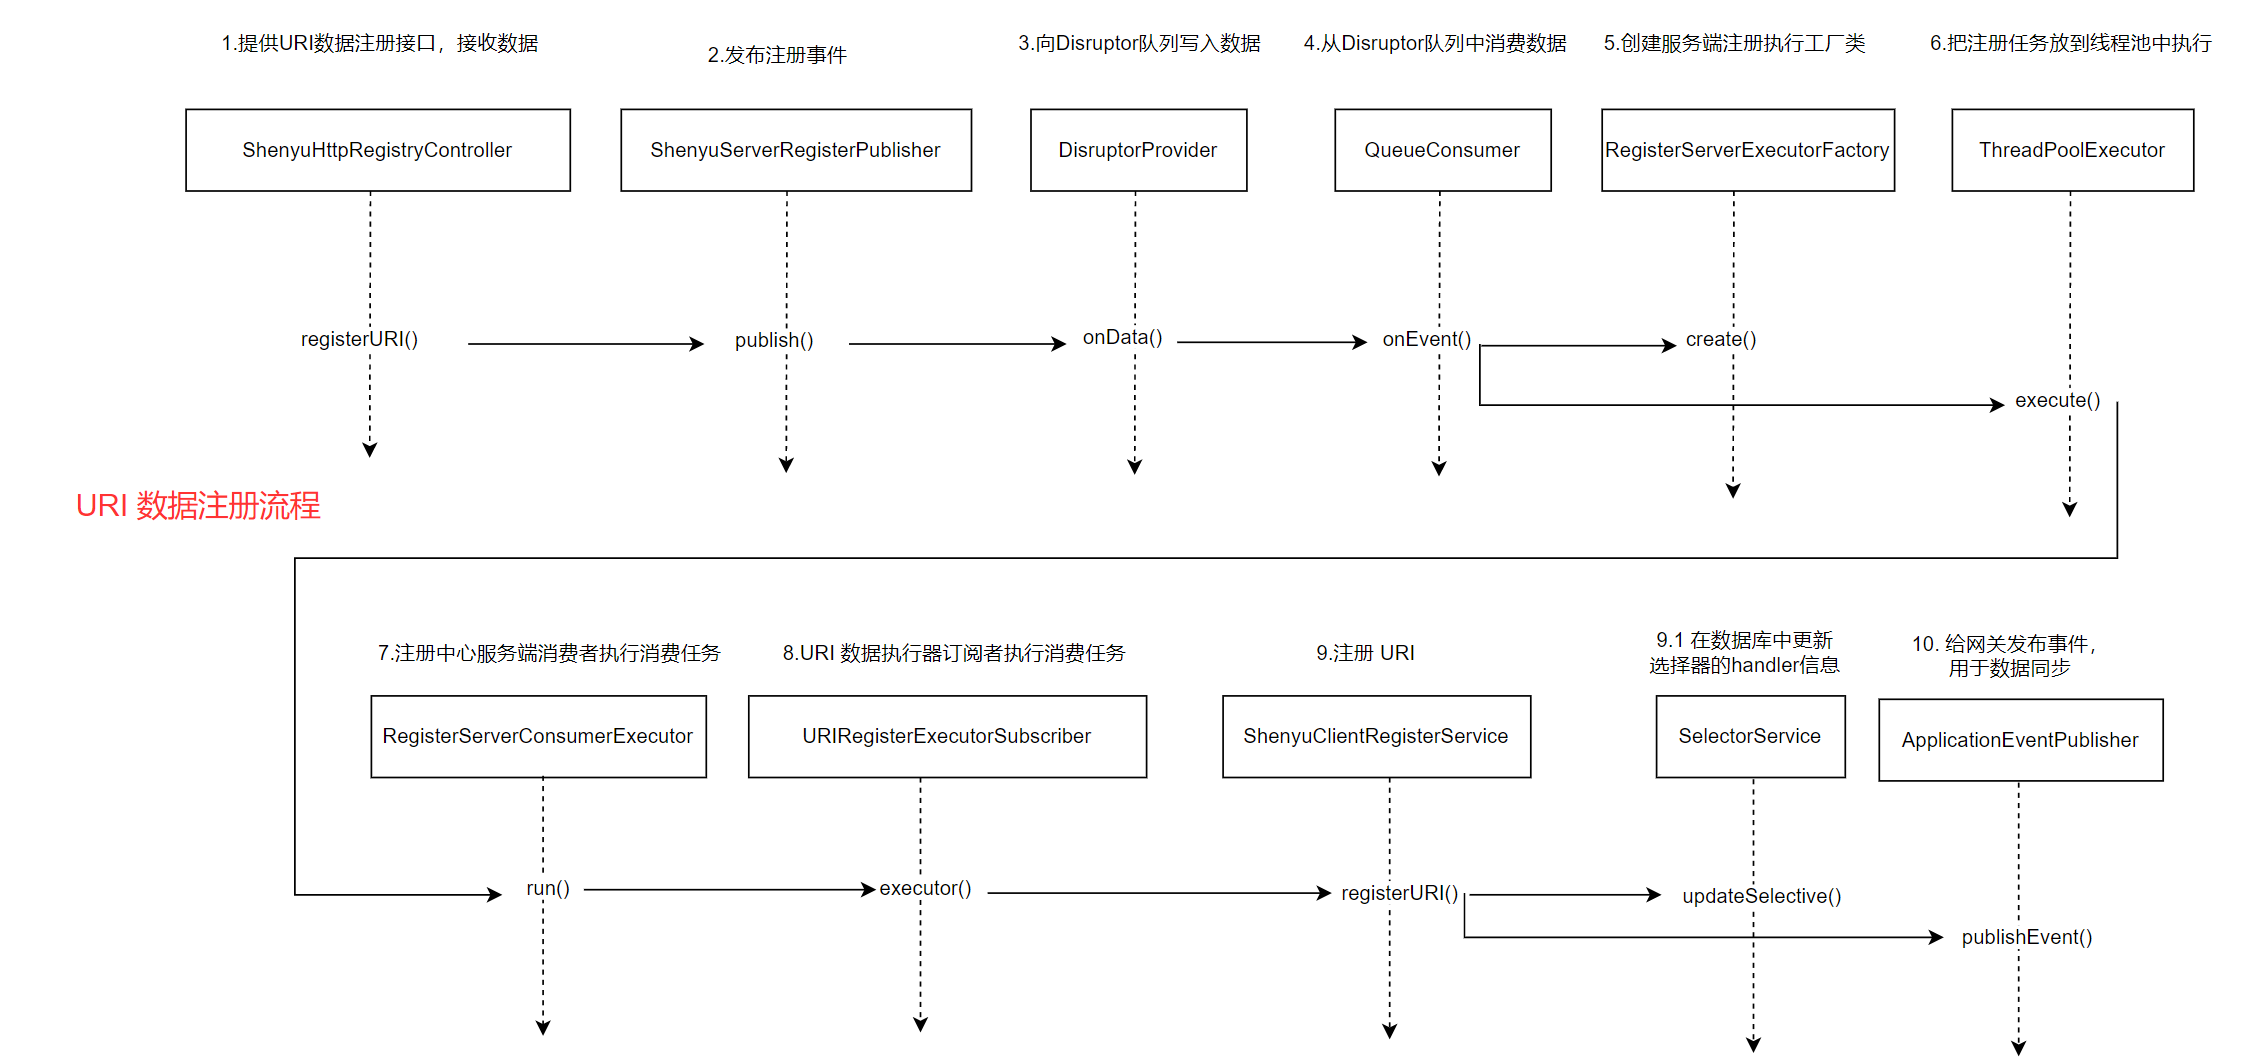
关于服务注册的源码分析就以及完成了,分析流程图如下:
接下来就分析divide插件是如何根据这些信息向http服务发起调用。
2. 服务调用
divide插件是网关用于处理 http协议请求的核心处理插件。
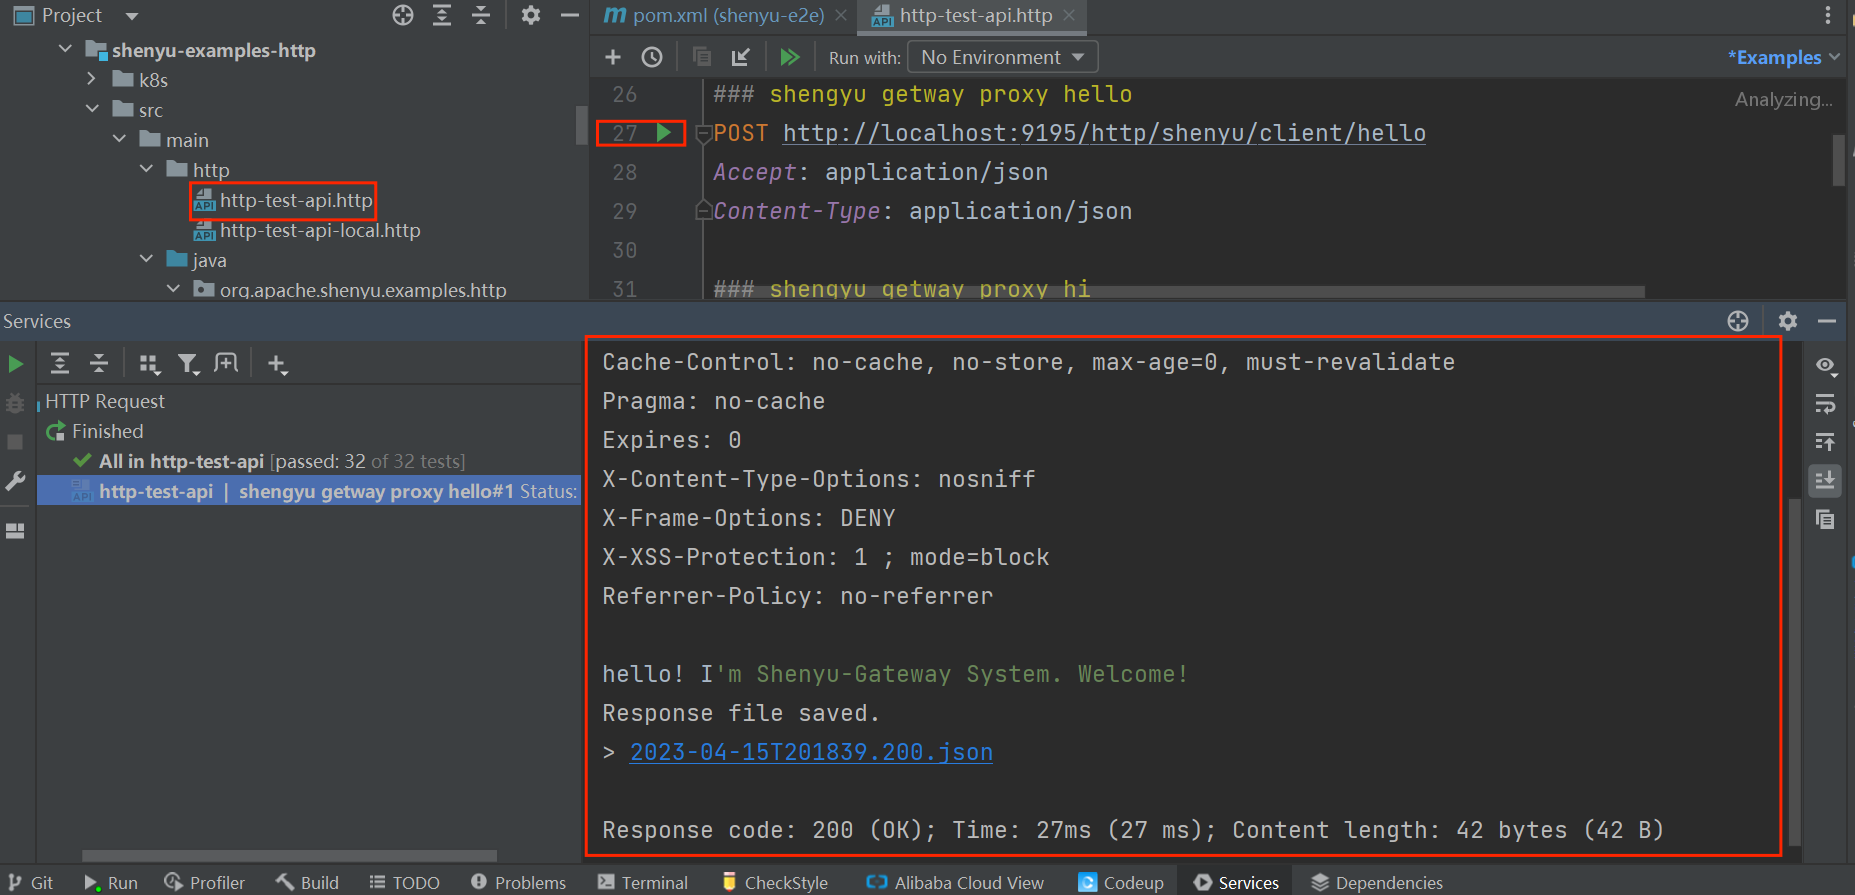
以官网提供的案例 Http快速开始 为例,一个直连请求如下:
GET http://localhost:8189/order/findById?id=100
Accept: application/json
通过ShenYu网关代理后,请求如下:
GET http://localhost:9195/http/order/findById?id=100
Accept: application/json
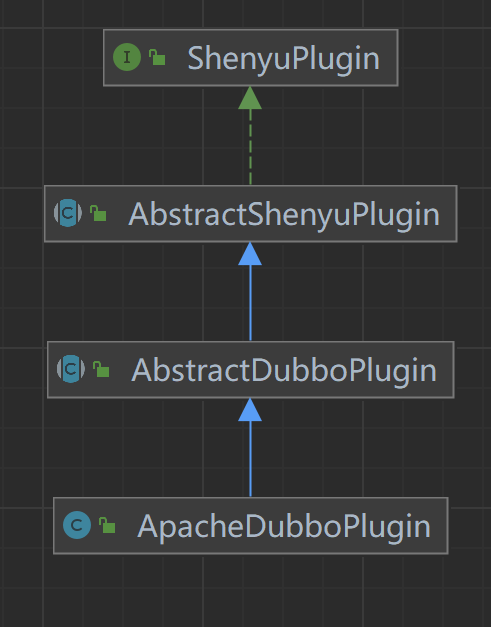
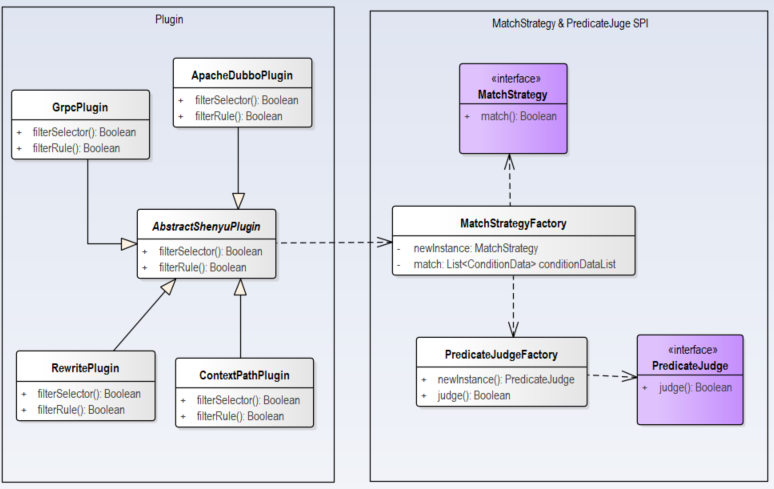
通过ShenYu网关代理后的服务仍然能够请求到之前的服务,在这里起作用的就是divide插件。类继承关系如下:

- ShenyuPlugin:顶层接口,定义接口方法;
- AbstractShenyuPlugin:抽象类,实现插件共有逻辑;
- DividePlugin:Divide插件。
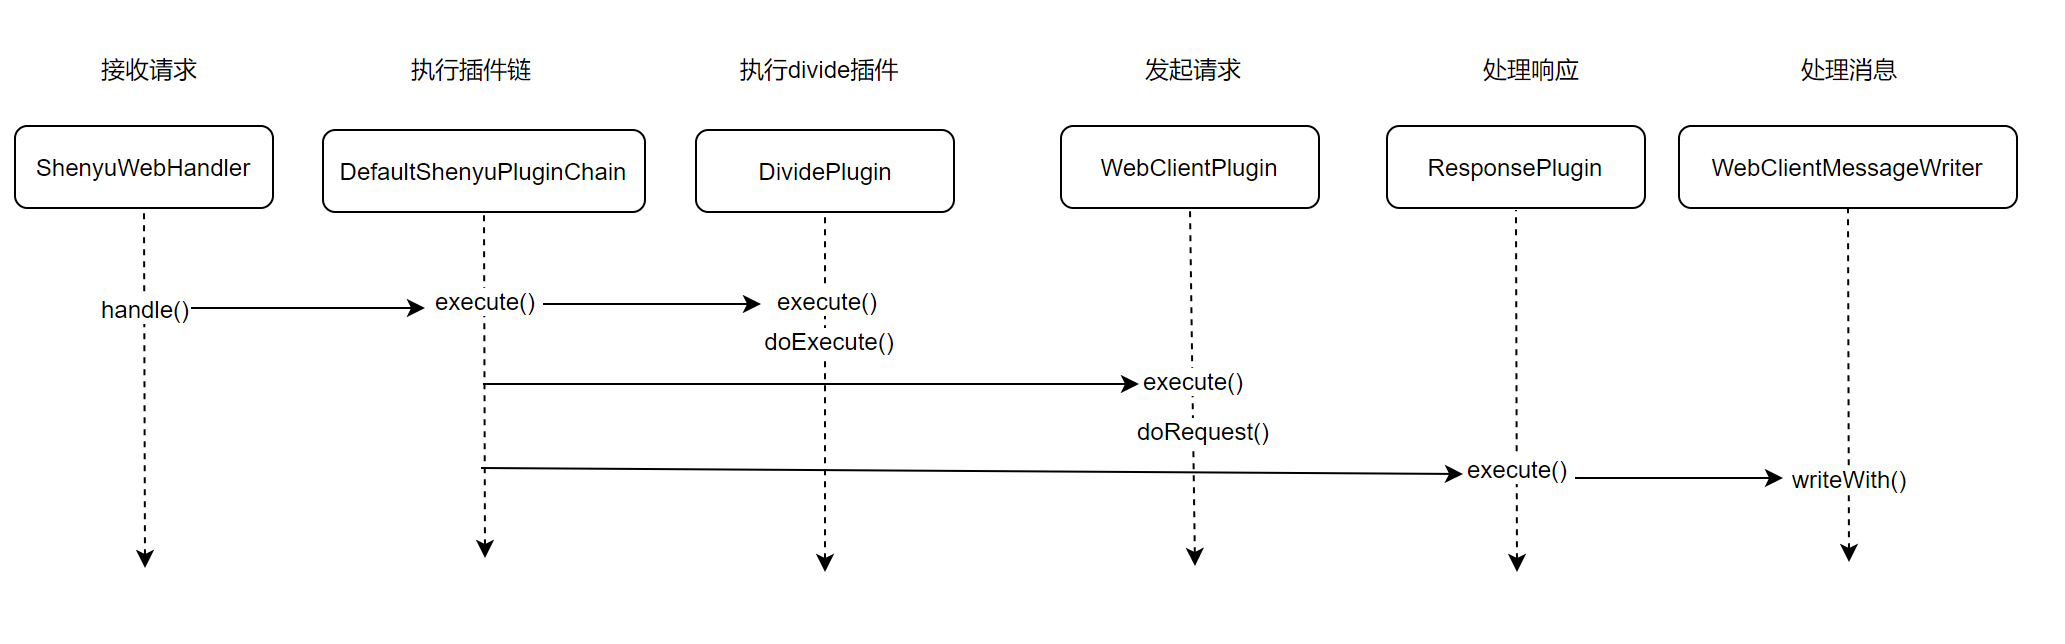
2.1 接收请求
通过ShenYu网关代理后,请求入口是ShenyuWebHandler,它实现了org.springframework.web.server.WebHandler接口。
public final class ShenyuWebHandler implements WebHandler, ApplicationListener<SortPluginEvent> {
//......
/**
* 处理web请求
*/
@Override
public Mono<Void> handle(@NonNull final ServerWebExchange exchange) {
// 执行默��认插件链
Mono<Void> execute = new DefaultShenyuPluginChain(plugins).execute(exchange);
if (scheduled) {
return execute.subscribeOn(scheduler);
}
return execute;
}
private static class DefaultShenyuPluginChain implements ShenyuPluginChain {
private int index;
private final List<ShenyuPlugin> plugins;
/**
* 实例化默认插件链
*/
DefaultShenyuPluginChain(final List<ShenyuPlugin> plugins) {
this.plugins = plugins;
}
/**
* 执行每个插件.
*/
@Override
public Mono<Void> execute(final ServerWebExchange exchange) {
return Mono.defer(() -> {
if (this.index < plugins.size()) {
// 获取当前执行插件
ShenyuPlugin plugin = plugins.get(this.index++);
// 是否跳过当前插件
boolean skip = plugin.skip(exchange);
if (skip) {
// 如果跳过就执行下一个
return this.execute(exchange);
}
// 执行当前插件
return plugin.execute(exchange, this);
}
return Mono.empty();
});
}
}
}
2.2 匹配规则
- org.apache.shenyu.plugin.base.AbstractShenyuPlugin#execute()
在execute()方法中执行选择器和规则的匹配逻辑。
- 匹配选择器;
- 匹配规则;
- 执行插件。
@Override
    public Mono<Void> execute(final ServerWebExchange exchange, final ShenyuPluginChain chain) {
        // 插件名称
        String pluginName = named();
        // 插件信息
        PluginData pluginData = BaseDataCache.getInstance().obtainPluginData(pluginName);
        if (pluginData != null && pluginData.getEnabled()) {
            // 选择器信息
            final Collection<SelectorData> selectors = BaseDataCache.getInstance().obtainSelectorData(pluginName);
            if (CollectionUtils.isEmpty(selectors)) {
                return handleSelectorIfNull(pluginName, exchange, chain);
            }
            // 匹配选择器
            SelectorData selectorData = matchSelector(exchange, selectors);
            if (Objects.isNull(selectorData)) {
                return handleSelectorIfNull(pluginName, exchange, chain);
            }
            selectorLog(selectorData, pluginName);
            // 规则信息
            List<RuleData> rules = BaseDataCache.getInstance().obtainRuleData(selectorData.getId());
            if (CollectionUtils.isEmpty(rules)) {
                return handleRuleIfNull(pluginName, exchange, chain);
            }
            // 匹配规则
            RuleData rule;
            if (selectorData.getType() == SelectorTypeEnum.FULL_FLOW.getCode()) {
                //get last
                rule = rules.get(rules.size() - 1);
            } else {
                rule = matchRule(exchange, rules);
            }
            if (Objects.isNull(rule)) {
                return handleRuleIfNull(pluginName, exchange, chain);
            }
            ruleLog(rule, pluginName);
            // 执行插件
            return doExecute(exchange, chain, selectorData, rule);
        }
        return chain.execute(exchange);
    }
2.3 执行divide插件
- org.apache.shenyu.plugin.divide.DividePlugin#doExecute()
在doExecute()方法中执行divide插件的具体逻辑:
- 校验
header大小; - 校验
request大小; - 获取服务列表;
- 实现负载均衡;
- 设置请求
url,超时时间,重试策略。
@Override
    protected Mono<Void> doExecute(final ServerWebExchange exchange, final ShenyuPluginChain chain, final SelectorData selector, final RuleData rule) {
        // 获取上下文信息
        ShenyuContext shenyuContext = exchange.getAttribute(Constants.CONTEXT);
        assert shenyuContext != null;
        // 获取规则的handle属性
        DivideRuleHandle ruleHandle = DividePluginDataHandler.CACHED_HANDLE.get().obtainHandle(CacheKeyUtils.INST.getKey(rule));
        long headerSize = 0;
        // 校验header大小
        for (List<String> multiHeader : exchange.getRequest().getHeaders().values()) {
            for (String value : multiHeader) {
                headerSize += value.getBytes(StandardCharsets.UTF_8).length;
            }
        }
        if (headerSize > ruleHandle.getHeaderMaxSize()) {
            LOG.error("request header is too large");
            Object error = ShenyuResultWrap.error(exchange, ShenyuResultEnum.REQUEST_HEADER_TOO_LARGE, null);
            return WebFluxResultUtils.result(exchange, error);
        }

        // 校验request大小
        if (exchange.getRequest().getHeaders().getContentLength() > ruleHandle.getRequestMaxSize()) {
            LOG.error("request entity is too large");
            Object error = ShenyuResultWrap.error(exchange, ShenyuResultEnum.REQUEST_ENTITY_TOO_LARGE, null);
            return WebFluxResultUtils.result(exchange, error);
        }
        // 获取服务列表upstreamList
        List<Upstream> upstreamList = UpstreamCacheManager.getInstance().findUpstreamListBySelectorId(selector.getId());
        if (CollectionUtils.isEmpty(upstreamList)) {
            LOG.error("divide upstream configuration error: {}", rule);
            Object error = ShenyuResultWrap.error(exchange, ShenyuResultEnum.CANNOT_FIND_HEALTHY_UPSTREAM_URL, null);
            return WebFluxResultUtils.result(exchange, error);
        }
        // 请求ip
        String ip = Objects.requireNonNull(exchange.getRequest().getRemoteAddress()).getAddress().getHostAddress();
        // 实现负载均衡
        Upstream upstream = LoadBalancerFactory.selector(upstreamList, ruleHandle.getLoadBalance(), ip);
        if (Objects.isNull(upstream)) {
            LOG.error("divide has no upstream");
            Object error = ShenyuResultWrap.error(exchange, ShenyuResultEnum.CANNOT_FIND_HEALTHY_UPSTREAM_URL, null);
            return WebFluxResultUtils.result(exchange, error);
        }
        // 设置url
        String domain = upstream.buildDomain();
        exchange.getAttributes().put(Constants.HTTP_DOMAIN, domain);
        // 设置超时时间
        exchange.getAttributes().put(Constants.HTTP_TIME_OUT, ruleHandle.getTimeout());
        exchange.getAttributes().put(Constants.HTTP_RETRY, ruleHandle.getRetry());
        // 设置重试策略
        exchange.getAttributes().put(Constants.RETRY_STRATEGY, ruleHandle.getRetryStrategy());
        exchange.getAttributes().put(Constants.LOAD_BALANCE, ruleHandle.getLoadBalance());
        exchange.getAttributes().put(Constants.DIVIDE_SELECTOR_ID, selector.getId());
        return chain.execute(exchange);
    }
2.4 发起请求
默认由WebClientPlugin向http服务发起调用请求,类继承关系如下:
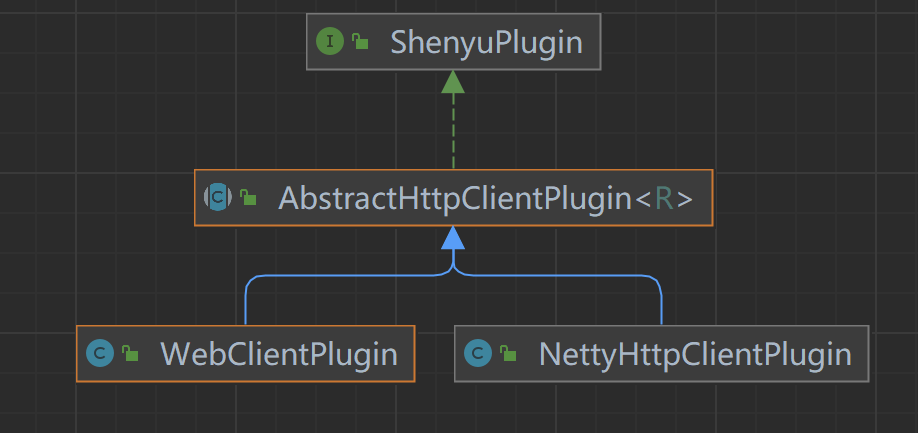
- ShenyuPlugin:顶层插件,定义插件方法;
- AbstractHttpClientPlugin:抽象类,实现请求调用的公共逻辑;
- WebClientPlugin:通过
WebClient发起请求; - NettyHttpClientPlugin:通过
Netty发起请求。
发起请求调用:
- org.apache.shenyu.plugin.httpclient.AbstractHttpClientPlugin#execute()
在execute()方法中发起请求调用:
- 获取指定的超时时间,重试次数
- 发起请求
- 根据指定的重试策略进行失败后重试操作
public abstract class AbstractHttpClientPlugin<R> implements ShenyuPlugin {

    protected static final Logger LOG = LoggerFactory.getLogger(AbstractHttpClientPlugin.class);

    @Override
    public final Mono<Void> execute(final ServerWebExchange exchange, final ShenyuPluginChain chain) {
        // 获取上下文信息
        final ShenyuContext shenyuContext = exchange.getAttribute(Constants.CONTEXT);
        assert shenyuContext != null;
        // 获取uri
        final URI uri = exchange.getAttribute(Constants.HTTP_URI);
        if (Objects.isNull(uri)) {
            Object error = ShenyuResultWrap.error(exchange, ShenyuResultEnum.CANNOT_FIND_URL, null);
            return WebFluxResultUtils.result(exchange, error);
        }
        // 获取指定的超时时间
        final long timeout = (long) Optional.ofNullable(exchange.getAttribute(Constants.HTTP_TIME_OUT)).orElse(3000L);
        final Duration duration = Duration.ofMillis(timeout);
        // 获取指定重试次数
        final int retryTimes = (int) Optional.ofNullable(exchange.getAttribute(Constants.HTTP_RETRY)).orElse(0);
        // 获取指定的重试策略
        final String retryStrategy = (String) Optional.ofNullable(exchange.getAttribute(Constants.RETRY_STRATEGY)).orElseGet(RetryEnum.CURRENT::getName);
        LOG.info("The request urlPath is {}, retryTimes is {}, retryStrategy is {}", uri.toASCIIString(), retryTimes, retryStrategy);
        // 构建header
        final HttpHeaders httpHeaders = buildHttpHeaders(exchange);
        // 发起请求
        final Mono<R> response = doRequest(exchange, exchange.getRequest().getMethodValue(), uri, httpHeaders, exchange.getRequest().getBody())
                .timeout(duration, Mono.error(new TimeoutException("Response took longer than timeout: " + duration)))
                .doOnError(e -> LOG.error(e.getMessage(), e));

        // 重试策略CURRENT,对当前服务进行重试
        if (RetryEnum.CURRENT.getName().equals(retryStrategy)) {
            //old version of DividePlugin and SpringCloudPlugin will run on this
            return response.retryWhen(Retry.anyOf(TimeoutException.class, ConnectTimeoutException.class, ReadTimeoutException.class, IllegalStateException.class)
                    .retryMax(retryTimes)
                    .backoff(Backoff.exponential(Duration.ofMillis(200), Duration.ofSeconds(20), 2, true)))
                    .onErrorMap(TimeoutException.class, th -> new ResponseStatusException(HttpStatus.GATEWAY_TIMEOUT, th.getMessage(), th))
                    .flatMap((Function<Object, Mono<? extends Void>>) o -> chain.execute(exchange));
        }

        // 对其他服务进行重试
        // 排除已经调用过的服务
        final Set<URI> exclude = Sets.newHashSet(uri);
        // 请求重试
        return resend(response, exchange, duration, httpHeaders, exclude, retryTimes)
                .onErrorMap(TimeoutException.class, th -> new ResponseStatusException(HttpStatus.GATEWAY_TIMEOUT, th.getMessage(), th))
                .flatMap((Function<Object, Mono<? extends Void>>) o -> chain.execute(exchange));
    }

    private Mono<R> resend(final Mono<R> clientResponse,
                           final ServerWebExchange exchange,
                           final Duration duration,
                           final HttpHeaders httpHeaders,
                           final Set<URI> exclude,
                           final int retryTimes) {
        Mono<R> result = clientResponse;
        // 根据指定的重试次数进行重试
        for (int i = 0; i < retryTimes; i++) {
            result = resend(result, exchange, duration, httpHeaders, exclude);
        }
        return result;
    }

    private Mono<R> resend(final Mono<R> response,
                           final ServerWebExchange exchange,
                           final Duration duration,
                           final HttpHeaders httpHeaders,
                           final Set<URI> exclude) {
        return response.onErrorResume(th -> {
            final String selectorId = exchange.getAttribute(Constants.DIVIDE_SELECTOR_ID);
            final String loadBalance = exchange.getAttribute(Constants.LOAD_BALANCE);
            //查询可用服务
            final List<Upstream> upstreamList = UpstreamCacheManager.getInstance().findUpstreamListBySelectorId(selectorId)
                    .stream().filter(data -> {
                        final String trimUri = data.getUrl().trim();
                        for (URI needToExclude : exclude) {
                            // exclude already called
                            if ((needToExclude.getHost() + ":" + needToExclude.getPort()).equals(trimUri)) {
                                return false;
                            }
                        }
                        return true;
                    }).collect(Collectors.toList());
            if (CollectionUtils.isEmpty(upstreamList)) {
                // no need to retry anymore
                return Mono.error(new ShenyuException(ShenyuResultEnum.CANNOT_FIND_HEALTHY_UPSTREAM_URL_AFTER_FAILOVER.getMsg()));
            }
            // 请求ip
            final String ip = Objects.requireNonNull(exchange.getRequest().getRemoteAddress()).getAddress().getHostAddress();
            // 实现负载均衡
            final Upstream upstream = LoadBalancerFactory.selector(upstreamList, loadBalance, ip);
            if (Objects.isNull(upstream)) {
                // no need to retry anymore
                return Mono.error(new ShenyuException(ShenyuResultEnum.CANNOT_FIND_HEALTHY_UPSTREAM_URL_AFTER_FAILOVER.getMsg()));
            }
            final URI newUri = RequestUrlUtils.buildRequestUri(exchange, upstream.buildDomain());
            // 排除已经调用的uri
            exclude.add(newUri);
             // 进行再次调用
            return doRequest(exchange, exchange.getRequest().getMethodValue(), newUri, httpHeaders, exchange.getRequest().getBody())
                    .timeout(duration, Mono.error(new TimeoutException("Response took longer than timeout: " + duration)))
                    .doOnError(e -> LOG.error(e.getMessage(), e));
        });
    }

    //......
}
- org.apache.shenyu.plugin.httpclient.WebClientPlugin#doRequest()
在doRequest()方法中通过webClient发起真正的请求调用。
@Override
    protected Mono<ClientResponse> doRequest(final ServerWebExchange exchange, final String httpMethod, final URI uri,
                                             final HttpHeaders httpHeaders, final Flux<DataBuffer> body) {
        return webClient.method(HttpMethod.valueOf(httpMethod)).uri(uri) //请求uri
                .headers(headers -> headers.addAll(httpHeaders)) // 请求header
                .body(BodyInserters.fromDataBuffers(body))
                .exchange() // 发起请求
                .doOnSuccess(res -> {
                    if (res.statusCode().is2xxSuccessful()) { // 成功
                        exchange.getAttributes().put(Constants.CLIENT_RESPONSE_RESULT_TYPE, ResultEnum.SUCCESS.getName());
                    } else { // 失败
                        exchange.getAttributes().put(Constants.CLIENT_RESPONSE_RESULT_TYPE, ResultEnum.ERROR.getName());
                    }
                    exchange.getResponse().setStatusCode(res.statusCode());
                    exchange.getAttributes().put(Constants.CLIENT_RESPONSE_ATTR, res);
                });
    }
2.5 处理响应结果
- org.apache.shenyu.plugin.response.ResponsePlugin#execute()
响应结果由ResponsePlugin插件处理。
    @Override
    public Mono<Void> execute(final ServerWebExchange exchange, final ShenyuPluginChain chain) {
        ShenyuContext shenyuContext = exchange.getAttribute(Constants.CONTEXT);
        assert shenyuContext != null;
        // 根据rpc类型处理结果
        return writerMap.get(shenyuContext.getRpcType()).writeWith(exchange, chain);
    }
处理类型由MessageWriter决定,类继承关系如下:

- MessageWriter:接口,定义消息处理方法;
- NettyClientMessageWriter:处理
Netty调用结果; - RPCMessageWriter:处理
RPC调用结果; - WebClientMessageWriter:处理
WebClient调用结果;
默认是通过WebCient发起http请求。
- org.apache.shenyu.plugin.response.strategy.WebClientMessageWriter#writeWith()
在writeWith()方法中处理响应结果。
    @Override
    public Mono<Void> writeWith(final ServerWebExchange exchange, final ShenyuPluginChain chain) {
        return chain.execute(exchange).then(Mono.defer(() -> {
            // 获取响应
            ServerHttpResponse response = exchange.getResponse();
            ClientResponse clientResponse = exchange.getAttribute(Constants.CLIENT_RESPONSE_ATTR);
            if (Objects.isNull(clientResponse)) {
                Object error = ShenyuResultWrap.error(exchange, ShenyuResultEnum.SERVICE_RESULT_ERROR, null);
                return WebFluxResultUtils.result(exchange, error);
            }
            //获取cookies和headers
            response.getCookies().putAll(clientResponse.cookies());
            response.getHeaders().putAll(clientResponse.headers().asHttpHeaders());
            // image, pdf or stream does not do format processing.
            // 处理特殊响应类型
            if (clientResponse.headers().contentType().isPresent()) {
                final String media = clientResponse.headers().contentType().get().toString().toLowerCase();
                if (media.matches(COMMON_BIN_MEDIA_TYPE_REGEX)) {
                    return response.writeWith(clientResponse.body(BodyExtractors.toDataBuffers()))
                            .doOnCancel(() -> clean(exchange));
                }
            }
            // 处理一般响应类型
            clientResponse = ResponseUtils.buildClientResponse(response, clientResponse.body(BodyExtractors.toDataBuffers()));
            return clientResponse.bodyToMono(byte[].class)
                    .flatMap(originData -> WebFluxResultUtils.result(exchange, originData))
                    .doOnCancel(() -> clean(exchange));
        }));
    }
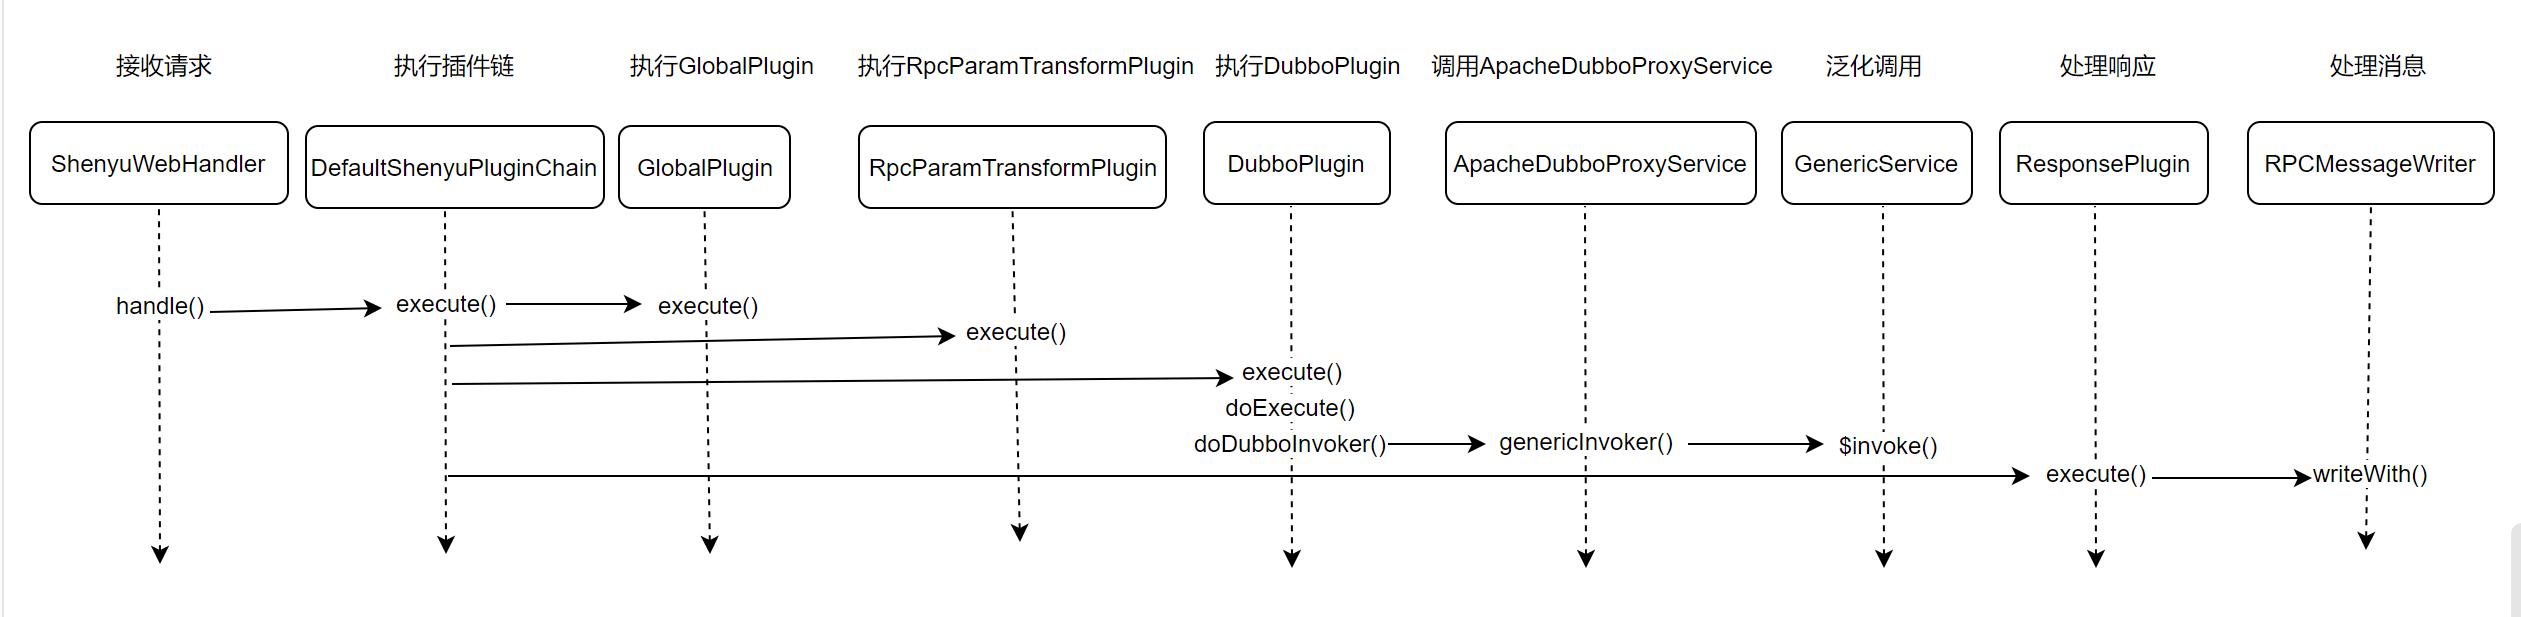
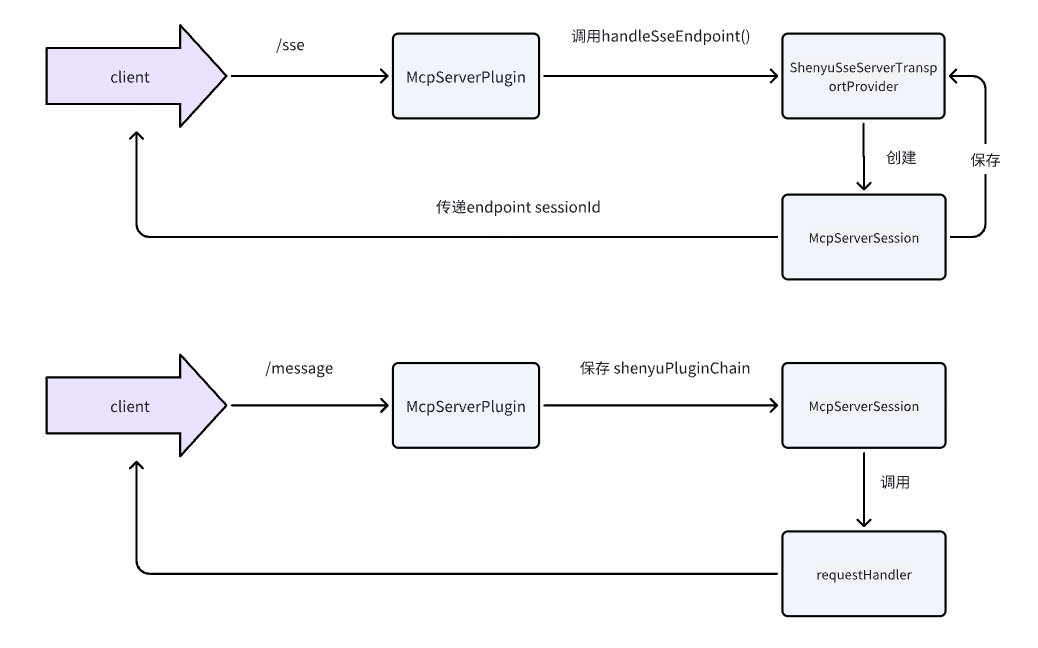
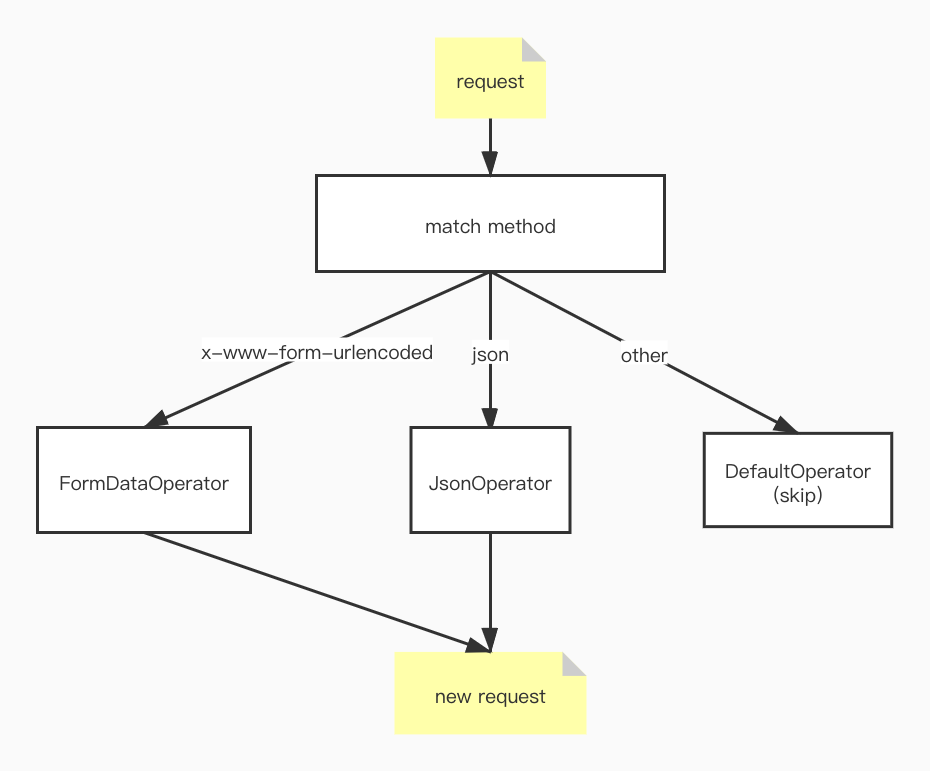
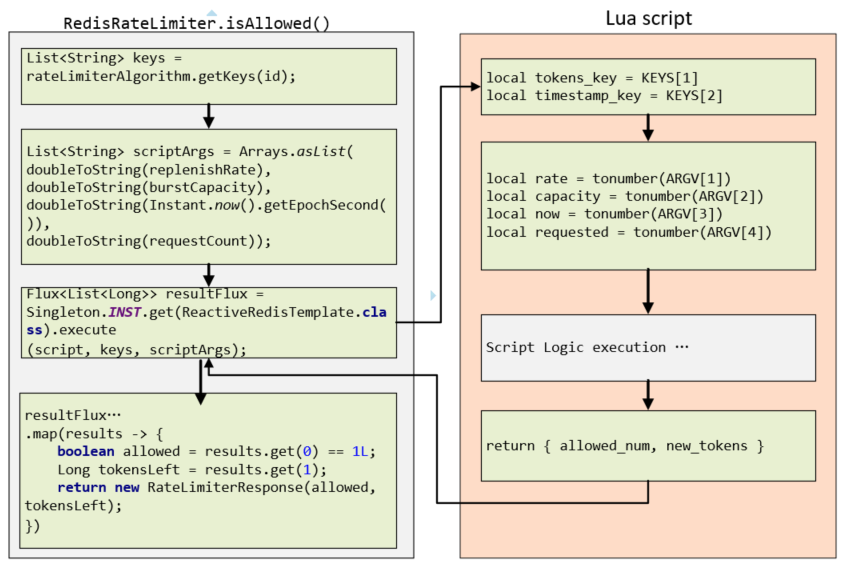
分析至此,关于Divide插件的源码分析就完成了,分析流程图如下:
3. 小结
本文源码分析从http服务注册开始,到divide插件的服务调用。divide插件主要用来处理http请求。有些源码没有进入深入分析,比如负载均衡的实现,服务探活,将在后续继续分析。