1. 概述
1.1 插件名称
- Websocket 插件
1.2 适用场景
- 转发场景,处理 websocket协议 请求,将其转发到后端其他 websocket 协议的服务
- 服务负载均衡
1.3 插件功能
- 支持根据 host、uri、query 等请求信息做流量的治理
- 支持设置请求的负载均衡策略,同时支持服务预热,目前支持三种策略:ip hash(带虚拟节点的一致性哈希)、round-robbin(加权轮询)、random(加权随机)
- 支持设置接口级别请求超时时间
- 支持设置超时重试次数
1.4 插件代码
- 核心模块
shenyu-plugin-websocket - 核心类
org.apache.shenyu.plugin.websocket.WebSocketPlugin
1.5 添加自哪个shenyu版本
- 2.4.3
2. 如何使用插件
2.1 插件使用流程图
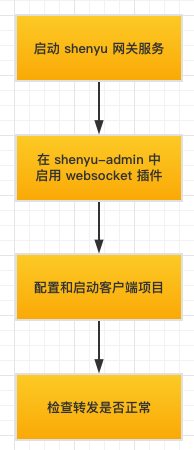
名词解释
- shenyu 网关:包含 shenyu-admin 和 shenyu-bootstrap 服务。
- 客户端项目:后端真实 websocket 服务
流程解释
- 启动 shenyu 网关服务:参照运维部署,启动 shenyu-admin 和 shenyu-bootstrap,确保 shenyu 网关服务正常
- 在 shenyu-admin 中启用 websocket 插件:在 shenyu-admin 插件管理的页面中开启 websocket 插件
- 配置和启动客户端项目:启动客户端项目(后端真实 websocket 服务),并将服务信息配置到 shenyu 网关中,分为手动配置和自动配置两种方式
- 检查转发是否正常:检查转发能否成功
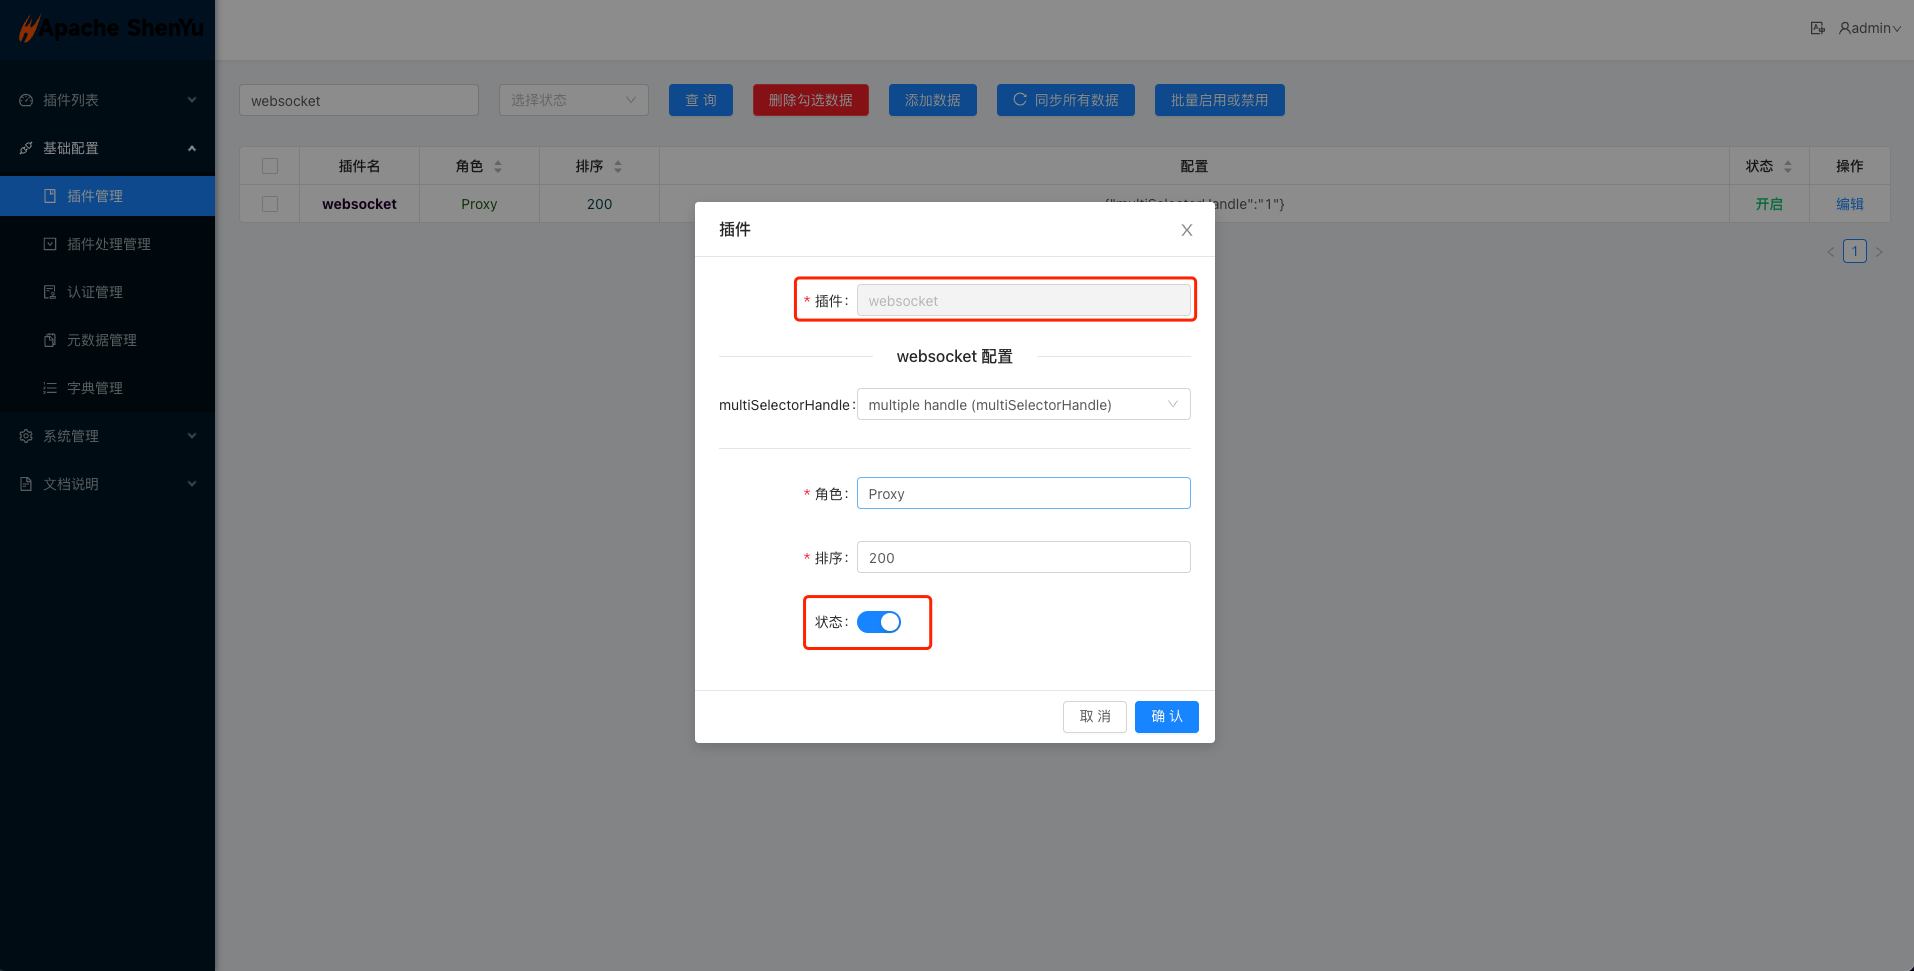
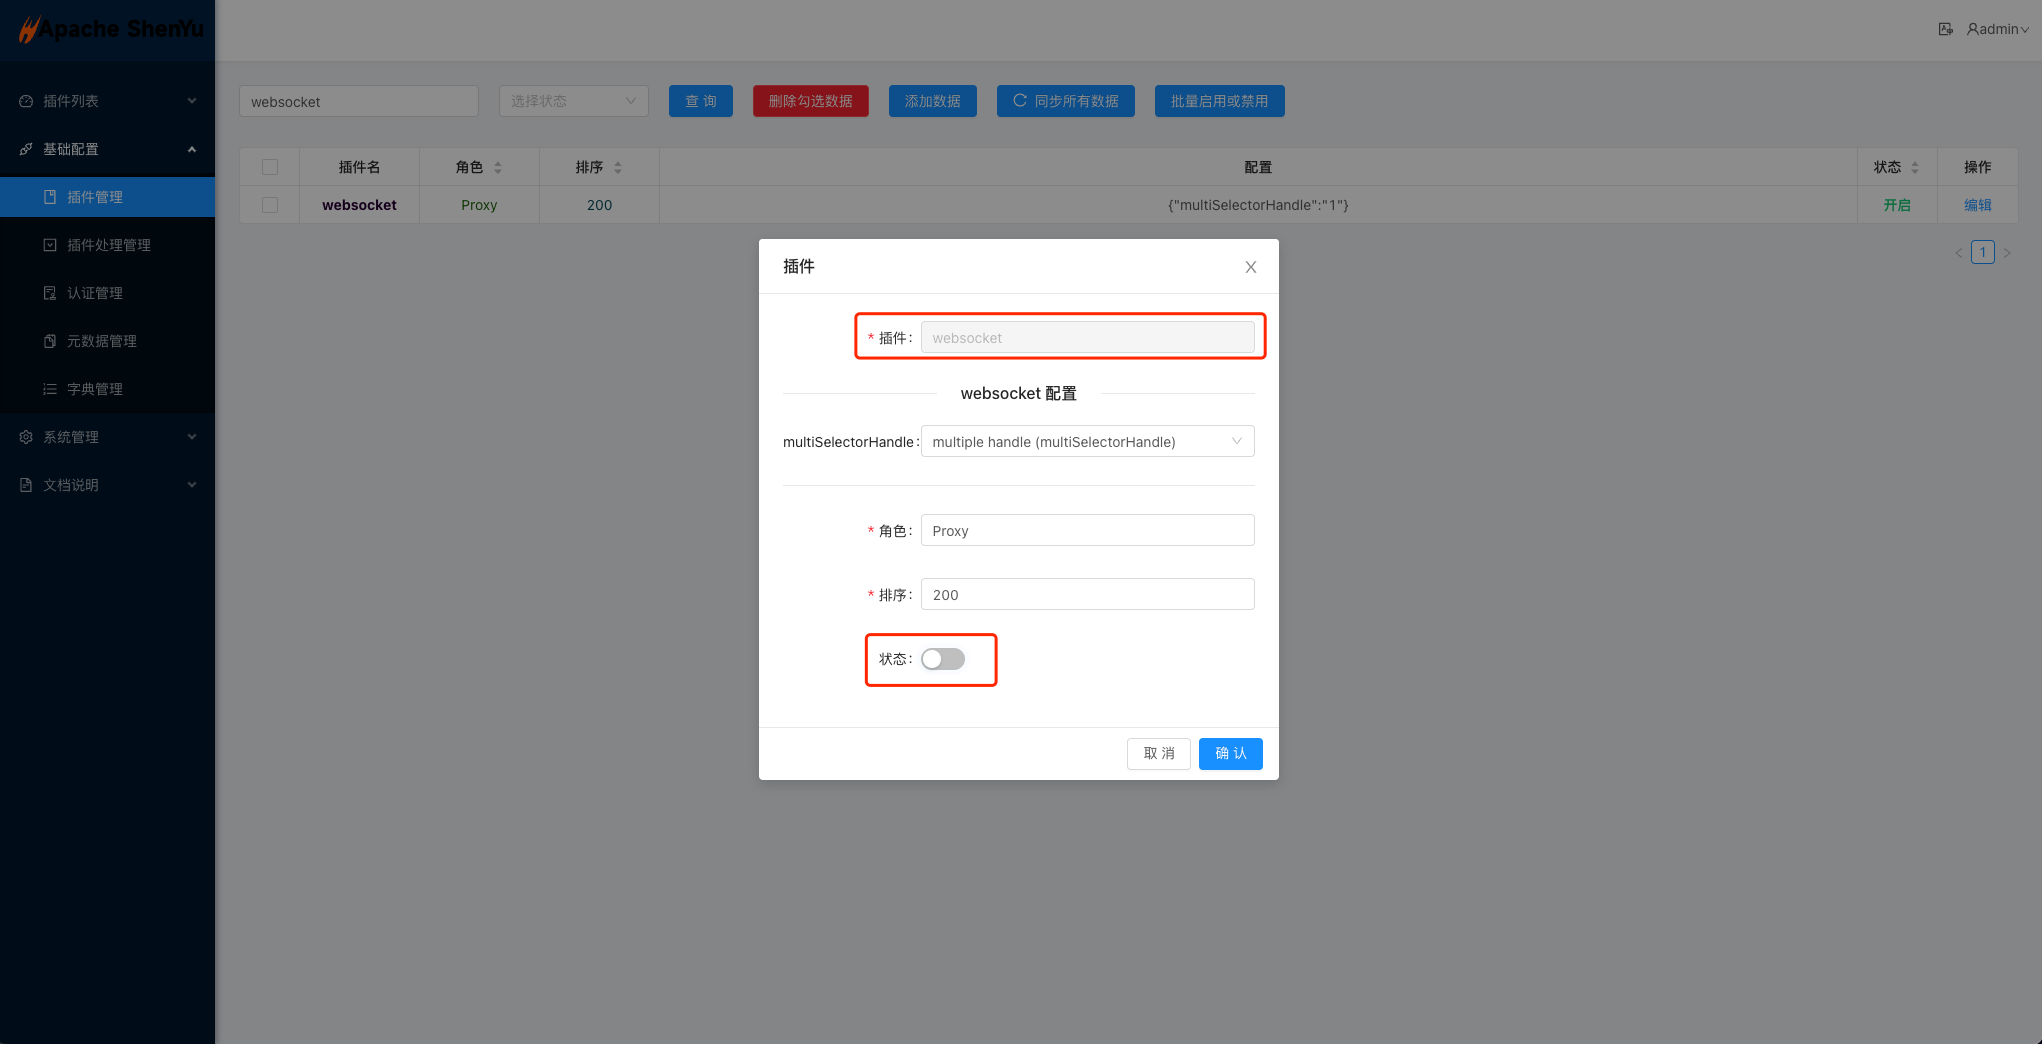
2.2 启用插件
- 在 shenyu-admin --> 基础配置 --> 插件管理 --> websocket 设置为开启。
2.3 配置客户端服务
2.3.1 手动配置
在 shenyu-admin 页面上手��动配置客户端服务,后端服务不需要任何改动,即可实现 websocket 协议转发
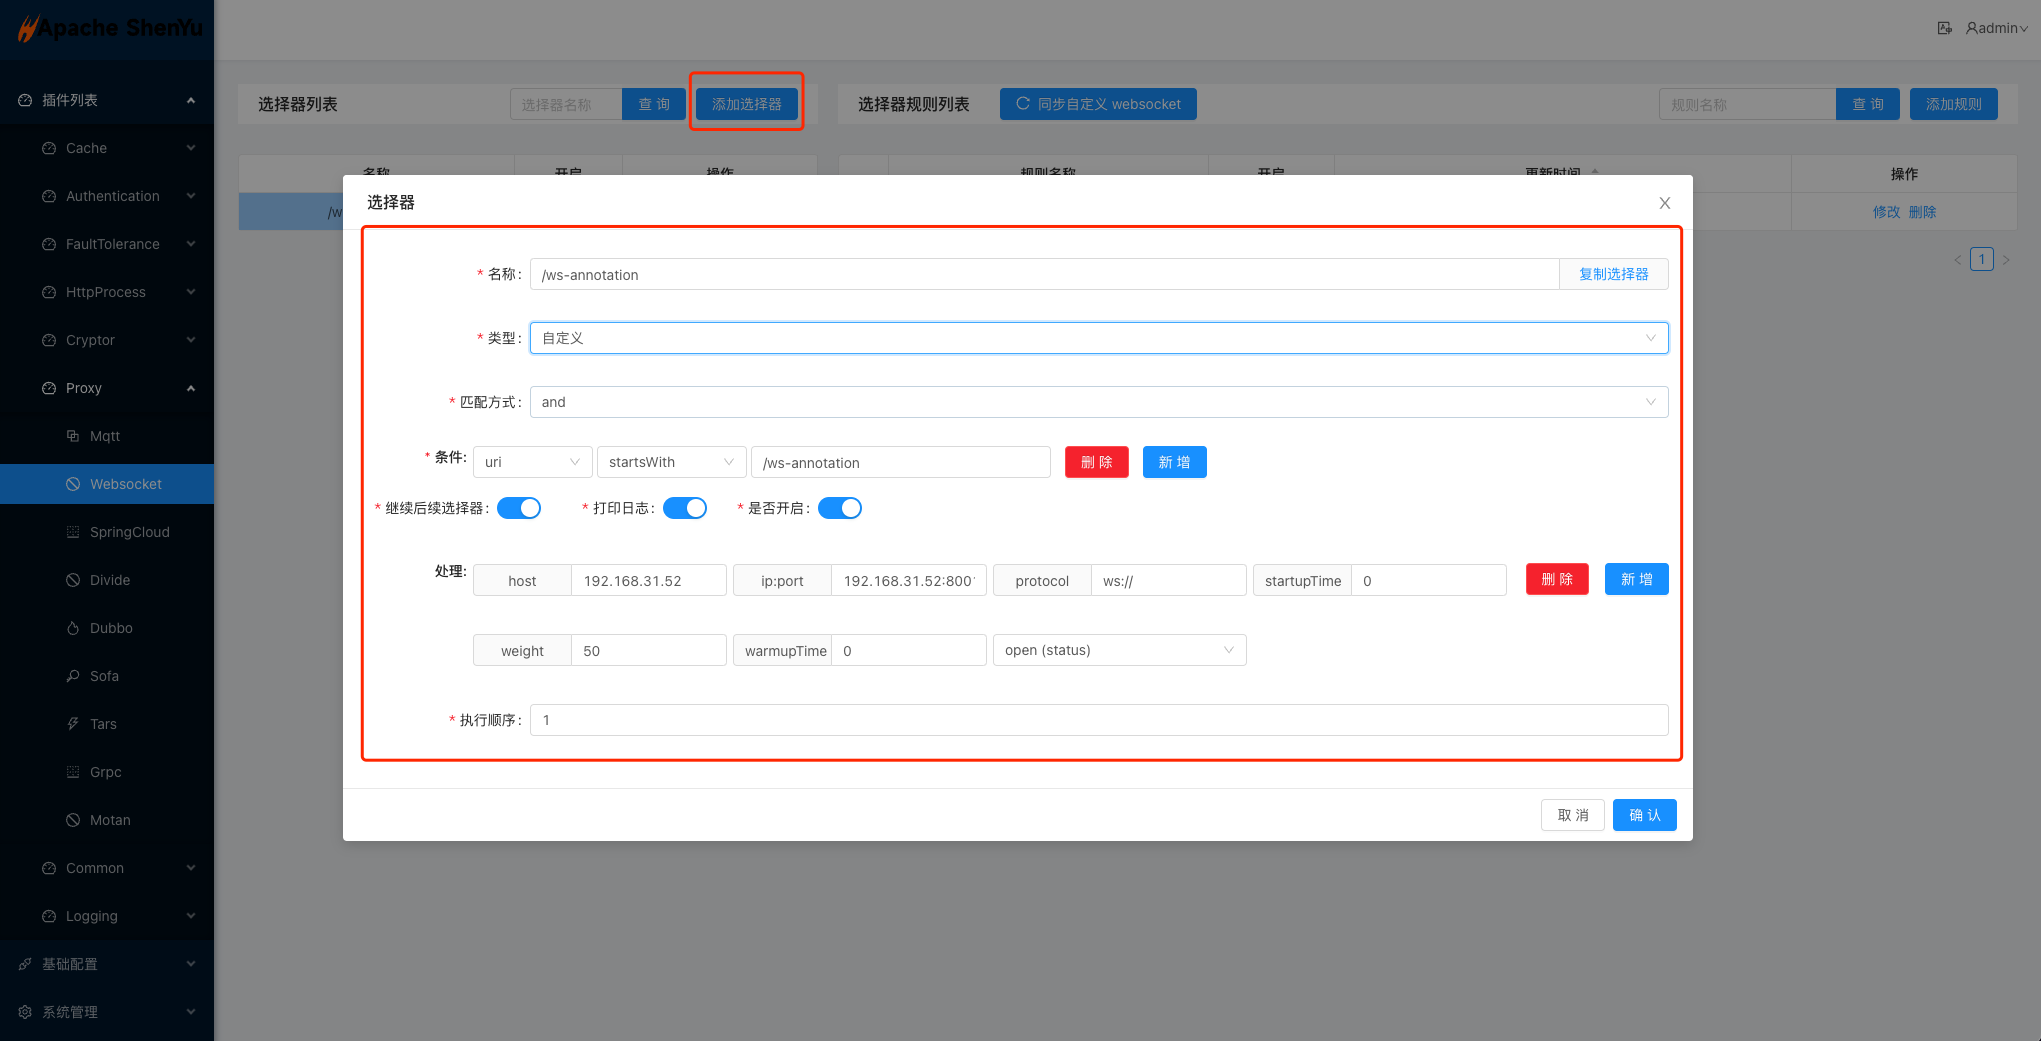
- Websocket 插件中添加选择器
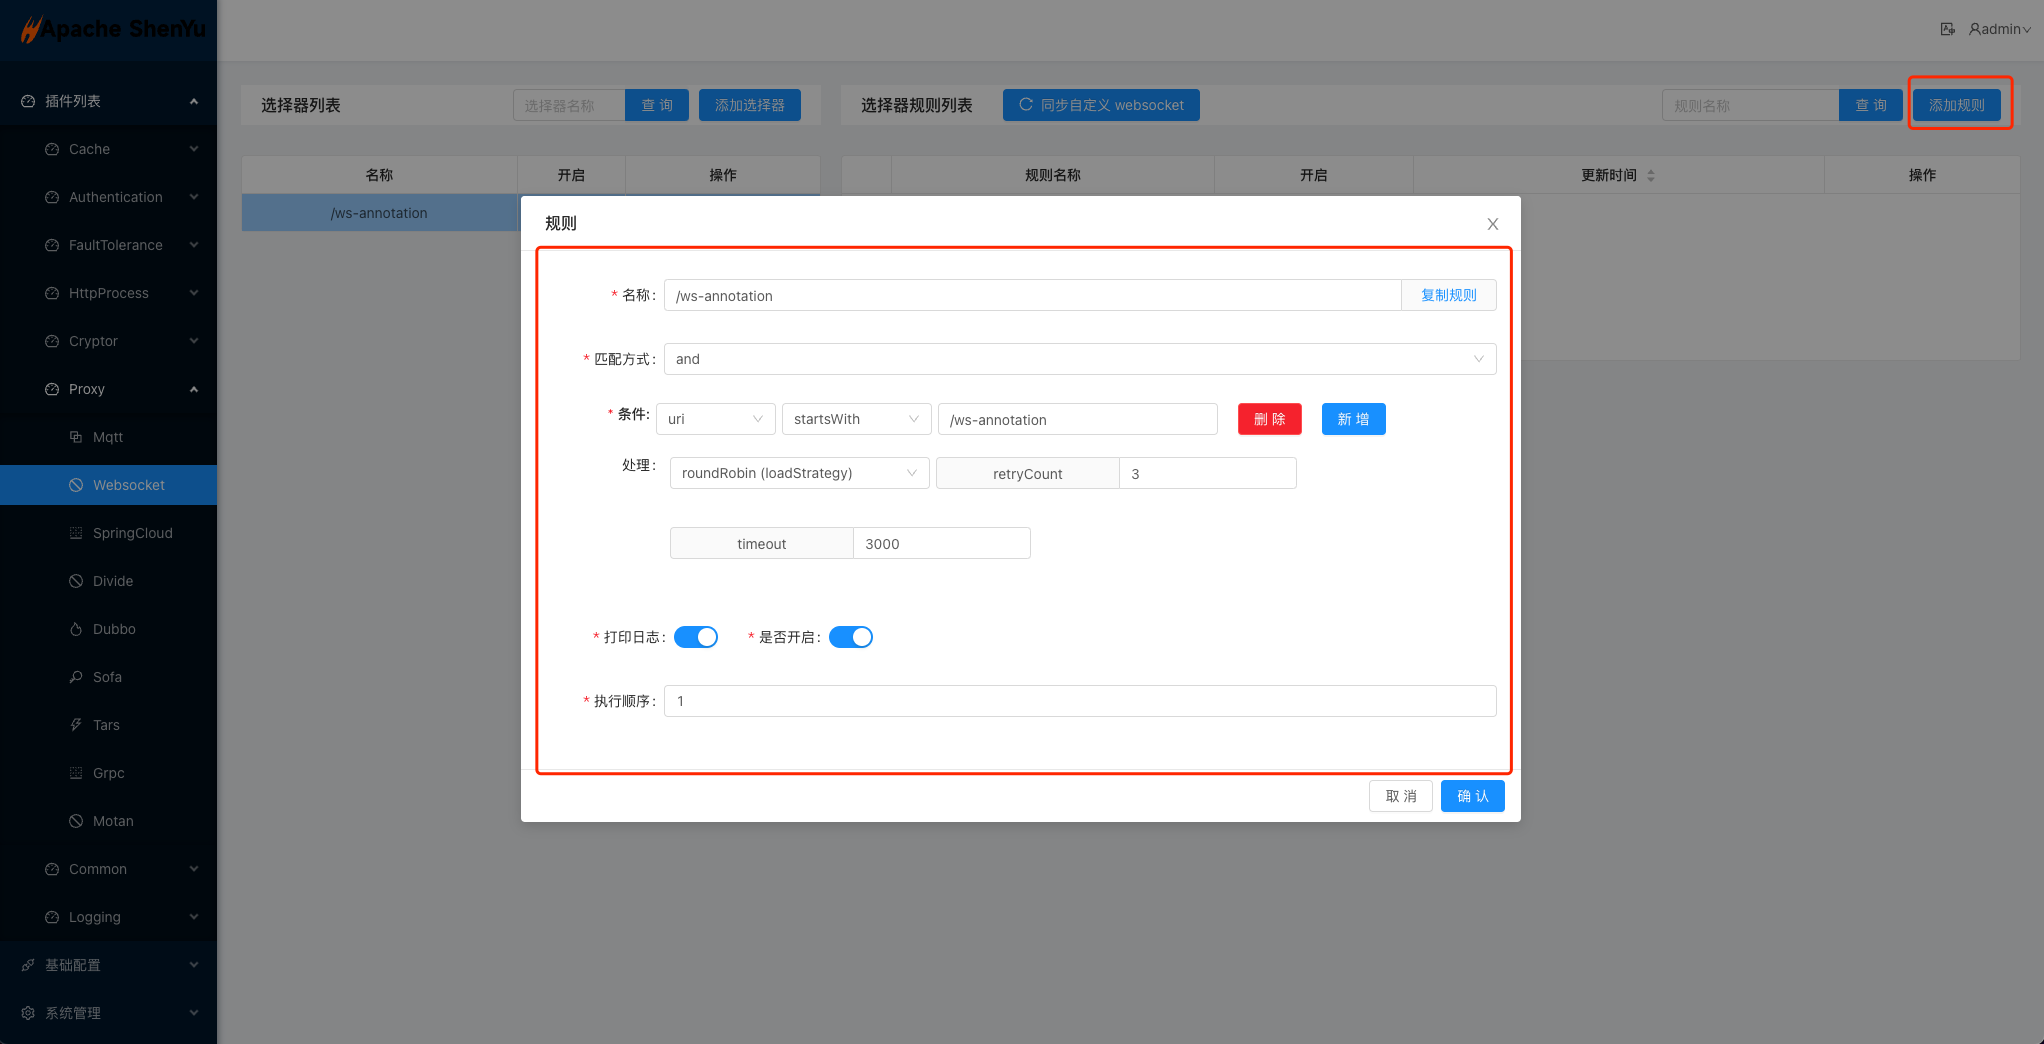
- Websocket 插件中添加规则
-
启动客户端项目(后端 websocket 服务)
-
测试服务转发是否成功
- 测试代码见附件5.1
2.3.2 自动配置
如果某些场景你需要通过自动配置来减少工作量,可以在后端服务中增加注解,实现自动配置服务到 shenyu 网关中
- 在后端服务项目中的 pom.xml 文件中添加插件 maven 配置。
  <dependency>
      <groupId>org.apache.shenyu</groupId>
  		<artifactId>shenyu-spring-boot-starter-plugin-websocket</artifactId>
      <version>${project.version}</version>
  </dependency>
- 使用
@ShenyuSpringWebSocketClient注解,该注解会将 websocket 服务自动注册到 shenyu 网关 - 调整插件配置,配置参数详情见 2.4.1
- 启动客户端项目(后端 websocket 服务),示例代码见 2.5 示例
- 检查 shenyu-admin 页面中插件列表服务注册信息是否注册成功
- 测试服务转发是否成功
- 测试代码见附件5.1
2.4 配置插件
2.4.1 在客户端项目中配置文件中配置接入参数
- 客户端接入方式和服务器地址,参数为:
shenyu.register.*,下面的示例使用了 http 接入方式,目前客户端支持的接入的方式有以下几种:http、zookeeper、etcd、nacos、consul,详细的接入配置参数请参考客户端接入配置。 - 客户端配置,参数为:
shenyu.client.websocket.*,包含服务的名称、路由地址以及端口,必须配置 contextPath 的值作为每个服务的路由地址。
shenyu:
  register:
    registerType: http
    serverLists: http://localhost:9095
    props:
      username: admin
      password: 123456
  client:
    websocket:
      props:
        contextPath: /ws-annotation
        appName: ws-annotation
        port: 8001 # 需要和服务端口保持一致
2.4.2 在 shenyu-admin 配置 websocket 插件的选择器和规则信息
使用自动配置的方式,在客户端启动之后会在 shenyu-admin -> 插件列表 -> Proxy -> Websocket 自动注册选择器和规则信息。
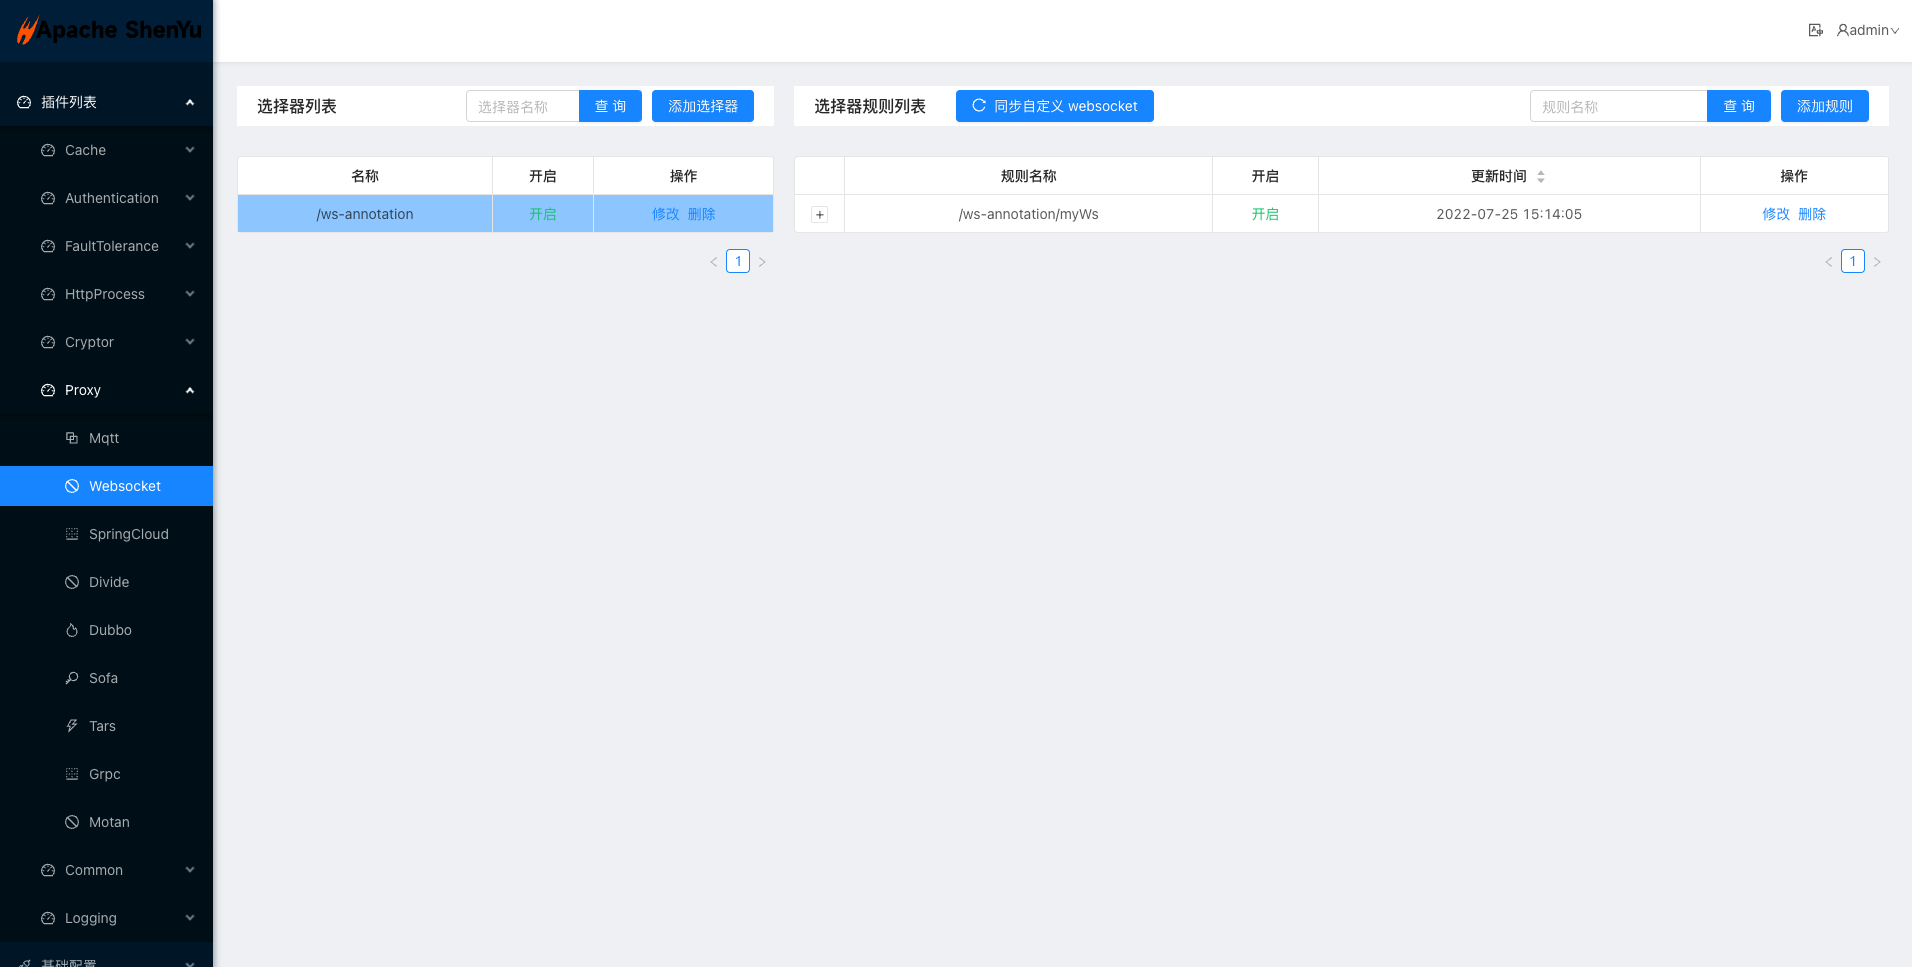
2.4.2.1 选择器的配置
Websocket 选择器示例,通用选择器配置请参考选择器和规则。
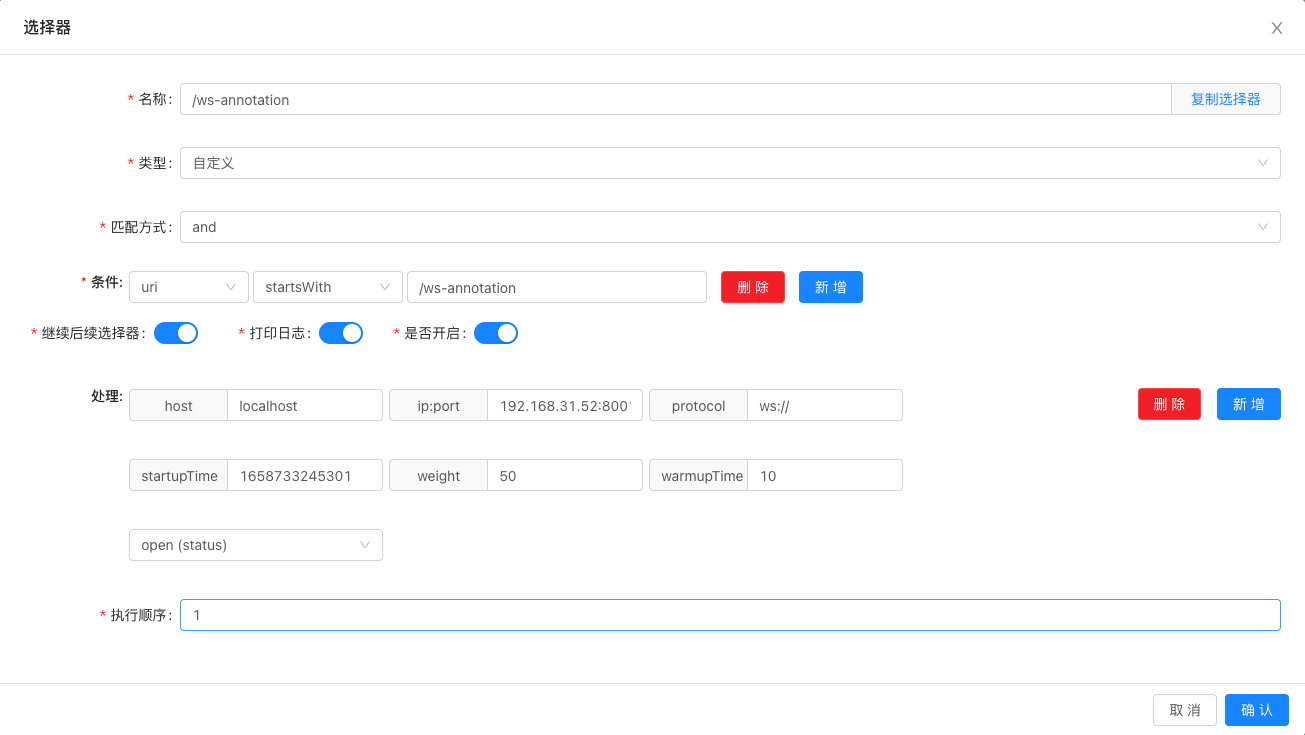
2.4.2.1.1 选择器处理信息配置
host:填写localhost,该字段暂时没使用。ip:port:ip与端口,这里填写你真实服务的ip+ 端口。protocol::ws协议,不填写默认为:ws://startupTime: 启动时间,单位毫秒。weight:负载均衡权重,服务启动自动注册的默认值为 50。warmupTime:预热时间,单位毫秒,在预热中的服务器会计算瞬时权重,计算值会小于实际配置的权重,以保护刚启动的服务器,服务启动注册的默认值为 10。举个例子预热时间 100 毫秒,目前启动了 50 毫秒,配置的权重 50, 实际的权重是 25。status:开启或关闭,开始状态此处理器才有效。
2.4.2.2 规则的配置
Websocket 规则示例,通用规则配置请参考选择器和规则。
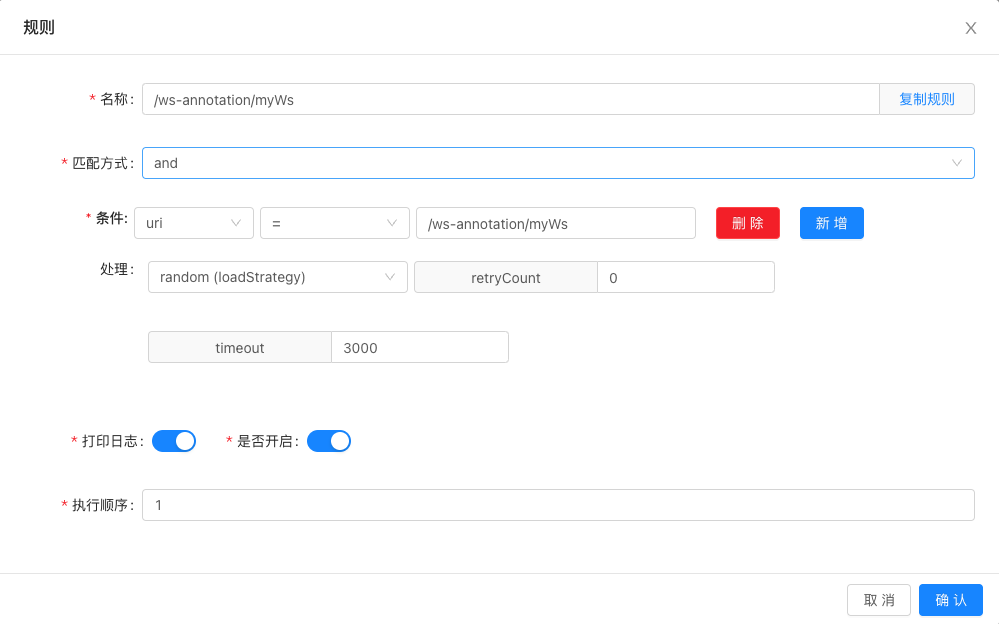
2.4.2.2.1 规则处理信息配置
loadStrategy:如果 websocket 客户端是一个集群,Apache ShenYu 网关调用时采取哪种负载均衡策略,当前支持 roundRobin、random 和 hash。timeout:调用客户端的超时时间。retryCount:调用客户端超时失败的重试次数。
2.5 示例
2.5.1 Spring Annotation Websocket使用示例
shenyu-example-spring-annotation-websocket
2.5.2 Spring Native Websocket 使用示例
shenyu-example-spring-native-websocket
2.5.3 Spring Reactive Websocket 使用示例
shenyu-example-spring-reactive-websocket
3. 如何禁用插件
- 在 shenyu-admin --> 基础配置 --> 插件管理 --> 关闭 websocket 插件状态
4. 常见问题
4.1 websocket 建立连接出现 1002 错误
可能原因:客户端服务不正常,shenyu 网关和客户端项目不能建立正常连接,请检查网关到客户端的网络、客户端服务是否正常
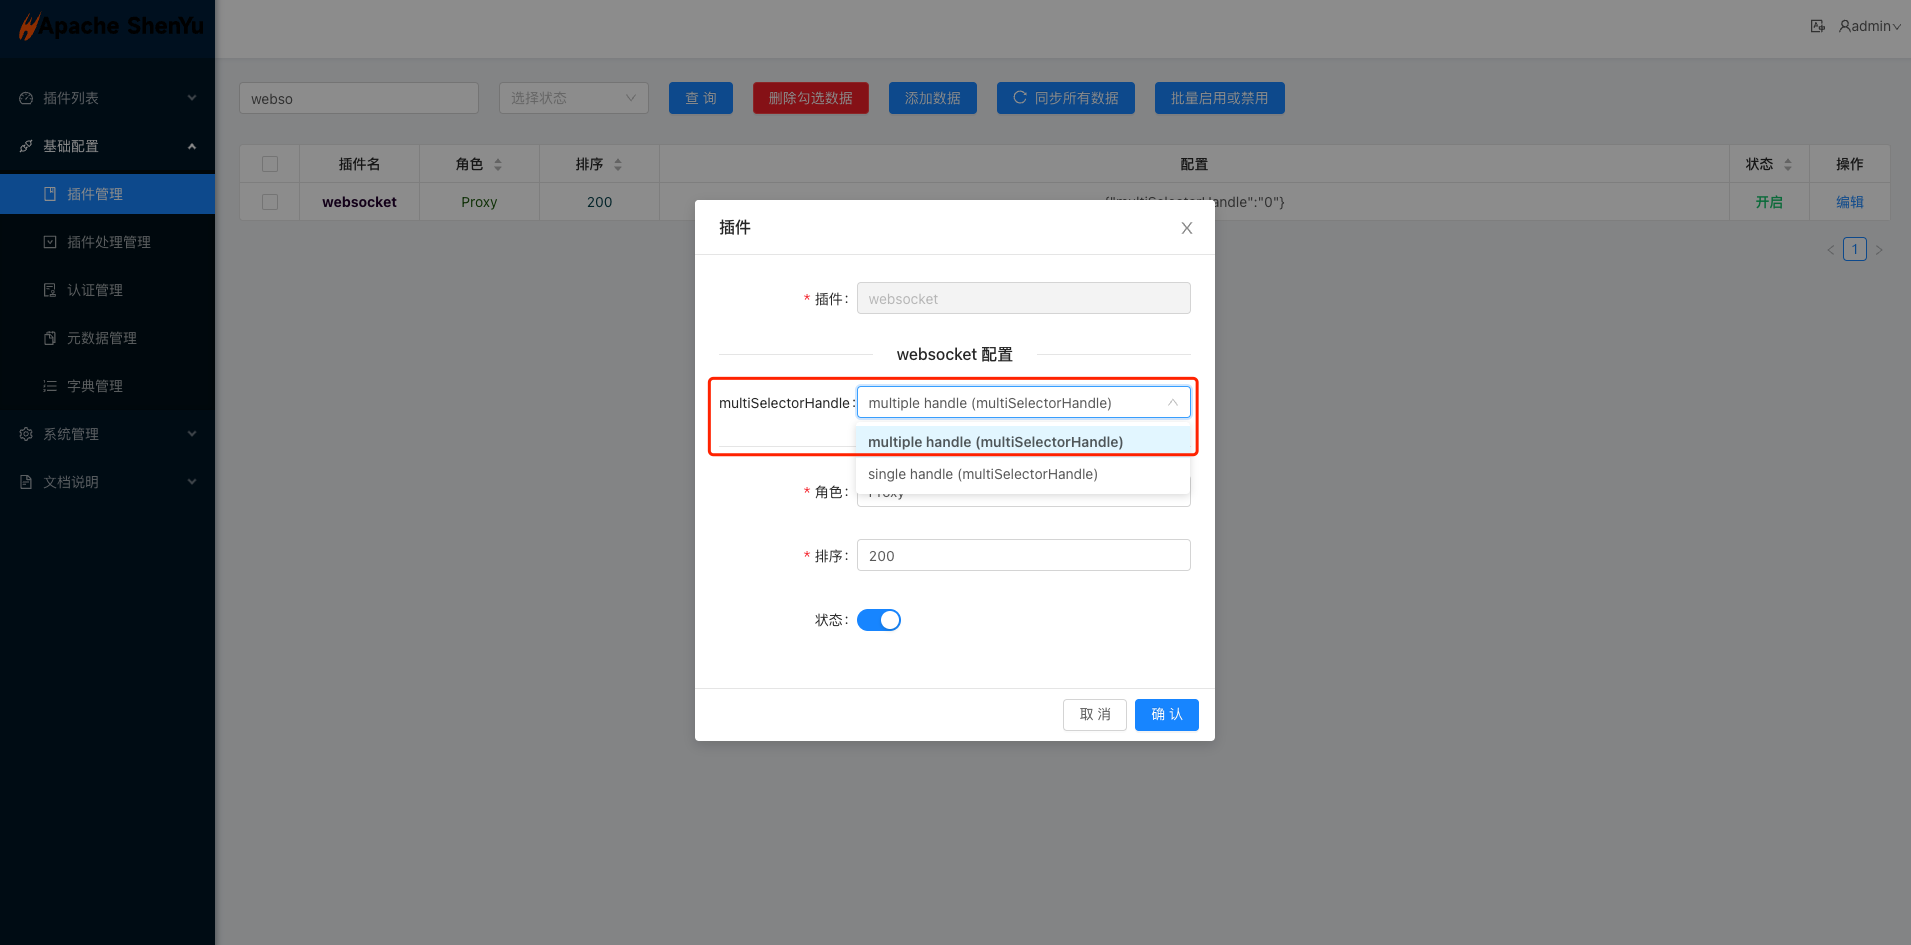
4.2 多个客户端服务在 websocket 选择器中展示为空
可能原因:基础配置-> 插件管理 -> websocket -> multiSelectorHandle 选项选择 multiple handle
5. 附件
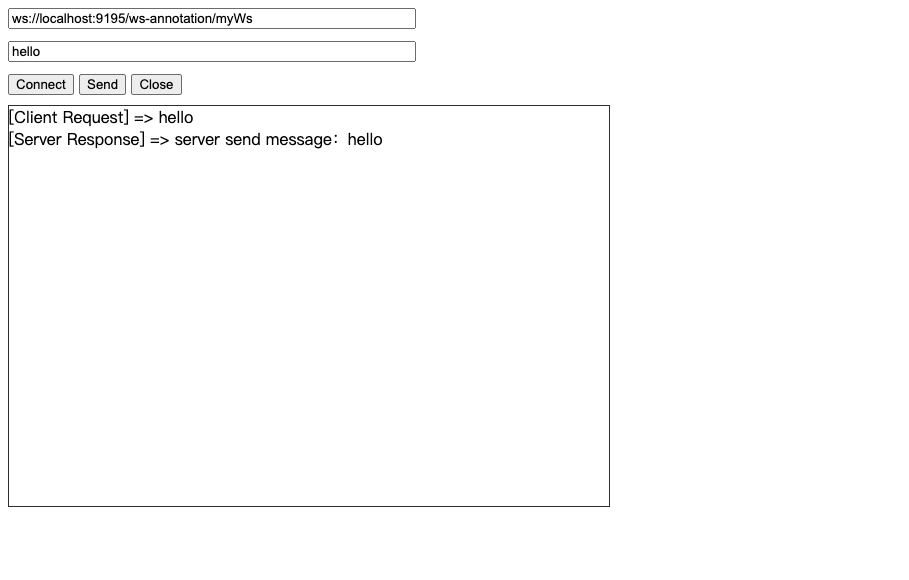
5.1 websocket调试代码
- 创建一个名为 websocket.html 的文件,复制下面的代码到文件中
- 使用谷歌浏览器打开 websocket.html
<!DOCTYPE HTML>
<html>
<head>
    <meta http-equiv="content-type" content="text/html" />
    <title>Shenyu WebSocket Test</title>
    <script>
        var websocket;
        function connect() {
            try {
                websocket = new WebSocket(document.getElementById("url").value);
                websocket.onopen = onOpen;
                websocket.onerror = onError;
                websocket.onmessage = onReceive;
                websocket.onclose = onClose;
            } catch (e) {
                alert('[websocket] establish connection error.');
            }
        }
        function onOpen() {
            alert('[websocket] connect success.');
        }
        function onError(e) {
            alert("[websocket] connect error. code: " + e.code);
        }
        function onReceive(msg) {
            var show = document.getElementById("show");
            show.innerHTML += "[Server Response] => " + msg.data + "<br/>";
            show.scrollTop = show.scrollHeight;
        }
        function onClose(e) {
            console.log("[websocket] connect closed. code: " + e.code)
            alert("[websocket] connect closed.");
            document.getElementById("show").innerHTML = "";
            document.getElementById("msg").value = "";
            websocket = null;
        }
        function buttonClose() {
            if (websocket == null) {
                console.log("Please establish a connection first.")
            } else {
                websocket.close(1000);
                document.getElementById("show").innerHTML = "";
                document.getElementById("msg").value = "";
            }
        }
        function send() {
            if (websocket == null) {
                alert("Please establish a connection first.")
            } else {
                var msg = document.getElementById("msg").value;
                show.innerHTML += "[Client Request] => " + msg + "<br/>";
                websocket.send(msg);
            }
        }
    </script>
</head>
<body>
    <input id="url" type="text" value="ws://localhost:9195/ws-annotation/myWs"><br />
    <input id="msg" type="text"><br />
    <button id="connect" onclick="connect();">Connect</button>
    <button id="send" onclick="send();">Send</button>
    <button id="close" onclick="buttonClose();">Close</button></br>
    <div id="show" class="show"></div>
</body>
</html>
<style>
    input {
        width: 400px;
        margin-bottom: 10px;
    }
    .show {
        width: 600px;
        height: 400px;
        overflow-y: auto;
        border: 1px solid #333;
        margin-top: 10px;
    }
</style>