客户端接入配置
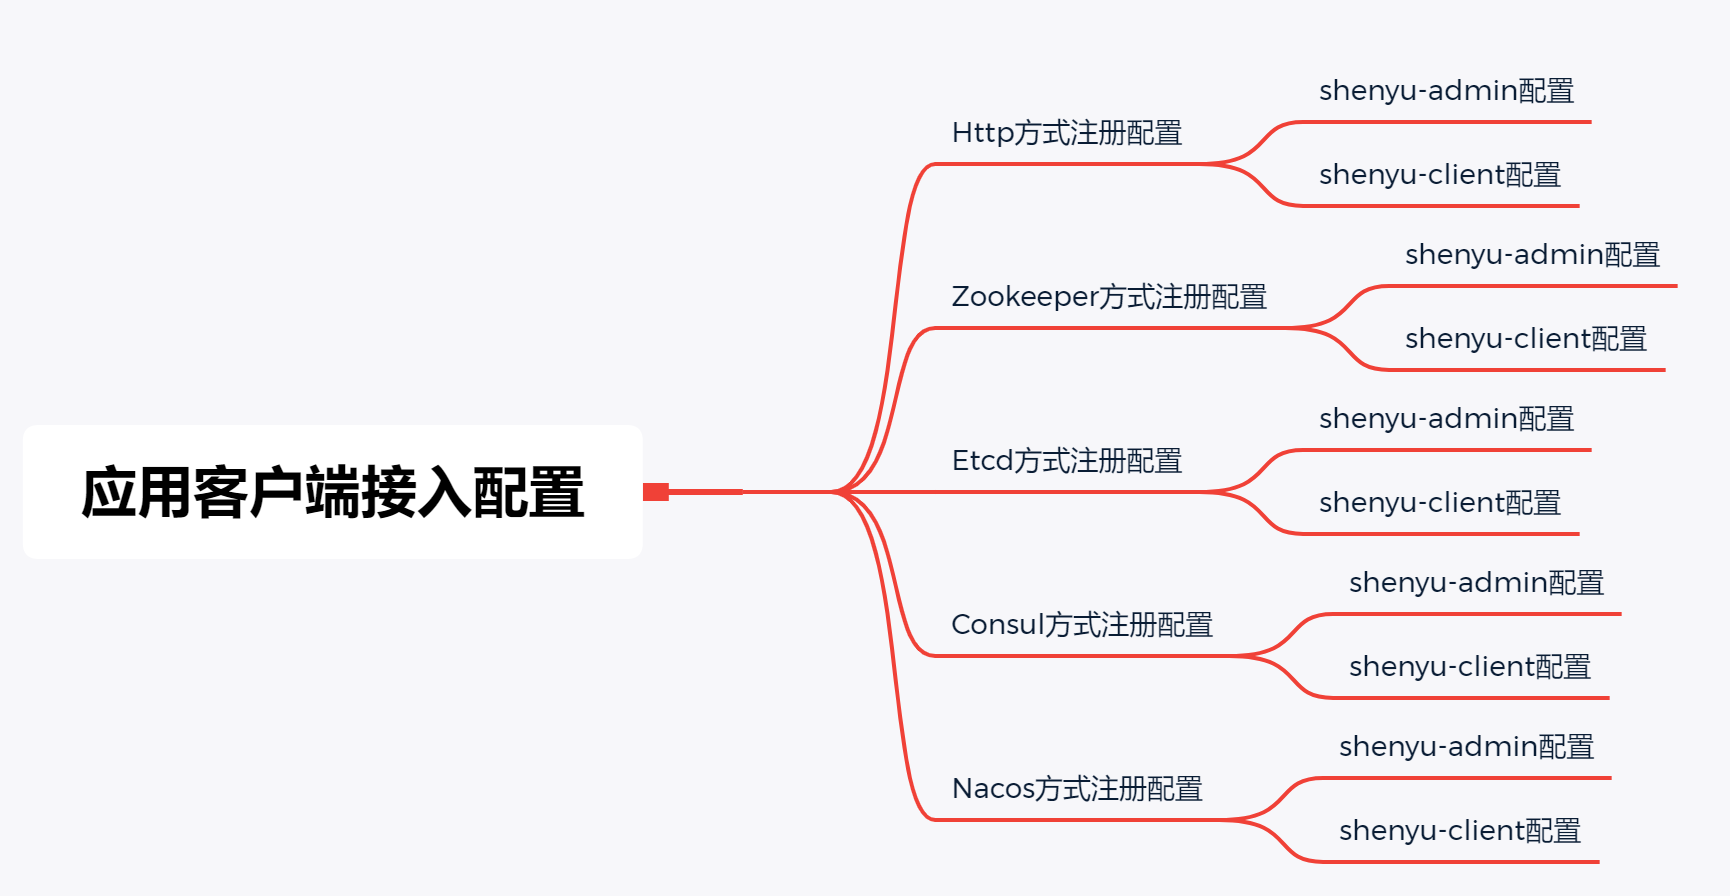
应用客户端接入是指将你的微服务接入到Apache ShenYu网关,当前支持Http、 Dubbo、 Spring Cloud、 gRPC、 Motan、 Sofa、 Tars等协议的接入。
将应用客户端接入到Apache ShenYu网关是通过注册中心来实现的,涉及到客户端注册和服务端同步数据。注册中心支持Http、Zookeeper、Etcd、Consul和Nacos。
本篇文章介绍将应用客户端接入到Apache ShenYu网关,应该如何配置。相关原理请参考设计文档中的 客户端接入原理 。
Http方式注册配置
shenyu-admin配置
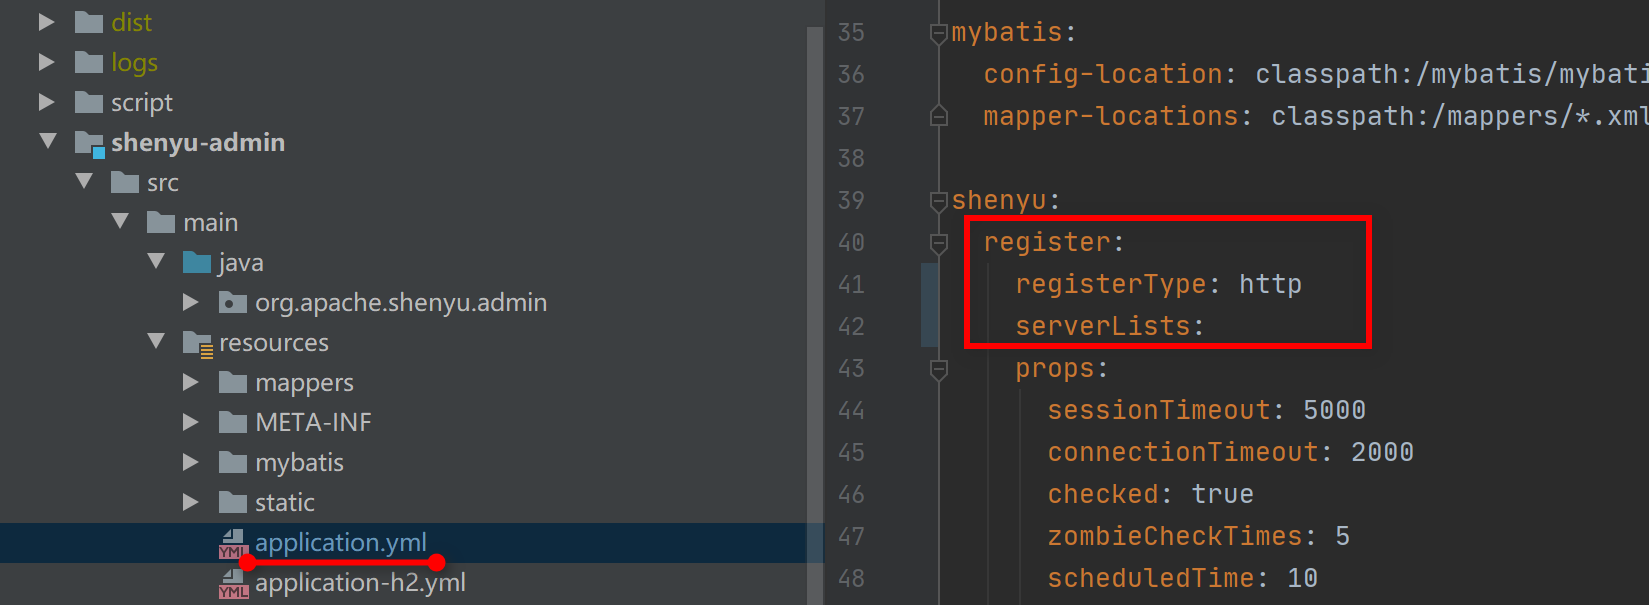
在 yml文件中配置注册类型为http,配置信息如下:
shenyu:
  register:
    registerType: http
    props:
      checked: true  #是否开启检测
      zombieCheckTimes: 5 #失败几次后剔除服务
      scheduledTime: 10 #定时检测间隔时间 (秒)
shenyu-client配置
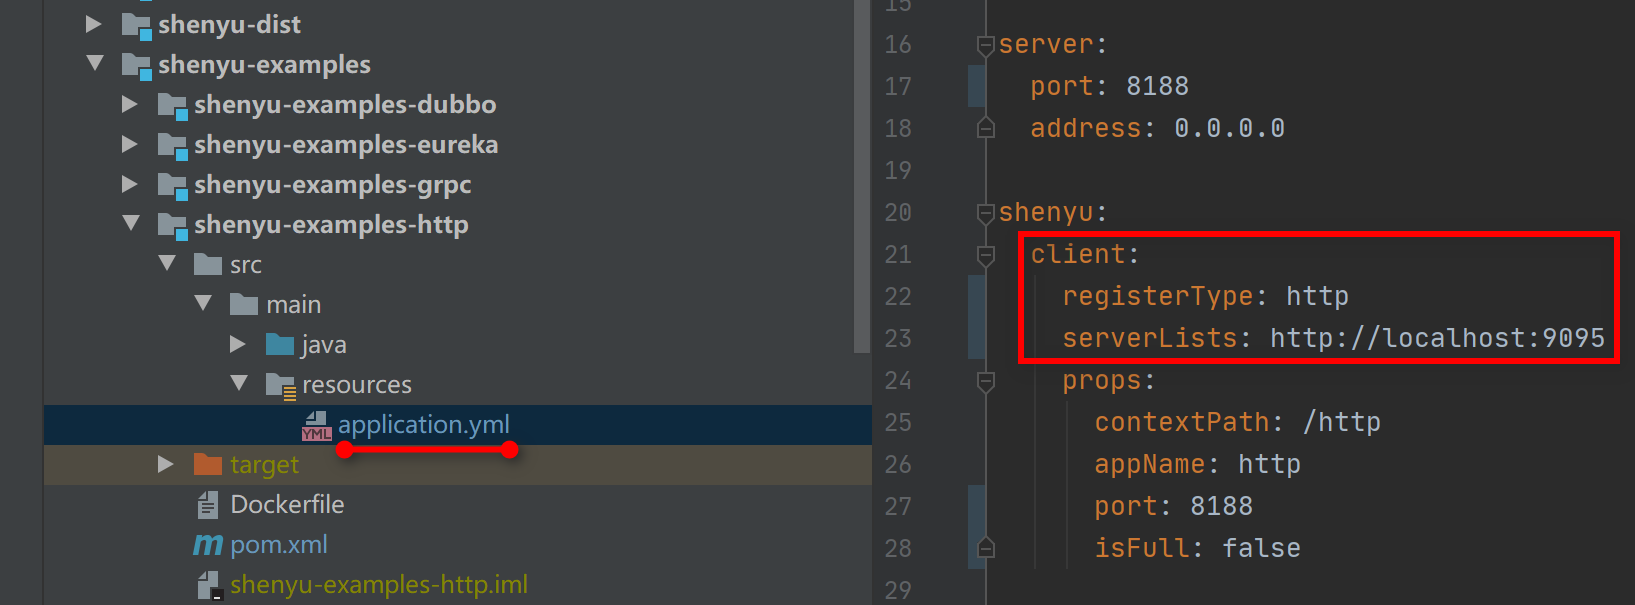
下面展示的是http服务作为客户端接入到Apache ShenYu网关时,通过Http方式注册配置信息。其他客户端接入时(Dubbo、 Spring Cloud等),配置方式同理。
在微服务中的 yml文件配置注册方式设置为http,并填写shenyu-admin服务地址列表,配置信息如下:
shenyu:
  client:
    registerType: http
    serverLists: http://localhost:9095
    props:
      contextPath: /http
      appName: http
      port: 8188
      isFull: false
# registerType : 服务注册类型,填写 http
# serverList: 为http注册类型时,填写Shenyu-Admin项目的地址,注意加上http://,多个地址用英文逗号分隔
# port: 你本项目的启动端口,目前springmvc/tars/grpc需要进行填写
# contextPath: 为你的这个mvc项目在shenyu网关的路由前缀, 比如/order ,/product 等等,网关会根据你的这个前缀来进行路由.
# appName:你的应用名称,不配置的话,会默认取 `spring.application.name` 的值
# isFull: 设置true 代表代理你的整个服务,false表示代理你其中某几个controller;目前适用于springmvc/springcloud
Zookeeper方式注册配置
shenyu-admin配置
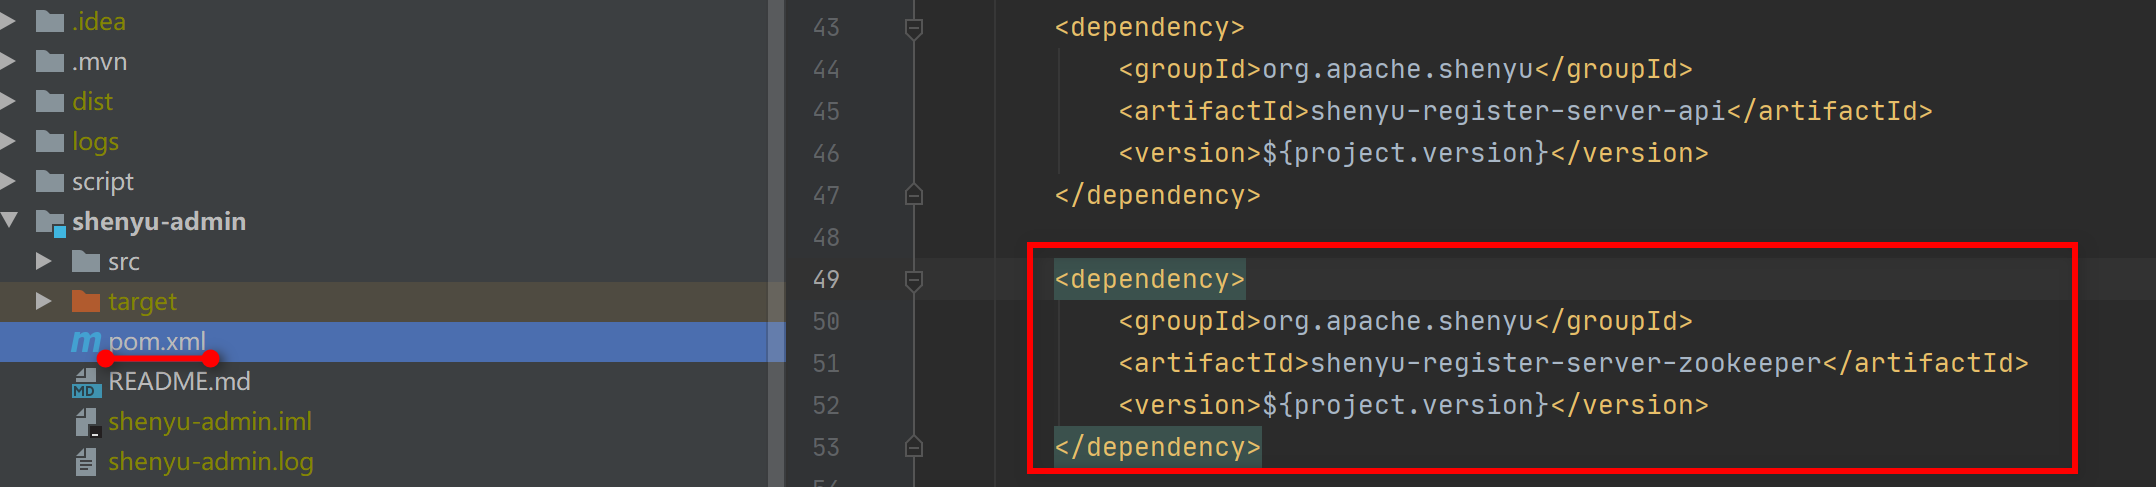
- 首先在
pom文件中加入相关的依赖(默认已经引入):
        <dependency>
            <groupId>org.apache.shenyu</groupId>
            <artifactId>shenyu-register-server-zookeeper</artifactId>
            <version>${project.version}</version>
        </dependency>
- 然后在
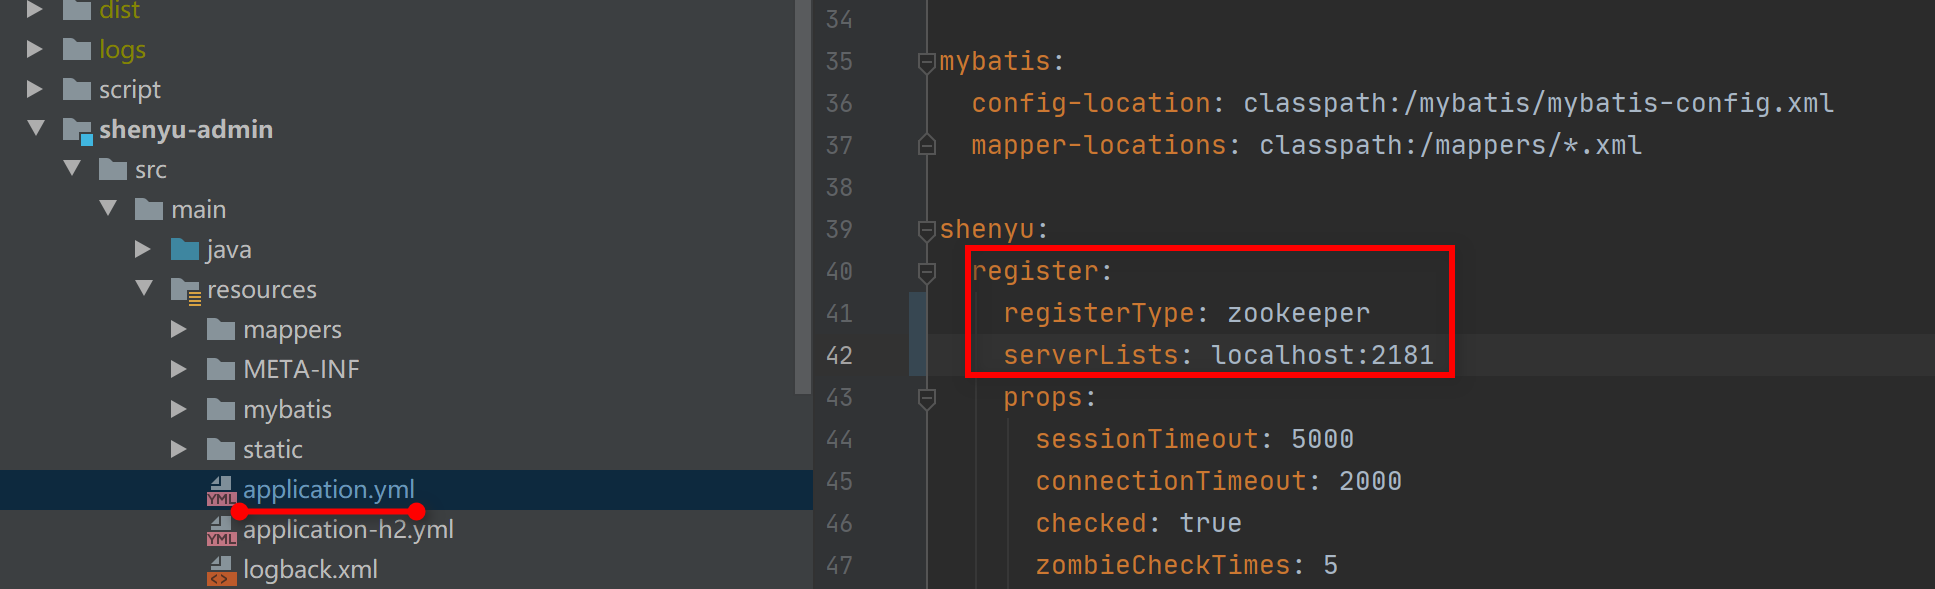
yml文件中配置注册类型为zookeeper,填写zookeeper服务地址和参数,配置信息如下:
shenyu:
  register:
    registerType: zookeeper
    serverLists: localhost:2181
    props:
      sessionTimeout: 5000
      connectionTimeout: 2000
shenyu-client配置
下面展示的是http服务作为客户端接入到Apache ShenYu网关时,通过Zookeeper方式注册配置信息。其他客户端接入时(Dubbo、 Spring Cloud等),配置方式同理。
- 首先在
pom文件中加入相关的依赖:
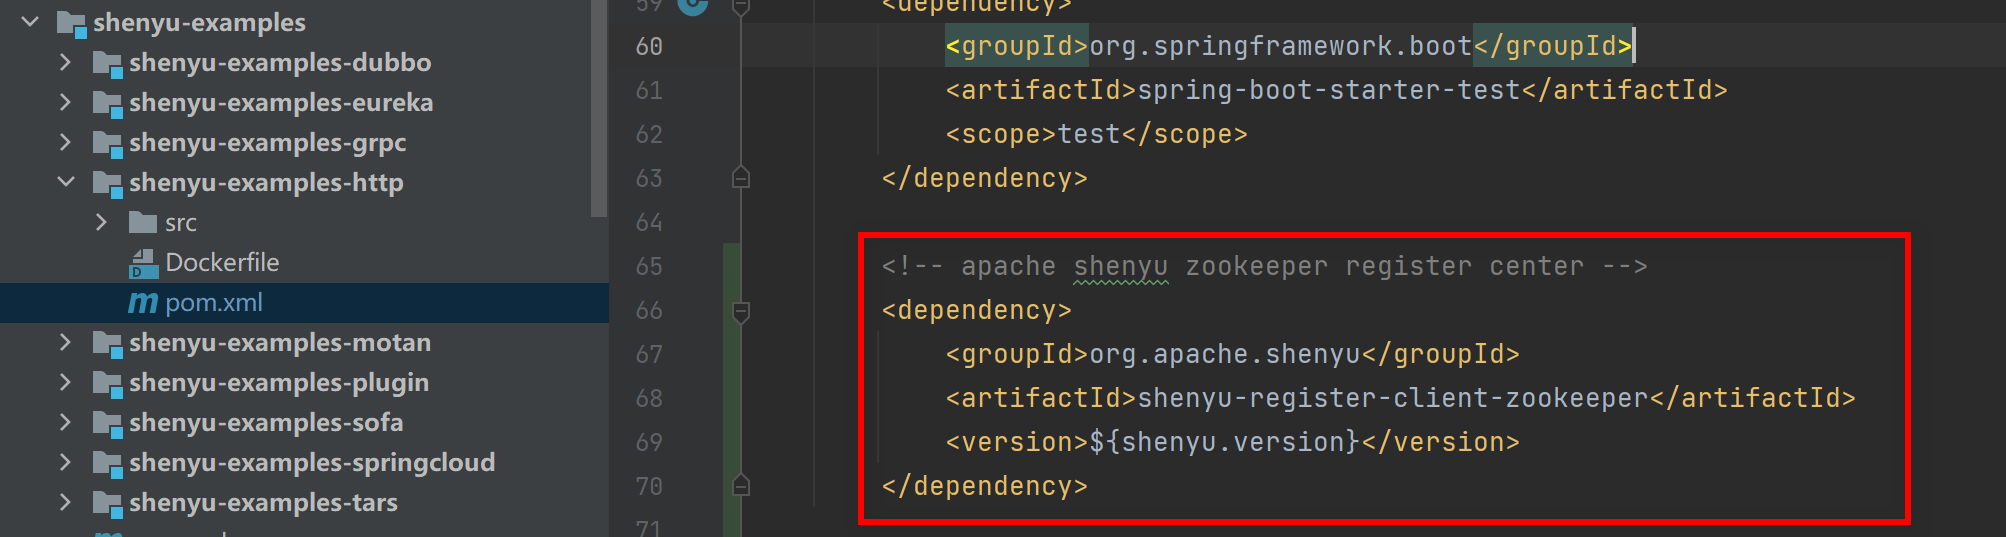
        <!-- apache shenyu zookeeper register center -->
        <dependency>
            <groupId>org.apache.shenyu</groupId>
            <artifactId>shenyu-register-client-zookeeper</artifactId>
            <version>${shenyu.version}</version>
        </dependency>
- 然后在
yml中配置注册类型为zookeeper,并填写Zookeeper服务地址和相关参数,如下:
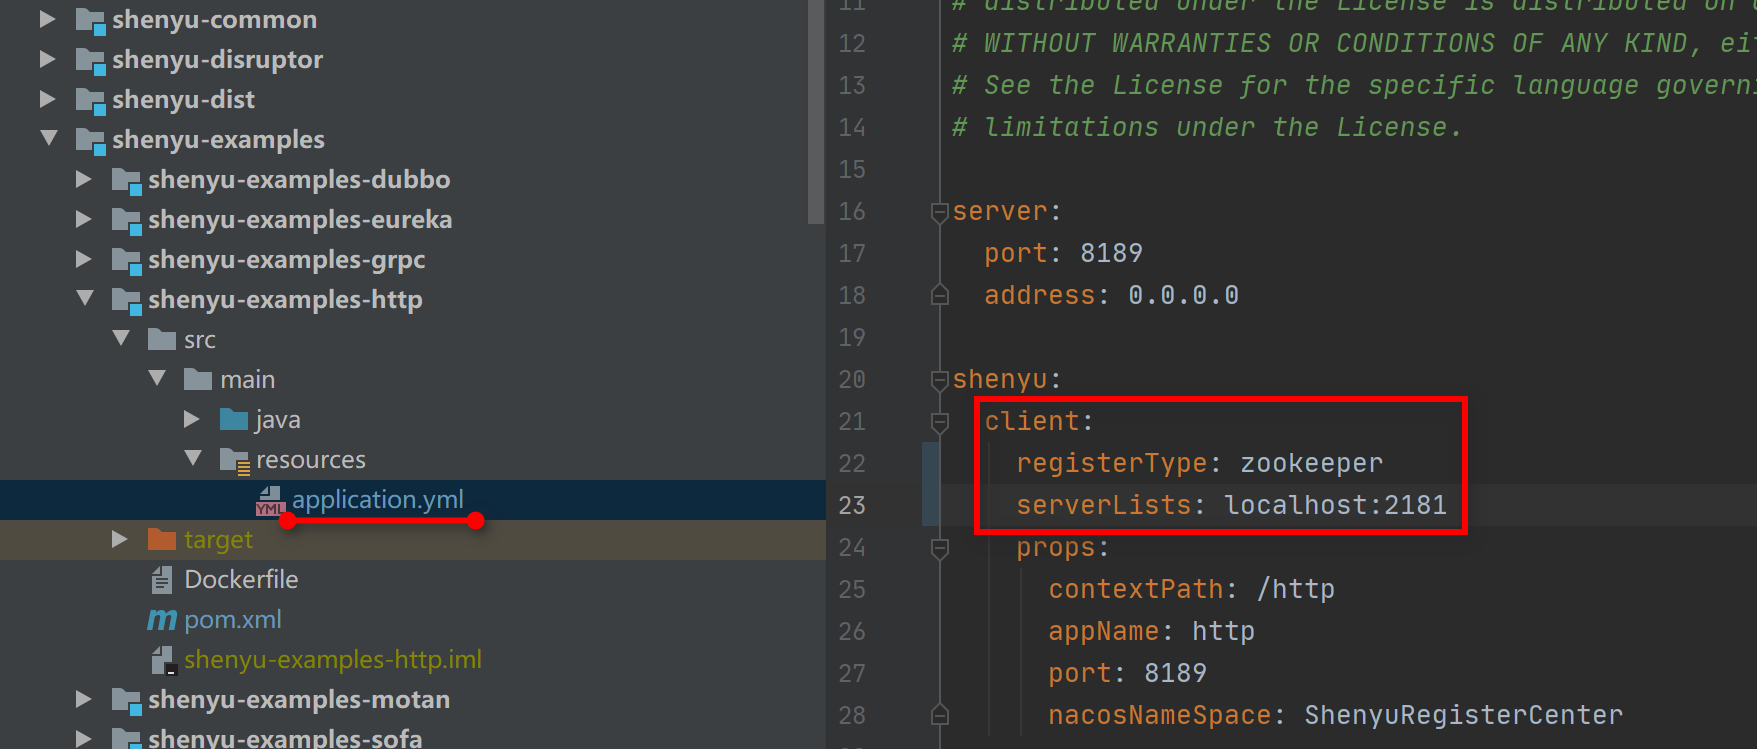
shenyu:
  client:
    registerType: zookeeper
    serverLists: localhost:2181
    props:
      contextPath: /http
      appName: http
      port: 8189
      isFull: false
# registerType : 服务注册类型,填写 zookeeper
# serverList: 为zookeeper注册类型时,填写zookeeper地址,多个地址用英文逗号分隔
# port: 你本项目的启动端口,目前springmvc/tars/grpc需要进行填写
# contextPath: 为你的这个mvc项目在shenyu网关的路由前缀, 比如/order ,/product 等等,网关会根据你的这个前缀来进行路由.
# appName:你的应用名称,不配置的话,会默认取 `spring.application.name` 的值
# isFull: 设置true 代表代理你的整个服务,false表示代理你其中某几个controller;目前适用于springmvc/springcloud
Etcd方式注册配置
shenyu-admin配置
- 首先在
pom文件中加入相关的依赖(默认已经引入):
        <dependency>
            <groupId>org.apache.shenyu</groupId>
            <artifactId>shenyu-register-server-etcd</artifactId>
            <version>${project.version}</version>
        </dependency>

- 然后在
yml配置注册类型为etcd, 填写etcd服务地址和参数,配置信息如下:
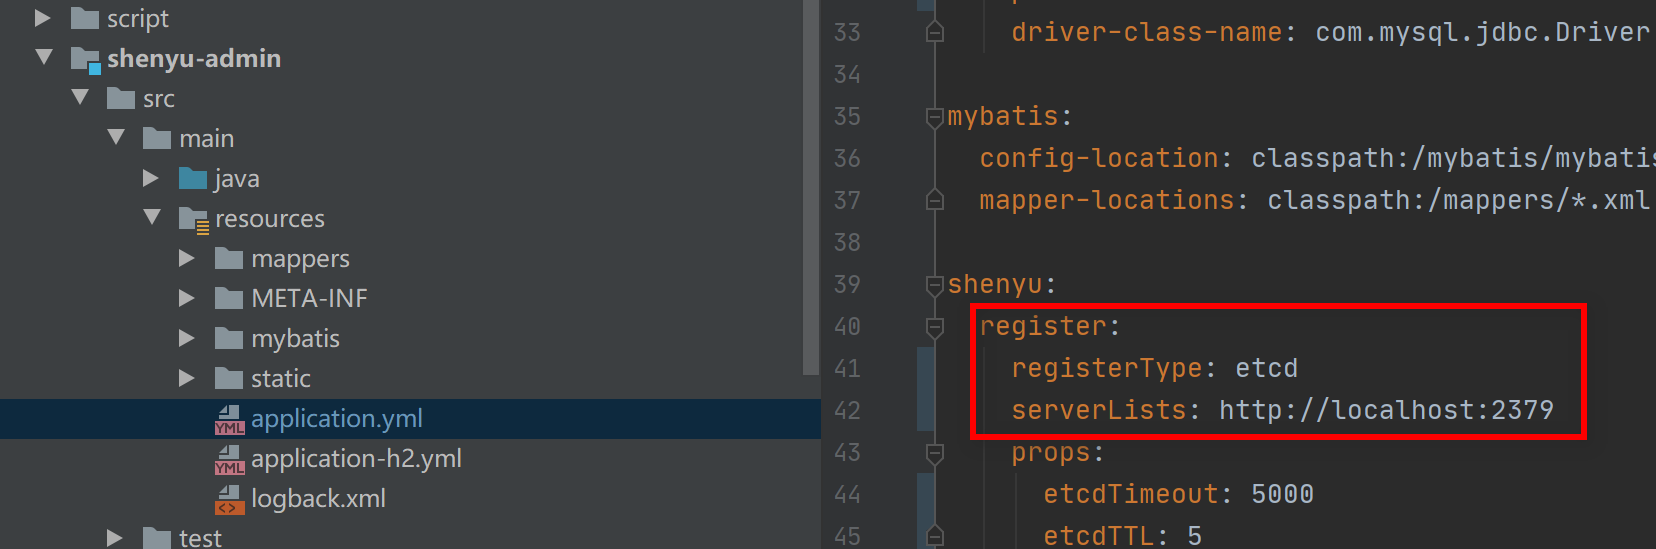
shenyu:
  register:
    registerType: etcd
    serverLists : http://localhost:2379
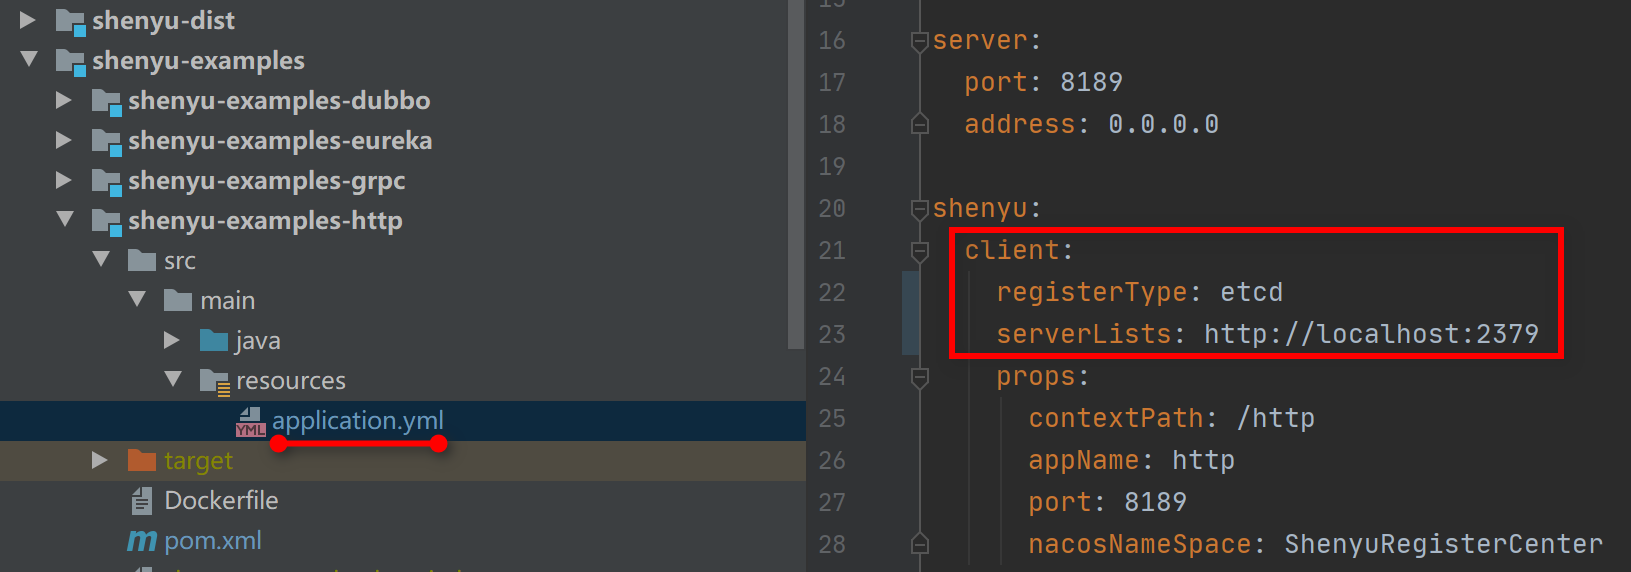
shenyu-client配置
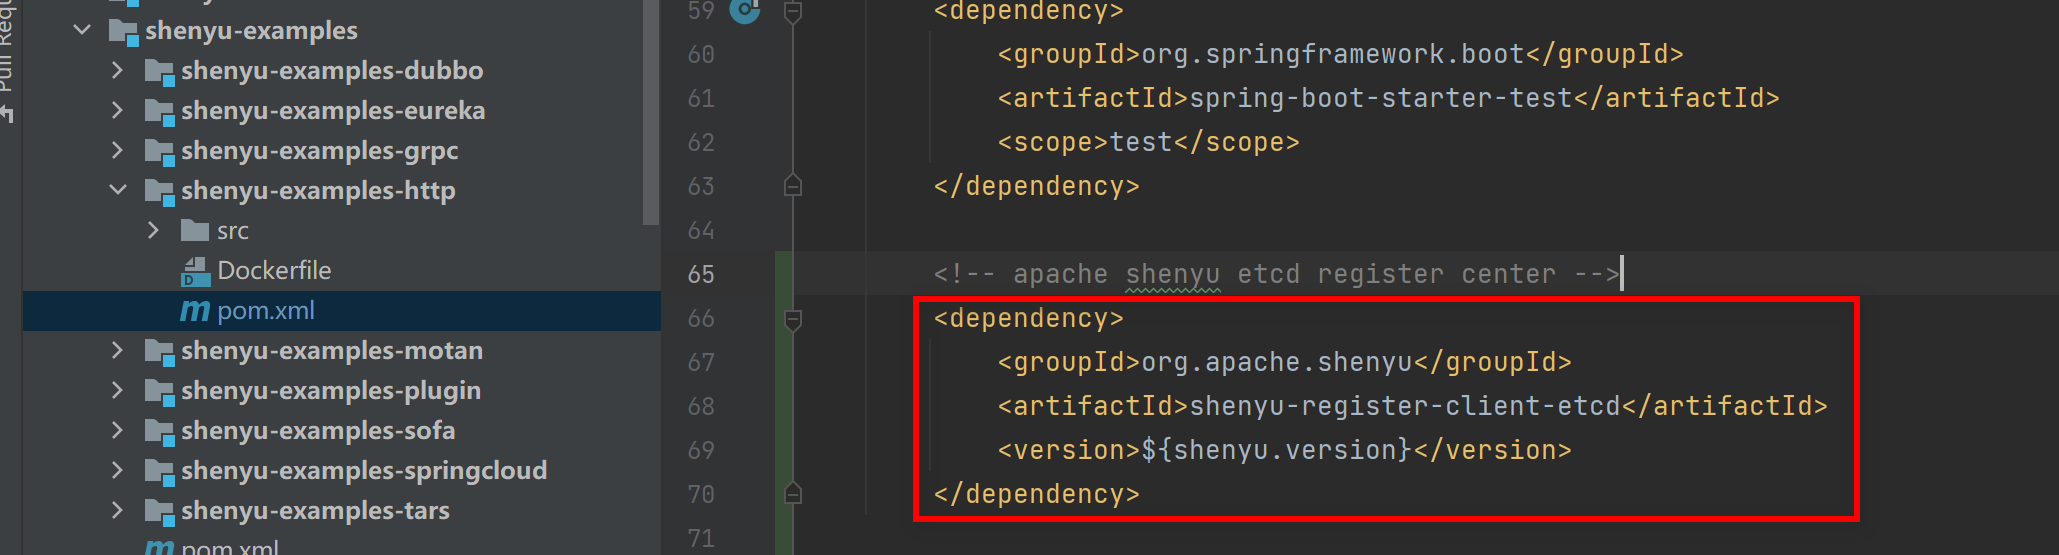
下面展示的是http服务作为客户端接入到Apache ShenYu网关时,通过Etcd方式注册配置信息。其他客户端接入时(Dubbo、 Spring Cloud等),配置方式同理。
- 首先在
pom文件中加入相关的依赖:
        <!-- apache shenyu etcd register center -->
        <dependency>
            <groupId>org.apache.shenyu</groupId>
            <artifactId>shenyu-register-client-etcd</artifactId>
            <version>${shenyu.version}</version>
        </dependency>
- 然后在
yml中配置注册类型为etcd, 并填写etcd服务地址和相关参数,如下:
shenyu:
client:
registerType: etcd
serverLists: http://localhost:2379
props:
contextPath: /http
appName: http
port: 8189
isFull: false
# registerType : 服务注册类型,填写 etcd
# serverList: 为etcd注册类型时,填写etcd地址,多个地址用英文逗号分隔
# port: 你本项目的启动端口,目前springmvc/tars/grpc需要进行填写
# contextPath: 为你的这个mvc项目在shenyu网关的路由前缀, 比如/order ,/product 等等,网关会根据你的这个��前缀来进行路由.
# appName:你的应用名称,不配置的话,会默认取 `spring.application.name` 的值
# isFull: 设置true 代表代理你的整个服务,false表示代理你其中某几个controller;目前适用于springmvc/springcloud
Consul方式注册配置
shenyu-admin配置
- 首先在 pom.xml 文件中加入相关的依赖:
        <!-- apache shenyu consul register start-->
        <dependency>
            <groupId>org.apache.shenyu</groupId>
            <artifactId>shenyu-register-server-consul</artifactId>
            <version>${project.version}</version>
        </dependency>

        <!-- apache shenyu consul register start -->
        <dependency>
            <groupId>com.ecwid.consul</groupId>
            <artifactId>consul-api</artifactId>
            <version>${consul.api.version}</version>
        </dependency>
        <!-- apache shenyu consul register end-->
- 在
yml文件配置注册中心为consul, consul的特有配置在props节点下进行配置, 配置信息如下:
shenyu:
  register:
    registerType: consul
    serverLists: localhost:8500
    props:
      delay: 1
      wait-time: 55
      name: shenyuAdmin
      instanceId: shenyuAdmin
      hostName: localhost
      port: 8500
      tags: test1,test2
      preferAgentAddress: false
      enableTagOverride: false

# registerType : 服务注册类型,填写 consul
# serverLists: consul client agent地址(sidecar模式部署(单机或者集群),也可以是consul server agent的地址(只能连接一个consul server agent节点,如果是集群,那么会存在单点故障问题))
# delay: 对Metadata的监控每次轮询的间隔时长,单位为秒,默认1秒
# wait-time: 对Metadata的监控单次请求的等待时间(长轮询机制),单位为秒,默认55秒
# instanceId: consul服务必填,consul需要通过instance-id找到具体服务
# name 服务注册到consul时所在的组名
# hostName: 为 consul 注册类型时,填写 注册服务实例的 地址, 该注册中心注册的服务实例地址,并不会用于客户端的调用,所以该配置可以不填,port,preferAgentAddress同理
# port: 为 consul 注册类型时,填写 注册服务实例的 端口
# tags: 对应consul配置中的tags配置
# preferAgentAddress:使用consul客户端侧的agent对应的address作为注册服务实例的address,会覆盖hostName的手动配置
# enableTagOverride:对应consul配置中的enableTagOverride配置
shenyu-client配置
下面展示的是springCloud服务作为客户端接入到Apache ShenYu网关时,通过Consul方式注册配置信息(springCloud服务本身的注册中心可以随意选择,与shenyu所选择的注册中心并不会存在冲突,example中使用的是eureka)。其他客户端接入时(Dubbo、 Spring Cloud等),配置方式同理。
- 首先在
pom文件中加入相关的依赖:
<!-- apache shenyu consul register center -->
<dependency>
    <groupId>org.apache.shenyu</groupId>
    <artifactId>shenyu-register-client-consul</artifactId>
    <version>${shenyu.version}</version>
</dependency>
- 然后在
yml文件中配置注册方式为consul, 额外还需要配置shenyu.register.props, 配置信息如下:
shenyu:
register:
registerType: consul
serverLists: localhost:8500
props:
name: shenyuSpringCloudExample
instanceId: shenyuSpringCloudExample
hostName: localhost
port: 8500
tags: test1,test2
preferAgentAddress: false
enableTagOverride: false
client:
springCloud:
props:
contextPath: /springcloud
port: 8884
# registerType : 服务注册类型,填写 consul
# serverLists: consul client agent地址(sidecar模式部署(单机或者集群),也可以是consul server agent的地址(只能连接一个consul server agent节点,如果是集群,那么会存在单点故障问题))
# shenyu.client.props.port: 你本项目的启动端口,目前springmvc/tars/grpc需要进行填写
# contextPath: 为你的这个mvc项目在shenyu网关的路由前�缀, 比如/order ,/product 等等,网关会根据你的这个前缀来进行路由.
# appName:你的应用名称,不配置的话,会默认取 `spring.application.name` 的值
# isFull: 设置true 代表代理你的整个服务,false表示代理你其中某几个controller;目前适用于springmvc
# instanceId: consul服务必填,consul需要通过instance-id找到具体服务
# name 服务注册到consul时所在的组名
# hostName: 为 consul 注册类型时,填写 注册服务实例的 地址, 该注册中心注册的服务实例地址,并不会用于客户端的调用,所以该配置可以不填,port,preferAgentAddress同理
# port: 为 consul 注册类型时,填写 注册服务实例的 端口
# tags: 对应consul配置中的tags配置
# preferAgentAddress:使用consul客户端侧的agent对应的address作为注册服务实例的address,会覆盖hostName的手动配置
# enableTagOverride:对应consul配置中的enableTagOverride配置
Nacos方式注册配置
shenyu-admin配置
- 首先在
pom文件中加入相关的依赖(默认已经引入):
        <dependency>
            <groupId>org.apache.shenyu</groupId>
            <artifactId>shenyu-register-server-nacos</artifactId>
            <version>${project.version}</version>
        </dependency>

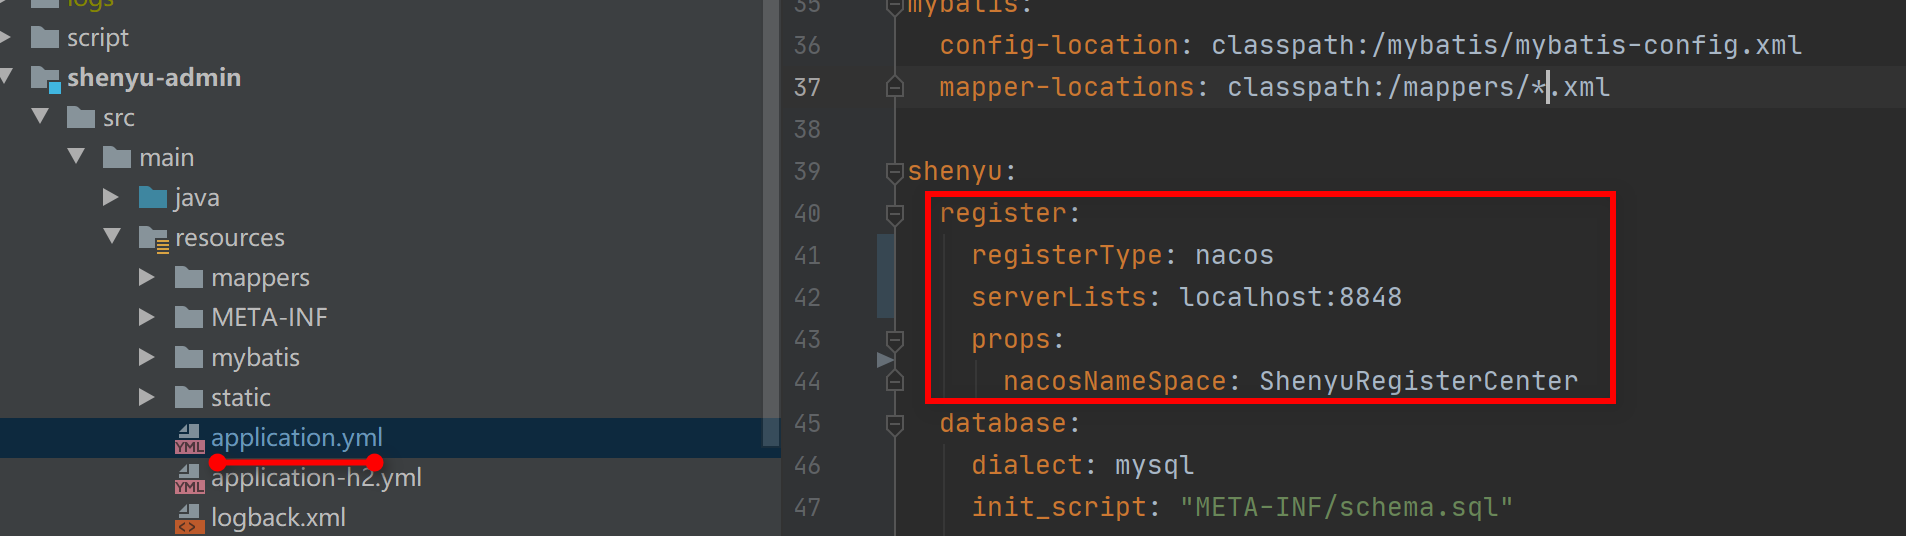
- 然后在
yml文件中配置注册中心为nacos, 填写相关nacos服务地址和参数,还有nacos的命名空间(需要和shenyu-client保持一致),配置信息如下:
shenyu:
  register:
    registerType: nacos
    serverLists : localhost:8848
    props:
      nacosNameSpace: ShenyuRegisterCenter
shenyu-client配置
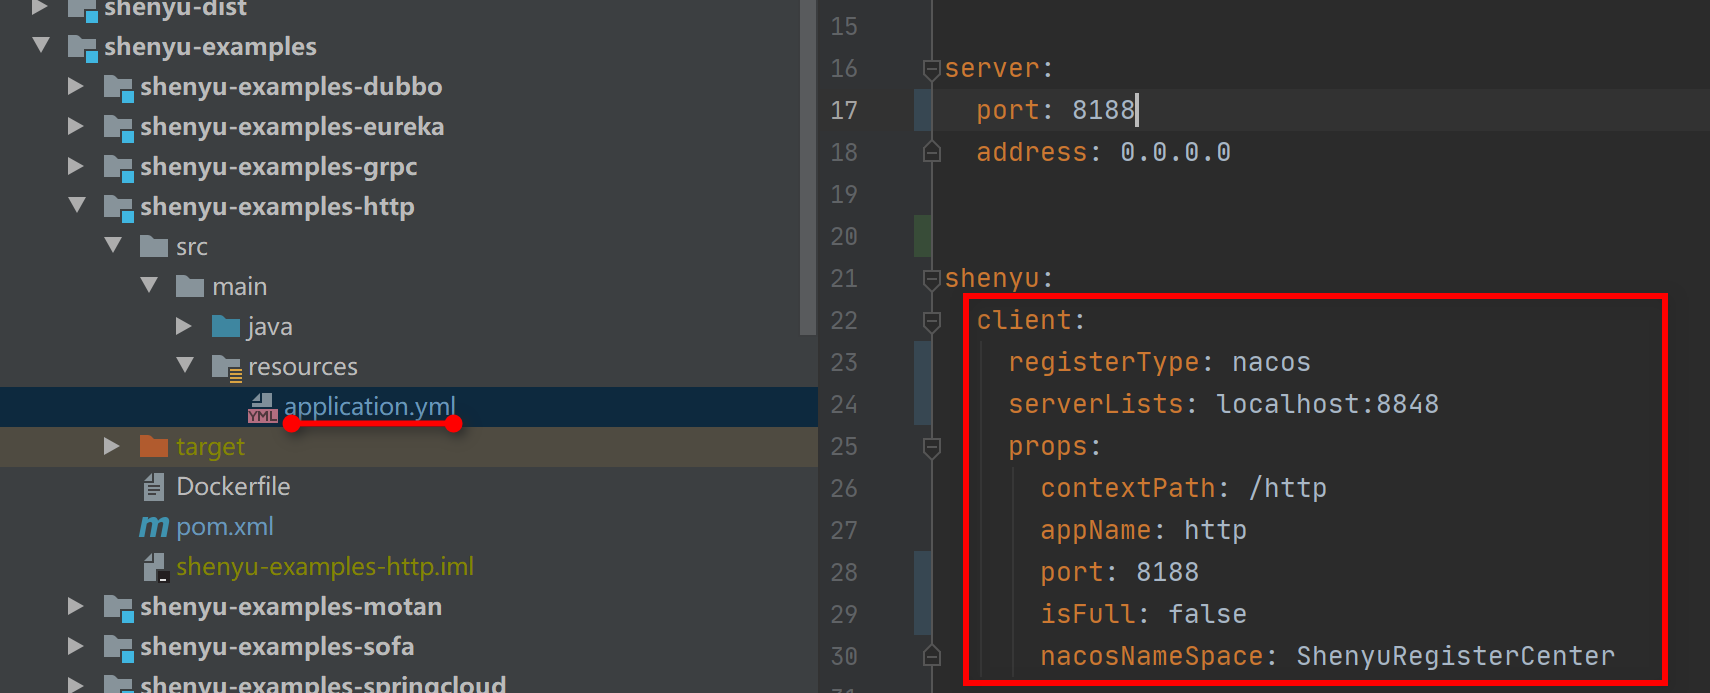
下面展示的是http服务作为客户端接入到Apache ShenYu网关时,通过Nacos方式注册配置信息。其他客户端接入时(Dubbo、 Spring Cloud等),配置方式同理。
- 首先在
pom文件中加入相关的依赖:
        <dependency>
            <groupId>org.apache.shenyu</groupId>
            <artifactId>shenyu-register-client-nacos</artifactId>
            <version>${shenyu.version}</version>
        </dependency>

- 然后在
yml中配置注册方式为nacos, 并填写nacos服务地址和相关参数,还��需要Nacos命名空间(需要和shenyu-admin端保持一致),IP(可不填,则自动获取本机ip)和端口,配置信息如下:
shenyu:
  client:
    registerType: nacos
    serverLists: localhost:8848
    props:
      contextPath: /http
      appName: http
      port: 8188
      isFull: false
      nacosNameSpace: ShenyuRegisterCenter
# registerType : 服务注册类型,填写 nacos
# serverList: 为nacos注册类型时,填写nacos地址,多个地址用英文逗号分隔
# port: 你本项目的启动端口,目前springmvc/tars/grpc需要进行填写
# contextPath: 为你的这个mvc项目在shenyu网关的路由前缀,比如/order ,/product 等等,网关会根据你的这个前缀来进行路由.
# appName:你的应用名称,不配置的话,会默认取 `spring.application.name` 的值
# isFull: 设置true 代表代理你的整个服务,false表示代理你其中某几个controller;目前适用于springmvc/springcloud
# nacosNameSpace: nacos的命名空间
同时注册多种服务类型
以同时注册http和dubbo服务举例。 在
yml参考如下配置即可:
shenyu:
  register:
    registerType: nacos
    serverLists: localhost:8848
  client:
    http:
    	props:
      		contextPath: /http
      		appName: http
      		port: 8188
      		isFull: false
    dubbo:
    	props:
      		contextPath: /dubbo
      		appName: dubbo
      		port: 28080
    props:
      nacosNameSpace: ShenyuRegisterCenter
# registerType : 服务注册类型,填写 nacos
# serverList: 为nacos注册类型时,填写nacos地址,多个地址用英文逗号分隔
# http.port: 你本项目的启动Http端口,目前springmvc/SpringCloud需要进行填写
# http.contextPath: 为你的这个mvc项目在shenyu网关的路由前缀,比如/order ,/product 等等,网关会根据你的这个前缀来进行路由.
# http.appName:你的应用名称,不配置的话,会默认取 `spring.application.name` 的值
# http.isFull: 设置true 代表代理你的整个服务,false表示代理你其中某几个controller;目前适用于springmvc/springcloud
# dubbo.contextPath: 为你的项目中对应dubbo接口的contextPath
# dubbo.port: dubbo服务端口
# dubbo.appName: dubbo应用名称
# nacosNameSpace: nacos的命名空间
总结,本文主要介绍了如何将你的微服务(当前支持Http、 Dubbo、 Spring Cloud、 gRPC、 Motan、 Sofa、 Tars等协议)接入到Apache ShenYu网关。介绍了注册中心的原理,Apache ShenYu网关支持的注册中心有Http、Zookeeper、Etcd、Consul、Nacos等方式。介绍了以http服务作为客户端接入到Apache ShenYu网关时,使用不同方式注册配置信息。